
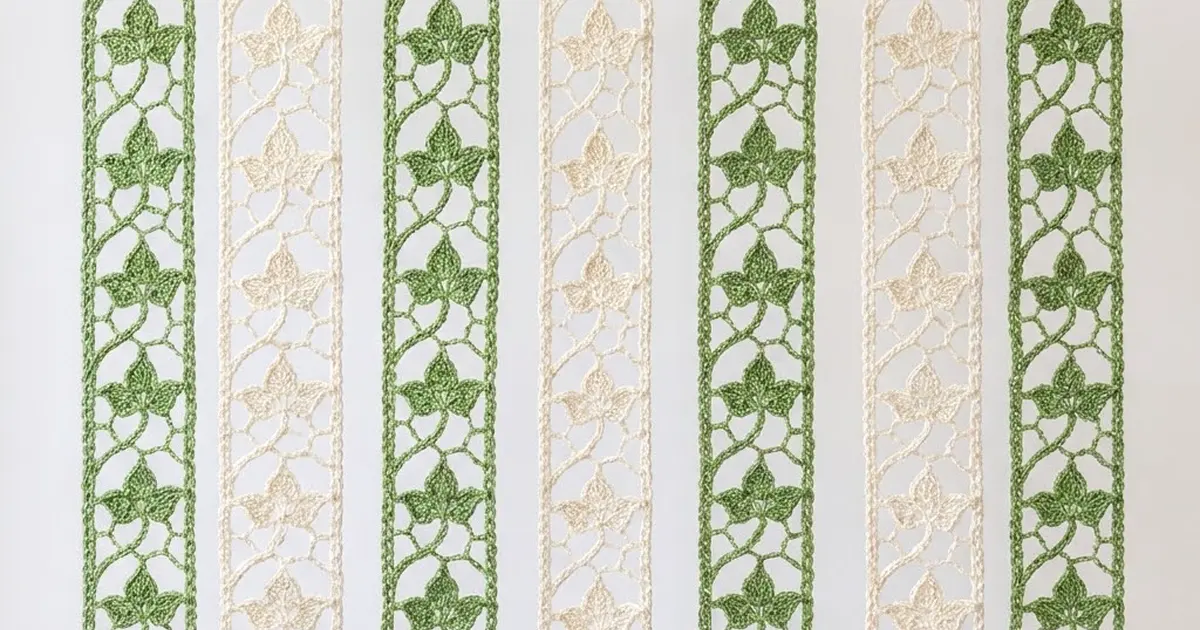
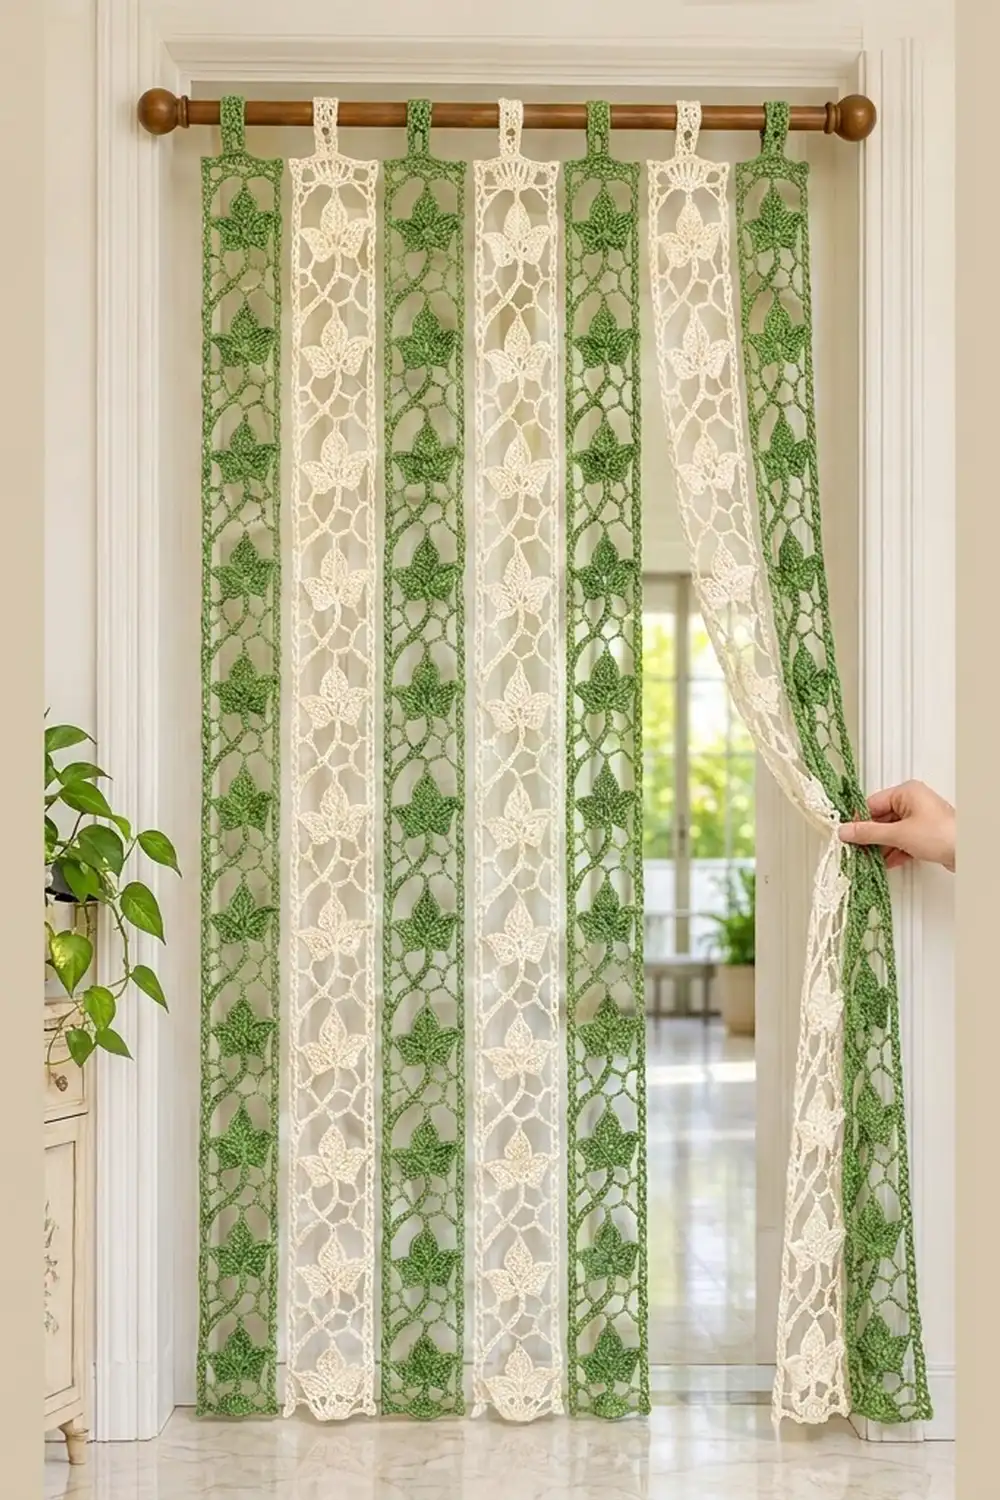
This door curtain is made of seven narrow lace strips that hang side by side from a single rod. Each strip has an open diamond mesh, straight rails down both sides, and a column of three-lobed ivy leaves trailing down the center.
The strips alternate fresh leaf green and soft cream: four green and three cream. Every leaf matches the color of its own strip, so the green strips look like climbing vines and the cream strips look like pale lace. The strips are not joined to each other. You can push them aside, walk through them, and hang them with gaps between them.
The pattern uses US crochet terms. Each finished strip measures 6 in (15.2 cm) wide and 81.5 in (207.0 cm) long, plus a 2 in (5.1 cm) hanging loop. With 0.5 in (1.3 cm) gaps, the seven strips span about 45 in (114.3 cm) on the rod.
Construction is straightforward. You work each strip in short rows across its width: a single crochet band, 120 mesh rows, then a closing band. Next you add a two-round single crochet border and a tab. You make the ivy leaves separately, three lobes per leaf, and sew them onto the mesh.
Finished Size and Construction
- Finished strip size: 6 in x 81.5 in (15.2 cm x 207.0 cm), not including the tab
- Skill level: Intermediate
- Terminology: US
- Yarn weight: DK (#3) cotton
- Hook: 4.0 mm (G-6)
- Number of pieces: 7 strips and 70 leaf appliqués (10 per strip)
- Layout: 7 strips side by side in the order G, C, G, C, G, C, G, not joined
- Strip size before border: 5 in x 80.5 in (12.7 cm x 204.5 cm)
- Border depth: 2 rounds, 0.5 in (1.3 cm) on each edge
- Total rod width: about 45 in (114.3 cm) including gaps
Materials
Use a smooth mercerized or matte cotton, or a cotton blend, in DK weight. Cotton holds its shape when hanging, and it shows off the leaf texture.
- Color G (leaf green): 750 g / 1,725 m
- Color C (cream): 600 g / 1,380 m
Each strip uses about 165 g in total: about 120 g for the mesh and border, 40 g for the leaves, and 5 g for the tab. These quantities include a margin of about 10% per strip, plus extra for swatching.
Tools:
– 4.0 mm (G-6) crochet hook
– Tapestry needle
– Locking stitch markers
– Rust-proof pins and a long blocking surface
– Measuring tape
– Curtain rod up to 1.5 in (3.8 cm) in diameter
Abbreviations (US Terms)
- ch: chain
- sl st: slip stitch
- sc: single crochet
- hdc: half double crochet
- dc: double crochet
- tr: treble crochet
- sp: space
- sk: skip
- st(s): stitch(es)
- tch: turning chain
- BLO: back loop only
Surface vein: Hold the yarn behind the lobe. Insert the hook from front to back through the lobe, pull up a loop, and pull it through the loop on your hook. Repeat every 0.25 in (0.6 cm) to make a raised chain line on the front.
Gauge and Checkpoints
- Single crochet gauge: 20 sc and 16 rows = 4 in (10.2 cm), so 5 sc and 4 rows = 1 in (2.5 cm)
- Mesh gauge: 25 sts from rail to rail = 5 in (12.7 cm); 3 mesh rows = 2 in (5.1 cm)
Test one piece first. Treat the first 13 rows of your first strip as the swatch: the band row plus one 12-row repeat. Measure it lightly stretched to its natural hang.
Checkpoints:
– After Row 1: 5 in (12.7 cm) wide
– After Row 13: 8.25 in (21.0 cm) long
– After Row 61: 40.25 in (102.2 cm) long
– After Row 122: 80.5 in (204.5 cm) long
– After the border: 6 in x 81.5 in (15.2 cm x 207.0 cm)
If the work is too big, go down 0.5 mm. If it is too small, go up 0.5 mm. If only the length is off, change the hook for the treble rows only. Length is easy to adjust: each 12-row repeat adds or removes 8 in (20.3 cm).
Strip Pattern
Make 4 strips in G and 3 in C.
Foundation: Ch 26.
Row 1 (top band): Sc in 2nd ch from hook and in each ch across. Turn. (25 sc)
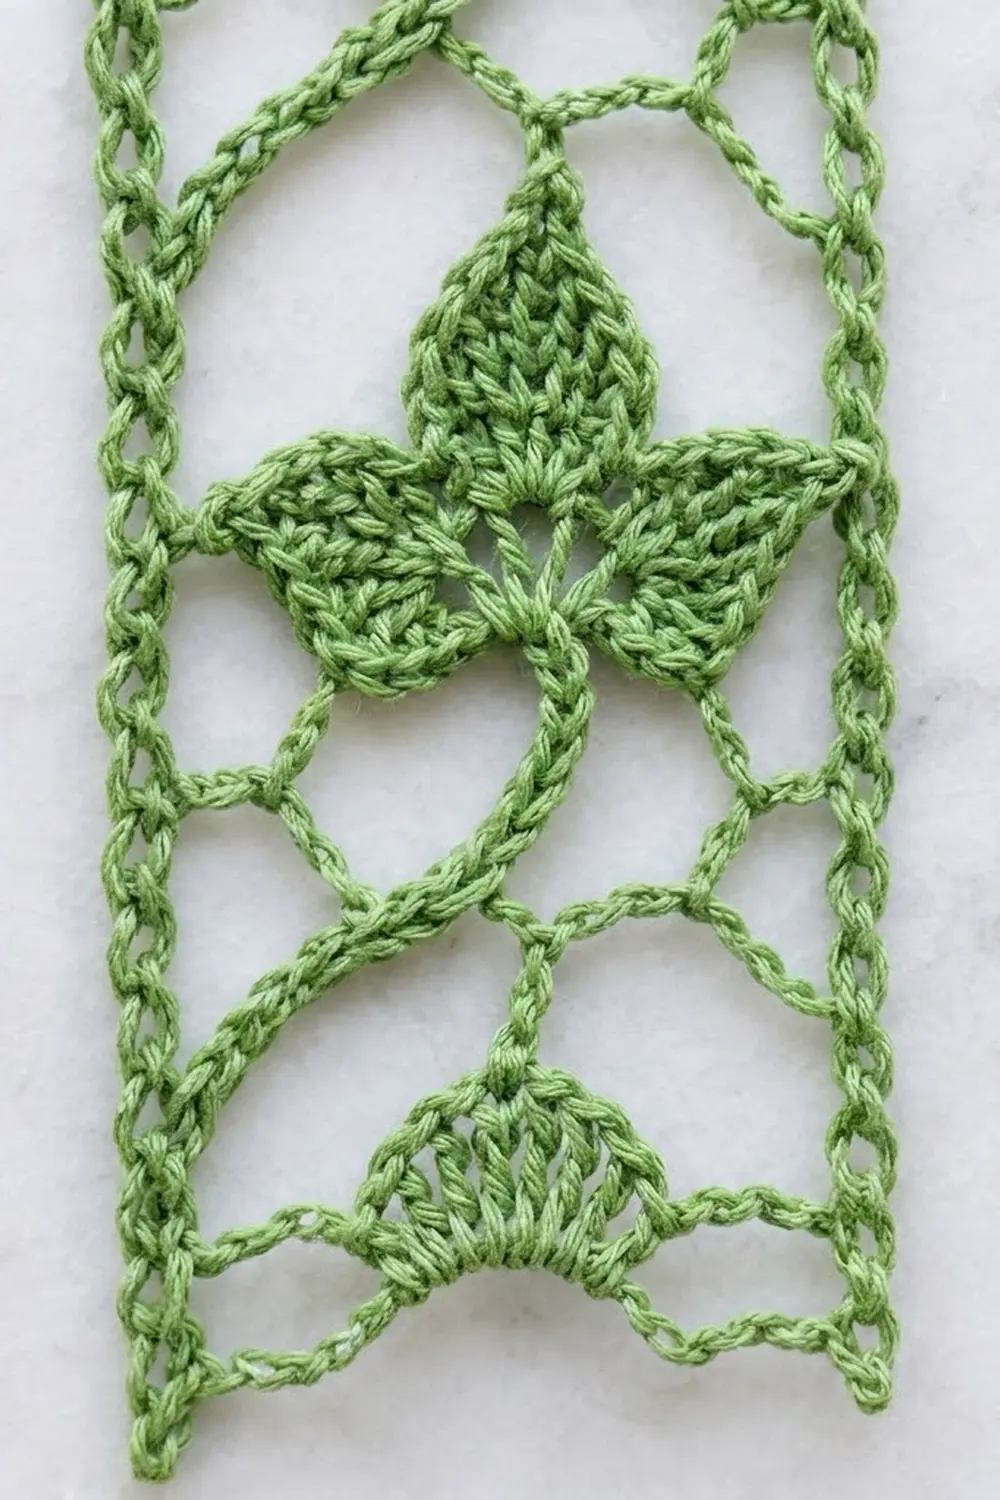
Row 2 (Mesh A): Ch 4 (counts as tr), ch 5, sk 5 sc, sc in next sc, [ch 5, sk 5 sc, sc in next sc] twice, ch 5, sk 5 sc, tr in last sc. Turn. (2 tr, 3 sc, 4 ch-5 sps)
Check the width: 1 tr + 4 x (5 skipped + 1 worked) = 25 positions, so the rail-to-rail width stays at 25 sts.
Row 3 (Mesh B): Ch 4 (counts as tr), ch 2, sc in first ch-5 sp, [ch 5, sc in next ch-5 sp] 3 times, ch 2, tr in 4th ch of tch. Turn. (2 tr, 4 sc, 3 ch-5 sps, 2 ch-2 sps)
Row 4 (Mesh A): Ch 4 (counts as tr), ch 5, sc in first ch-5 sp, [ch 5, sc in next ch-5 sp] twice, ch 5, tr in 4th ch of tch. Turn. (2 tr, 3 sc, 4 ch-5 sps)
Rows 5–121: Repeat Rows 3 and 4 alternately: odd rows are Mesh B and even rows are Mesh A. End after Row 121, which is a Mesh B row.
That makes 120 mesh rows (Rows 2–121), or 10 repeats of 12 rows. At 3 rows = 2 in, they measure 80 in (203.2 cm).
Row 122 (bottom band): Ch 1, sc in first tr, 2 sc in ch-2 sp, sc in next sc, [5 sc in ch-5 sp, sc in next sc] 3 times, 2 sc in ch-2 sp, sc in 4th ch of tch. (25 sc)
This is a trim row: 1 + 2 + 1 + 18 + 2 + 1 = 25. That matches Row 1, so the strip stays straight.
Strip before border: 0.25 in + 80 in + 0.25 in = 80.5 in (204.5 cm) long and 5 in (12.7 cm) wide. Don’t fasten off. Continue straight into the border.
Ivy Leaf (Make 70)
Make 40 leaves in G and 30 in C. Each leaf has three lobes that you sew together.
Center lobe (make 1 per leaf):
Ch 11. Sc in 2nd ch from hook, hdc in next ch, dc in next 2 ch, tr in next 2 ch, dc in next 2 ch, hdc in next ch, 3 sc in last ch. Rotate the work and continue along the free loops on the other side of the chain: hdc in next ch, dc in next 2 ch, tr in next 2 ch, dc in next 2 ch, hdc in next ch, sc in next ch. Ch 2 for the tip, then sl st in the first sc. (21 sts plus the ch-2 tip)
The lobe is about 2 in (5.1 cm) long.
Side lobes (make 2 per leaf):
Ch 9. Sc in 2nd ch from hook, hdc in next ch, dc in next ch, tr in next 2 ch, dc in next ch, hdc in next ch, 3 sc in last ch. Rotate and work along the free loops: hdc in next ch, dc in next ch, tr in next 2 ch, dc in next ch, hdc in next ch, sc in next ch. Ch 2, then sl st in the first sc. (17 sts plus the ch-2 tip)
The lobe is about 1.6 in (4.1 cm) long.
Veins: Work a surface vein up the center of each lobe, from the base to the tip, following the foundation chain line. Fasten off and weave in the ends.
Assembly: Lay the center lobe pointing up. Place the side lobes at 10 o’clock and 2 o’clock. Overlap all three bases by 0.25 in (0.6 cm) and sew them together through both layers.
Base fan and stem: Join yarn at the center of the base. [Ch 4, sl st in the same spot] 5 times, fanning the loops downward. Then make the stem: ch 16, sl st in 2nd ch from hook and in each ch back to the base. (15 sl sts) Fasten off and leave a 12 in (30.5 cm) tail.
Finished leaf: about 3.5 in (8.9 cm) wide and 3 in (7.6 cm) tall, with a 3 in (7.6 cm) stem.
Make All Pieces
| Piece | Color G | Color C |
|---|---|---|
| Strips | 4 | 3 |
| Leaves | 40 | 30 |
| Tabs | 4 | 3 |
Layout (left to right, seen from the front):
[G] [C] [G] [C] [G] [C] [G]
 1   2   3   4   5   6   7
Leaf placement: Lay a bordered strip flat with the tab end at the top. Center one leaf in each 12-row repeat, with the lobes pointing up.
- Leaf 1 is centered 4.75 in (12.1 cm) below the top finished edge.
- Each following leaf is centered 8 in (20.3 cm) lower.
- Leaf 10 is centered 76.75 in (194.9 cm) below the top finished edge.
Curl each stem in a soft S-curve down toward the leaf below, and pin it. Sew the leaf edges and the stem to the mesh with the matching tail, catching the chain bars only so the stitches stay invisible.
Joining: Hanging the Strips
The strips are not seamed together. The only joins are the tab on each strip and the leaf appliqués.
Tab: With the right side facing, count the 27 non-corner sts on the top edge of the border (Rnd 2). Skip 9 sts and join yarn in the 10th st.
- Row 1: Ch 1, sc in the same st and in the next 8 sts. Turn. (9 sc)
- Rows 2–16: Ch 1, sc in each st across. Turn. (9 sc)
The tab measures 1.8 in (4.6 cm) wide and 4 in (10.2 cm) long. Fold it to the back and whipstitch the last row to the base of Row 1, matching one stitch to one stitch across all 9 sts. This makes a 2 in (5.1 cm) loop.
Tension advice: Sew the tabs firmly, because they carry the full weight of each strip. Keep the appliqué stitching relaxed so the mesh doesn’t pucker.
Size checkpoint: Thread all seven strips onto the rod and space them 0.5 in (1.3 cm) apart. Seven strips at 6 in plus six gaps at 0.5 in comes to 42 + 3 = 45 in (114.3 cm).
Border
Border gauge: 5 sc = 1 in (2.5 cm) along every edge.
Along the long edges, each mesh row is 2 in (5.1 cm) tall. Working 10 sc per 3 rows gives 10 sc per 2 in, which is 5 sc per inch. That matches the gauge, so the edges neither ruffle nor pull in.
Rnd 1: Continue from Row 122 and don’t turn.
- Bottom edge: 3 sc in the first st (corner). Sc in the next 23 sts. 3 sc in the last st (corner).
- First long edge: 1 sc in the row-end of Row 122. Then work [3 sc, 3 sc, 4 sc] across each group of 3 mesh rows, 40 times (400 sc). Finish with 1 sc in the row-end of Row 1.
- Top edge: Working into the free loops of the foundation chain, work 3 sc in the first loop (corner), sc in the next 23 loops, and 3 sc in the last loop (corner).
- Second long edge: Work it the same way as the first long edge.
- Sl st in the first sc to join.
Rnd 1 counts per side (each count includes its 2 corner sts):
– Short sides: 1 + 1 + 23 + 1 + 1 = 27
– Long sides: 1 + 402 + 1 = 404
– Round total: 4 corners + 2 x 25 + 2 x 402 = 858 sc
Rnd 2: Ch 1. Sc in each sc around, working 3 sc in each corner st. Sl st in the first sc to join. Fasten off.
Rnd 2 counts per side (each count includes its 2 corner sts):
– Short sides: 29
– Long sides: 406
– Round total: 4 + 2 x 27 + 2 x 404 = 866 sc
Why the math works:
– Width: 5 in + 2 x 0.5 in = 6 in (15.2 cm)
– Length: 80.5 in + 2 x 0.5 in = 81.5 in (207.0 cm)
– The 23 center sts on each short side plus 2 sts from each 3-sc corner group cover all 25 band sts exactly once.
Final Blocking
- Weave in all ends before blocking, splitting the plies inside the rails.
- Soak each strip in cool water for 15 minutes, then press out the water in a towel. Don’t wring it.
- Pin the strip to 6 in x 81.5 in (15.2 cm x 207.0 cm), pinning the rails straight every 4 in (10.2 cm).
- Open each ch-5 diamond evenly by pinning the center sc points.
- Shape each leaf, pin each lobe tip to a sharp point, and pin each stem curve.
- Let it dry completely. Hang the strip for 24 hours before the final check, because cotton settles under its own weight.
Final Quality-Control Checklist
- 7 strips, in the order G, C, G, C, G, C, G
- Each strip is 6 in x 81.5 in (15.2 cm x 207.0 cm)
- 120 mesh rows in each strip, with 25 sts on both bands
- Border Rnd 2 has 29 / 406 / 29 / 406 sts
- 10 leaves per strip, each centered 8 in (20.3 cm) apart
- Every lobe has a sharp tip and a visible vein
- Each tab is centered on the top edge and sewn securely
- No puckering around the appliqués
Troubleshooting
- Rails ripple: You are working too many sc along the long edges. Recount to 10 sc per 3 rows.
- The strip narrows toward the bottom: Your trebles are tightening. Check the 25-position count in a Mesh A row.
- Diamonds lean: Make sure the sc goes into the ch-5 sp, not into a chain.
- Leaf tips are rounded: Pull the ch-2 tip snug and pin it firmly during blocking.
- The strip sags at the tab: Add a second line of stitching across the tab fold.
- The strip is too long: Remove one 12-row repeat (8 in / 20.3 cm) and one leaf.
Care
Hand wash in cool water and dry flat, or hang to dry over a rod. Don’t tumble dry, because the long strips can stretch and the leaves can lose their shape.
Final Notes
Here is the measurement chain:
- A gauge of 5 sc per in sets a 25-st band at 5 in (12.7 cm).
- 3 mesh rows = 2 in, so 120 rows = 80 in (203.2 cm).
- With both bands, the strip measures 80.5 in (204.5 cm).
- Two border rounds bring each strip to 6 in x 81.5 in (15.2 cm x 207.0 cm).
- Seven strips with six gaps of 0.5 in (1.3 cm) fill 45 in (114.3 cm) of rod.
Check each stage against these numbers and the ivy will hang straight from the first leaf to the last.
Happy crocheting!