

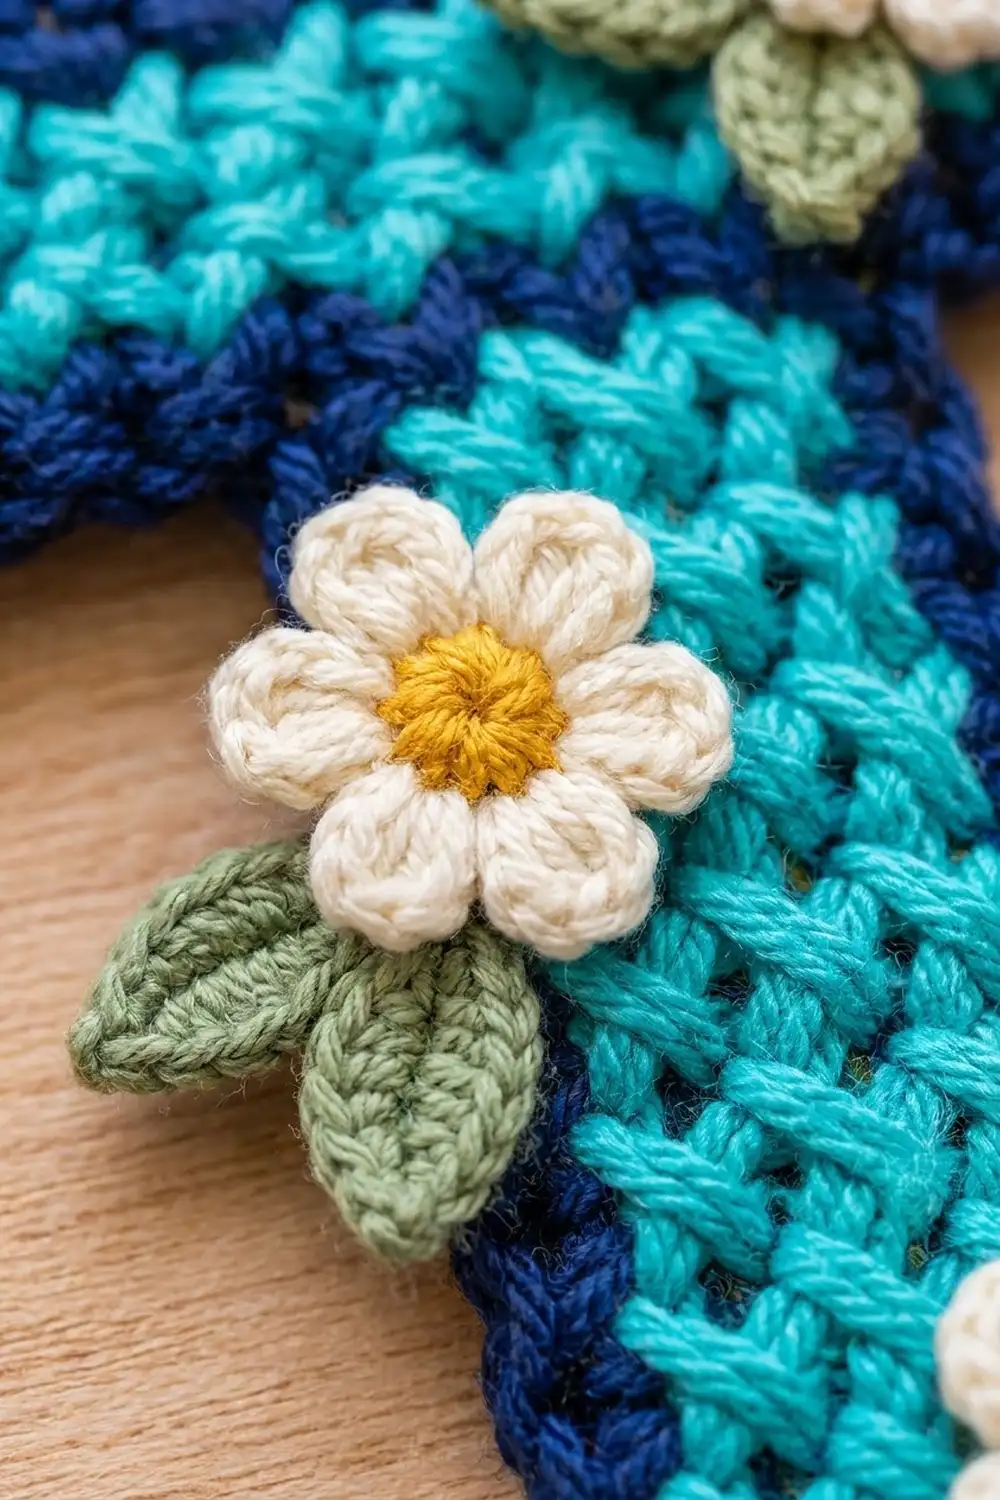
The Lagoon Bloom Letter T is a small, sturdy initial keychain with a lot of texture. The center is bright turquoise crossed double crochet, which covers the letter in raised X’s that look almost woven. A firm navy edge frames the letter and keeps its shape crisp.
Three small cream daisies with golden centers and sage-green leaves sit on top. They soften the graphic letter and give it a cottage-garden feel. Clip it to a tote, a backpack or a set of keys.
This pattern uses US crochet terms. The finished letter is 3.5 in (8.9 cm) wide and 3.5 in (8.9 cm) tall, and the stem is 1.5 in (3.8 cm) wide.
The letter is worked as one piece. You crochet the stem from the bottom up, add the crossbar by extending both sides in one row, and then work two navy rounds of border around the whole shape. The daisies and leaves are made separately and sewn on as appliqués.
Finished Size and Construction
- Finished size: 3.5 in x 3.5 in (8.9 cm x 8.9 cm)
- Skill level: Easy+ (crossed stitches and foundation double crochet)
- Terminology: US crochet terms
- Yarn weight: Sport / fine (weight 2) cotton
- Hooks: 3.0 mm for the letter body; 2.75 mm for the border and appliqués
- Number of pieces: 1 letter, plus 3 daisy appliqués and 6 leaf appliqués
- Layout: One single letter T; no joining between pieces
- Body size before border: 3.0 in x 3.0 in (7.6 cm x 7.6 cm)
- Stem width before border: 1.0 in (2.5 cm)
- Border depth: 0.25 in (0.6 cm) on every side, in 2 rounds
Materials
Use a smooth, tightly plied cotton or cotton blend. Cotton keeps the crossed stitches clearly defined and holds up well on a keychain that gets handled every day. Avoid fuzzy or very soft acrylics, because they blur the X texture.
- Turquoise (body): 6 g / 20 m
- Navy (border): 5 g / 17 m
- Cream (petals): 2 g / 7 m
- Golden yellow (daisy centers): 1 g / 3 m
- Sage green (leaves): 2 g / 7 m
All quantities include a safety margin of roughly 50%, so leftover yarn works fine.
Tools:
– 3.0 mm and 2.75 mm crochet hooks
– Tapestry needle
– Gold split keyring, 1 in (2.5 cm) diameter, with a short chain of about 1.25 in (3.2 cm)
– 1 gold jump ring and two pairs of flat-nose pliers
– Scissors, rust-proof pins, blocking mat and a spray bottle
– Optional: fabric stiffener or a felt backing
Abbreviations (US Terms)
- ch – chain
- sl st – slip stitch
- sc – single crochet
- hdc – half double crochet
- dc – double crochet
- sc2tog – single crochet 2 together
- sc3tog – single crochet 3 together
- fdc – foundation double crochet
- tch – turning chain
- st(s) – stitch(es)
- RS / WS – right side / wrong side
Special stitch – crossed double crochet (Xdc): Skip the next st and dc in the following st. Then, working in front of the dc you just made, dc in the skipped st. One Xdc uses 2 sts and makes 2 sts.
Foundation double crochet (fdc), worked off a row: Yo, insert your hook into the base (the 2 lower loops) of the last dc made, yo and pull up a loop, yo and pull through 1 loop (this is the “foot” chain), [yo and pull through 2 loops] twice. For each following fdc, yo and insert your hook into the foot chain of the previous fdc, then repeat the same steps.
Gauge and Checkpoints
Gauge in Xdc pattern with the 3.0 mm hook: 6 sts and 3 rows = 1 in (2.5 cm).
Make a test swatch before you start the letter. Ch 20 and work Row 1 the same way as the stem (sk 3 ch, then Xdc across the chain and dc in the last ch), which gives 18 sts. Work 5 more pattern rows. Your swatch should measure 3.0 in (7.6 cm) wide and 2.0 in (5.1 cm) tall. Since the swatch matches the full crossbar width, it also works as a practice run for the top of the letter.
Checkpoints:
– After Row 1: 1.0 in (2.5 cm) wide
– After Row 7: 1.0 in (2.5 cm) wide and 2 1/3 in (5.9 cm) tall
– After Row 9: 3.0 in (7.6 cm) wide and 3.0 in (7.6 cm) tall
– After border Round 1: 3.25 in (8.3 cm) square overall
– After border Round 2: 3.5 in (8.9 cm) square overall
Too big? Go down 0.25 mm in hook size. Too small? Go up 0.25 mm. If the width is right but the height is off, change how far you pull up each dc instead of changing hooks. Row height is the main thing that controls the stem length.
The Letter Body
Use turquoise and the 3.0 mm hook.
Stem
Foundation: Ch 8.
Row 1 (RS): Skip the first 3 ch (they count as the first dc). Work 1 Xdc over the 4th and 5th ch from the hook: skip the 4th ch, dc in the 5th ch, then dc in the 4th ch working in front. Work 1 Xdc over the 6th and 7th ch. Dc in the 8th ch. (6 sts: 1 edge dc, 2 Xdc, 1 edge dc)
Row 2 (WS): Ch 3 (counts as dc), turn. Work 2 Xdc over the next 4 sts, then dc in the top of the tch. (6 sts)
Rows 3–7: Repeat Row 2. (6 sts per row)
Do not fasten off. Row 7 is a RS row. Check that the stem is 1.0 in (2.5 cm) wide and 2 1/3 in (5.9 cm) tall.
Crossbar
Row 8 (WS, extension row): Don’t turn yet. Ch 8, then turn the work. Dc in the 4th ch from the hook and in the next 4 ch, which gives 6 sts on this side including the tch. Dc in each of the 6 sts of Row 7. Then work 6 fdc off the last dc. (18 sts: 6 + 6 + 6)
This row is plain dc, which gives the new crossbar a firm, straight base. The stem stays centered, with 6 sts extending on each side.
Row 9 (RS): Ch 3 (counts as dc), turn. Work 8 Xdc over the next 16 sts, then dc in the 3rd ch of the starting ch-8. (18 sts: 1 + 16 + 1)
Fasten off and weave in the ends. The body should measure 3.0 in (7.6 cm) wide across the crossbar and 3.0 in (7.6 cm) tall.
Daisy and Leaf Appliqués
Use the 2.75 mm hook.
Daisy (make 3)
Round 1: With golden yellow, make a magic ring and work 5 sc into it. Join with a sl st to the first sc. Pull the ring closed and fasten off. (5 sc)
Round 2: Join cream with a sl st in any sc. (Ch 2, 2 dc, ch 2, sl st) all in the same sc, then sl st in the next sc. Repeat from * 4 more times; on the last repeat, work the final sl st into the joining sl st. (5 petals)*
Fasten off and leave a 10 in (25.4 cm) tail for sewing. Each daisy measures about 0.75 in (1.9 cm) across.
Leaf (make 6)
With sage green, ch 6. Sl st in the 2nd ch from the hook, sc in the next ch, hdc in the next ch, sc in the next ch, and sl st in the last ch. Fasten off and leave an 8 in (20.3 cm) tail. Each leaf measures about 0.5 in (1.3 cm) long.
Border
Use navy and the 2.75 mm hook. The smaller hook keeps the edge firm and corded.
Border gauge: 6 sc = 1 in (2.5 cm) along each edge. Work 1 sc per st across tops and foundation edges, and 2 sc per dc row-end along the sides.
Round 1 (RS): With the RS facing, join navy with a sc in the first st of Row 9, at the top-right corner. Work 2 more sc in the same st to finish the corner.
- Top: Sc in the next 16 sts, then 3 sc in the last st.
- Left crossbar end: Work 2 sc in each of the row-ends of Rows 9 and 8 (4 sc).
- Left underside: Work 3 sc in the first base st, then sc in the next 4 base sts.
- Left inner corner: Sc2tog, inserting into the last base st and then into the top of the Row 7 row-end.
- Left stem side: Work 1 more sc in the Row 7 row-end, then 2 sc in each row-end of Rows 6–1 (13 sc).
- Bottom: Work 3 sc in the first foundation st, sc in the next 4, and 3 sc in the last.
- Right stem side: Work 2 sc in each row-end of Rows 1–6 and 1 sc in the Row 7 row-end (13 sc).
- Right inner corner: Sc2tog, inserting into the rest of the Row 7 row-end and then into the first base st of the extension.
- Right underside: Sc in the next 4 base sts, then 3 sc in the last base st.
- Right crossbar end: Work 2 sc in each row-end of Rows 8 and 9 (4 sc).
Join with a sl st to the first sc. Total: 82 sts (22 + 4 + 7 + 1 + 13 + 10 + 13 + 1 + 7 + 4).
Per-side counts for Round 1, measured from corner center to corner center and including both corner sts:
– Top: 20
– Each crossbar end: 8
– Each underside: 7
– Each stem side: 16
– Bottom: 8
These sides add up to 90. The 8 corners are each counted twice, so the actual total is 90 − 8 = 82.
Round 2: Ch 1. Sc in each st around, with two exceptions:
– At each of the 6 outer corners, work 3 sc in the center sc of the corner.
– At each inner corner, work sc3tog over the sc before the sc2tog, the sc2tog itself, and the sc after it.
Join with a sl st to the first sc. Total: 90 sts. The count works like this: 70 plain sts, plus 18 sts at the 6 outer corners, plus 2 sts at the inner corners.
Per-side counts for Round 2:
– Top: 22
– Each crossbar end: 10
– Each underside: 7
– Each stem side: 16
– Bottom: 10
These add up to 98. Subtract the 8 shared corners and you get 90.
Fasten off and weave in the ends.
Why the math works: The top edge of 18 sts is 3.0 in (7.6 cm). Two sc per dc row-end matches the 3 rows per inch of the body, so each side gets 6 sc per inch, the same rate as the top. Because every edge gets the same density, the border lies flat. The 3-sc groups add just enough length for the outer corners to turn, and the decreases take out the extra fullness at the inner corners. Two rounds add 0.25 in (0.6 cm) on every side, so the finished letter is 3.5 in (8.9 cm) each way.
Final Blocking
- Lightly mist the letter with water until it is damp, but not wet.
- Pin it RS up on a mat. Set the crossbar to 3.5 in (8.9 cm) wide and the total height to 3.5 in (8.9 cm).
- Pin the stem straight and 1.5 in (3.8 cm) wide, with the crossbar centered above it.
- Put a pin at each of the 6 outer corners so they stay sharp. Gently push the inner corners into clean right angles.
- Let it dry completely. If you want a stiffer charm, brush a thin coat of fabric stiffener on the WS.
- Sew on the leaves first, two behind each daisy. Then sew the daisies on top:
- Daisy 1: upper right of the crossbar
- Daisy 2: upper-left edge of the stem
- Daisy 3: lower right of the stem
Let each daisy overlap the navy border slightly.
7. Open the jump ring and thread it through both border rounds at the center of the top edge. Hook it onto the end of the chain, then close it firmly.
Final Quality-Control Checklist
- The body has 6 sts in every stem row and 18 sts in Rows 8 and 9.
- The X texture runs in straight columns up the stem.
- Border Round 1 has 82 sts and Round 2 has 90 sts.
- All 6 outer corners are sharp, and both inner corners lie flat.
- The finished letter measures 3.5 in x 3.5 in (8.9 cm x 8.9 cm).
- Each daisy has 5 even petals and 2 leaves showing.
- The jump ring is fully closed and anchored through both border rounds.
Troubleshooting
The stem slants or twists. You may be working the final dc into the wrong st. Each row must end in the top of the tch.
The X’s look flat. Make sure the second dc of each Xdc is worked in front of the first, not behind it.
The border ruffles. You have too many sc along the row-ends. Use exactly 2 per row, or switch to a smaller hook.
The border cups. You have too few sc. Check your corner groups and confirm 2 sc per row-end.
The inner corners bulge. Use the decreases exactly as written, and pin them firmly while blocking.
The petals flop over. Tighten the ch-2 before and after each petal, or go down a hook size.
Care
Hand wash in cool water with a mild soap and lay flat to dry, reshaping the corners while damp. Remove the metal hardware before washing if you can.

Final Notes
Each stage builds on the one before it:
- The 6-st stem is 1.0 in (2.5 cm) wide.
- The 18-st crossbar is 3.0 in (7.6 cm) wide.
- Nine rows make a body 3.0 in (7.6 cm) tall.
- Two border rounds add 0.25 in (0.6 cm) on each side, for a finished letter 3.5 in x 3.5 in (8.9 cm x 8.9 cm).
If you check each stage as you go, the letter will come out the right size and shape before you add the daisies.
Happy crocheting!