

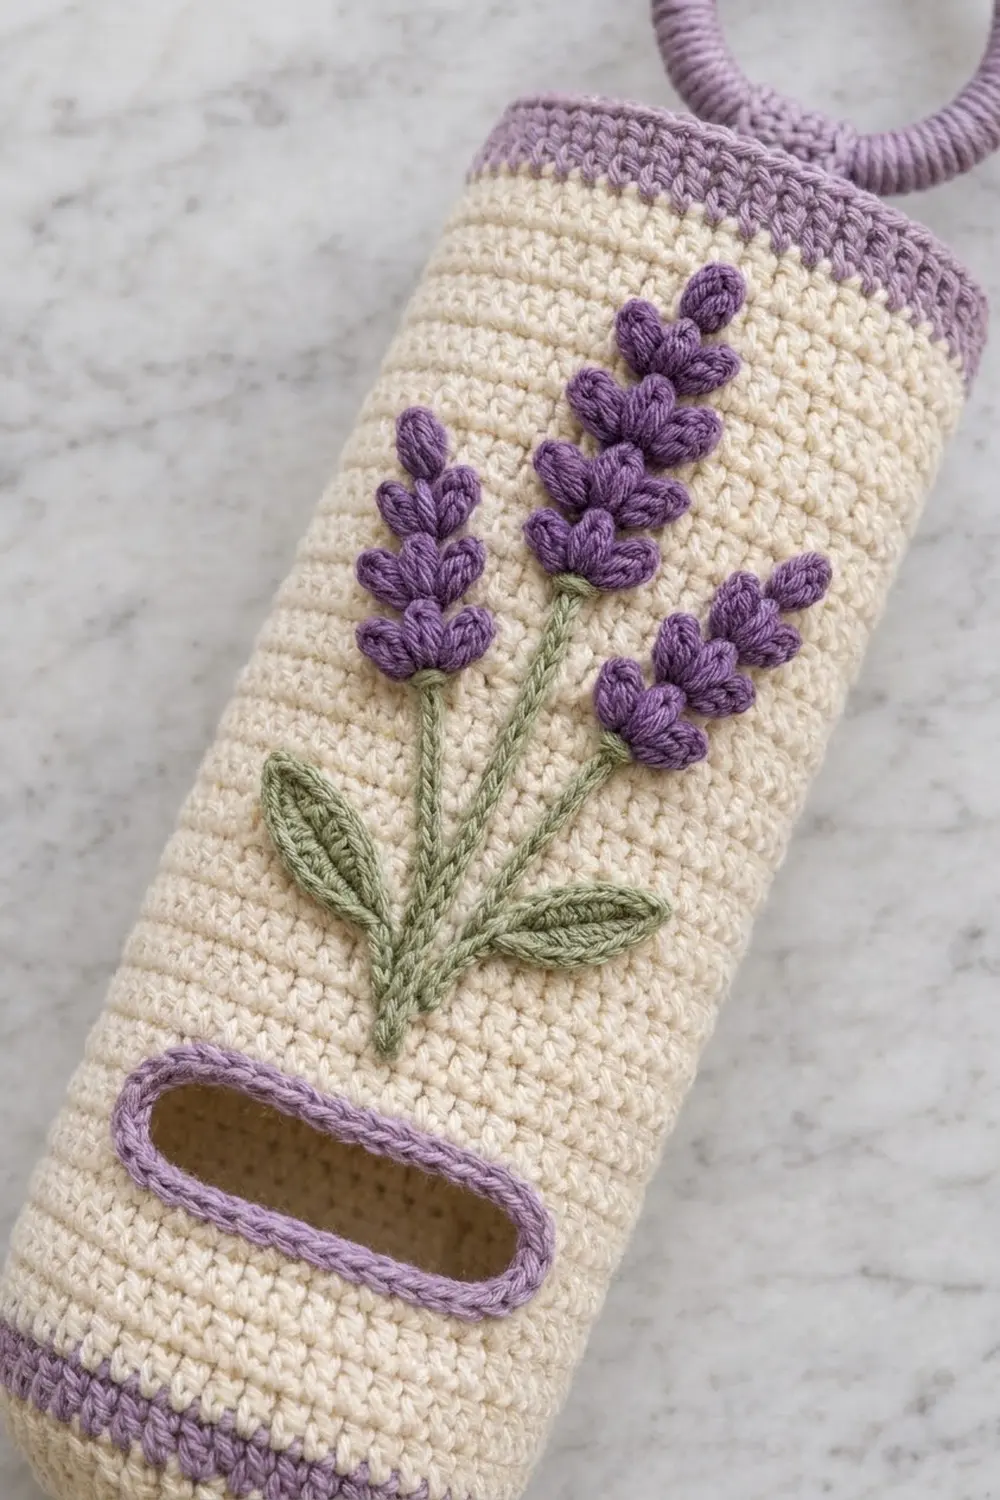
This kitchen holder gives a pile of grocery bags somewhere neat to live. The body is a tall cream tube with a closed oval base, a dispensing slot near the bottom, and soft lavender stripes at the top and bottom.
The front is decorated with a small spray of lavender: three dark purple puff-stitch spikes on sage-green stems, plus two pointed leaves. A covered ring on a short tab lets the holder hang from a cabinet knob, hook, or door handle.
The pattern uses US crochet terms. The finished holder is about 6 in (15.2 cm) wide when flat and about 14¼ in (36.2 cm) tall without the ring. With the ring, it is about 17 in (43.2 cm) tall.
You work the body from the bottom up in joined rounds of single crochet. Five short turned rows form the slot, and a chain closes it. You make the ring, tab, spikes, stems, and leaves separately and sew them on at the end.
Finished Size and Construction
- Finished size: 6 in (15.2 cm) wide flat x 14¼ in (36.2 cm) tall; about 17 in (43.2 cm) including ring
- Skill level: Intermediate
- Terminology: US
- Yarn weight: Worsted (#4), cotton or cotton blend
- Hook: 4.5 mm (US 7)
- Number of pieces: 1 body plus small sewn-on parts (1 ring, 1 tab, 3 spikes, 3 stems, 2 leaves)
- Layout: Single tube; slot centered on the front, lavender spray centered above it
- Body circumference: 48 sts = 12 in (30.5 cm)
- Size before border: 14 in (35.6 cm) tall after Rnd 66
- Border depth: 1 round of reverse sc, about ¼ in (0.6 cm)
Materials
Choose a smooth worsted-weight cotton or cotton blend (around 170 m per 100 g). Cotton holds its shape and stands up to frequent handling. Avoid fuzzy yarns, because they hide the puff-stitch buds.
- Cream (body): 80 g / 136 m
- Light lavender (stripes, top band, slot edging, ring, tab): 30 g / 51 m
- Dark purple (lavender buds): 10 g / 17 m
- Sage green (stems and leaves): 8 g / 14 m
These amounts include about 20 percent extra for swatching and sewing tails.
Tools:
– 4.5 mm (US 7) crochet hook
– One 3 in (7.6 cm) plastic or metal ring
– Tapestry needle
– 4 stitch markers
– Rust-proof pins
– Measuring tape
– Scissors
Abbreviations (US Terms)
- ch – chain
- sl st – slip stitch
- sc – single crochet
- hdc – half double crochet
- dc – double crochet
- BLO – back loop only
- rev sc – reverse single crochet (crab stitch), worked left to right
- st(s) – stitch(es)
- rnd(s) – round(s)
- RS / WS – right side / wrong side
Puff st: (Yarn over, insert hook in indicated st, yarn over, pull up a loop) 3 times, yarn over, pull through all 7 loops on hook.
Gauge and Checkpoints
Gauge: 16 sc and 18 rnds = 4 in (10.2 cm) in sc worked in rounds.
Make the base first as your test. It takes only three rounds and shows whether your tension is right before you start the long tube.
- After Rnd 3: Flat oval base about 5¼ in x 1¼ in (13.3 x 3.2 cm), 48 sts.
- After Rnd 13: Tube 6 in (15.2 cm) wide when flat, about 2¼ in (5.7 cm) tall from the base fold.
- After Row 18: About 3⅓ in (8.5 cm) tall, slot open.
- After Rnd 62: About 13 in (33.0 cm) tall.
- After Rnd 67: About 14¼ in (36.2 cm) tall.
If your base is longer than 5¼ in (13.3 cm), go down a hook size. If it is shorter, go up a size. The stitch count stays the same, so only the hook size changes. Tight fabric works better here, because bags can poke through loose fabric.
Body
Work in joined rounds. The ch 1 at the start of each round does not count as a stitch. Join with a sl st to the first sc.
Base
With cream, ch 18.
Rnd 1: Sc in 2nd ch from hook and in next 15 ch, 3 sc in last ch; working along the opposite side of the chain, sc in next 15 ch, 2 sc in the last ch (the same ch as the first sc); join. (36 sts)
Rnd 2: Ch 1, 2 sc in first st, sc in next 15 sts, 2 sc in each of next 3 sts, sc in next 15 sts, 2 sc in each of last 2 sts; join. (42 sts)
Rnd 3: Ch 1, sc in first st, 2 sc in next st, sc in next 15 sts, [sc in next st, 2 sc in next st] 3 times, sc in next 15 sts, [sc in next st, 2 sc in next st] twice; join. (48 sts)
Check: Rnd 3 is worked over 42 sts and adds 6 increases, for 48 sts.
Sides
Rnd 4: Ch 1, sc in BLO of each st around; join. (48 sts) This round turns the edge up and gives the base a crisp fold.
Rnd 5: Ch 1, sc in each st around; join. (48 sts)
Rnds 6–7: Change to light lavender. Repeat Rnd 5. (48 sts) Change to cream at the end of Rnd 7.
Rnds 8–13: Repeat Rnd 5. (48 sts)
Slot
The slot is 14 sts wide. You’ll work the other 34 sts back and forth in rows, leaving a gap.
Row 14 (RS): Ch 1, sc in first 34 sts; leave remaining 14 sts unworked. Turn. (34 sts)
Rows 15–17: Ch 1, sc in each of 34 sts. Turn. (34 sts) Rows 15 and 17 are WS rows.
Row 18 (RS): Ch 1, sc in each of 34 sts, ch 14, sl st to first sc of this row to close the gap. Do not turn. (34 sc + 14 ch)
Rnd 19: Ch 1, sc in each of 34 sc and in the back bump of each of 14 ch; join. (48 sts)
The slot is now about 3½ in (8.9 cm) wide and five rows tall. Sts 30–34 and sts 1–5 sit on either side of the slot, so the front of the holder runs from st 30 around to st 5 (24 sts). Place a marker at each side fold.
Rnds 20–62: Repeat Rnd 5. (48 sts) Change to light lavender at the end of Rnd 62.
Rnds 63–66 (top band): With light lavender, repeat Rnd 5. (48 sts) Do not fasten off; the border comes next.
Hanging Ring and Tab
Ring: Attach light lavender to the ring with a sl st. Work about 66 sc over the ring, packing them tightly so no plastic shows (adjust by up to 4 sts either way). Join to first sc, fasten off, and weave in the end.
Tab: With light lavender, ch 7.
Row 1: Sc in 2nd ch from hook and in each ch across. Turn. (6 sts)
Rows 2–14: Ch 1, sc in each st. Turn. (6 sts)
The tab is 1½ in (3.8 cm) wide and about 3⅛ in (7.9 cm) long. Fasten off with a long tail.
Lavender Spray Appliqués
Side spikes (make 2): With dark purple, ch 7. Puff st in 2nd ch from hook, sl st in same ch (top bud). *Puff st in next ch, sl st in same ch; repeat from * in each of next 5 ch. Rotate and work along the bottom loops of the same 5 ch: [puff st, sl st] in each. Sl st into the top bud. Fasten off with a long tail. (11 buds: 1 top + 5 per side)
Each side spike is about 2 in (5.1 cm) long.
Center spike (make 1): With dark purple, ch 9. Work as for the side spikes, but make 7 bud pairs, one in each of 7 ch on each side. (15 buds: 1 top + 7 per side) It is about 2½ in (6.4 cm) long.
Side stems (make 2): With sage, ch 16. Sl st in back bump of 2nd ch from hook and in each ch across. (15 sl sts) Each is about 3 in (7.6 cm) long.
Center stem (make 1): With sage, ch 21. Work as for the side stems. (20 sl sts) It is about 4 in (10.2 cm) long.
Leaves (make 2): With sage, ch 9. Sl st in 2nd ch from hook, sc in next ch, hdc in next ch, dc in next 2 ch, hdc in next ch, sc in next ch, 3 sc in last ch; working along the opposite side, sc in next ch, hdc in next ch, dc in next 2 ch, hdc in next ch, sc in next ch, sl st in next ch; (sl st, ch 2, sl st) in the turning ch at the tip. (17 sts plus the pointed tip) Fasten off with a long tail.
Each leaf is about 1¾ in (4.4 cm) long. The line where the two sides meet along the foundation chain looks like a center vein.
Border
Pick up the light lavender loop left after Rnd 66.
Border gauge: Work 1 rev sc into each st. It keeps the same 16 sts per 4 in (10.2 cm), so the rim stays the same size.
Rnd 67: Ch 1, rev sc in each st around; join. (48 sts) Fasten off and weave in.
Slot edging: With RS facing, join light lavender at the lower right corner of the slot.
Rnd 1: Ch 1, sc in each of the 14 unworked sts of Rnd 13 along the bottom; sc in each of 5 row ends (Rows 14–18) up the left side; sc in the 14 bottom loops of the Row 18 chain along the top; sc in each of 5 row ends down the right side; join. (38 sts)
Rnd 2: Sl st loosely in each st around. (38 sl sts) Fasten off and weave in.
Why the math works: The rim has 1 rev sc per body stitch, so its 48 sts match the 48-st tube and the edge doesn’t flare. The slot edging is 14 + 5 + 14 + 5 = 38: one stitch per stitch on the long sides and one per row end on the short sides. A sc row is about as tall as a sc stitch is wide, so the short sides lie flat. The slip-stitch round firms the opening into a neat rounded oblong of about 3¼ x ¾ in (8.3 x 1.9 cm).
Assembly
- Flatten the tube with the slot centered on the front.
- Pin the center stem straight up, with its bottom end 1 in (2.5 cm) above the slot edging.
- Pin the side stems so their bottom ends meet the bottom of the center stem and they fan out at about 20 degrees.
- Pin each spike so its base overlaps the top of its stem by ¼ in (0.6 cm). The spray is about 6½ in (16.5 cm) tall and 4 in (10.2 cm) wide.
- Pin one leaf on each side where the stems meet, with the tips pointing up and outward.
- Sew everything on with the matching tails, going through the front layer only. Keep a hand inside the tube so you don’t catch the back.
- Fold the tab around the ring. Sew both tab ends to the inside of the back wall, centered on the top band, so the ring sits above the rim.
Final Blocking
- Lightly mist the holder with water, or soak it briefly and roll it in a towel.
- Slip a rolled towel inside to fill out the tube.
- Lay it flat and smooth it to 6 in (15.2 cm) wide and 14¼ in (36.2 cm) tall.
- Pat the leaves flat and shape their tips to a point.
- Fluff the puff buds with your fingertips.
- Let it dry completely before you remove the towel.
Final Quality-Control Checklist
- Base is 5¼ x 1¼ in (13.3 x 3.2 cm) with a crisp fold from Rnd 4.
- Body is 48 sts in every round.
- Tube lies 6 in (15.2 cm) wide flat.
- Slot is centered on the front and edged with 38 sts.
- Lavender stripe (Rnds 6–7) sits below the slot.
- Top band is 4 rounds plus 1 rev sc round.
- Ring is fully covered.
- Spray is centered, with stems meeting at one point.
- No stitches show through to the back.
- All ends are woven in securely.
Troubleshooting
The tube spirals. Joined sc often spirals a little. Joining each round and keeping the seam lined up helps. Blocking straightens most of it.
Slot is off-center. Check that sts 30–34 and 1–5 sit on either side of the slot. If they don’t, move the appliqué so it stays centered over the slot.
Slot edging puckers. You probably added extra sts at the corners. Use exactly 38.
Slot edging ruffles. Use a smaller hook for the slip-stitch round.
Puff buds look flat. Pull each loop up to the height of a dc before you close the puff.
Rim flares. Your rev sc is too loose. Go down one hook size.
Holder is too short. Add plain cream rounds before Rnd 63. Each 4½ rounds adds 1 in (2.5 cm).
Care
Hand wash in cool water with mild soap, gently press out the water, and dry flat. Don’t use the dryer, which can stretch the tube out of shape and crush the buds.

Final Notes
Every measurement here comes from the gauge. At 16 sc per 4 in (10.2 cm), the 48-st tube is 12 in (30.5 cm) around and 6 in (15.2 cm) wide flat. At 18 rnds per 4 in (10.2 cm), the 64 rounds and rows above the base fold make the holder about 14¼ in (36.2 cm) tall. The 14-st slot leaves a 3½ in (8.9 cm) gap, and its 38-st edging has one stitch for each stitch and row end around it. If the base and the width measure correctly, the rest of the holder will too.
For a bolder version, swap the cream and light lavender: make the body lavender and the stripes, rim, and slot edging cream.
Happy crocheting!