

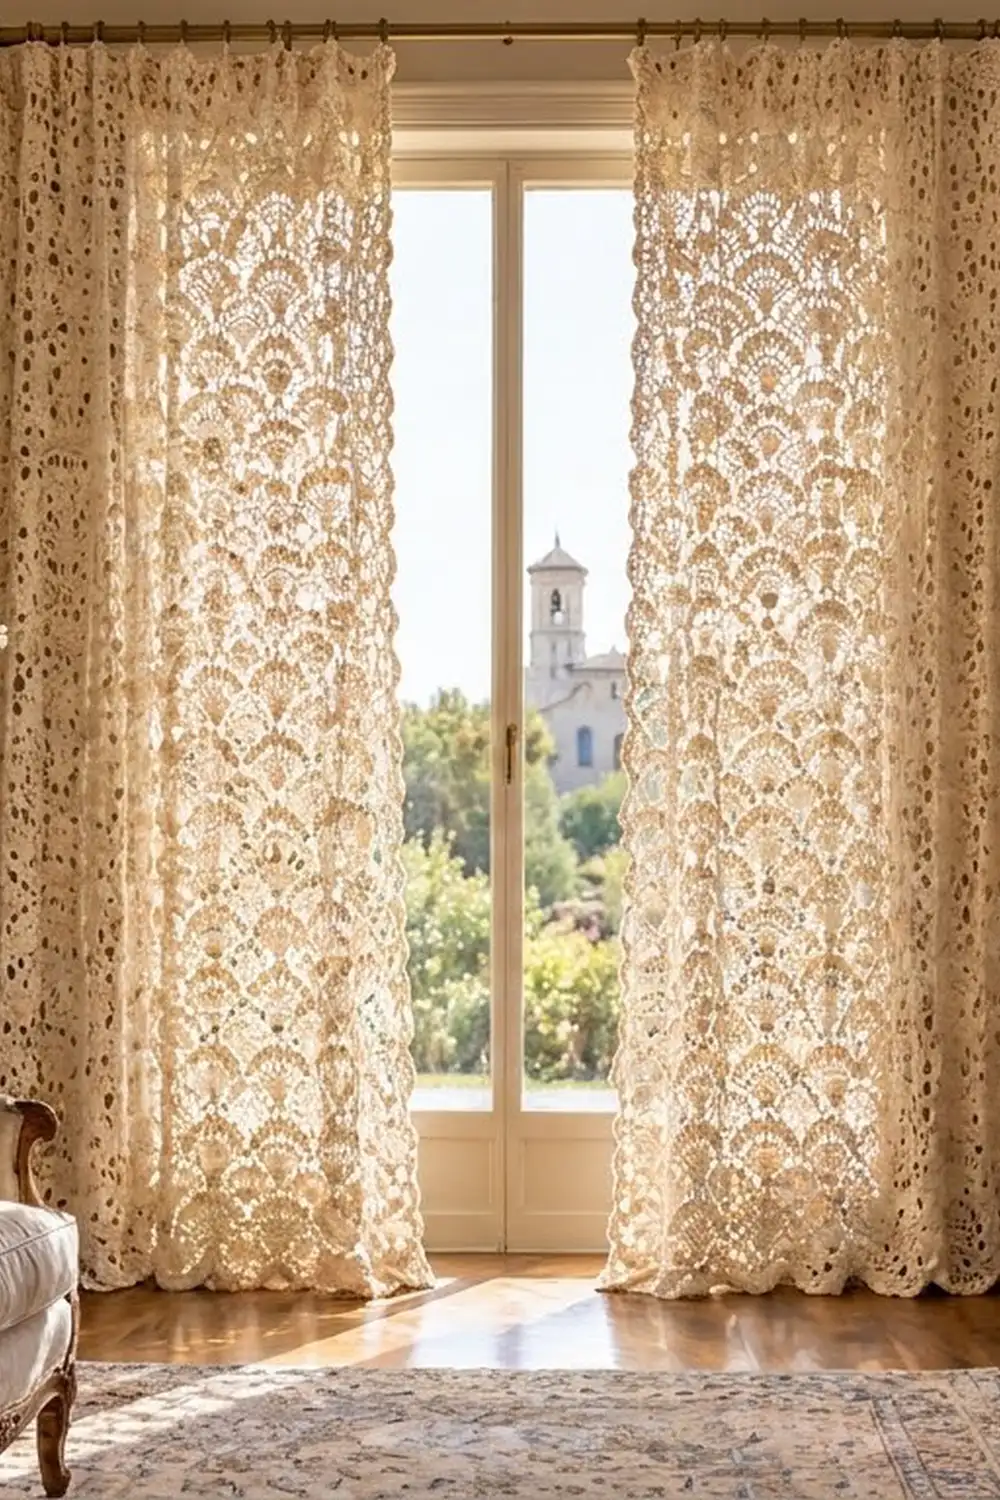
The Villa Fanlight curtains are a pair of floor-length lace panels covered in overlapping open fans. Every fan has seven slim double-crochet spokes, and the rows are offset, so the fans stack like scales. Light coming through the window shows up the spokes and the small diamond-shaped gaps between fans.
Both panels are worked in a single cream or ecru cotton. The look is soft, a bit old-fashioned, and good for sunny rooms. The pattern uses US crochet terms throughout.
Each finished panel measures 30.5 in (77.5 cm) wide by 83 in (210.8 cm) long. That includes a scalloped picot edge along the bottom and a 2 in (5.1 cm) rod pocket at the top.
Each panel is one piece, worked flat in rows from the bottom up. You start with a foundation chain, work a two-row fan repeat, square off the top with a leveling row, and finish with a band of half double crochet that folds over to make the rod pocket. Then you add scallops to the foundation edge and single crochet up each side. You make two identical panels. They are never joined.
Finished Size and Construction
- Finished size (each panel): 30.5 in x 83 in (77.5 cm x 210.8 cm)
- Skill level: Intermediate
- Terminology: US crochet terms
- Yarn weight: Sport (CYC 2, fine) mercerized cotton
- Hook: 3.5 mm (US E-4)
- Number of pieces: 2 separate panels, each worked in one piece
- Layout: One panel hangs on each side of the window, both on one rod
- Panel size before border: 30 in x 82 in (76.2 cm x 208.3 cm), made up of an 80 in (203.2 cm) fan body and a 2 in (5.1 cm) folded rod pocket
- Border depth: 1 in (2.5 cm) of scallops at the bottom, 0.25 in (0.6 cm) of single crochet on each side
Materials
Yarn: Use a smooth, mercerized sport-weight cotton, or a cotton-linen blend, at about 310 m per 100 g. Mercerized cotton shows off the fan spokes and keeps its shape when it hangs. Avoid stretchy acrylic, because a long panel of it will grow under its own weight.
- Cream / ecru: 550 g (about 1,700 m) per panel, so 1,100 g (about 3,400 m) for the pair
These amounts include a margin of roughly 10% for your swatch, tension differences and weaving in ends. Buy all your yarn from one dye lot, because a change in shade shows clearly when light comes through the panels.
Tools:
- 3.5 mm (US E-4) crochet hook
- Locking stitch markers (at least 12)
- Tapestry needle
- Scissors
- Long tape measure
- Blocking mats or a large clean towel, rustproof pins, and a spray bottle
- A curtain rod up to 1 in (2.5 cm) across
Abbreviations (US Terms)
- ch – chain
- sl st – slip stitch
- sc – single crochet
- hdc – half double crochet
- dc – double crochet
- tr – treble crochet
- sp – space
- st(s) – stitch(es)
- RS / WS – right side / wrong side
- rep – repeat
Special stitches
- Fan: [dc, ch 1] 6 times, then dc, all in the same stitch. That makes 7 dc and 6 ch-1 sps. The 4th dc is the center dc.
- Beginning half fan: ch 4 (counts as dc and ch 1), [dc, ch 1] twice, then dc, all in the same stitch. That makes 4 dc and 3 ch-1 sps.
- Ending half fan: [dc, ch 1] 3 times, then dc, all in the same stitch. That makes 4 dc and 3 ch-1 sps.
- Picot: ch 3.
Gauge and Checkpoints
Gauge (after blocking): One 12-st repeat (one fan with its anchor sc) is 3 in (7.6 cm) wide. Two pattern rows are 1.25 in (3.2 cm) tall, so one row is about 0.625 in (1.6 cm). Header: 141 hdc measure 30 in (76.2 cm), which is about 4.7 hdc per inch.
Test one piece first. Each panel is big, so make a swatch before you commit. Ch 38. Work Rows 1–8 of the Body below, so you have 3 fans across. Use the same row structure as the panel, but work the repeats across 3 fans instead of 10. Wet-block the swatch and let it dry flat. It should measure 9 in (22.9 cm) wide and 5 in (12.7 cm) tall.
- Swatch too big: Go down to a 3.25 mm hook, or chain more tightly into each dc.
- Swatch too small: Go up to a 3.75 mm hook. Pull up each dc a little taller so the spokes stay open.
Width matters most here. Being 0.1 in (0.3 cm) off on each fan adds up to 1 in (2.5 cm) across the panel.
Checkpoints for each panel:
- After Row 1, the unblocked width should be about 28–30 in (71.1–76.2 cm). Lace widens when you block it.
- After Row 15, gently stretch the work flat. It should be about 30 in x 9.4 in (76.2 cm x 23.9 cm).
- After Row 127 and the Leveling Row, the body should measure about 80 in (203.2 cm) long when blocked or smoothed flat.
- After the header is folded, the panel should be 30 in x 82 in (76.2 cm x 208.3 cm).
- After the border, the panel should be 30.5 in x 83 in (77.5 cm x 210.8 cm).

Panel Body
Work with a 3.5 mm hook. Each fan is 12 sts wide, so the foundation is 12 x 10 + 1 = 121 ch, plus 1 ch for turning.
Foundation: Ch 122.
Row 1 (RS): Sc in 2nd ch from hook. Skip 5 ch, fan in next ch, skip 5 ch, sc in next ch. Rep from * across. Turn.
(10 fans and 11 sc. That is 70 dc, 60 ch-1 sps and 11 sc.)*
Row 2 (WS): Beginning half fan in first sc. Sc in center dc of next fan, fan in next sc. Rep from * 8 more times. Sc in center dc of last fan, then ending half fan in last sc. Turn.
(2 half fans, 9 full fans and 10 sc.)*
Row 3 (RS): Ch 1. Sc in first dc. Fan in next sc, sc in center dc of next fan. Rep from * 8 more times. Fan in next sc, then sc in 3rd ch of the turning ch-4. Turn.
(10 fans and 11 sc. This row has the same structure as Row 1.)*
Each fan sits on top of the sc in the row below, with that sc at the center of the fan underneath. This offset is what makes the fans overlap like scales.
Rows 4–127: Rep Rows 2–3 another 62 times. In total, Rows 2–3 are worked 63 times. Row 127 is a RS row, the same type as Row 3, and has 10 fans and 11 sc.
Put a stitch marker in every 10th row. That makes it easier to count rows and work out the side border later.
Leveling Row (WS): This row fills the dips between fans so the top edge is straight.
Ch 4 (counts as tr) in the first sc. *Then work across the next fan like this:
- dc in 1st dc
- hdc in ch-1 sp
- hdc in 2nd dc
- sc in each of the next 7 sts and sps (the sp, 3rd dc, sp, center dc, sp, 5th dc, sp)
- hdc in 6th dc
- hdc in last ch-1 sp
- dc in 7th dc
Then tr in next sc. Rep from * across. Turn.
(141 sts: 11 tr and 13 sts over each of the 10 fans, 11 + 130 = 141.)
Rod-Pocket Header
Header Rows 1–10: Ch 2 (does not count as a st). Hdc in each st across. Turn.
(141 hdc in each row.)
When you finish, the 10 header rows should measure 4 in (10.2 cm) tall. Fasten off, leaving a tail 40 in (101.6 cm) long.
Fold the pocket: Fold the header to the WS along the line between Header Rows 5 and 6. Line up the 141 sts of Row 10 with the 141 sts of the Leveling Row. Use the tail to whipstitch them together, one stitch to one stitch. Leave both short ends open for the rod.
This makes a pocket 2 in (5.1 cm) deep with an inside loop of about 4 in (10.2 cm), which fits a rod up to 1 in (2.5 cm) across.
Make Both Panels
- Cream / ecru: 2 panels, each made with Body, Leveling Row and Header exactly as written
Work both panels with the same hook. Measure Panel B against Panel A at every checkpoint.
The panels are not sewn together. They hang side by side on the rod:
[ ROD ===================================== ]
[ Panel A ]   [ window opening ]   [ Panel B ]
 10 fans                             10 fans
 30.5 in                             30.5 in
Each panel is a single piece, so there is no joining step.
Border
Border gauge: Side edging is worked at 4 sc per 1 in (2.5 cm), which matches the 4 sts per inch of the body (12 sts in 3 in). The bottom scallops follow the same 12-st spacing as Row 1.
Border Row A, bottom scallops (RS): Turn the panel upside down so the foundation chain is on top. With the RS facing, join yarn in the free loop of the first foundation ch.
Ch 1, sc in the same ch. Skip 5 ch, fan in the next ch (the one at the base of a Row 1 fan), skip 5 ch, sc in next ch (the one at the base of a Row 1 sc). Rep from * across. Fasten off.
(10 fans and 11 sc. That is 70 dc, 60 ch-1 sps and 11 sc, the same as Row 1.)*
These fans hang downward from the foundation, so the bottom edge is scalloped.
Border Row B, picot edge (RS): With the RS facing, join yarn in the first sc of Row A. Ch 1, sc in the same sc. Then for each fan:
- sc in 1st dc
- *(sc, picot, sc) in the next ch-1 sp, then sc in the next dc. Rep from * 5 more times.
Then sc in the next sc. Fasten off.
(19 sc on each scallop (7 sc on the dc + 12 sc in the sps), plus 11 anchor sc. That gives 190 + 11 = 201 sc and 60 picots.)
Side Edging (work on each side, RS): With the RS facing, join yarn at the bottom corner. Ch 1, then work upward like this:
- 1 sc in the end of Border Row B
- 1 sc in the end of Border Row A
- 2 sc in the end of each odd body row (the sc edge rows, Rows 1, 3, … 127)
- 3 sc around the dc post at the end of each even body row (the half-fan rows, Rows 2, 4, … 126)
- 2 sc in the end of the Leveling Row
Stop at the base of the pocket. Fasten off.
Count per side: 1 + 1 + (64 odd rows x 2 = 128) + (63 even rows x 3 = 189) + 2 = 321 sc.
The pocket ends stay open and are not edged.
Why the math works: The body is 128 rows deep (127 pattern rows plus the Leveling Row), which is 80 in (203.2 cm). The side edging puts 319 sc into that 80 in. That is 3.99 sc per inch, which is very close to the body’s 4 sts per inch, so the sides hang straight without ruffling or pulling in. At the bottom, Row A uses the same 121 foundation ch, placing 10 fans and 11 sc exactly where Row 1 did. That means each scallop sits directly under a fan.
Final Blocking
- Weave in all ends along the side edging or the header, never across open spokes.
- Soak one panel in cool water with a little wool wash for 15 minutes. Press out the water. Do not wring.
- Roll the panel in towels to take out more water.
- Lay it flat on mats, a bed or a clean floor sheet. Work in sections if you need to.
- Pin the side edges straight to a width of 30.5 in (77.5 cm). Check the width every 12 in (30.5 cm).
- Smooth the length to 83 in (210.8 cm). Do not overstretch it, because hanging adds a little length.
- Pin each bottom scallop at its center dc and each picot at its tip.
- Open the fan spokes evenly with your fingers. Spray the panel lightly and let it dry completely.
- Repeat for the second panel, pinning it to the same measurements.
Final Quality-Control Checklist
- Each panel has 10 fans across in every full-fan row
- Rows 1 through 127 are all present, and Row 127 is a sc-edge row
- The Leveling Row and every header row have 141 sts
- The pocket seam runs straight and both ends are open
- The bottom has 10 scallops, 201 sc and 60 picots
- Each side has 321 sc
- Both panels measure 30.5 in x 83 in (77.5 cm x 210.8 cm)
- No ends show through the lace
Troubleshooting
- The fans lean or crowd together: Check that you skip 5 ch on each side of every fan in Row 1. One missed skip shifts every fan after it.
- You have the wrong number of fans in a row: Count the sc in the row below. Every fan row has as many full fans as there are sc beneath it, not counting the edge stitches.
- The sides wave: Your edging is too dense. Work 2 sc into the half-fan rows instead of 3.
- The sides pull in: Work 3 sc into the sc-edge rows instead of 2.
- The top flares: Your header hdc are too loose. Go down to a 3.25 mm hook for the header only.
- One panel is longer than the other: Block both panels at the same time, and pin the longer one slightly shorter.
Care
Hand wash cool or machine wash on a gentle cycle in a mesh bag, then dry flat. Rehang the panels while they are slightly damp so they settle straight.
Final Notes
Here is how the measurements build on each other. Each 12-st fan is 3 in (7.6 cm), so 10 fans make 30 in (76.2 cm). Each pair of rows is 1.25 in (3.2 cm), so 128 rows make 80 in (203.2 cm). The folded header adds 2 in (5.1 cm), the scallops add 1 in (2.5 cm), and the side edging adds 0.25 in (0.6 cm) to each side. Together, that gives a finished panel of 30.5 in x 83 in (77.5 cm x 210.8 cm).
Check your swatch, count your fans, and measure Panel B against Panel A. Then your pair will hang evenly at the window.
Happy crocheting!