

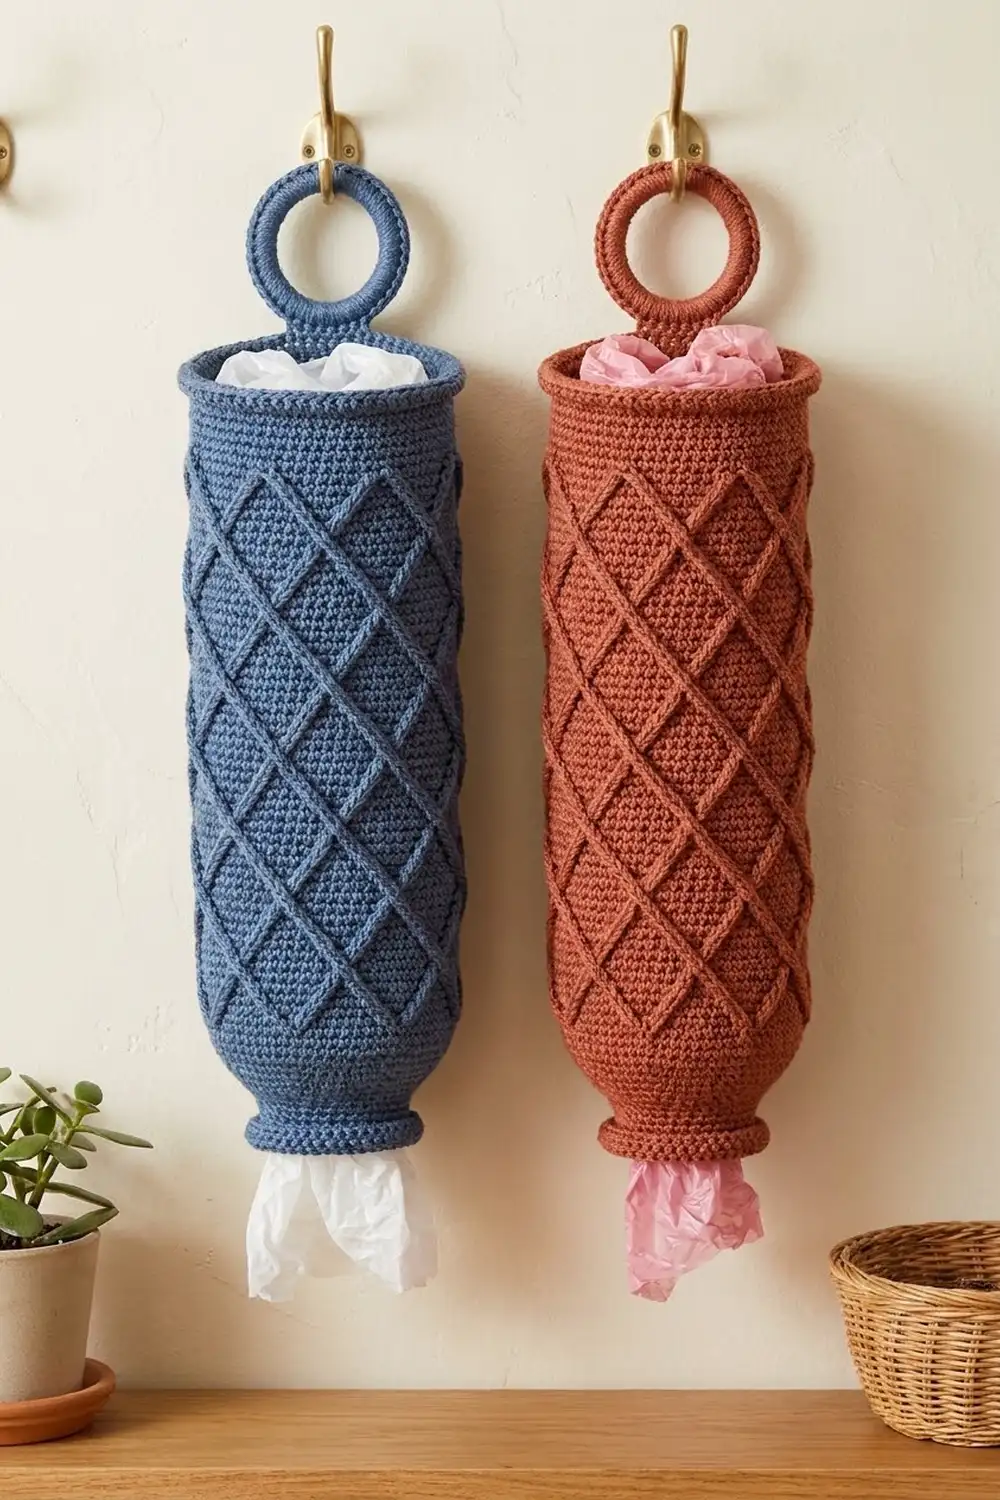
Plastic bags tend to spread through a kitchen drawer. This holder keeps them in one tidy column: you push bags in at the top and pull them out one at a time from the small opening at the bottom. The Lattice Larder is a single crocheted tube covered in a raised diamond lattice, and it hangs from a covered ring.
The samples are in denim blue and in warm rust. Any solid, medium-to-dark color shows the lattice well. Speckled and variegated yarns hide the raised lines, so save those for other projects. The style is tailored and slightly vintage, and it looks good next to wood, brass and woven baskets.
This pattern uses US crochet terms. The finished holder measures 16.5 in (41.9 cm) long including the edgings, 6.9 in (17.5 cm) wide when laid flat, and about 18 in (45.7 cm) long including the hanging ring.
You work the body in joined rounds from the bottom up. You start with the small dispensing opening, increase to full width, work the lattice in alternating post-stitch and single-crochet rounds, and finish with a plain top band. Then you add a rolled reverse single crochet edging to both openings, cover a ring with single crochet, and stitch the ring inside the back of the rim.
Finished Size and Construction
- Finished size: 16.5 in (41.9 cm) long × 6.9 in (17.5 cm) wide flat; 4.4 in (11.2 cm) diameter; about 18 in (45.7 cm) long including the ring
- Skill level: Intermediate (post stitches worked two rounds below)
- Terminology: US
- Yarn weight: Worsted (#4)
- Hook: 5.0 mm (H-8)
- Number of pieces: 1 tubular body + 1 covered ring
- Layout: Vertical tube; ring centered over the round seam at the back
- Body size before edging: 16 in (40.6 cm) long, 13.7 in (34.8 cm) around
- Edging depth: 0.25 in (0.6 cm) at each end
- Bottom opening: 3.4 in (8.6 cm) wide flat, about 2.2 in (5.6 cm) across
Materials
Yarn: Worsted-weight cotton or a cotton-acrylic blend, about 180 m per 100 g. Cotton gives the crispest lattice and holds its shape when the holder is full. Pure acrylic also works, but the tube will stretch a little more.
- Main color (one holder): 150 g / 270 m (295 yd). The samples are denim blue and rust.
You need only one color per holder. To make a matching pair like the photo, buy 150 g of each color.
Tools:
– 5.0 mm (H-8) crochet hook
– 1 metal, wooden or plastic ring, 2 in (5.1 cm) outer diameter
– 4 stitch markers (one locking marker for the start of the round)
– Tapestry needle
– Scissors
– Measuring tape
– Rust-proof pins and a cylindrical form for blocking (a rolled towel or a tall bottle about 4.4 in / 11.2 cm across)
The yarn amount includes a margin of about 15% for the gauge swatch, joins and tails.
Abbreviations (US Terms)
- ch – chain
- sl st – slip stitch
- sc – single crochet
- rev sc – reverse single crochet (crab stitch)
- FPtr – front post treble crochet
- st(s) – stitch(es)
- rnd(s) – round(s)
- yo – yarn over
Special stitches
FPtr (front post treble): Yo twice. Insert the hook from front to back to front around the post of the stitch named in the pattern, two rounds below. Yo and pull up a loop to the height of the current round. (Yo, pull through 2 loops) 3 times. Always skip the stitch of the current round that sits behind the FPtr, so the stitch count stays the same.
The pattern tells you which stitch each FPtr wraps around:
- FPtr-s (straight): around the stitch two rounds below, directly beneath the current stitch.
- FPtr-a (ahead): around the raised stitch two rounds below that sits 1 stitch ahead of the current stitch, in your working direction.
- FPtr-b (behind): around the raised stitch two rounds below that sits 1 stitch behind the current stitch.
Every FPtr moves one stitch sideways from the line it came from. That shift is what creates the diagonal lines.
Gauge and Checkpoints
Gauge: 14 sc and 16 rnds = 4 in (10.2 cm) in sc worked in the round.
Lattice gauge: one diamond = 8 sts wide and 12 rnds tall = 2.3 in (5.8 cm) wide × 3 in (7.6 cm) tall.
Use the body itself as your test piece. Work Rnds 1–9, then lay the tube flat and measure it before you continue:
- After Rnd 9: 6.9 in (17.5 cm) wide flat, 2.25 in (5.7 cm) tall
- After Rnd 23: 5.75 in (14.6 cm) tall
- After Rnd 35: 8.75 in (22.2 cm) tall
- After Rnd 47: 11.75 in (29.8 cm) tall
- After Rnd 59: 14.75 in (37.5 cm) tall
- After Rnd 64: 16 in (40.6 cm) tall
If your tube is too wide (more than 7.1 in / 18.0 cm flat), go down one hook size (4.5 mm) and start again. If it is too narrow (less than 6.6 in / 16.8 cm flat), go up to 5.5 mm. Don’t change the stitch count, because the lattice needs a multiple of 8 sts.
If the width is right but your height checkpoints run long or short, your row gauge is off. That’s fine. Work the lattice repeats as written and adjust only the plain top band by 1 rnd if needed.
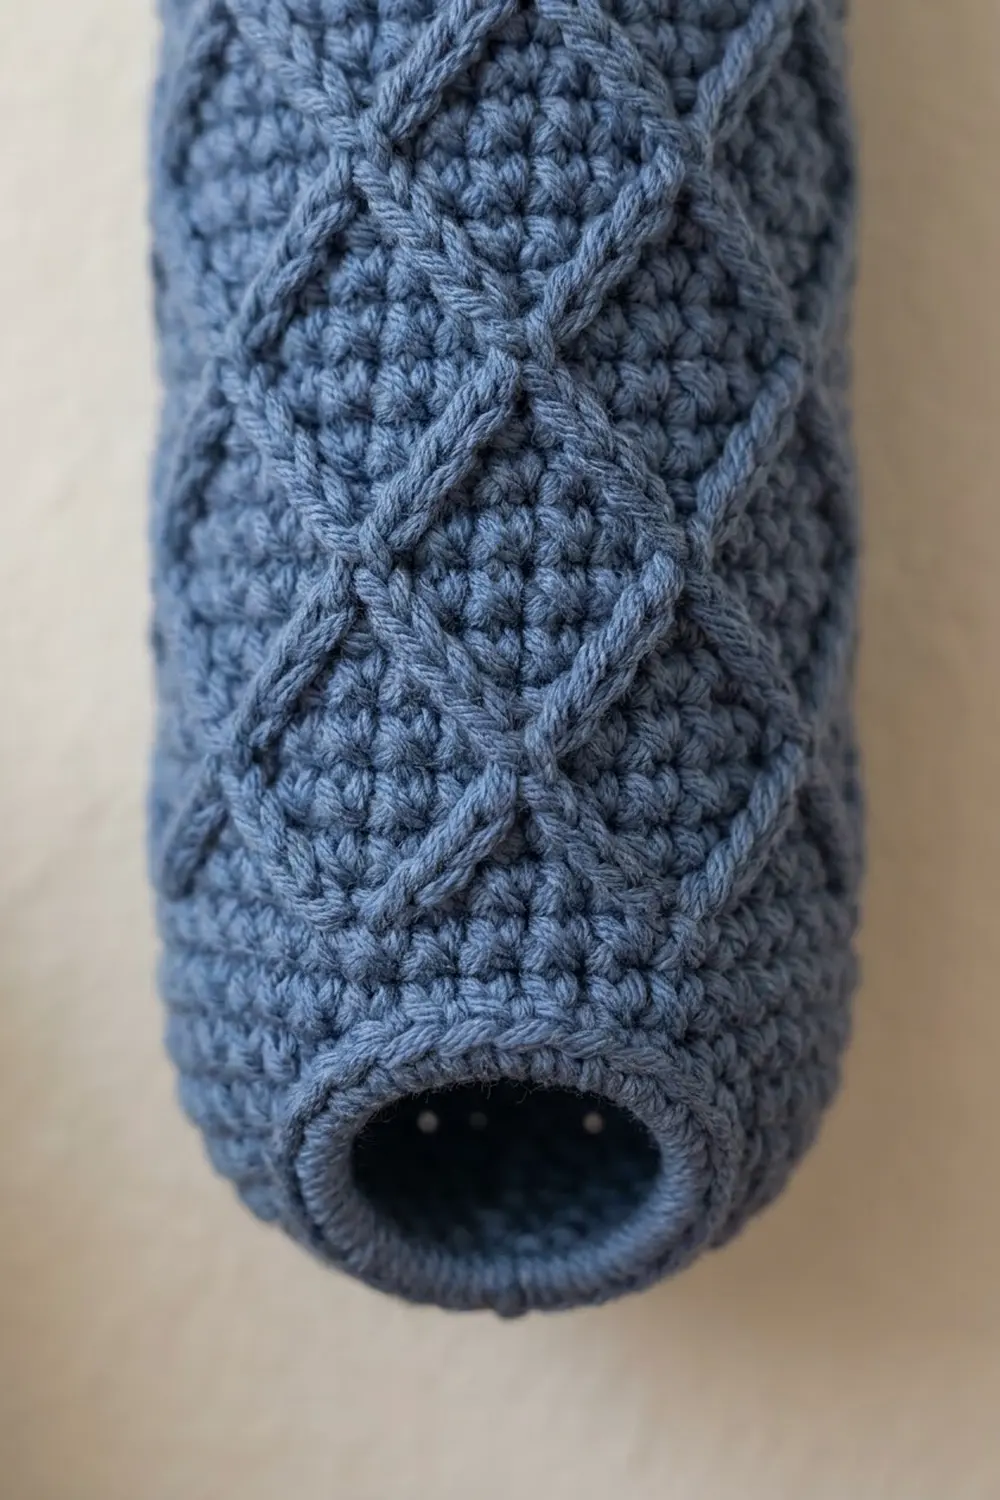
Body
Join every round with a sl st to the first st, and start every round with ch 1, which does not count as a stitch. Work the first st of each round into the same st as the join. Joined rounds keep the lattice lined up, and they put the seam in one straight line at the back, which the ring will cover.
Bottom Opening and Shaping
Foundation: Ch 24 and sl st into the first ch to form a ring. Don’t twist the chain.
Rnd 1: Ch 1, sc in each ch around, join. (24)
Rnd 2: Ch 1, sc in each st around, join. (24)
Rnd 3: Ch 1, sc in next 2 sts, 2 sc in next st; repeat from * 7 more times, join. (32)
Rnd 4: Ch 1, sc in each st around, join. (32)
Rnd 5: Ch 1, sc in next 3 sts, 2 sc in next st; repeat from * 7 more times, join. (40)
Rnd 6: Ch 1, sc in each st around, join. (40)
Rnd 7: Ch 1, sc in next 4 sts, 2 sc in next st; repeat from * 7 more times, join. (48)
Rnds 8–9: Ch 1, sc in each st around, join. (48)
Checkpoint: the tube is 6.9 in (17.5 cm) wide flat and 2.25 in (5.7 cm) tall. The bottom forms a gentle cone that narrows to the small opening.
Place markers after sts 8, 16, 24 and 32 if you find it helpful. Each 8-st section is one lattice repeat, and the round has 6 repeats.
Lattice
The lattice alternates two kinds of rounds:
- Even rounds are post rounds. Each 8-st repeat has 2 FPtr and 6 sc.
- Odd rounds are plain sc rounds. Work one sc into every stitch, including the tops of the FPtr.
Within each repeat, the two raised stitches move apart, meet the lines from the neighboring repeats, and then move back together. This forms the diamonds.
Rnd 10 (set-up post rnd): Ch 1, sc in next 3 sts, FPtr-s around each of next 2 sts, sc in next 3 sts; repeat from * around, join. (48: 36 sc + 12 FPtr)
Rnd 11: Ch 1, sc in each st around, join. (48)
Begin 12-round lattice repeat:
Rnd 12: Ch 1, sc in next 2 sts, FPtr-a, sc in next 2 sts, FPtr-b, sc in next 2 sts; repeat from * around, join. (48: 36 sc + 12 FPtr)
Rnd 13: Ch 1, sc in each st around, join. (48)
Rnd 14: Ch 1, sc in next st, FPtr-a, sc in next 4 sts, FPtr-b, sc in next st; repeat from * around, join. (48: 36 sc + 12 FPtr)
Rnd 15: Ch 1, sc in each st around, join. (48)
Rnd 16: Ch 1, FPtr-a, sc in next 6 sts, FPtr-b; repeat from * around, join. (48: 36 sc + 12 FPtr)
In Rnd 16, the last FPtr of one repeat sits right beside the first FPtr of the next, so neighboring diamonds touch here.
Rnd 17: Ch 1, sc in each st around, join. (48)
Rnd 18: Ch 1, sc in next st, FPtr-b, sc in next 4 sts, FPtr-a, sc in next st; repeat from * around, join. (48: 36 sc + 12 FPtr)
Rnd 19: Ch 1, sc in each st around, join. (48)
Rnd 20: Ch 1, sc in next 2 sts, FPtr-b, sc in next 2 sts, FPtr-a, sc in next 2 sts; repeat from * around, join. (48: 36 sc + 12 FPtr)
Rnd 21: Ch 1, sc in each st around, join. (48)
Rnd 22: Ch 1, sc in next 3 sts, FPtr-b, FPtr-a, sc in next 3 sts; repeat from * around, join. (48: 36 sc + 12 FPtr)
Rnd 23: Ch 1, sc in each st around, join. (48)
This completes one lattice repeat and the first full row of diamonds. Checkpoint: 5.75 in (14.6 cm) tall.
Rnds 24–35: Repeat Rnds 12–23. Checkpoint: 8.75 in (22.2 cm).
Rnds 36–47: Repeat Rnds 12–23. Checkpoint: 11.75 in (29.8 cm).
Rnds 48–59: Repeat Rnds 12–23. Checkpoint: 14.75 in (37.5 cm).
Rnd 58, the last post round, brings the lines back together in pairs. This closes the top row of diamonds with a point.
Top Band
Rnds 60–64: Ch 1, sc in each st around, join. (48)
Don’t fasten off. The top band is 1.25 in (3.2 cm) tall. Checkpoint: the body measures 16 in (40.6 cm) from the foundation to the top and 6.9 in (17.5 cm) wide flat.
Covered Ring
Join the yarn around the 2 in (5.1 cm) ring with a sl st. Ch 1, then work sc around the ring, pushing the stitches together as you go, until the ring is fully covered (about 36 sc for most 2 in rings). Use as many as you need for full coverage without the stitches twisting. Join with a sl st to the first sc. Fasten off and leave a 12 in (30.5 cm) tail for sewing.
The covered ring measures about 2.4 in (6.1 cm) across.
Border (Top and Bottom Edging)
Border gauge: 1 rev sc into each st, which keeps the edging the same length as the body.
Top Edging
Rnd 65: Continuing from Rnd 64, ch 1. Working from left to right (or right to left if you crochet left-handed), work 1 rev sc into each st around, then join. (48 worked 1-per-stitch + 0 added = 48)
Fasten off and weave in the end.
Bottom Edging
Turn the tube upside down. With RS facing, join the yarn with a sl st into any free loop of the foundation chain, at the back seam line.
Rnd 1: Ch 1, 1 rev sc into each free loop around, join. (24 worked 1-per-stitch + 0 added = 24)
Fasten off and weave in the end.
Why the math works: each opening keeps its own stitch count. The top rim has 48 sts and 48 rev sc. The bottom opening has 24 foundation loops and 24 rev sc. Because there are no added or skipped stitches, the edging lies flat and doesn’t flare or pull in. The bottom opening stays snug, so it holds bags back until you pull one out. Each edging adds about 0.25 in (0.6 cm), so the length goes from 16 in (40.6 cm) to 16.5 in (41.9 cm).
Attaching the Ring
Lay the tube flat with the join seam facing you, so the seam marks the center back. Center the covered ring over the 6 sts that straddle the seam, which are the last 3 sts of the round and the first 3 sts of the next.
Tuck the lower 0.5 in (1.3 cm) of the ring inside the rim. Using the ring tail, whipstitch the covered ring to the inside of Rnds 62–64 across those 6 sts. Go around twice for strength, keeping the stitches hidden on the inside. Weave in the tail.
Final Blocking
- Weave in all the remaining ends along the back seam line, on the inside.
- Wet the holder in cool water, gently squeeze it out (don’t wring it), and roll it in a towel.
- Slide it over a cylindrical form about 4.4 in (11.2 cm) across, such as a rolled towel or a tall bottle.
- Straighten the lattice so each diamond is centered and the diagonal lines run in clean, even slopes.
- Smooth both edgings and check that the bottom opening is round and about 2.2 in (5.6 cm) across.
- Pinch the raised lines lightly between your fingers so they stand out.
- Let it dry completely on the form, then check the final measurements: 16.5 in (41.9 cm) long and 6.9 in (17.5 cm) wide flat.
Final Quality-Control Checklist
- [ ] Every round has 48 sts from Rnd 7 to Rnd 65
- [ ] Every post round has 12 FPtr, with 2 in each 8-st repeat
- [ ] The diamonds line up in 6 vertical columns, with none skewed or doubled
- [ ] The lines from neighboring repeats touch at Rnds 16, 28, 40 and 52
- [ ] Pairs meet at the center of each repeat at Rnds 10, 22, 34, 46 and 58
- [ ] The bottom opening has 24 rev sc and lies flat
- [ ] The top rim has 48 rev sc and lies flat
- [ ] The ring is centered over the seam and firmly stitched inside the rim
- [ ] The body is 16 in (40.6 cm) long before edging and 16.5 in (41.9 cm) after
- [ ] All ends are woven in on the inside
Troubleshooting
The lattice lines drift diagonally around the tube. You probably skipped a join or added a stitch. Count each post round, and recheck that you skip the stitch behind every FPtr.
The FPtr pull the fabric up or pucker it. The post stitches are too short. Pull up the first loop to the full height of the current round before you finish the treble.
The FPtr look loose and loopy. Use a lighter tension on the sc rounds rather than tightening the trebles, or go down half a hook size just for the post stitches.
There are gaps behind the post stitches. Make sure you skip exactly one stitch behind each FPtr. Don’t skip two.
The bags fall out of the bottom. Your bottom edging is too loose. Redo it with a tighter tension, or work it with a 4.5 mm hook.
The ring tilts forward. Sew it deeper inside the rim, overlapping 0.75 in (1.9 cm), and add a third pass of whipstitch.
The tube twists. This is normal with joined rounds in some yarns. Blocking on a form corrects most of it.
Care
Hand wash in cool water and dry flat or on a cylindrical form. Shake out crumbs from the bottom opening now and then, and re-shape the holder while it’s damp if the lattice relaxes.
Final Notes
The measurements build on each other. Your gauge of 14 sc = 4 in (10.2 cm) gives 48 sts around, which makes 13.7 in (34.8 cm) around and 6.9 in (17.5 cm) wide flat. Six lattice repeats of 8 sts fit exactly into those 48 sts.
For the length, 9 shaping rounds, 50 lattice rounds and 5 band rounds make 64 rounds, or 16 in (40.6 cm). The two 1:1 edgings bring the length to 16.5 in (41.9 cm), and the covered ring brings the total hanging length to about 18 in (45.7 cm).
If you check the width after Rnd 9 and the height at each repeat, the finished holder will match. Make one in each kitchen color you like.
Happy crocheting!