
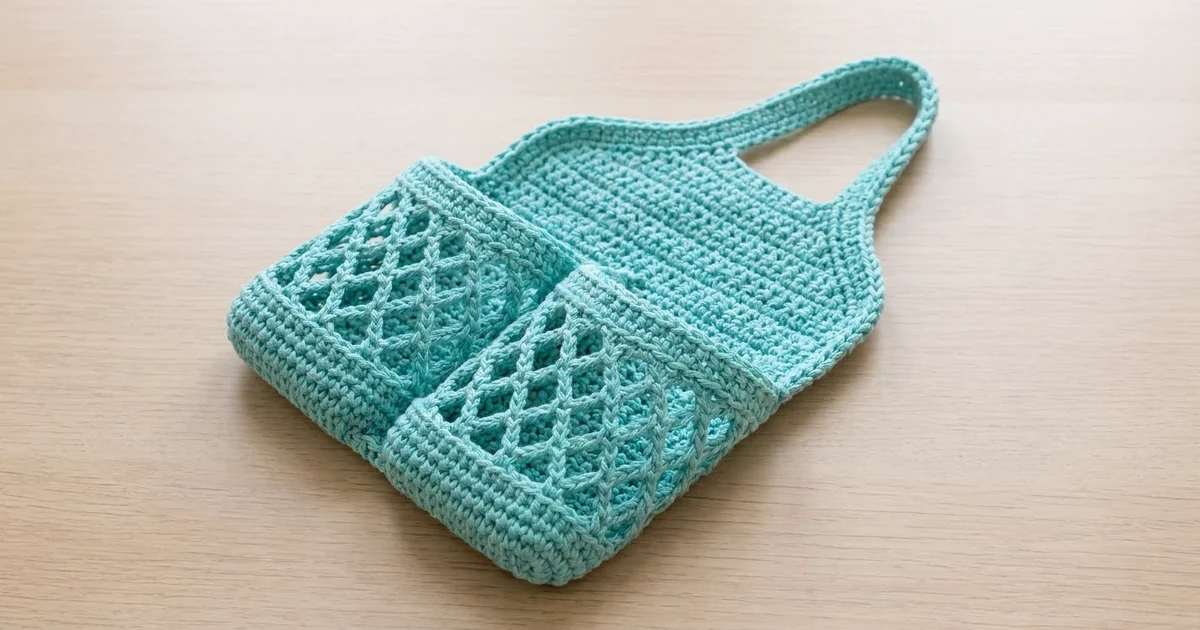
This hanging shower caddy has two roomy mesh pockets on a solid back panel, with one strap handle at the top. The diamond lattice lets water drain and air move through, so the pockets dry quickly. The solid bands at the base and rim keep the shape firm, even when the pockets hold full bottles.
The sample is in turquoise cotton, a fresh spa color that looks good against pale tile. It also works well in cream, sand or soft white. Pick one solid color so the lattice reads clearly. Variegated yarns tend to hide the diamond pattern.
This pattern uses US crochet terms. The finished caddy is 8 in (20.3 cm) wide and about 13.5 in (34.3 cm) tall from the bottom edge to the top of the handle. Each pocket is 5 in (12.7 cm) tall and holds a standard shampoo or conditioner bottle.
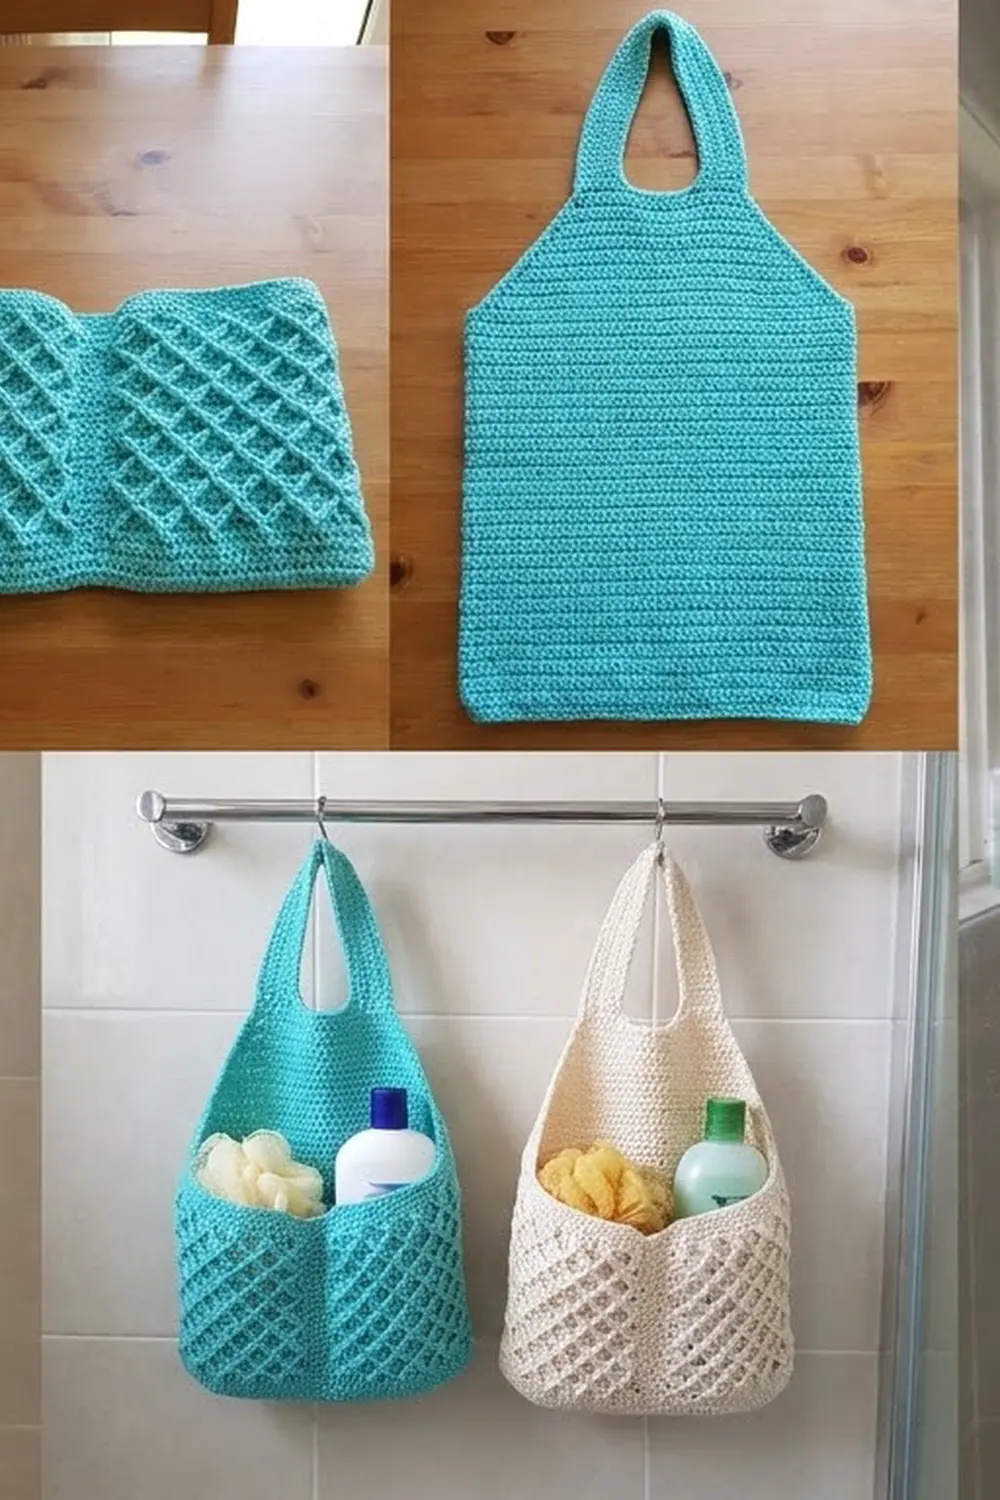
There are two parts. First you work the pocket unit in the round, starting from an oval base. Then you work the back panel flat in rows, with the shoulders and handle straps worked directly onto it. You sew the pocket unit to the panel and tack it at the center to make two pockets. To finish, a simple border goes around the panel and handle.
Finished Size and Construction
- Finished size: 8 in (20.3 cm) wide x 13.5 in (34.3 cm) tall
- Skill level: Easy-intermediate
- Terminology: US crochet terms
- Yarn weight: Worsted (#4) cotton
- Hook: US 7 (4.5 mm)
- Number of pieces: 2 (1 back panel, 1 pocket unit)
- Layout: Pocket unit centered on the lower panel and divided into 2 pockets
- Back panel body before border: 7.5 in (19.1 cm) wide x 8 in (20.3 cm) tall
- Pocket unit: 17 in (43.2 cm) around x 5 in (12.7 cm) tall
- Size before border: 7.5 in (19.1 cm) wide
- Border depth: about 1/4 in (0.6 cm) per side
Materials
Use a smooth, mercerized or plain worsted cotton. Cotton holds its shape when wet and doesn’t stretch out the way acrylic can under the weight of full bottles. Avoid fuzzy or loosely plied yarns, because they blur the lattice.
- Turquoise worsted cotton: 140 g, about 238 m (based on 85 m per 50 g)
- US 7 (4.5 mm) crochet hook
- Tapestry needle
- 4 locking stitch markers
- Rustproof pins
- Measuring tape
- Scissors
These quantities include a margin of about 20% for your gauge swatch and for sewing.
Abbreviations (US Terms)
- ch – chain
- sl st – slip stitch
- sc – single crochet
- dc – double crochet
- sc2tog – single crochet 2 together
- sk – skip
- BLO – back loop only
- st(s) – stitch(es)
- sp – space
- rnd – round
Special stitch – mesh loop closing (ch 2, dc): End a mesh round with ch 2, then dc in the first sc. Together these replace the final ch-5 loop and leave your hook at the center of that loop, ready for the next round.
Gauge and Checkpoints
Gauge: 16 sc x 18 rows = 4 in (10.2 cm) in sc worked flat.
That works out to 4 sc and 4.5 rows per inch. In the mesh, each ch-5 loop spans 4 base stitches, or 1 in (2.5 cm).
Make the pocket unit first. Its oval base will tell you quickly whether your gauge is right.
Checkpoints:
– After pocket Rnd 3: the oval measures about 7 in x 1.5 in (17.8 x 3.8 cm), and its outer edge is about 17 in (43.2 cm) around.
– After pocket Rnd 8: the solid bottom band is 1.1 in (2.8 cm) tall.
– After pocket Rnd 17: the mesh section is about 3 in (7.6 cm) tall.
– After pocket Rnd 21: the pocket unit is 5 in (12.7 cm) tall.
– After panel Row 36: the panel is 7.5 in (19.1 cm) wide x 8 in (20.3 cm) tall.
– After panel Row 44: the top edge is 3.5 in (8.9 cm) wide.
– Each strap is 1 in (2.5 cm) wide x 4.9 in (12.4 cm) long.
If your work is too big, go down one hook size. If it is too small, go up one hook size. Loose gauge makes the pockets saggy, so it is better to be slightly tight.
Pocket Unit
You work this in joined rounds. Start each round with ch 1, which doesn’t count as a stitch, and join each round with a sl st to the first st.
Oval Base
Ch 25.
Rnd 1: 2 sc in 2nd ch from hook, sc in next 22 ch, 4 sc in last ch. Rotate and work along the underside of the chain: sc in next 22 ch, 2 sc in the same ch as the first sts. Join. (52 sts)
Rnd 2: [2 sc in next st] 2 times, sc in next 22 sts, [2 sc in next st] 4 times, sc in next 22 sts, [2 sc in next st] 2 times. Join. (60 sts)
Rnd 3: [Sc in next st, 2 sc in next st] 2 times, sc in next 22 sts, [sc in next st, 2 sc in next st] 4 times, sc in next 22 sts, [sc in next st, 2 sc in next st] 2 times. Join. (68 sts)
Check: each end now has 12 sts and each straight side has 22 sts, so 12 + 22 + 12 + 22 = 68.
Solid Bottom Band
Rnd 4: Sc in BLO of each st around. Join. (68 sts) This turns the walls upward and leaves a neat ridge of front loops around the base.
Rnds 5–8: Sc in each st around. Join. (68 sts)
The walls now stand upright, like a low oval tray.
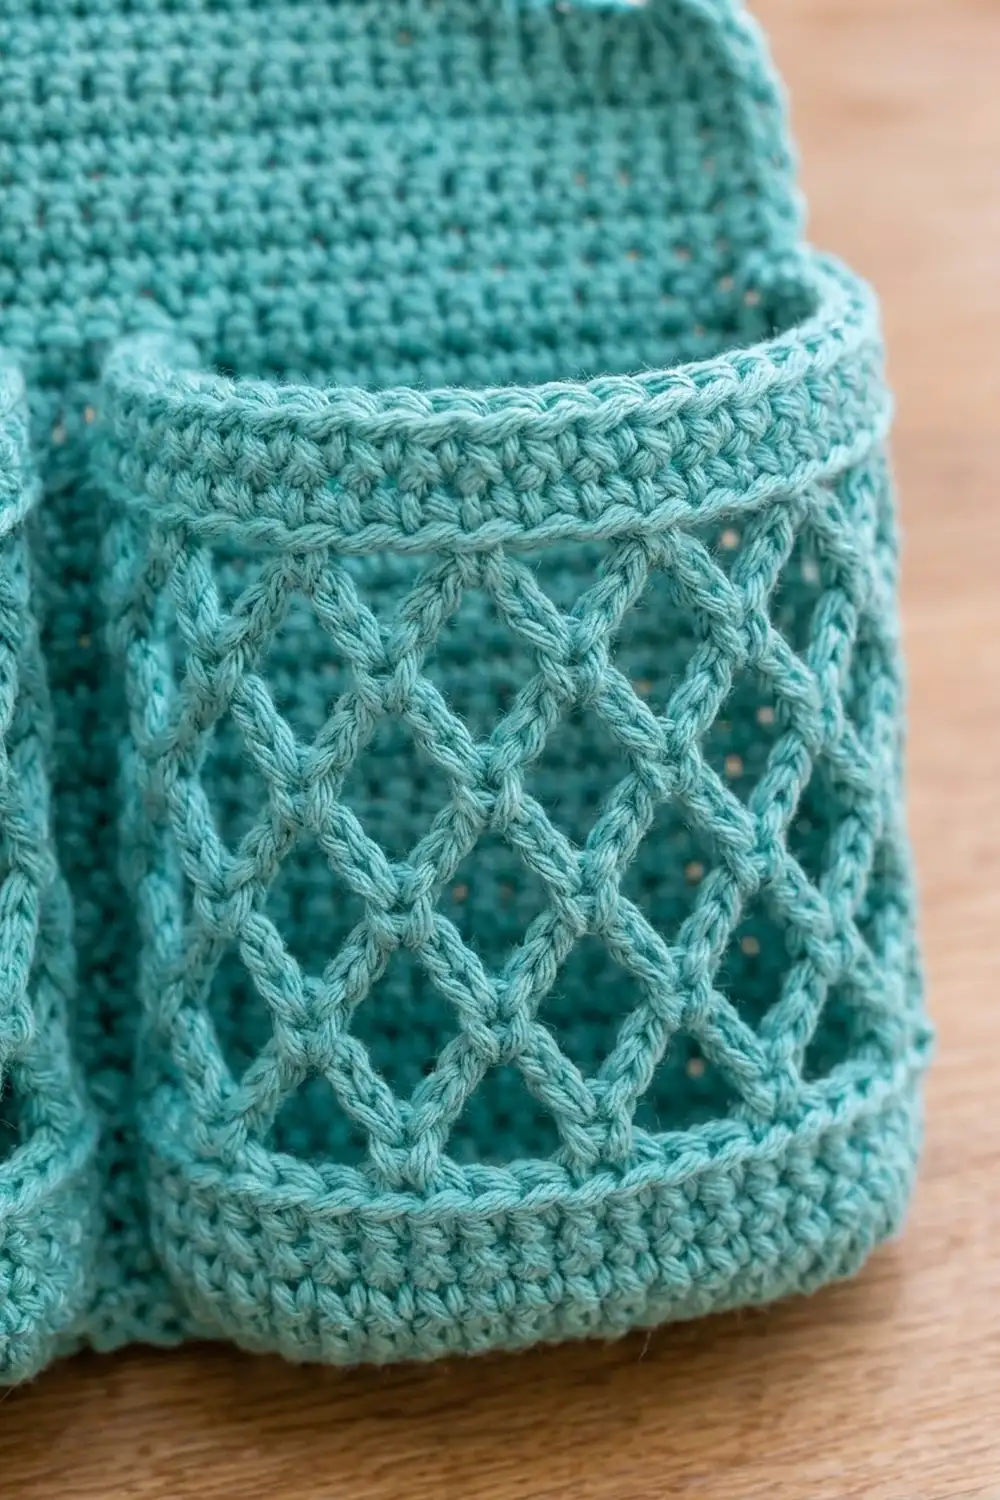
Lattice Mesh
Rnd 9: Sc in first st, [ch 5, sk 3, sc in next st] 16 times, sk 3, then ch 2, dc in first sc. (17 sc, 17 loops)
Check: 1 + 16 x 4 = 65 sts used, and the last 3 are skipped, which brings you back to 68.
Rnd 10: Sc around the post of the dc below, [ch 5, sc in next ch-5 loop] 16 times, ch 2, dc in first sc. (17 sc, 17 loops)
Rnds 11–16: Repeat Rnd 10. (17 sc, 17 loops)
Rnd 17: Sc around the post of the dc below, [ch 5, sc in next ch-5 loop] 16 times, ch 5, sl st in first sc. (17 sc, 17 loops)
Each round offsets the loops by half a repeat, which forms the diamond lattice.
Solid Rim Band
Rnd 18 (conversion): Sc in first sc, 3 sc in next ch-5 sp, [sc in next sc, 3 sc in next ch-5 sp] 16 times. Join. (17 sc + 51 sc = 68 sts)
Rnds 19–21: Sc in each st around. Join. (68 sts)
Fasten off, leaving a 12 in (30.5 cm) tail.
Mark the rim: In Rnd 21, sts 1–34 are the front and sts 35–68 are the back. Place markers in st 17 and st 51. These are the front and back centers.
Back Panel
Work the panel flat in rows. At the start of each row, ch 1 and turn. The ch 1 doesn’t count as a stitch.
Foundation: Ch 31.
Row 1: Sc in 2nd ch from hook and in each ch across. (30 sts)
Rows 2–36: Sc in each st across. (30 sts)
Checkpoint: 7.5 in (19.1 cm) x 8 in (20.3 cm).
Shoulder Shaping
Row 37: Sc2tog, sc in next 26 sts, sc2tog. (28 sts)
Rows 38–44: Sc2tog, sc across to the last 2 sts, sc2tog. Each row decreases by 2, so the counts are 26, 24, 22, 20, 18, 16, 14 sts.
The shoulders slope over 1.8 in (4.6 cm).
Handle Straps
First strap, Row 45: Sc in first 4 sts, turn, leaving the rest unworked. (4 sts)
Rows 46–66: Sc in each st across. (4 sts) Don’t fasten off yet.
Second strap: Sk the next 6 sts of Row 44. Join new yarn in the next st and work Rows 45–66 over the last 4 sts the same way. (4 sts)
Check: 4 + 6 + 4 = 14.
Close the handle: Bring the tops of the two straps together without twisting them. Hold the last rows together and sl st through both layers across the 4 sts. Fasten off.
The 6 skipped sts make a 1.5 in (3.8 cm) base for the teardrop handle opening.
Make All Pieces
- Pocket unit: 1, turquoise
- Back panel with handle: 1, turquoise
Layout, front view:
        [  handle  ]
      /  shoulders   \
[      back panel      ]
[ pocket A | pocket B  ]
Joining
Method: Whipstitch with the yarn tail or a new length of matching yarn.
- Lay the panel flat with the right side up. Center the pocket unit on it, back half (sts 35–68) down. The front loops of the base ridge from Rnd 4 should line up along panel Row 2.
- Base seam: Sew the 34 back-half front loops of Rnd 3 to the 30 sts of Row 2. Sew stitch to stitch, but take 2 pocket loops into 1 panel st 4 times, spread evenly, so 34 loops fit across 30 sts.
- Rim seam: Sew back-half sts 35–68 of Rnd 21 along panel Row 24, easing them in the same way: 30 panel sts, with 4 double catches.
- Divider: Pull front marker st 17 back to meet back marker st 51. Sew a vertical line from rim to base through the front wall, the back wall and the panel, between panel sts 15 and 16. Each pocket now has 34 sts around: 8.5 in (21.6 cm) around and about 2.7 in (6.9 cm) across.
Keep your tension snug but not pulled tight. The seams should lie flat without puckering the panel. Go over the divider line twice so it can carry the weight of full bottles.
Checkpoint: The pockets cover the panel from Row 2 to Row 24. That leaves about 3.25 in (8.3 cm) of solid panel showing above them.
Border
Border gauge: 4 sc per inch along the edges. Along the side edges, work 8 sc per 9 row ends.
Rnd 1 (outer edge): Join yarn at the bottom right corner. Work in this order:
– Bottom: 3 sc in the first foundation st, sc in the next 28 sts, 3 sc in the last st. (34 sts)
– Side: 32 sc evenly along the 36 row ends, skipping every 9th row end. (32 sts)
– Shoulder: 1 sc in each of the 8 row ends. (8 sts)
– Strap outer edge: 20 sc along the 22 row ends. (20 sts)
– Continue over the handle top, then repeat the side, shoulder and strap counts on the opposite side.
Join. Total: 34 + 2 x (32 + 8 + 20) = 154 sts
Rnd 2: Sl st in each st around. (154 sl sts) This firms the edge and stops it from rippling.
Inner handle edging: Join yarn at the bottom of one strap’s inner edge. Work 20 sc along the strap, 6 sc across the skipped sts and 20 sc along the other strap. (46 sts) Fasten off.
Why the math works: The bottom edge is 28 + 3 + 3 = 34, which is the 30 foundation sts + 4 extra corner sts. At 9 rows per 2 in, 36 rows make 8 in, and 32 sc at 4 per inch also make 8 in. That’s why the sides lie flat. The 1/4 in (0.6 cm) border on each side brings the width from 7.5 in (19.1 cm) to 8 in (20.3 cm).
Final Blocking
- Weave in all ends securely along the seams.
- Soak the caddy in cool water for 10 minutes.
- Gently squeeze out the water. Don’t wring it.
- Lay it flat and pin the panel to 8 in (20.3 cm) wide.
- Fill each pocket loosely with a rolled towel so the cylinders round out.
- Straighten the lattice diamonds with your fingers.
- Let it dry completely, then remove the pins.
Final Quality-Control Checklist
- [ ] Panel measures 8 in (20.3 cm) wide after the border.
- [ ] Total height is about 13.5 in (34.3 cm).
- [ ] Pockets are 5 in (12.7 cm) tall and equal in size.
- [ ] Lattice has 17 loops per round and no twisted rounds.
- [ ] Divider seam is straight and centered.
- [ ] Handle is untwisted and closed securely.
- [ ] All ends are woven in.
Troubleshooting
- The oval base cups: Your tension is too tight on the end increases. Loosen up, or go up a hook size for Rnds 1–3 only.
- The base ruffles: You have too many stitches. Recount the end increases on Rnds 2–3.
- The lattice leans or spirals: Make sure each round starts in the loop formed by the dc.
- The pockets bag outward: Your rim tension is loose. Redo Rnds 18–21 with a smaller hook.
- The handle stretches: Sl st a second time along both strap edges.
- The panel puckers at the seams: Re-sew those seams with looser stitches.
- The pockets are uneven: Unpick the divider and line it up again with the markers at st 17 and st 51.
Care
Hand wash in cool water and lay flat to dry. Empty the caddy now and then so it dries fully between uses.
Final Notes
Here is the measurement chain to check against. The gauge of 16 sc = 4 in (10.2 cm) gives a 68-st pocket that is 17 in (43.2 cm) around and 5 in (12.7 cm) tall. The 30-st panel is 7.5 in (19.1 cm) wide, and the border brings it to 8 in (20.3 cm). Shoulders, straps and handle bring the total height to 13.5 in (34.3 cm). If you check each step as you go, the finished caddy will come out the right size.
Happy crocheting!