

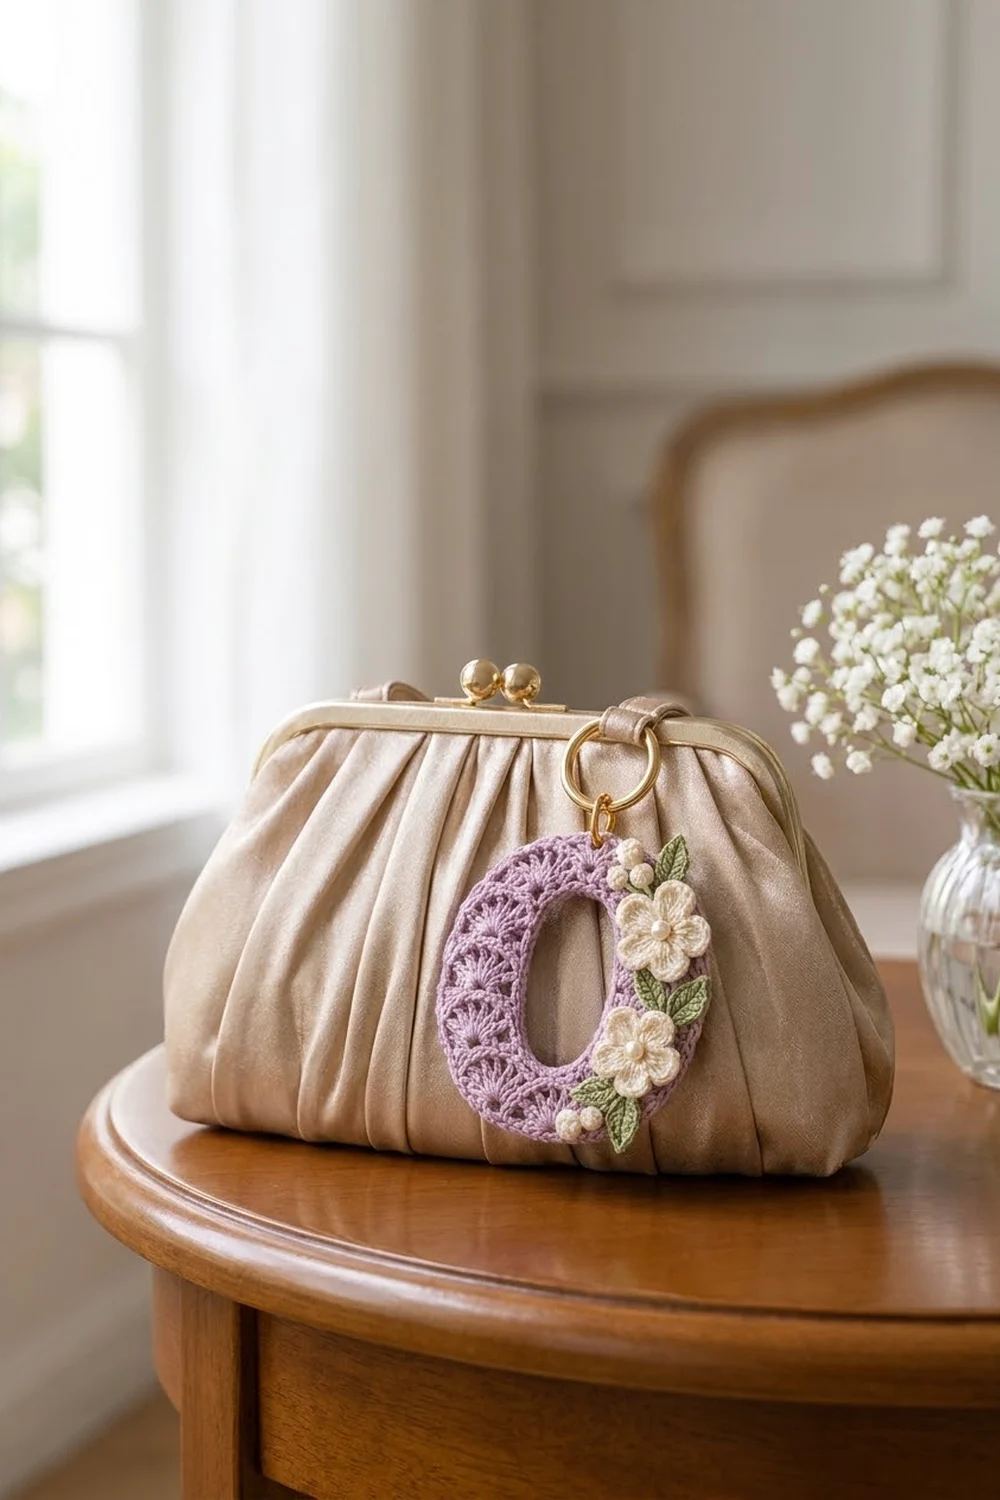
This Lavender Blossom Letter O is a small, textured bag charm with a soft vintage look. The oval letter is covered in staggered shell fans that look like fish scales, and the edges are finished with a neat rope. A spray of cream flowers, green leaves and tiny bobble berries runs down the right side.
The palette is lavender for the letter, cream for the flowers and berries, and sage green for the leaves. Pearl beads in the flower centers and gold hardware make it look dressy enough for a clutch, a keyring or a gift.
The pattern uses US crochet terms. The finished charm is 3.25 in (8.3 cm) wide and 4.5 in (11.4 cm) tall, not counting the hardware.
You start the letter from a chain ring that forms the center opening. Then you work outward in rounds: a single crochet round, a double crochet increase round, three shell rounds and a two-round edging. The flowers, leaves and berries are made separately and sewn on, and the hardware is added last.
Finished Size and Construction
- Finished size: 3.25 in x 4.5 in (8.3 cm x 11.4 cm)
- Center opening: 1.25 in x 2.5 in (3.2 cm x 6.4 cm)
- Skill level: Intermediate
- Terminology: US
- Yarn weight: #1 super fine (fingering) cotton
- Hook: 2.25 mm (B-1)
- Number of pieces: 1 letter base, plus 2 flowers, 3 leaves and 5 berries sewn on as appliqués
- Layout: a single oval letter, with the appliqués placed down its right side
- Piece size before border: 3.0 in x 4.25 in (7.6 cm x 10.8 cm)
- Border depth: 0.125 in (0.3 cm) on each edge
Materials
Use a smooth mercerized cotton. It shows the shell texture clearly and holds its shape on a charm that gets handled a lot. Avoid fuzzy yarns, because they hide the fans.
- Lavender (letter): 10 g / 34 m
- Cream (flowers and berries): 4 g / 14 m
- Sage green (leaves): 3 g / 10 m
Tools and notions:
- 2.25 mm (B-1) crochet hook
- Tapestry needle and a fine sewing needle
- 2 cream or ivory pearl beads, 6 mm (0.25 in / 0.6 cm)
- 1 gold split ring or O-ring, 20 mm (0.8 in / 2.0 cm)
- 1 gold jump ring, 6 mm, and 2 pairs of flat-nose pliers
- Stitch markers (4)
- Blocking mat, rust-proof pins and a spray bottle
- A pinch of fiberfill or yarn scraps for the berries
All yarn amounts include a safety margin of about 20%.
Abbreviations (US Terms)
- ch – chain
- sl st – slip stitch
- sc – single crochet
- hdc – half double crochet
- dc – double crochet
- BL – back loop only
- st(s) – stitch(es)
- sk – skip
- yo – yarn over
Special stitches
- Shell: 5 dc in the same st.
- Large shell: 7 dc in the same st.
- Bobble: (yo, insert hook in the st, yo, pull up a loop, yo, pull through 2 loops) 4 times in the same st, yo, pull through all 5 loops on the hook.
Gauge and Checkpoints
Gauge is 28 sc and 32 rows = 4 in (10.2 cm), which works out to 7 sc per 1 in (2.5 cm). In the shell rounds, one shell-plus-sc repeat is about 0.75 in (1.9 cm) wide.
Make the letter base before any appliqués. It sets the size of everything else.
Measure the piece flat after each stage:
| Stage | Outer size |
|---|---|
| After Rnd 1 | 1.75 x 3.0 in (4.4 x 7.6 cm) |
| After Rnd 2 | 2.25 x 3.5 in (5.7 x 8.9 cm) |
| After Rnd 3 | 2.5 x 3.75 in (6.4 x 9.5 cm) |
| After Rnd 4 | 2.75 x 4.0 in (7.0 x 10.2 cm) |
| After Rnd 5 | 3.0 x 4.25 in (7.6 x 10.8 cm) |
| After Rnd 7 | 3.25 x 4.5 in (8.3 x 11.4 cm) |
Rnd 2 adds about 0.25 in (0.6 cm) on each edge. Each shell round adds only about 0.125 in (0.3 cm) on each edge, because the new fans nestle into the dips of the round below.
- If the piece is more than 0.25 in (0.6 cm) too big after Rnd 3: start again with a 2.0 mm hook.
- If it is too small: start again with a 2.5 mm hook.
- If it ruffles: your dc are too loose for the shells. Go down a hook size.
- If it cups: go up a hook size.

Letter Base
Use lavender. Do not turn at the end of any round.
Foundation: Ch 56. Sl st in the first ch to form a ring, making sure the chain is not twisted.
Rnd 1: Ch 1. Sc in each ch around. Join with a sl st to the first sc. (56 sts)
Flatten the ring into an upright oval with the join at the bottom center. Then place markers to divide it into four zones, counting from the join:
- Sts 1–6: right half of the bottom end
- Sts 7–22: right side (16 sts)
- Sts 23–34: top end (12 sts)
- Sts 35–50: left side (16 sts)
- Sts 51–56: left half of the bottom end
Rnd 2: Ch 3 (counts as a dc throughout).
- Bottom right: dc in the same st, 2 dc in the next st, dc in the next st. Then 2 dc in the next st, 2 dc in the next st, dc in the next st once. (10 sts)
- Right side: dc in each of the next 16 sts. (16 sts)
- Top end: 2 dc in the next st, 2 dc in the next st, dc in the next st 4 times. (20 sts)
- Left side: dc in each of the next 16 sts. (16 sts)
- Bottom left: 2 dc in the next st, 2 dc in the next st, dc in the next st twice. (10 sts)
Join to the top of the ch-3. (72 sts: 20 at the bottom, 16 per side, 20 at the top)
All 16 increases are on the two curved ends. That keeps the long sides straight and the opening a true oval.
Rnd 3: Ch 1, sc in the same st. Sk 2, shell in the next st, sk 2, sc in the next st. Repeat from * 11 more times, but leave out the final sc on the last repeat. Join to the first sc. (72 sts: 12 shells of 5 dc + 12 sc)
Label the sc of Rnd 3 as sc #1 to sc #12. Sc #1 is at the bottom center and sc #7 is at the top center.
Rnd 4: Ch 3, 6 dc in the same sc. This is shell A1, a large shell worked into sc #1. Then work around in this order, always working the sc into the center (3rd) dc of the next Rnd 3 shell:
- sc, large shell in sc #2 (A2)
- sc, shell in each of sc #3, #4 and #5 (A3–A5), with a sc between each
- sc, large shell in each of sc #6, #7 and #8 (A6–A8), with a sc between each
- sc, shell in each of sc #9, #10 and #11 (A9–A11), with a sc between each
- sc, large shell in sc #12 (A12), then a final sc
Join to the top of the ch-3. (84 sts: 6 large shells (42 dc) + 6 shells (30 dc) + 12 sc)
The large shells sit at the two curved ends, three at the bottom and three at the top. The 4 sc between the shells at each end form a valley. Label the sc of Rnd 4 as b1 to b12, where b1 follows A1.
Rnd 5: Sl st in each of the next 3 dc. You are now in the center (4th) dc of A1. Ch 1 and sc in the same st. Then work this sequence around:
- large shell in b1, sc in the center dc of A2, large shell in b2, sc in the center of A3
- shell in b3, sc in the center of A4, shell in b4, sc in the center of A5
- large shell in each of b5, b6, b7 and b8, with a sc in the center dc of each Rnd 4 shell between them
- shell in b9, sc, shell in b10, sc
- large shell in b11, sc, large shell in b12
Join to the first sc. (88 sts: 8 large shells (56 dc) + 4 shells (20 dc) + 12 sc)
This round has 31 sts on the bottom end (4 large shells + 3 sc), 13 sts on each side (2 shells + 3 sc), and 31 sts on the top end. That is 31 + 13 + 31 + 13 = 88. The fans are now staggered in a scale pattern, and the piece should measure 3.0 x 4.25 in (7.6 x 10.8 cm).
Flowers (Make 2, Cream)
Rnd 1: Ch 4 and join with a sl st into a ring. Ch 1, work 10 sc in the ring, join. (10 sts)
Rnd 2: (Hdc, 2 dc, hdc) in the next st, sl st in the next st. Repeat from * 4 more times. (5 petals, 25 sts)
Fasten off and leave a 10 in (25.4 cm) tail. Each flower is about 1 in (2.5 cm) across. Sew a 6 mm pearl bead into the center of each one.
Leaves (Make 3, Sage Green)
Ch 8.
- First side: Starting in the 2nd ch from the hook, sl st, sc in the next ch, hdc in the next ch, dc in each of the next 2 ch, hdc in the next ch, sc in the last ch. (7 sts)
- Tip: Ch 2, sl st in the 2nd ch from the hook to make a picot.
- Second side: Working along the other side of the foundation chain, sc, hdc, dc in each of the next 2 ch, hdc, sc, sl st in the last ch. (7 sts)
Fasten off and leave a tail. Each leaf is 0.75 in (1.9 cm) long. The line where the two sides meet forms the center vein.
Berries (Make 5, Cream)
Ch 3. Work a bobble in the 3rd ch from the hook, then ch 1 to close it. Fasten off and leave a 6 in (15.2 cm) tail.
Push a tiny pinch of fiberfill into the back of the bobble. Then run the tail around the base and pull it snug to round the berry off. Each berry is about 0.25 in (0.6 cm) across.
Border
Use lavender. The border gauge is the same as the main gauge: 7 sc per 1 in (2.5 cm), which eases to about 7.5 sc per inch around the curved ends.
Rnd 6: Join the yarn in the bottom-center sc of Rnd 5. Ch 1 and sc in each st around. Also work 2 sc in the center (4th) dc of each of the 4 end-center large shells: b12 and b1 at the bottom, and b6 and b7 at the top. Join.
Count for Rnd 6: 88 sts worked one-per-st + 4 extra sc = 92 sts. That is 33 on the bottom end, 13 on each side and 33 on the top end.
Rnd 7: Ch 1. Sl st loosely in the BL of each sc around. Join and fasten off. (92 sl sts: 33 / 13 / 33 / 13)
Inner edge: Join lavender in any free loop of the foundation chain. Sl st loosely in each free loop around, keeping the edge on the front so it shows as a rope. (56 sl sts)
Why the math works: On the straight sides, the 13 sts are worked one into each existing st, so the sides stay flat. Each curved end gets 2 extra sts. That eases the outer edge around the extra curve without flaring. The two edge rounds add 0.125 in (0.3 cm) on each edge, which takes the piece from 3.0 x 4.25 in to 3.25 x 4.5 in (7.6 x 10.8 cm to 8.3 x 11.4 cm).
Appliqué Placement and Hardware
Pin the appliqués to the right side of the letter, working from the top down:
- 3 berries at the upper right
- 1 leaf just below them
- Flower 1, overlapping the leaf tip
- 1 leaf angled outward to the right
- Flower 2 on the lower right
- 1 leaf below Flower 2, angled toward the lower left
- 2 berries at the bottom right
Whipstitch each piece in place around its edge with matching tails, sewing only through the top loops of the letter. Weave in all ends on the back.
Open the jump ring by twisting it sideways with the pliers. Pass it through Rnds 5–7 at the top center, add the split ring and close the jump ring.
Final Blocking
- Remove the hardware if it is already attached.
- Pin the letter face up to 3.25 x 4.5 in (8.3 x 11.4 cm) on the mat. Put one pin at the top center, one at the bottom center and three along each side.
- Shape the opening to 1.25 x 2.5 in (3.2 x 6.4 cm).
- Mist the piece until it is damp, but not soaked. Avoid soaking the pearls.
- Gently press the fans flat with your fingertips.
- Let it dry completely, for at least 6 hours.
- Unpin it and fluff the flower petals.
- Reattach the hardware.
Final Quality-Control Checklist
- [ ] The letter measures 3.25 x 4.5 in (8.3 x 11.4 cm).
- [ ] The opening is a smooth oval, not pointed at the ends.
- [ ] The Rnd 5 count is 88 and the Rnd 6 count is 92.
- [ ] The fans are staggered evenly, with no doubled shells.
- [ ] The rope edges are smooth on both the inner and outer edges.
- [ ] Both flowers have 5 even petals and a secure pearl.
- [ ] All the appliqués are sewn down with no gaps at the edges.
- [ ] The jump ring is fully closed and the ring hangs straight.
- [ ] All ends are woven in on the back.
Troubleshooting
- The opening is twisted: The foundation ring was twisted before you joined it. Restart Rnd 1.
- The ends come out pointed: The increases in Rnd 2 bunched together. Keep the “2 dc, 2 dc, dc” pattern even across each end.
- The sides ripple: Make sure you worked 5-dc shells, not large shells, at A3–A5 and A9–A11.
- The shell count is off: Count the sc, not the dc. There must be 12 in every shell round.
- The edge cups: Work Rnd 7 more loosely, or use a hook one size larger for that round only.
- The flowers droop: Tack each petal tip down with one small stitch.
Care
Hand wash in cool water, press out the water in a towel and dry flat. Keep pearls and metal rings away from bleach.
Final Notes
The measurement chain is simple. A 56-st foundation ring makes a 1.25 x 2.5 in (3.2 x 6.4 cm) opening. Rnd 2 grows the piece to 72 sts, and the shell rounds take it to 84 and then 88 sts and 3.0 x 4.25 in (7.6 x 10.8 cm). The 92-st border brings it to the final 3.25 x 4.5 in (8.3 x 11.4 cm). Check each stage against the table and the letter will finish true.
Happy crocheting!