

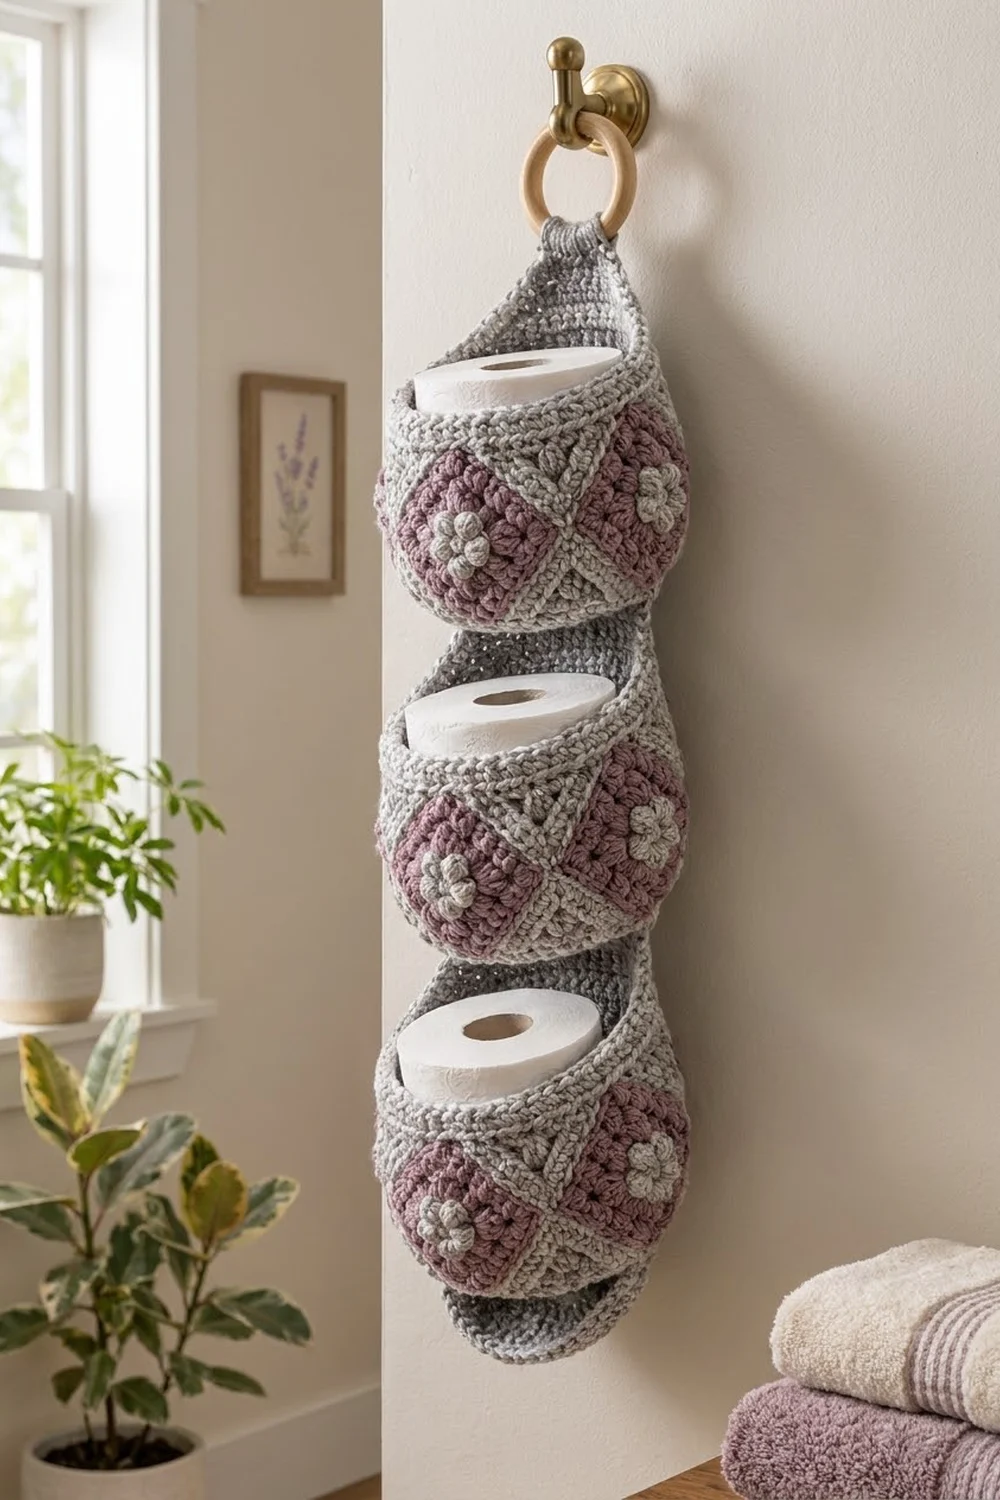
This hanging holder has three round, bowl-shaped baskets stacked on top of each other. Each one holds a standard toilet roll. The baskets are covered in dusty mauve diamonds, each with a small light gray bobble flower in the middle. Gray triangles fill the space between the diamonds, and soft gray rims, flat bases, and a back spine finish it off. At the top, a gray triangular tab hangs from a natural wooden ring.
The palette is just two colors: light heather gray and dusty mauve. The result looks calm, a little vintage, and suits a bathroom with lavender or neutral decor. The pattern uses US crochet terms throughout.
Each basket is about 7 in (17.8 cm) across at its widest and about 5.75 in (14.6 cm) tall. From the bottom of the lowest basket to the top of the fabric loop, the holder measures about 21.8 in (55.4 cm), not counting the ring.
Here’s how it goes together. You make fifteen square-in-a-square motifs, each a mauve granny diamond framed by gray corner triangles. Five motifs are joined into a ring for each basket. Then you add a tapered bottom trim, a flat round base, and a tapered rim. Last, all three baskets are sewn onto one gray spine that ends in the hanging tab.
Finished Size and Construction
- Finished size: about 7 in (17.8 cm) wide x 21.8 in (55.4 cm) long, plus the ring
- Skill level: Intermediate
- Terminology: US
- Yarn weight: DK (#3), cotton or cotton blend
- Hook: 4.0 mm (G-6)
- Number of pieces: 15 motifs, 3 bases, 1 spine with tab (19 pieces)
- Layout: 3 baskets stacked vertically, 5 motifs around each basket
- Motif size: 4.5 in (11.4 cm) square, 21 sts per side including corners
- Motif before edging round: about 4.25 in (10.8 cm) square
- Rim depth: 5 rounds, about 1 in (2.5 cm)
- Base: 84 sts, about 6 in (15.2 cm) across
Materials
Pick a smooth DK cotton or cotton-acrylic blend. Cotton holds its shape well, so the baskets stay upright and don’t sag. Avoid fluffy yarns, because they hide the diamond outlines.
- Color A – Dusty Mauve: 75 g, about 170 m
- Color B – Light Heather Gray: 230 g, about 520 m
- 4.0 mm (G-6) crochet hook
- Wooden ring, 2.5 in (6.4 cm) diameter
- Tapestry needle
- Scissors
- Stitch markers (at least 6)
- Pins and a blocking mat
- Spray bottle
All quantities include a safety margin of about 15 percent.
Abbreviations (US Terms)
- ch – chain
- sl st – slip stitch
- sc – single crochet
- dc – double crochet
- sc2tog – single crochet 2 together
- sc3tog – single crochet 3 together
- MR – magic ring
- sp(s) – space(s)
- st(s) – stitch(es)
- RS / WS – right side / wrong side
Special stitches:
- Bobble: (yarn over, insert hook, pull up a loop, yarn over, pull through 2 loops) 3 times in the same place, then yarn over and pull through all 4 loops on hook.
- Beginning bobble (beg bobble): ch 2, then work the bobble with only 2 repeats instead of 3.
Gauge and Checkpoints
Gauge: 18 sc and 20 rows = 4 in (10.2 cm) in sc worked in rows.
Make one complete motif and block it before you make the other fourteen. Then measure it at each stage:
- After Rnd 1: the flower is about 1.25 in (3.2 cm) across.
- After Rnd 4: the gray-framed diamond is 3 in (7.6 cm) square.
- After the four triangles: the motif is about 4.25 in (10.8 cm) square.
- After the edging round: the motif is 4.5 in (11.4 cm) square.
If your motif is too big: go down to a 3.75 mm hook. If it is too small: go up to a 4.5 mm hook. Being off by a quarter inch per motif turns into 1.25 in (3.2 cm) around each basket, so fix the size before you go any further.

Motif (Make 15)
Center Flower and Diamond
Rnd 1 (B): MR, beg bobble, ch 1, (bobble, ch 1) 7 times; join with sl st to top of beg bobble. (8 bobbles, 8 ch-1 sps) Fasten off B.
Rnd 2 (A): Join A in any ch-1 sp. Ch 3 (counts as dc), 2 dc in same sp, ch 2, 3 dc in next ch-1 sp, ch 1, 3 dc in next ch-1 sp, ch 2; repeat from * 2 more times, 3 dc in next ch-1 sp, ch 1; join to top of ch-3. (24 dc: 8 groups of 3, 4 ch-2 corner sps, 4 ch-1 side sps)*
Rnd 3 (A): Sl st across to the next ch-2 corner sp. Ch 3 (counts as dc), (2 dc, ch 2, 3 dc) in same sp, 3 dc in next ch-1 sp, (3 dc, ch 2, 3 dc) in next corner sp; repeat from * 2 more times, 3 dc in last ch-1 sp; join. (36 dc: 9 dc per side, 4 ch-2 corner sps)* Fasten off A.
Rnd 4 (B): Join B in any corner sp. (Sc, ch 2, sc) in corner sp, sc in each of the next 9 dc; repeat from * 3 more times; join. (44 sc: 11 sc per side between corner sps, plus 4 ch-2 corner sps)*
Checkpoint: 3 in (7.6 cm) square. Do not fasten off.
Corner Triangles
The four gray triangles turn the mauve square into a diamond set on point. Each triangle’s point becomes one corner of the finished square.
Triangle Row 1: Sl st into the next ch-2 corner sp, ch 1, sc in corner sp, sc in each of the next 11 sc, sc in next corner sp, turn. (13 sc)
Row 2: Ch 1, sc2tog, sc in next 9 sts, sc2tog, turn. (11 sc)
Row 3: Ch 1, sc2tog, sc in next 7 sts, sc2tog, turn. (9 sc)
Row 4: Ch 1, sc2tog, sc in next 5 sts, sc2tog, turn. (7 sc)
Row 5: Ch 1, sc2tog, sc in next 3 sts, sc2tog, turn. (5 sc)
Row 6: Ch 1, sc2tog, sc in next st, sc2tog, turn. (3 sc)
Row 7: Ch 1, sc3tog. (1 st, the apex) Fasten off.
Make the other three triangles the same way. Join B into the corner sp where the last triangle ended, so neighboring triangles share each corner sp. Each corner sp ends up holding 2 sc, one from each triangle.
Checkpoint: about 4.25 in (10.8 cm) square.
Edging Round
Rnd 5 (B): Join B in any apex. *3 sc in apex. Along the triangle edge, work 8 sc across the 6 row-ends (1 sc in each row-end, plus 1 extra in the 2nd and 5th row-ends). Sc in the shared corner sp at the bottom of the valley. Work 8 sc across the 6 row-ends of the next triangle the same way. Repeat from * 3 more times; join.
Count per side between corner center sts: 1 + 8 + 1 + 8 + 1 = 19. Add both corner center sts and you get 21 per side, including corners. Total: 4 x 19 + 4 corners = 80 sc.
Checkpoint: 4.5 in (11.4 cm) square. Fasten off and weave in ends.
Make All Pieces
- Motifs: 15 total (5 per basket). Each uses A for Rnds 2–3 and B for everything else.
- Bases: 3, all in B.
- Spine with tab: 1, in B.
Layout (each row below is one basket, seen flat; the last motif joins back to the first to close the ring):
Top basket:     [M][M][M][M][M] -> back to first M
Middle basket:  [M][M][M][M][M] -> back to first M
Bottom basket:  [M][M][M][M][M] -> back to first M
All three baskets are attached to one vertical spine at the back.
Base (Make 3)
Use B and work in continuous rounds. Mark the first st of each round.
Rnd 1: 6 sc in MR. (6)
Rnd 2: 2 sc in each st. (12)
Rnd 3: (sc 1, 2 sc in next) 6 times. (18)
Rnds 4–14: Keep increasing 6 sts evenly in each round, with one more sc between increases than the round before. Each round’s total is 6 times its round number: Rnd 4 = 24, Rnd 5 = 30, Rnd 6 = 36, Rnd 7 = 42, Rnd 8 = 48, Rnd 9 = 54, Rnd 10 = 60, Rnd 11 = 66, Rnd 12 = 72, Rnd 13 = 78, Rnd 14 = 84.
Stagger the increases so the base stays round instead of turning hexagonal. Checkpoint: about 6 in (15.2 cm) across, lying flat. Fasten off and leave a long tail.
Spine with Tab (Make 1)
Use B. Ch 11.
Row 1: Sc in 2nd ch from hook and in each ch across, turn. (10 sc)
Rows 2–97: Ch 1, sc in each st, turn. (10 sc)
Checkpoint: about 19.4 in (49.3 cm) long.
Row 98: Ch 1, sc2tog, sc in next 6, sc2tog, turn. (8)
Row 99: Ch 1, sc in each st, turn. (8)
Row 100: Ch 1, sc2tog, sc in next 4, sc2tog, turn. (6)
Row 101: Ch 1, sc in each st, turn. (6)
Row 102: Ch 1, sc2tog, sc in next 2, sc2tog, turn. (4)
Rows 103–116: Ch 1, sc in each st, turn. (4)
The triangle part is about 1 in (2.5 cm) tall, and the strap is about 2.8 in (7.1 cm) long. Fasten off and leave a long tail.
Joining
Motifs into a Ring
Hold two motifs with wrong sides together. Join B in a corner center st going through both layers, then sc through both loops of matching sts across the side: 21 sc per seam, matched stitch to stitch. Join 5 motifs in a row, then join the last one to the first to close the ring. That makes 5 seams. Turn each motif on point so all the mauve diamonds point up and down.
Because the wrong sides are held together, each seam forms a subtle raised line on the RS. Keep your tension the same as in the motifs. If a seam ripples, it’s too loose. If it puckers, it’s too tight.
Checkpoint: the ring is about 22.5 in (57.2 cm) around and about 4.5 in (11.4 cm) tall.
Base to Basket
The bottom trim (see the next section) brings the lower edge down to 84 sts. Hold the base inside the ring with WS together. Sc through both layers, one st of the trim with one st of Rnd 14 of the base. (84 sc) This makes a neat ridge around the bottom.
Border: Bottom Trim and Rim
Border gauge: 105 edge sts across 22.5 in (57.2 cm) is about 4.7 sts per inch. That’s close to the swatch gauge, so the first round lies flat before any shaping.
Each open edge of the ring gives you 5 motifs x 21 sts per side = 105 sts. Corner sts are already part of the 21, and the seams don’t add any sts.
Bottom Trim
Trim Rnd 1 (B): Join in any seam st along the bottom edge. Sc in each st around. (105 = 21 per motif)
Trim Rnd 2: (Sc in next 3, sc2tog) 21 times. (84 = 63 sc + 21 sc2tog, which use 105 sts)
Now join the base as described above.
Rim
Rim Rnd 1 (B): Join in any seam st along the top edge. Sc in each st around. (105 = 21 per motif)
Rim Rnd 2: (Sc in next 3, sc2tog) 21 times. (84 = 63 sc + 21 sc2tog)
Rim Rnds 3–5: Sc in each st. (84) Fasten off.
Why the math works: 105 divides evenly into 21 repeats of 5 sts, and 84 is exactly 21 x 4. The base also ends at 84, so the trim and base meet one-to-one. Taking the edges in from 105 to 84 at both top and bottom gives each basket its rounded shape. The opening is about 18.7 in (47.5 cm) around, roughly 6 in (15.2 cm) across, which fits a 4.5 in (11.4 cm) roll easily.
Checkpoint: each finished basket is about 5.75 in (14.6 cm) tall.
Final Blocking
- Block each basket before you attach it to the spine.
- Stuff the basket firmly with a towel wrapped around a roll so it holds its rounded shape.
- Spray it evenly until it’s damp, but not soaking.
- Line up the diamond points so they run straight up and down.
- Let it dry completely, about 24 hours.
- Pin the spine flat at 2.25 in (5.7 cm) wide, spray it, and let it dry.
- Lay the spine out and mark the basket positions. The bottom basket covers Rows 1–29. Leave a gap at Rows 30–34. The middle basket covers Rows 35–63. Leave a gap at Rows 64–68. The top basket covers Rows 69–97.
- Center the spine behind one motif on each basket. Sew it with B from the rim down to the base seam, along both long edges.
- Wrap the strap around the wooden ring to the WS of the tab and sew it down securely.
Final Quality-Control Checklist
- 15 motifs, each 4.5 in (11.4 cm) square with 80 sts in Rnd 5
- Every seam has 21 sc
- Each ring edge counts 105 sts, and each trim/rim ends at 84
- Bases are flat, 84 sts, about 6 in (15.2 cm) across
- Diamonds point straight up and down on all three baskets
- Spine is centered, and the baskets are spaced 1 in (2.5 cm) apart
- The strap is sewn twice through the ring and doesn’t stretch under load
- All ends are woven in at least 1 in (2.5 cm)
Troubleshooting
Motif cups in the center: Your bobbles are too tight. Pull up each loop to the full height of a dc.
Triangles look short and the corners are rounded: Block to 4.5 in (11.4 cm) and pin out the apex points.
Base ruffles: Your gauge is loose. Go down a hook size for the base and keep 84 sts in Rnd 14.
Base cups up: Your increases are too tight. Go up a hook size.
Basket slumps: Use a stiffer cotton, or crochet the rim more tightly.
Gaps at the seams: Go through both loops, and make sure you start at a corner center st.
Care
Hand wash in cool water, press out the water in a towel, and dry reshaped over a roll. Don’t put it in the dryer.
Final Notes
The measurement chain is simple. The 3 in (7.6 cm) diamond grows into a 4.25 in (10.8 cm) square with the triangles, then 4.5 in (11.4 cm) after edging. Five motifs make a 22.5 in (57.2 cm) ring with 105 sts on each edge. That edge decreases to 84 sts to match the 6 in (15.2 cm) base and the rim. Each basket is 5.75 in (14.6 cm) tall, and three of them on a 97-row spine give a holder about 21.8 in (55.4 cm) long. Check each link as you go and the finished piece will come together without surprises.
Happy crocheting!