

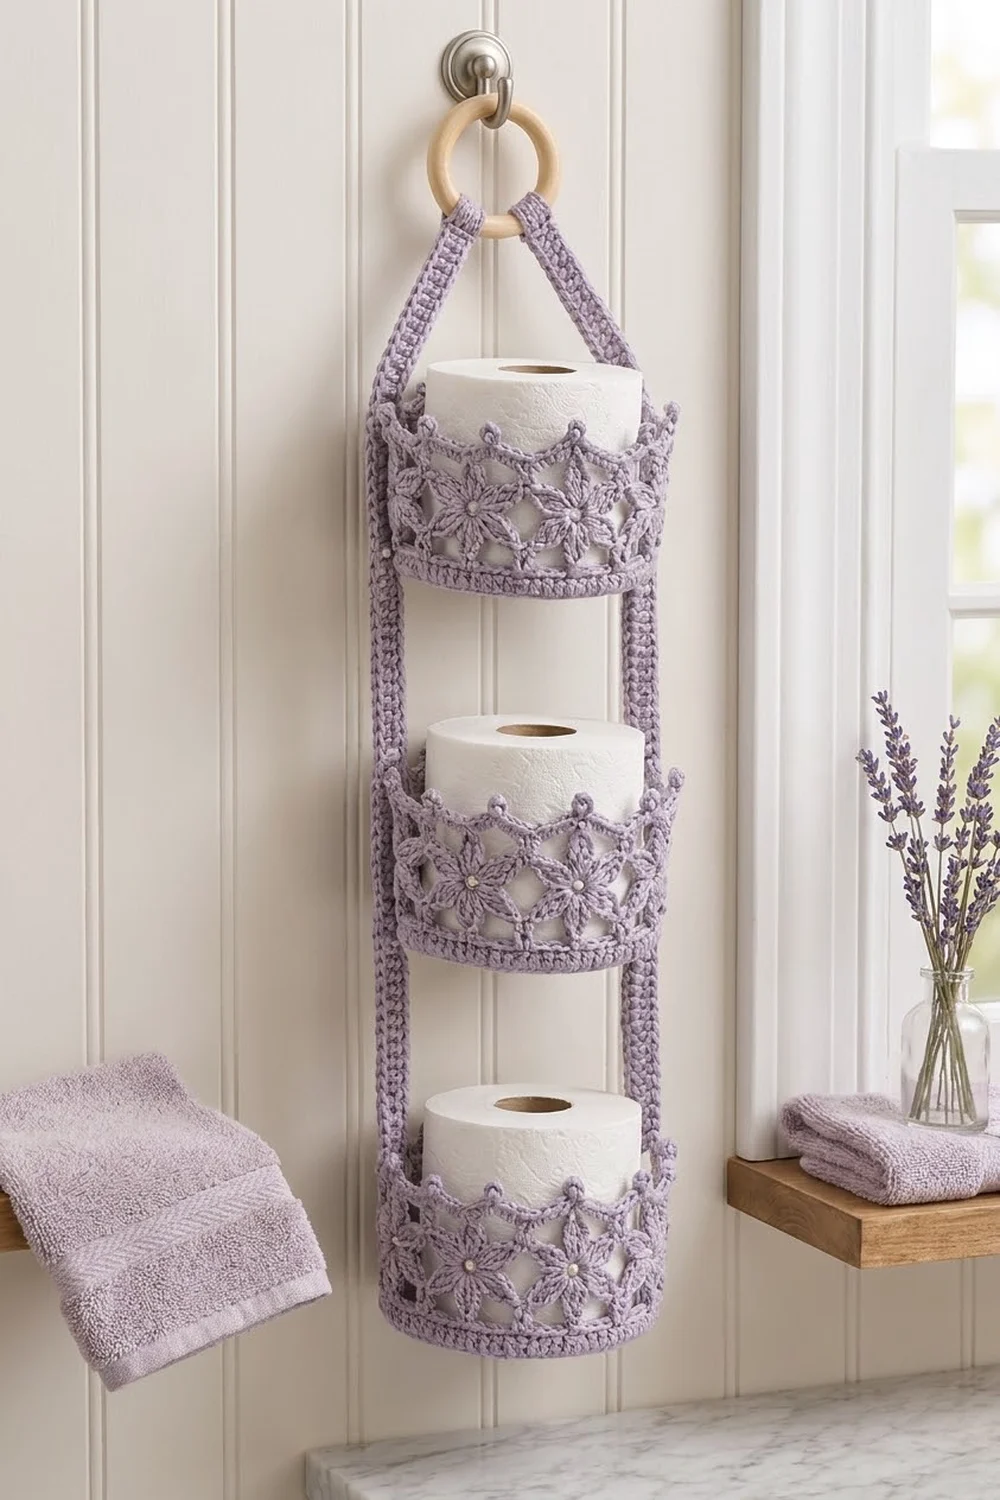
This hanging holder stacks three lacy round baskets on two straps and a wooden ring. Each basket holds one standard toilet roll, and the whole piece hangs from a single hook or towel knob.
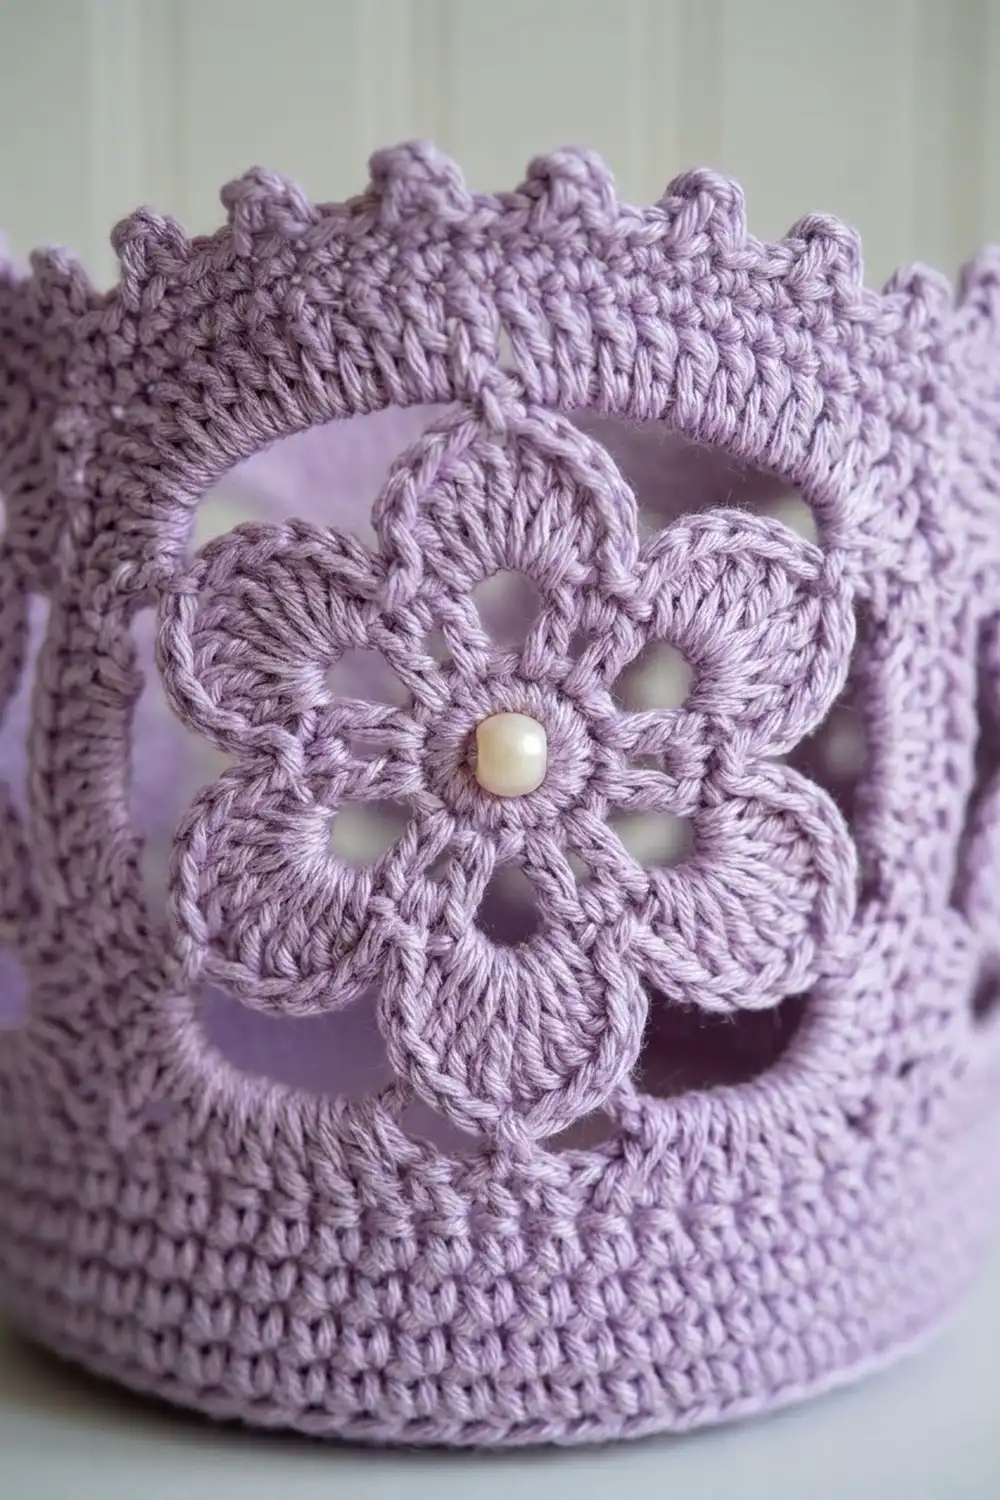
The look is soft and romantic. Each basket has a solid lavender base, a ring of six-petal flowers around the wall, and a crown edge of picot points along the top rim. The whole holder uses one color. A small pearl bead in each flower center is optional but makes a lovely finish.
The pattern uses US crochet terms. Each basket measures 5.75 in (14.6 cm) across and 3.25 in (8.3 cm) tall. The finished holder is about 23 in (58.4 cm) long including the ring.
The construction is simple and modular. You crochet three flat bases that turn up into a short wall, eight flower motifs per basket joined as you go into a ring, and two straps. You crochet each flower ring onto its base, add the crown border, and then use the straps to attach the baskets to the ring.
Finished Size and Construction
- Finished size: about 23 in (58.4 cm) long overall; each basket 5.75 in (14.6 cm) across, 3.25 in (8.3 cm) tall
- Skill level: Intermediate
- Terminology: US
- Yarn weight: #4 worsted, cotton or cotton blend
- Hook: 4.0 mm (G-6)
- Number of pieces: 3 bases, 24 flower motifs, 2 straps, plus 1 wooden ring
- Layout: 3 baskets stacked vertically on 2 parallel straps
- Piece size: base 5.75 in (14.6 cm) across; flower motif 2.25 in (5.7 cm) from side petal tip to opposite side petal tip; strap 22 in (55.9 cm) long
- Size before border: basket about 2.9 in (7.4 cm) tall to the top petal tips
- Border depth: the crown edging adds about 0.35 in (0.9 cm)
Materials
Choose a smooth worsted-weight cotton or cotton blend. Cotton holds the basket shape well and stays firm under the weight of a roll. Avoid very soft acrylic, which will sag.
- Lavender: 320 g, about 550 m (one color for every piece)
- 4.0 mm (G-6) crochet hook
- 1 wooden ring, 2.5 in (6.4 cm) outer diameter
- 24 pearl beads, 6 mm (optional), with matching sewing thread and a fine needle
- Tapestry needle
- Stitch marker
- Measuring tape
- Spray bottle and rust-proof pins for blocking
Quantities include a margin of about 10% for gauge swatches and differences in tension.
Abbreviations (US Terms)
- ch – chain
- sl st – slip stitch
- sc – single crochet
- hdc – half double crochet
- dc – double crochet
- dtr – double treble crochet (yarn over 3 times, insert hook, pull up a loop, [yarn over, pull through 2 loops] 4 times)
- BLO – back loop only
- st(s) – stitch(es)
- sp(s) – space(s)
- Rnd – round
- RS – right side
Special stitches
- Picot: ch 3, sl st in 3rd ch from hook.
- Joining picot: ch 1, sl st in the target picot of the neighboring motif, ch 1, sl st in the top of the last dc made.
- Join-sc: insert the hook from front to back through the target picot, then into the next st of the basket. Yarn over and pull up a loop through both, then yarn over and pull through 2 loops.
Gauge and Checkpoints
Gauge: 16 sc and 18 rnds = 4 in (10.2 cm).
Before you commit to the full project, make one base through Rnd 12 and one flower motif. These two pieces have to fit together, so check both.
- Base after Rnd 6: about 2.75 in (7.0 cm) across, 36 sts.
- Base after Rnd 12: 5.75 in (14.6 cm) across, 72 sts, about 18 in (45.7 cm) around.
- One motif: 2.25 in (5.7 cm) from side petal tip to opposite side petal tip.
- Eight motifs in a ring: 18 in (45.7 cm) around, matching the base.
If your base is too big, go down a hook size. If it’s too small, go up a size. If the base is right but the motif is off, change hook size for the motifs only. A motif that is 0.125 in (0.3 cm) too wide makes the ring 1 in (2.5 cm) too big.
Base (make 3)
Work in joined rounds and don’t turn. Keep the RS facing you throughout.
Rnd 1: Magic ring, ch 1, 6 sc in ring, sl st to first sc. (6 sts)
Rnd 2: Ch 1, 2 sc in each st around, sl st to first sc. (12 sts)
Rnd 3: Ch 1, sc in next st, 2 sc in next st; repeat from * 6 times, sl st to first sc. (18 sts)
Rnd 4: Ch 1, sc in next 2 sts, 2 sc in next st; repeat 6 times, join. (24 sts)
Rnd 5: Ch 1, sc in next 3 sts, 2 sc in next st; repeat 6 times, join. (30 sts)
Rnd 6: Ch 1, sc in next 4 sts, 2 sc in next st; repeat 6 times, join. (36 sts)
Checkpoint: 2.75 in (7.0 cm) across.
Rnds 7–12: Keep increasing 6 sts per rnd, working one more sc between increases each rnd. Move the increase position on every other rnd to keep the circle round.
- Rnd 7: 42 sts
- Rnd 8: 48 sts
- Rnd 9: 54 sts
- Rnd 10: 60 sts
- Rnd 11: 66 sts
- Rnd 12: 72 sts
Checkpoint: 5.75 in (14.6 cm) across. The base should lie flat with no ripples or cupping.
Rnd 13 (turning rnd): Ch 1, sc in BLO of each st around, join. (72 sts) The unworked front loops form a crisp ridge, and the work starts to turn upward.
Rnds 14–15: Ch 1, sc in each st around, join. (72 sts)
Don’t fasten off. Put the live loop on a stitch marker and set the base aside. Rnd 16 attaches the flower ring (see Joining) and brings the solid wall band to about 0.9 in (2.3 cm).
Flower Motif (make 24)
Each flower has 6 petals. In the finished ring, two petals point to the sides (Petals 1 and 4), two point down (Petals 2 and 3), and two point up (Petals 5 and 6).
Rnd 1: Magic ring, ch 1, 12 sc in ring, sl st to first sc. (12 sts)
Rnd 2: Ch 1, sc in same st, ch 4, sk next st, sc in next st, ch 4, sk next st; repeat from * 4 more times, sl st to first sc. (6 sc, 6 ch-4 sps)
Rnd 3: Sl st in first ch-4 sp. In each ch-4 sp work (sc, hdc, 2 dc, picot, 2 dc, hdc, sc), sl st to first sc. (6 petals; 48 sts plus 6 picots)
Fasten off. This complete round is for Motif 1 only. For every other motif, work Rnd 3 with joining picots as described in Joining.
Checkpoint: 2.25 in (5.7 cm) from the Petal 1 picot to the Petal 4 picot.
Strap (make 2)
Foundation: Ch 89.
Row 1: Sc in 2nd ch from hook and in each ch across, turn. (88 sts)
Rows 2–3: Ch 1, sc in each st across, turn. (88 sts)
Edging rnd: Ch 1, don’t turn. Work 1 sl st in each st along each long side (88 each) and 1 sl st in each row end along each short end (3 each), with ch 1 at each of the 4 corners. Join with sl st to first sl st. (176 + 6 = 182 sl sts, plus 4 corner ch-1)
Fasten off, leaving a 24 in (61.0 cm) tail for sewing.
Checkpoint: 22 in (55.9 cm) long and about 0.75 in (1.9 cm) wide.
Make All Pieces
- Bases: 3 (lavender)
- Flower motifs: 24, in 3 rings of 8 (lavender)
- Straps: 2 (lavender)
Layout from top to bottom as the holder hangs:
            [ RING ]
           /        \
      strap          strap
        |  [BASKET 1] |
        |             |
        |  [BASKET 2] |
        |             |
        |  [BASKET 3] |
Each basket ring, seen from the front:
M1 - M2 - M3 - M4 - M5 - M6 - M7 - M8 - (back to M1)
Joining
Join the Flower Ring (join as you go)
Work each basket’s 8 motifs as one ring. Keep the RS of every motif facing you so the petals all sit the same way.
Motif 2: Work Rnds 1–2. On Rnd 3, work Petal 1 up to its picot, then work a joining picot into Petal 4 of Motif 1. Finish Petal 1 and the remaining petals as usual.
Motifs 3–7: Join Petal 1 to Petal 4 of the previous motif in the same way.
Motif 8: Join Petal 1 to Petal 4 of Motif 7. Then, on Petal 4, work a joining picot into Petal 1 of Motif 1 to close the ring. Check that the ring isn’t twisted before you work Petal 4.
Each joint uses one picot from each motif, and no extra stitches are added between motifs.
Checkpoint: the ring measures 18 in (45.7 cm) around, the same as the base.
Attach the Ring to the Base
Slip the flower ring over the outside of the basket wall, with the RS facing out and Petals 2 and 3 pointing down. Put the base’s live loop back on your hook.
The gap from each motif’s Petal 2 to its Petal 3 is half a motif width. The gap from Petal 3 to the next motif’s Petal 2 is the same. So the 16 bottom picots sit evenly around the 72-st wall.
Rnd 16: Ch 1, sc in next 4 sts, join-sc in next st catching Petal 2 picot, sc in next 3 sts, join-sc in next st catching Petal 3 picot of the same motif; repeat from * 8 times, sl st to first sc. (72 sts: 56 sc + 16 join-sc)
This puts the join-sc alternately 4 and 5 sts apart, an average of 4.5 sts. At 4 sts per inch, that matches the 1.125 in (2.9 cm) spacing between the bottom picots.
Fasten off and weave in.
Tension tip: keep each join-sc the same height as a regular sc. If you pull them tight, the bottom of each petal dents inward.
Checkpoint: the basket now stands about 2.9 in (7.4 cm) tall to the top petal tips.
Border: Crown Edging
Work this edging around the top of each flower ring. It gives the basket its crown shape.
Border gauge: about 4 sts per 1 in (2.5 cm) of edge path, the same as the base.
Join yarn with a sl st in the Petal 5 picot of any motif.
Rnd 1: Ch 1, sc in Petal 5 picot, ch 4, sc in Petal 6 picot of the same motif, ch 3, dtr in the joined Petal 1/Petal 4 picots between this motif and the next, ch 3; repeat from * 8 times, sl st to first sc. (16 sc, 8 dtr, 8 ch-4 sps, 16 ch-3 sps)
The dtr reaches down into the V between flowers. Its height, about 1 in (2.5 cm), matches the drop from the top petal tips to the side joint.
Rnd 2: Ch 1, sc in next sc, picot, 4 sc in ch-4 sp, sc in next sc, picot, 3 sc in ch-3 sp, sc in dtr, 3 sc in next ch-3 sp; repeat from * 8 times, sl st to first sc. (104 sts + 16 picots)
Count for Rnd 2: 24 sts worked one into each existing st (16 sc + 8 dtr), plus 80 sts worked into spaces (8 × 4 + 16 × 3), for 104 sts.
Why the math works: each motif repeat follows an edge path of about 3.4 in (8.6 cm). That’s one straight bar between the top tips plus two diagonals down into the V. Thirteen sts over that path is about 3.8 sts per inch, close to gauge, so the crown stays flat without ruffling or pulling in. The 16 picots land on the 16 top petal tips and form 16 evenly spaced crown points.
Fasten off and weave in. Repeat for all three baskets.
Finish: Straps and Ring
- Fold the top 1.5 in (3.8 cm) of each strap over the wooden ring and whipstitch it to the back of the strap. Place the two straps side by side on the ring.
- Lay the holder flat and measure down from the bottom of the ring. Attach the straps on opposite sides of each basket, 4 motifs apart, so each strap runs over a dtr column.
- Basket 1: crown points at 5 in (12.7 cm), base at 8.25 in (21.0 cm)
- Basket 2: crown points at 10.75 in (27.3 cm), base at 14 in (35.6 cm)
- Basket 3: crown points at 16.5 in (41.9 cm), base at 19.75 in (50.2 cm)
- Whipstitch both long edges of each strap to the basket wall, from Rnd 13 up to the Rnd 2 sc above the dtr.
- Tuck the last 0.75 in (1.9 cm) of each strap under Basket 3 and stitch it to the base. The holder now hangs 20.5 in (52.1 cm) below the ring.
- Sew a pearl bead to the center of each flower (optional).
Final Blocking
- Wet the holder in cool water and press out the extra water in a towel. Don’t wring it.
- Slide each basket over a straight-sided jar or can about 5.5 in (14.0 cm) across.
- Shape each crown point upward with your fingers. Pin any picots that lean.
- Pin the straps flat and straight on a blocking mat between the baskets.
- Let everything dry completely, about 24 hours.
- Hang the holder and check that all three baskets sit level.
Final Quality-Control Checklist
- Each base is 5.75 in (14.6 cm) across and lies flat.
- Each basket has 8 motifs, 16 crown points, and 72 sts in Rnds 13–16.
- No ring is twisted, and every flower shows its RS.
- Crown Rnd 2 has 104 sts and 16 picots on every basket.
- Both straps are 22 in (55.9 cm) long before folding.
- The baskets hang level at the measured positions.
- All ends are woven in securely.
Troubleshooting
- Base cups like a bowl: your tension is too tight. Go up a hook size or loosen your sc.
- Base ruffles: tension is too loose or there are too many increases. Recount each rnd and go down a hook size.
- Flower ring is too large for the base: your motifs are oversized. Remake them with a smaller hook.
- Petals twist inward: a motif was joined with the wrong side facing. Undo the joining picot and rejoin.
- Crown edge ruffles: work 3 sc in each ch-4 sp instead of 4.
- Crown edge pulls in: loosen the chains in Rnd 1, or use a larger hook for the edging only.
- Holder tilts: the straps are attached at different heights. Re-measure and resew.
Care
Hand wash in cool water with mild soap and lay flat to dry, reshaping each basket over a jar. Don’t tumble dry.
Final Notes
The measurement chain is short and reliable. A 72-st base measures 18 in (45.7 cm) around. Eight 2.25 in (5.7 cm) motifs make an 18 in (45.7 cm) ring, so the ring matches the base exactly. Rnd 16 catches 16 bottom picots, and the crown edging adds 16 picot points over 104 sts. Two 22 in (55.9 cm) straps carry three 3.25 in (8.3 cm) baskets, for a finished length of about 23 in (58.4 cm).
Check your gauge at the base, the motif and the ring, and every later step will fit.
Happy crocheting!