

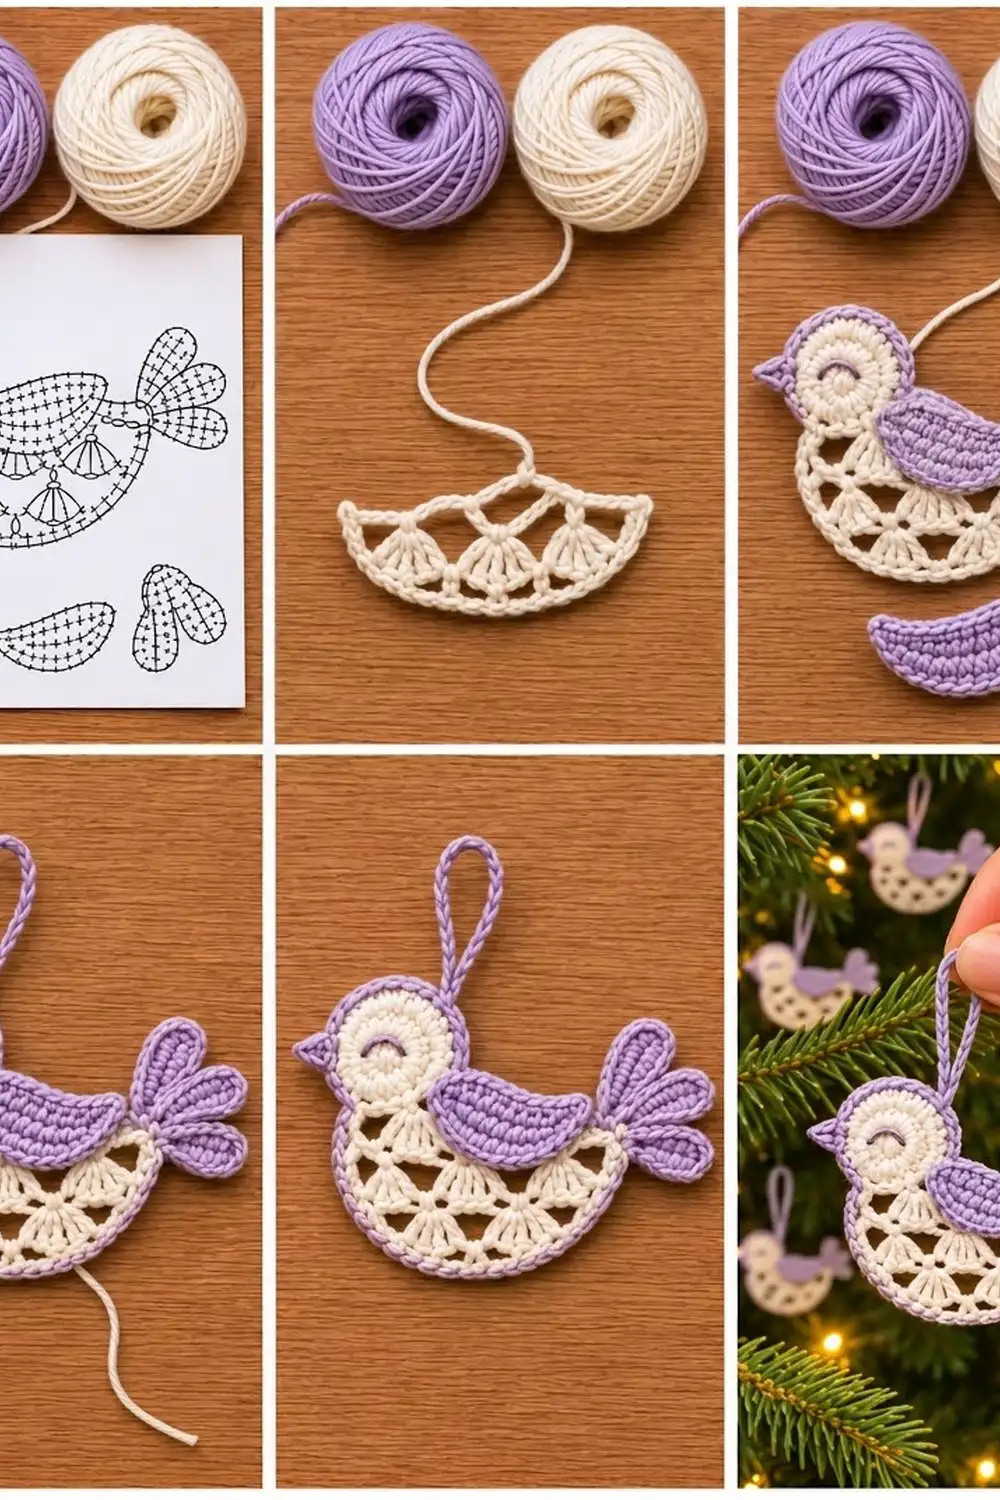
This little songbird is a soft, airy ornament. It has a cream lace body, a round cream head and a lavender outline that holds the shape together. Three rounded tail feathers, a tiny beak, an appliqué wing and a sleeping eye finish it.
The colors are cream and pale lavender, which gives it a calm, vintage holiday look. It looks just as nice on a tree as it does on a gift tag or a window hook.
All instructions use US crochet terms. The finished ornament measures about 5.5 in (14.0 cm) wide and 3.9 in (9.9 cm) tall, not counting the loop. With the loop, it is about 5.9 in (15.0 cm) tall.
How it’s made: you crochet a cream head in rounds and a cream half-circle body in rows, then sew the head onto the body. Next, two lavender border rounds outline the bird and add the beak and tail. Last, you sew on the wing, embroider the eye and add the hanging loop.
Finished Size and Construction
- Finished size: 5.5 in (14.0 cm) wide × 3.9 in (9.9 cm) tall, plus a 2 in (5.1 cm) loop
- Skill level: Intermediate (shells, working around a chain, reverse sc)
- Terminology: US
- Yarn weight: Sport (#2) cotton
- Hook: 2.75 mm (US C/2)
- Number of pieces: One ornament, made from three crocheted parts: head, body and wing
- Layout: The head overlaps the left half of the body’s top edge, and the wing sits on top of the body where it meets the head
- Part sizes: Head 1.8 in (4.6 cm) across; body 3.75 in (9.5 cm) wide × 1.9 in (4.8 cm) tall; wing 1.75 in (4.4 cm) × 0.9 in (2.3 cm)
- Size before border: 3.75 in (9.5 cm) wide × 3.4 in (8.6 cm) tall
- Border depth: 0.25 in (0.6 cm) all around
Materials
Use a smooth mercerized or matte cotton in sport weight. Cotton shows the shell stitches clearly and holds its shape well after blocking. Avoid fuzzy yarns, because they fill in the lace openings.
- Cream (Color A): 5 g, about 15 m
- Lavender (Color B): 4 g, about 12 m
These amounts include a margin for your gauge swatch and sewing tails.
Tools
– 2.75 mm (US C/2) crochet hook
– Tapestry needle
– 4 locking stitch markers
– Scissors
– Rustproof pins and a blocking mat
– Spray bottle with water
– Optional: diluted fabric stiffener
Abbreviations (US Terms)
- ch: chain
- sl st: slip stitch
- sc: single crochet
- hdc: half double crochet
- dc: double crochet
- rev sc: reverse single crochet
- sp: space
- st(s): stitch(es)
- RS: right side
- rep: repeat
Special stitches
– 5-dc shell / 7-dc shell: work 5 (or 7) dc into the same stitch.
– Reverse sc (rev sc): work from left to right. Insert the hook into the next stitch to the right, yarn over, pull up a loop, yarn over, and pull through both loops on the hook.
– Feather: ch 7, work 6 dc in the 4th ch from the hook, hdc in the next ch, sc in the next ch, sl st in the last ch. This makes a 7-dc rounded tip (the skipped ch-3 counts as 1 dc) on a narrow stem.
– Beak: ch 4, sl st in the 2nd ch from the hook, sc in the next ch, hdc in the next ch.
Gauge and Checkpoints
Gauge in sc: 6.5 sc = 1 in (2.5 cm). Gauge for the head: Rounds 1–2 = 1.2 in (3.0 cm) across.
Make the head first and treat it as your gauge test. If it matches, the body and border will match too.
Checkpoints
– Head, Round 1: 0.6 in (1.5 cm) across
– Head, Round 3: 1.8 in (4.6 cm) across
– Body, Row 1: 1.25 in (3.2 cm) wide
– Body, Row 2: 2 in (5.1 cm) wide
– Body, Row 3: 2.75 in (7.0 cm) wide
– Body, Row 4: 3.5 in (8.9 cm) wide
– Body, Row 5: 3.75 in (9.5 cm) wide × 1.9 in (4.8 cm) tall
– After the border: 4.25 in (10.8 cm) wide × 3.9 in (9.9 cm) tall, without beak or tail
If your piece is too big: go down one hook size, to 2.5 mm, and pull the yarn snug on the dc rounds.
If your piece is too small: go up to a 3.0 mm hook.
A difference of 0.1 in (0.3 cm) is fine at any stage. Blocking will even it out.
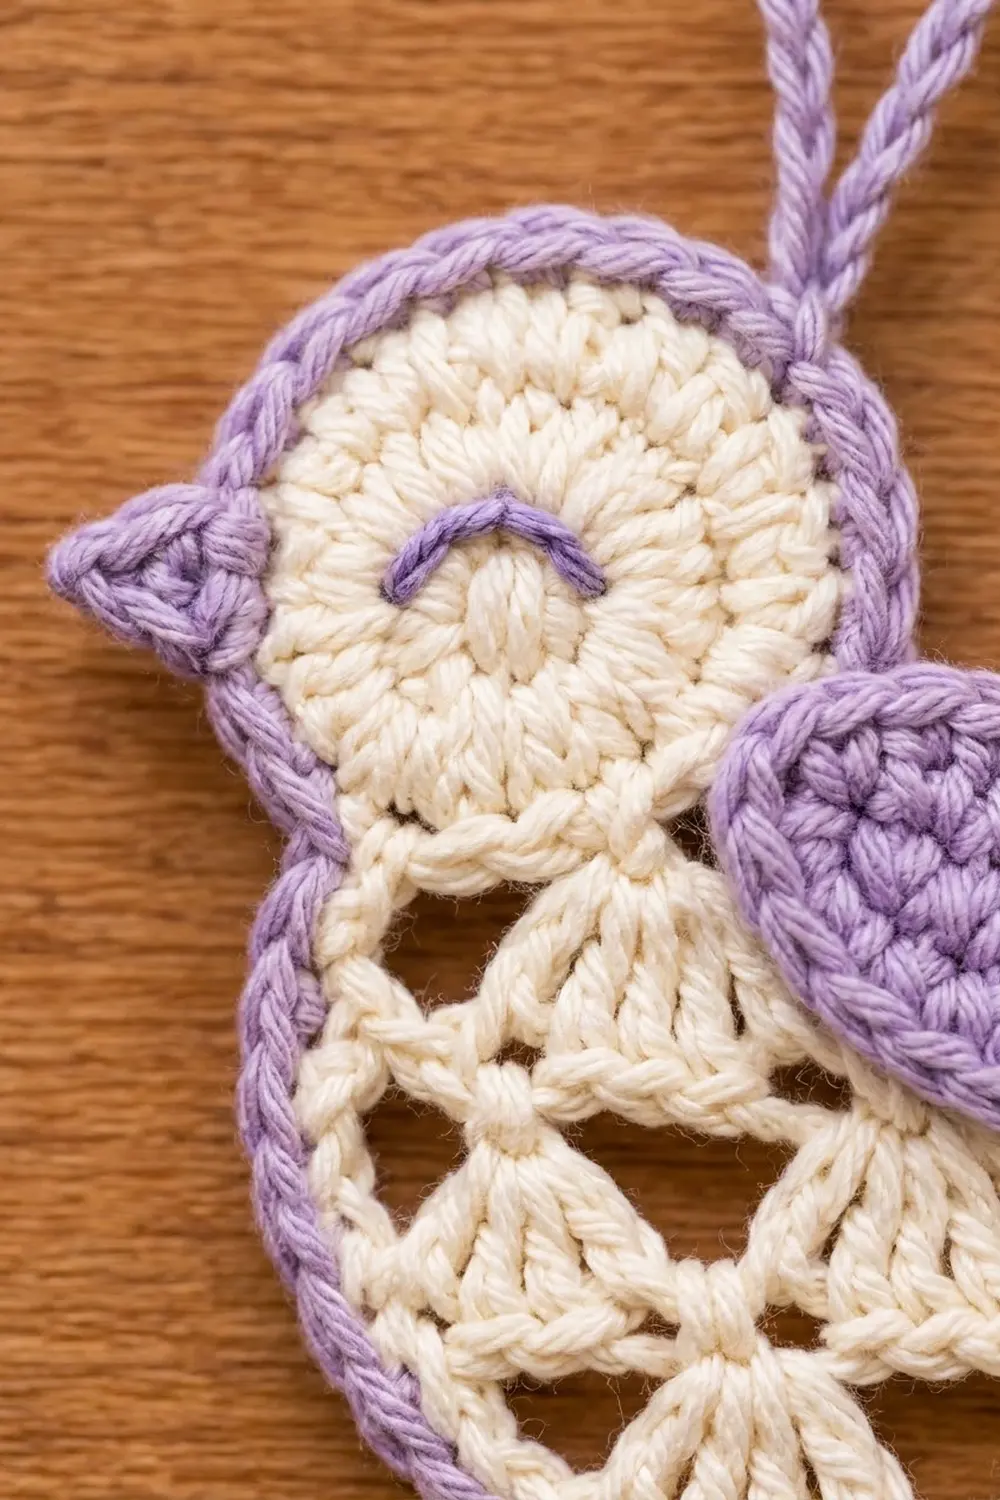
Part 1: Head (Color A)
Work in joined rounds with the RS facing. Do not turn.
Round 1: Make a magic ring. Ch 3 (counts as dc), then work 11 dc in the ring. Pull the ring closed and sl st to the top of the ch-3. (12 dc)
Round 2: Ch 3 (counts as dc), dc in the same st, then 2 dc in each st around. Sl st to the top of the ch-3. (24 dc)
Round 3: Ch 3 (counts as dc), 2 dc in the next st, dc in the next st, 2 dc in the next st; rep from * around. Sl st to the top of the ch-3. (36 dc)*
Fasten off and leave a 12 in (30.5 cm) tail for sewing. Check that the head is 1.8 in (4.6 cm) across and lies flat.
Part 2: Lace Body (Color A)
The body is worked in rows from the center of the straight top edge outward. Each row makes a larger half-circle. Turn at the end of every row.
Row 1: Make a magic ring. Ch 4 (counts as dc + ch 1), then [dc, ch 1] 5 times in the ring, then dc in the ring. Pull the ring snug, but keep it flat. Turn. (7 dc, 6 ch-1 sps)
Row 2: Ch 3 (counts as dc), 2 dc in the first st to make a half shell. Ch 2, skip the ch-1 sp, sc in the next dc. Ch 2, 5-dc shell in the next dc, ch 2, sc in the next dc; rep from * once more. Ch 2, 3 dc in the 3rd ch of the turning ch to make a half shell. Turn. (16 dc in 2 shells and 2 half shells, 3 sc, 6 ch-2 sps)*
Row 3: Ch 5 (counts as dc + ch 2). Skip the next dc and sc in the next dc, which is the inner dc of the half shell. Ch 2, 7-dc shell in the next sc, ch 2, sc in the center (3rd) dc of the next shell; rep from * once more. Ch 2, 7-dc shell in the next sc, ch 2, sc in the inner dc of the last half shell. Ch 2, skip the next dc, dc in the top of the turning ch. Turn. (23 dc: 21 in 3 shells + 2 edge dc; 4 sc; 8 ch-2 sps)*
Row 4: Ch 5 (counts as dc + ch 2), 5-dc shell in the next sc. Ch 2, sc in the center (4th) dc of the next shell, ch 2, 7-dc shell in the next sc; rep from * once more. Ch 2, sc in the 4th dc of the last shell, ch 2, 5-dc shell in the next sc. Ch 2, dc in the 3rd ch of the turning ch. Turn. (26 dc: 5 + 7 + 7 + 5 in shells + 2 edge dc; 3 sc; 8 ch-2 sps)*
The new shells sit above the sc of Row 3, and the sc sit on the centers of the Row 3 shells. This offset creates the triangular openings.
Row 5 (trim row): Ch 1. Sc in each dc and each sc (26 + 3 = 29), then work 1 sc in each ch-2 sp (+8). (37 sc)
Fasten off. The body should measure 3.75 in (9.5 cm) wide × 1.9 in (4.8 cm) tall.
Part 3: Attach the Head
- Lay the body RS up, with the straight edge at the top.
- Place the head on top, RS up. Line its left edge up with the body’s left corner, so it covers the left half of the top edge as far as the center ring. The lowest point of the head should sit 0.3 in (0.8 cm) below the top edge.
- From the back, whipstitch the 10 lowest head stitches to the body.
- Weave in the ends.
That leaves 26 head stitches free for the border. The assembled piece should measure 3.75 in (9.5 cm) wide × 3.4 in (8.6 cm) tall.
Part 4: Wing (Color B)
Round 1: Ch 10.
– Sc in the 2nd ch from the hook, hdc in the next ch, dc in the next 6 ch, then 6 dc in the last ch.
– Rotate to work along the other side of the foundation chain: hdc in the next ch, sc in the next 6 ch, then (sc, ch 2) in the last ch, which is the same ch as the first sc.
– Sl st to the first sc. (22 sts + 1 ch-2 tip)
The dc side becomes the domed top of the wing, the sc side becomes the flatter bottom, and the 6-dc end becomes the rounded front. At this point the wing should measure 1.5 in (3.8 cm) × 0.6 in (1.5 cm).
Round 2: Ch 1.
– Sc in the first sc and in the next 7 sts.
– 2 sc in each of the next 6 dc.
– Sc in the next 8 sts.
– (Sc, ch 2, sc) in the ch-2 tip.
– Sl st to the first sc. (30 sc: 22 + 6 increases + 2 at the tip)
Fasten off and leave a 10 in (25.4 cm) tail for sewing. The wing should measure 1.75 in (4.4 cm) × 0.9 in (2.3 cm).
Border (Color B)
Border gauge: 6.5 sc = 1 in (2.5 cm) along curves. On straight edges, work 2 sc per dc row-end and 1 sc per sc row-end.
The border outline has three segments:
– A: the curved bottom of the body (37 sts)
– C: the right half of the straight top edge (5 row-ends)
– B: the free arc of the head (26 sts)
Round 1: With the RS facing, join Color B with a sl st in the first Row 5 sc at the body’s left corner, just below the head. Ch 1.
– Segment A: sc in the same st and in each of the remaining 36 Row 5 sts. (37 sc) Place marker M1 in the 37th sc, at the right corner.
– Segment C: working in the row-ends toward the center, work 1 sc in the Row 5 end, then 2 sc in each dc row-end of Rows 4, 3, 2 and 1. (1 + 8 = 9 sc)
– Segment B: sc in each of the 26 free head sts, over the top of the head and down to the left corner. (26 sc) Where the head meets the body, insert the hook through both layers.
– Place marker M2 in the 22nd sc of B, at the head’s leftmost point, for the beak. Place marker M3 in the 11th sc of B for the loop.
– Sl st to the first sc. (72 sc: 37 + 9 + 26)
Why the math works: The bottom curve is about 5.75 in (14.6 cm) long. At 6.5 sc per inch, it needs about 37 sc, which matches the 37 stitches of Row 5 exactly. The free head arc is about 4 in (10.2 cm) long and also matches one sc per head stitch. On the straight edge, 2 sc per dc row-end keeps it flat without flaring. Because each existing stitch gets exactly one sc, the outline stays the same size and will not cup or ruffle.
Round 2: Do not turn. Ch 1, then rev sc in each sc around. (72 rev sc) Add the beak and tail as you reach their markers:
– At M2 (beak): rev sc in the marked st, work 1 Beak, then sl st in the same marked st.
– At M1 (tail): rev sc in the marked st, then [work 1 Feather, sl st in the same marked st] 3 times.
Sl st to the first rev sc and fasten off. The beak adds 0.3 in (0.8 cm) and the tail adds 1 in (2.5 cm), which brings the width to 5.5 in (14.0 cm).
Finishing Details
- Wing: Pin the wing with its rounded front overlapping the seam where the head meets the body. The pointed tip should aim toward the tail, and the top edge should sit just above the body’s straight top edge. Whipstitch all the way around through the Round 2 stitches.
- Eye: With Color B, backstitch a curve of 3 short stitches, 0.3 in (0.8 cm) wide, on Round 2 of the head between the center and the beak. Curve it downward so the eye looks closed.
- Loop: Join Color B with a sl st at M3. Ch 30, then sl st in the same st to close the loop. Sl st in each of the 30 ch around the loop for a corded look, then sl st into the base. Fasten off.
- Weave in all ends behind solid areas.
Final Blocking
- Spray the ornament until it is evenly damp, not soaked.
- Pin the body’s curve into a smooth half-circle, 4.25 in (10.8 cm) wide including the border.
- Pin the head into a circle, then pin each lace opening open with a pin through its center.
- Pin the three feathers into a fan, with about 0.25 in (0.6 cm) between their tips.
- Pin the beak to a point.
- Optional: brush diluted fabric stiffener over the feathers and lace.
- Let it dry completely before you unpin it. This takes about 6 hours.
Final Quality-Control Checklist
- The head measures 1.8 in (4.6 cm) across and lies flat
- Body Row 5 has 37 sc, and the body is 3.75 in (9.5 cm) wide
- Border Round 1 has 72 sc: 37 + 9 + 26
- The beak points left, at the head’s widest point
- The 3 feathers fan evenly from the right corner
- The wing sits flat, with no puckering at its edges
- The eye is centered and curves downward
- The loop is secure and about 2 in (5.1 cm) tall
- The finished size is about 5.5 in (14.0 cm) × 3.9 in (9.9 cm)
Troubleshooting
- Body cups: your shells are too tight. Use a larger hook for Rows 3–4 only.
- Body ruffles: there are too many stitches in Row 5. Recount: it should be 37 sc, with 1 sc per ch-2 sp.
- Head domes: the Round 3 increases are wrong. Recount to 36 dc.
- Gap where head meets body: add one extra whipstitch through both layers before you start the border.
- Feathers curl: block them flat with stiffener, or loosen the ch-7 a little.
- Wing puckers: you sewed it too tightly. Re-stitch with looser whipstitches.
- Rev sc looks lumpy: keep the loops loose and even, and don’t twist the hook.
Care
Hand wash in cool water with mild soap, press out the water in a towel, and dry flat. Re-block if needed. Store flat in tissue so the feathers keep their shape.
Final Notes
Here is how the measurements build: the 36-dc head is 1.8 in (4.6 cm) across, and the 37-sc body is 3.75 in (9.5 cm) wide. Once the head is attached, the piece is 3.75 in (9.5 cm) × 3.4 in (8.6 cm). The 72-sc border adds 0.25 in (0.6 cm) on every side, for 4.25 in (10.8 cm) × 3.9 in (9.9 cm). The beak and tail bring the final width to 5.5 in (14.0 cm). If each checkpoint matches, the finished bird will too.
Happy crocheting!