
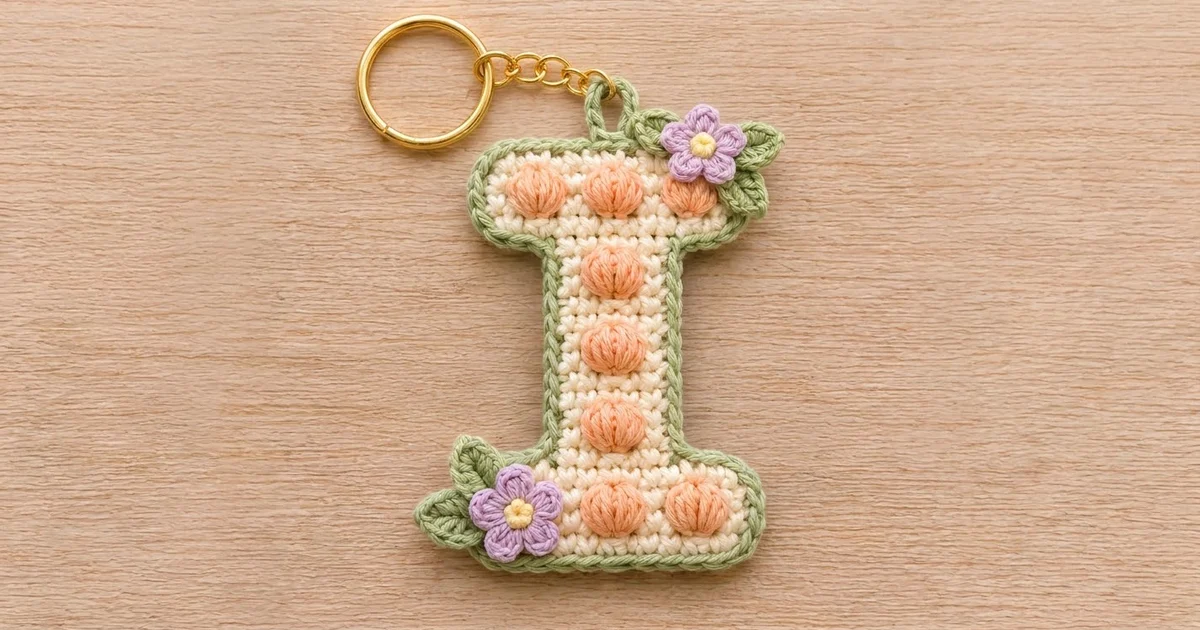
This little letter “I” keychain looks soft and sweet. The body is worked in creamy single crochet and dotted with plump peach bobbles. A sage green rope-textured edge frames the whole letter, and two tiny lilac flowers with sunny yellow centers sit on leafy corners. It works well as a personalized bag charm, a teacher gift, or a quick market make.
The pattern uses US crochet terms throughout. The finished keychain measures about 3 in (7.6 cm) wide by 3.75 in (9.5 cm) tall, including the border. It is small, quick, and a good way to practice bobbles, clean color changes, and a tidy border on a shape with inner corners.
Construction is simple. You work the letter flat in rows from the bottom up: first the bottom bar, then the narrower stem, then the top bar. The top bar is widened with a chain on one side and foundation single crochet on the other. A two-round border unifies the edge, and the hanging loop, flowers, leaves, and hardware are added last.
The letter is one piece. The flowers and leaves are small appliqués sewn on top, so no joining of motifs is involved.
Finished Size and Construction
- Finished size: 3 in (7.6 cm) wide x 3.75 in (9.5 cm) tall
- Skill level: Easy-intermediate
- Terminology: US
- Yarn weight: DK / light worsted (weight 3) cotton
- Hook: 3.0 mm (US C-2/D-3)
- Number of pieces: 1 letter body + 2 flowers + 4 leaves (appliqués)
- Layout: Bottom bar 15 sts x 5 rows; stem 5 sts x 11 rows; top bar 15 sts x 5 rows
- Size before border: 2.5 in (6.4 cm) wide x 3.25 in (8.3 cm) tall
- Border depth: about 0.25 in (0.6 cm) per side (2 rounds)
Materials
Choose a smooth mercerized or combed cotton. It shows bobbles clearly, holds a crisp outline, and survives life on a bag handle. Avoid fuzzy or very splitty yarns, because reverse single crochet needs clean stitches.
- Cream (main body): 6 g, about 14 m
- Peach (bobbles): 3 g, about 7 m
- Sage green (border, loop, leaves): 5 g, about 11 m
- Lilac (petals): 2 g, about 4 m
- Yellow (flower centers): 1 g, about 2 m
All quantities include a margin of roughly 20% for gauge swatching and tails.
Tools:
– 3.0 mm (US C-2/D-3) crochet hook
– Tapestry needle
– Stitch markers (2)
– Scissors
– Gold split keyring, 1 in (2.5 cm), with a short chain and a jump ring
– Two pairs of flat-nose pliers
– Pins and a blocking mat or folded towel
Abbreviations (US Terms)
- ch – chain
- sl st – slip stitch
- sc – single crochet
- hdc – half double crochet
- dc – double crochet
- sc2tog – single crochet 2 together
- fsc – foundation single crochet
- rev sc – reverse single crochet (crab stitch)
- B – bobble
- st(s) – stitch(es)
- RS / WS – right side / wrong side
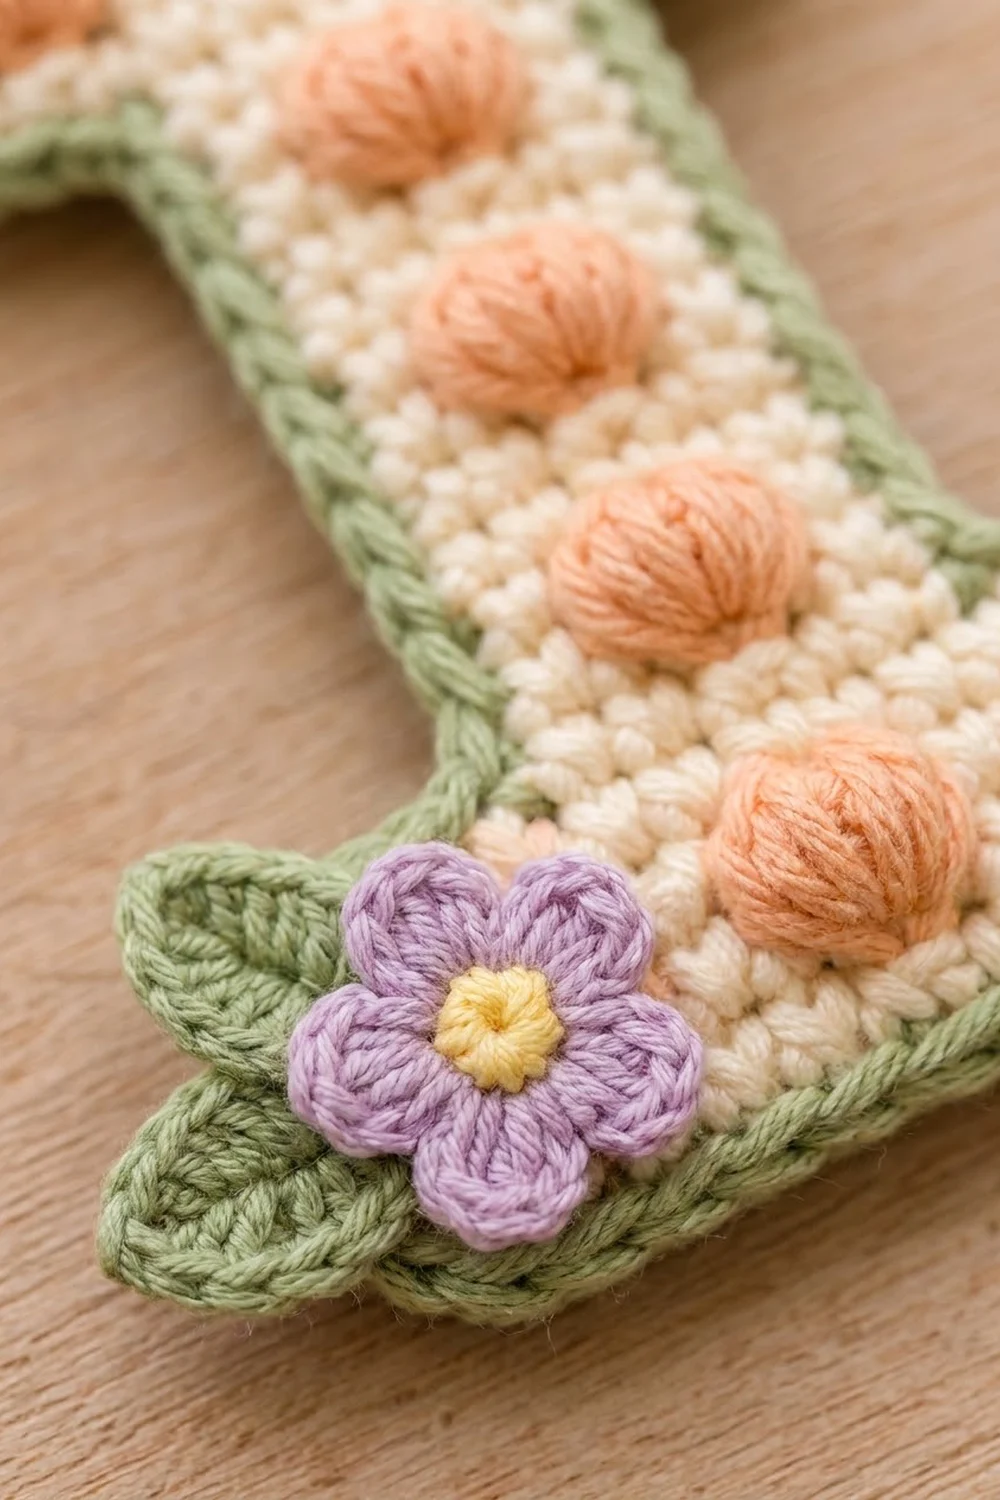
Bobble (B): Yo, insert hook in next st, yo and pull up a loop, yo and draw through 2 loops. Repeat from * to * 3 more times in the same st (5 loops on hook). Yo and draw through all 5 loops. The bobble counts as 1 st. Bobbles are always worked on WS rows so they pop out toward the RS.
Foundation single crochet (fsc): Insert hook in the base of the last st made, yo and pull up a loop, yo and draw through 1 loop (this forms the “chain”), yo and draw through 2 loops.
Reverse single crochet (rev sc): Working from left to right (right-handed), insert hook in the next st to the right, yo and pull up a loop, yo and draw through 2 loops.
Color changes for bobbles: Work the st before a bobble in cream until 2 loops remain on the hook. Finish it with peach. Make the bobble in peach, but complete its final yarnover with cream. Carry the unused color along the top of the row and work over it so it hides inside the stitches.
Gauge and Checkpoints
Gauge: 24 sc and 26 rows = 4 in (10.2 cm) in cream single crochet. That works out to 6 sts and 6.5 rows per 1 in (2.5 cm).
The bottom bar (Rows 1–5) doubles as your gauge test. Make it first and measure before moving on.
Checkpoints:
– After Row 5: 2.5 in (6.4 cm) wide x 0.77 in (2.0 cm) tall
– After Row 16: stem 0.83 in (2.1 cm) wide, piece 2.46 in (6.2 cm) tall
– After Row 21: 2.5 in (6.4 cm) wide x 3.25 in (8.3 cm) tall
– After the border: 3 in (7.6 cm) x 3.75 in (9.5 cm)
If your piece is too big by more than 0.125 in (0.3 cm), go down to a 2.75 mm hook. If it is too small, go up to a 3.25 mm hook. Bobble rows may sit slightly taller than plain rows. That is normal, and blocking evens it out.
Letter Body
Bottom Bar
With cream:
Row 1 (WS): Ch 16, sc in 2nd ch from hook and in each ch across, turn. (15 sc)
Row 2 (RS): Ch 1, sc in each st across, turn. (15 sc)
Row 3 (WS, bobble row): Ch 1, sc in next 3 sts, [B in peach in next st, sc in next 3 sts] 3 times, turn. (15 sts: 12 sc + 3 B) Cut peach after the last bobble, leaving a 4 in (10.2 cm) tail, and work over the tail.
The bobbles sit on stitches 4, 8 and 12. Stitch 8 is the exact center, so it will line up with the stem bobbles.
Rows 4–5: Ch 1, sc in each st across, turn. (15 sc) At the end of Row 5, fasten off cream.
Checkpoint: 2.5 in (6.4 cm) x 0.77 in (2.0 cm).
Stem
Row 6 (RS): With RS facing, skip the first 5 sts of Row 5. Join cream with a standing sc in the 6th st, then sc in the next 4 sts, turn. (5 sc) The last 5 sts of Row 5 stay unworked. This leaves two shelves of 5 sts each, which form the clean square inner corners.
Row 7 (WS, bobble row): Ch 1, sc in next 2 sts, B in peach in next st, sc in next 2 sts, turn. (5 sts: 4 sc + 1 B) Cut peach and work over the tail.
Rows 8–10: Ch 1, sc in each st across, turn. (5 sc)
Row 11 (WS, bobble row): Repeat Row 7. (5 sts)
Rows 12–14: Repeat Row 8. (5 sc)
Row 15 (WS, bobble row): Repeat Row 7. (5 sts)
Row 16 (RS): Ch 1, sc in each st across. (5 sc) Do not turn yet. Ch 6, then turn.
Checkpoint: stem 0.83 in (2.1 cm) wide, total height 2.46 in (6.2 cm).
Every bobble row is 4 rows apart (Rows 3, 7, 11, 15, 19). That even spacing gives the letter its steady polka-dot rhythm.
Top Bar
Row 17 (WS): Sc in 2nd ch from hook and in next 4 ch (5 sc), sc in each of the 5 stem sts (5 sc), then work 5 fsc, turn. (15 sts total: 5 + 5 + 5) The chain overhang and the fsc overhang are each 5 sts, which match the 5-st shelves on the bottom bar.
Row 18 (RS): Ch 1, sc in each st across, turn. (15 sc)
Row 19 (WS, bobble row): Ch 1, sc in next 3 sts, [B in peach in next st, sc in next 3 sts] 3 times, turn. (15 sts: 12 sc + 3 B) Cut peach and work over the tail.
Rows 20–21: Ch 1, sc in each st across, turn. (15 sc) Fasten off cream and weave in all tails on the WS.
Checkpoint: 2.5 in (6.4 cm) x 3.25 in (8.3 cm). The piece should have 9 bobbles in total: 3 in each bar and 3 in the stem.
Border
Border gauge: One sc per stitch along the top and bottom edges, and one sc per row-end along the sides. With 6 sts and 6.5 rows per inch, the side edges get very slightly more stitches. Reverse single crochet naturally draws the edge in, which balances that out.
Outer corners (8): Work 3 sc in the corner stitch.
Inner corners (4): Work sc2tog over the last position before the corner and the first position after it.
Round 1 (sage, RS facing)
Join sage in the first foundation loop at the bottom-left corner. Work around the letter in this order:
- Bottom edge: 3 sc in corner st, sc in next 13 sts, 3 sc in corner st. (19 sc)
- Right side of bottom bar: 1 sc in each of 5 row-ends. (5 sc)
- Right shelf: 3 sc in the corner st, sc in next 3 sts, then sc2tog over the last shelf st and the Row 6 row-end. (7 sts)
- Right side of stem: 1 sc in each row-end of Rows 7–15. (9 sc)
- Right overhang underside: sc2tog over the Row 16 row-end and the first overhang base st, sc in next 3 base sts, 3 sc in the outer corner base st. (7 sts)
- Right side of top bar: 1 sc in each of 5 row-ends. (5 sc)
- Top edge: 3 sc in corner st, sc in next 13 sts, 3 sc in corner st. (19 sc)
- Left side of top bar: 5 sc. (5 sc)
- Left overhang underside: 3 sc in the corner base st, sc in next 3, sc2tog over the last base st and the Row 16 row-end. (7 sts)
- Left side of stem: 9 sc. (9 sc)
- Left shelf: sc2tog over the Row 6 row-end and the first shelf st, sc in next 3 sts, 3 sc in corner st. (7 sts)
- Left side of bottom bar: 5 sc. (5 sc)
Sl st to the first sc. (104 sts)
Here is how the total adds up: 19 + 19 (top and bottom edges) + 4 x 5 (bar sides) + 4 x 7 (shelves and overhangs) + 2 x 9 (stem sides) = 104.
Round 2 (sage)
Ch 1. Rev sc in each st around. (104 rev sc) Sl st to the first st and fasten off.
The crab stitch creates the corded, rope-like edge. Work it at a relaxed, even tension so the edge doesn’t pucker at the inner corners.
Why the math works: Round 1 puts exactly one stitch on every edge position. The 3-sc corners add 2 extra stitches at each of the 8 outer corners, which gives the edge room to turn without cupping. The 4 inner sc2tog stitches each remove 1 stitch, so the edge doesn’t ripple at the concave corners. Round 2 works 1-into-1, so the count stays at 104.
Checkpoint: 3 in (7.6 cm) x 3.75 in (9.5 cm). The stem with its border measures about 1.33 in (3.4 cm) wide.
Hanging Loop
With RS facing, join sage in the Round 1 stitch at the center of the top edge, working behind the rev sc. Ch 8, sl st in the same st, and fasten off. Weave the tails firmly through the border on the WS. The loop is about 0.5 in (1.3 cm) long.
Flowers and Leaves (Make 2 Flowers, 4 Leaves)
Flower
Rnd 1 (yellow): Make a magic ring, 5 sc in the ring, pull it tight, sl st to the first sc. (5 sc) Fasten off.
Rnd 2 (lilac): Join lilac in any st. In each st work (ch 2, 2 dc, ch 2, sl st). (5 petals) Fasten off and leave a 10 in (25.4 cm) tail for sewing.
Each flower is about 0.9 in (2.3 cm) across.
Leaf
With sage, ch 6. Sl st in 2nd ch from hook, sc in next ch, hdc in next ch, dc in next ch, sc in last ch. (5 sts) Fasten off and leave an 8 in (20.3 cm) tail.
Each leaf is about 0.75 in (1.9 cm) long.
Placement and Layering
- Top-right corner: Pin one leaf pointing up and outward and a second leaf pointing down along the right side. Both should overlap the green border.
- Bottom-left corner: Pin both leaves pointing outward to the left, fanning slightly apart.
- Sew the leaves down first with small stitches through their bases.
- Center a flower over each pair of leaf bases so the petals cover the stitching. The top flower should partly cover the right-hand top bobble, and the bottom flower should sit beside the left-hand bottom bobble.
- Tack the flower down through its yellow center and between each petal, keeping the petal tips free.
Attaching the Hardware
Open the jump ring with two pliers by twisting it sideways, never pulling it apart. Thread on the hanging loop and the end of the chain, then close the jump ring flush. Attach the split keyring to the other end of the chain.
Final Blocking
- Lightly mist the keychain with water, or dampen it and press it in a towel.
- Lay it RS up on a blocking mat.
- Pin the four corners of each bar square, measuring 3 in (7.6 cm) across the bars.
- Pin the full height to 3.75 in (9.5 cm).
- Square the four inner corners with one pin each.
- Fluff each bobble with a fingertip so it stands up.
- Let it dry completely, then remove the pins.
Final Quality-Control Checklist
- 9 peach bobbles in total, all aligned on the center column or evenly spaced across the bars
- Bars are 15 sts, stem is 5 sts, and the shelves and overhangs are 5 sts each
- Border Round 1 and Round 2 each have 104 sts
- Finished size is 3 in (7.6 cm) x 3.75 in (9.5 cm), within 0.125 in (0.3 cm)
- No carried peach shows through the cream
- Inner corners are crisp and lie flat
- The hanging loop is secure and the jump ring is fully closed
- All tails are woven in and trimmed
Troubleshooting
Bobbles sink to the back: They were worked on a RS row. Make them only on WS rows (3, 7, 11, 15, 19).
Peach shows between stitches: Keep the carried strand snug against the row top and work over it with firm sc.
Inner corners bunch up: Make sure you used sc2tog at all 4 inner corners and didn’t add extra stitches there.
Outer corners curl: Check that each one has 3 sc, then block them square.
Rev sc edge ruffles: Your tension is too loose. Go down 0.25 mm for Round 2 only.
Top bar is lopsided: Recount Row 17 as 5 + 5 + 5. The chain side and the fsc side must match.
Care
Hand wash in cool water with mild soap, press out the water in a towel, and dry flat. Avoid wringing the keychain, which can flatten the bobbles and loosen the appliqués.

Final Notes
The measurement chain is short and reliable:
- Gauge of 6 sts and 6.5 rows per 1 in (2.5 cm) gives a bottom bar of 2.5 in (6.4 cm) x 0.77 in (2.0 cm).
- The stem builds the piece to 2.46 in (6.2 cm) tall.
- The top bar finishes the body at 2.5 in (6.4 cm) x 3.25 in (8.3 cm).
- A 104-stitch, two-round border brings it to 3 in (7.6 cm) x 3.75 in (9.5 cm).
Check each stage, and your letter will come out flat, square, and ready for its flowers.
Happy crocheting!