

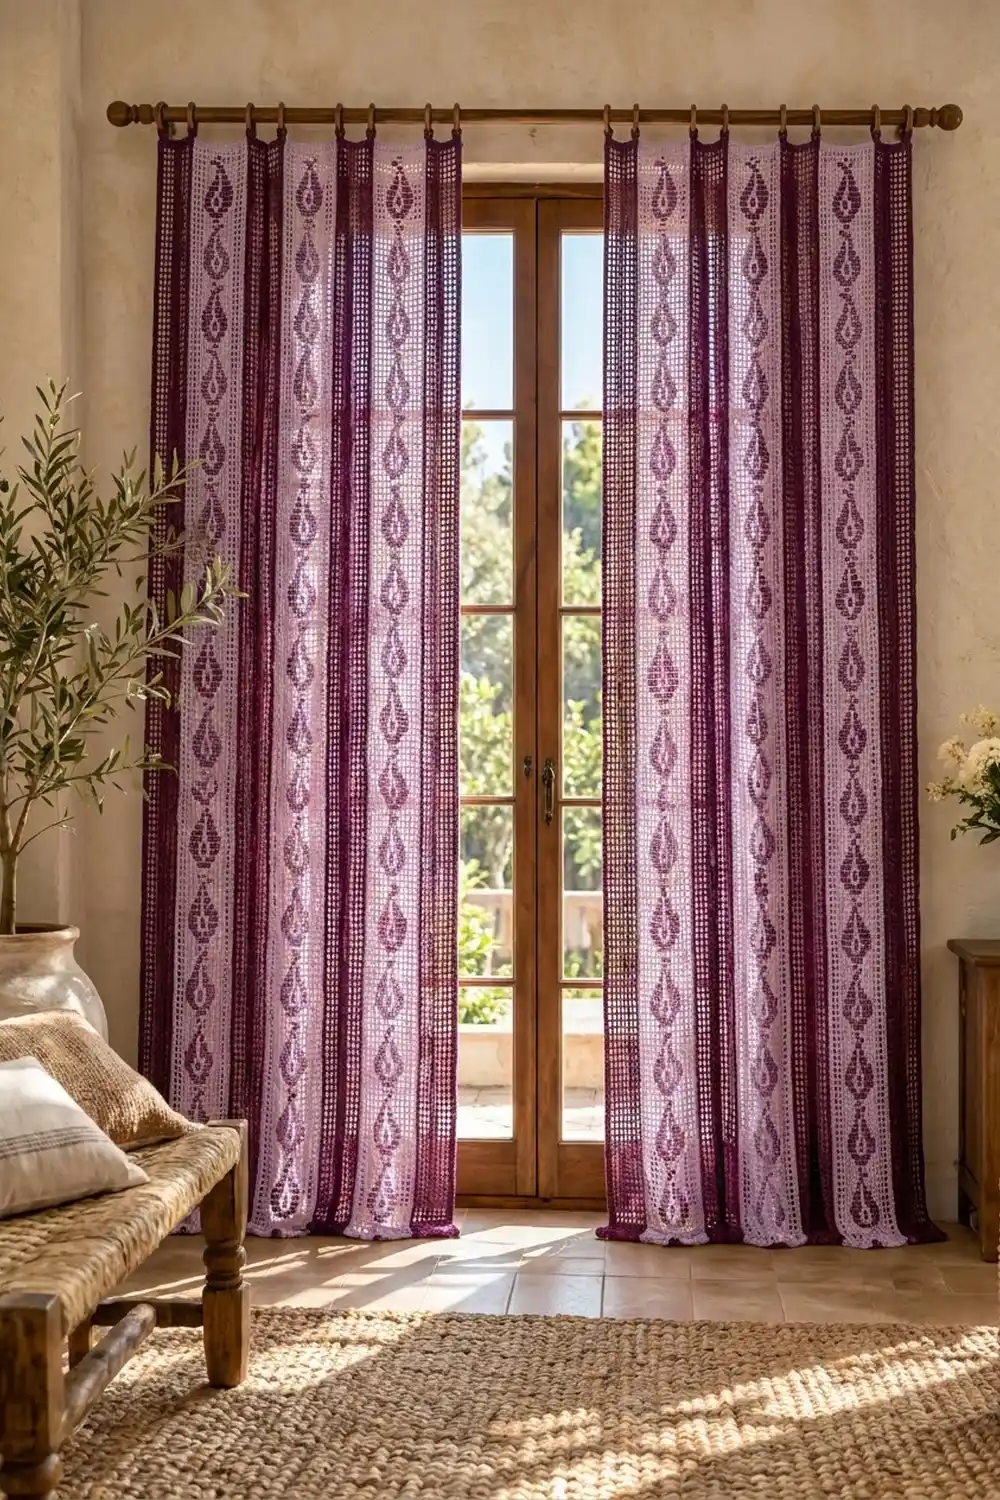
This curtain panel is airy and light. Plum paisleys run in columns down lavender filet mesh, and narrow plum mesh stripes frame each column. When daylight comes through the open squares, the paisleys stand out clearly.
The panel uses two colors: soft lavender for the paisley background and deep plum for the motifs, the stripes, the seams, the border and the hanging tabs. The style is classic filet crochet with a gentle boho feel.
The pattern uses US crochet terms. One finished panel measures 31 in (78.7 cm) wide by 83.5 in (212.1 cm) long, not counting the tabs. Make two panels for a pair like the one in the photos.
To build it, you crochet seven separate vertical strips: three lavender paisley strips and four plum mesh strips. You join them with single crochet seams, add a three-round plum border, then work seven tabs across the top.
Finished Size and Construction
- Finished panel: 31 in × 83.5 in (78.7 cm × 212.1 cm)
- Skill level: Intermediate (filet crochet plus intarsia color changes)
- Terminology: US
- Yarn weight: Sport (#2), cotton
- Hook: 3.25 mm (US D/3)
- Pieces per panel: 7 strips (3 lavender paisley, 4 plum mesh)
- Layout: plum, lavender, plum, lavender, plum, lavender, plum
- Paisley strip: 13 meshes wide, 6.5 in × 82 in (16.5 cm × 208.3 cm)
- Plum strip: 5 meshes wide, 2.5 in × 82 in (6.4 cm × 208.3 cm)
- Size before border: 29.5 in × 82 in (74.9 cm × 208.3 cm)
- Border depth: 0.75 in (1.9 cm) on each side
Materials
Choose a smooth mercerized or combed sport-weight cotton, about 150 m per 50 g. Crisp stitches keep the mesh squares open, and cotton hangs straight.
Per panel:
– Plum: 300 g (900 m)
– Lavender: 200 g (600 m)
For a pair of panels, double these amounts. They include a margin of about 25% for swatching, bobbins and weaving in ends.
Tools:
– 3.25 mm (US D/3) hook
– 3–4 small yarn bobbins
– Tapestry needle
– Stitch markers
– Rust-proof pins and blocking space
– Tape measure
Abbreviations (US Terms)
- ch – chain
- dc – double crochet
- sc – single crochet
- sl st – slip stitch
- sk – skip
- sp – space
- st(s) – stitch(es)
- RS / WS – right side / wrong side
Special stitches:
– O (open mesh): over an open mesh, ch 2 and dc in the next dc. Over a block, ch 2, sk 2 dc and dc in the next dc.
– B (block): over an open mesh, 2 dc in the ch-2 sp and dc in the next dc. Over a block, dc in each of the next 3 dc.
– Color change: work the last dc before the new color until 2 loops remain, then finish it with the new color.
Each mesh is 3 sts wide. A row of M meshes therefore has (3 × M) + 1 sts.
Gauge and Checkpoints
Gauge: 4 meshes × 4 rows = 2 in (5.1 cm), so one mesh is 0.5 in (1.3 cm) square.
Test first: work Rows 1–23 of one paisley strip. This gives one full motif and should measure 6.5 in × 11.5 in (16.5 cm × 29.2 cm).
Checkpoints:
– Each paisley strip: 6.5 in (16.5 cm) wide.
– Each plum strip: 2.5 in (6.4 cm) wide.
– After Row 40: 20 in (50.8 cm) long.
– After Row 84: 42 in (106.7 cm) long.
– Finished strip: 82 in (208.3 cm) long.
Keep each measurement within 0.25 in (0.6 cm).
If your piece is too big, go down 0.25 mm in hook size. If it is too small, go up 0.25 mm. If only the height is off, change the turning chain tension and how tall you pull up each dc. Don’t change the stitch counts.
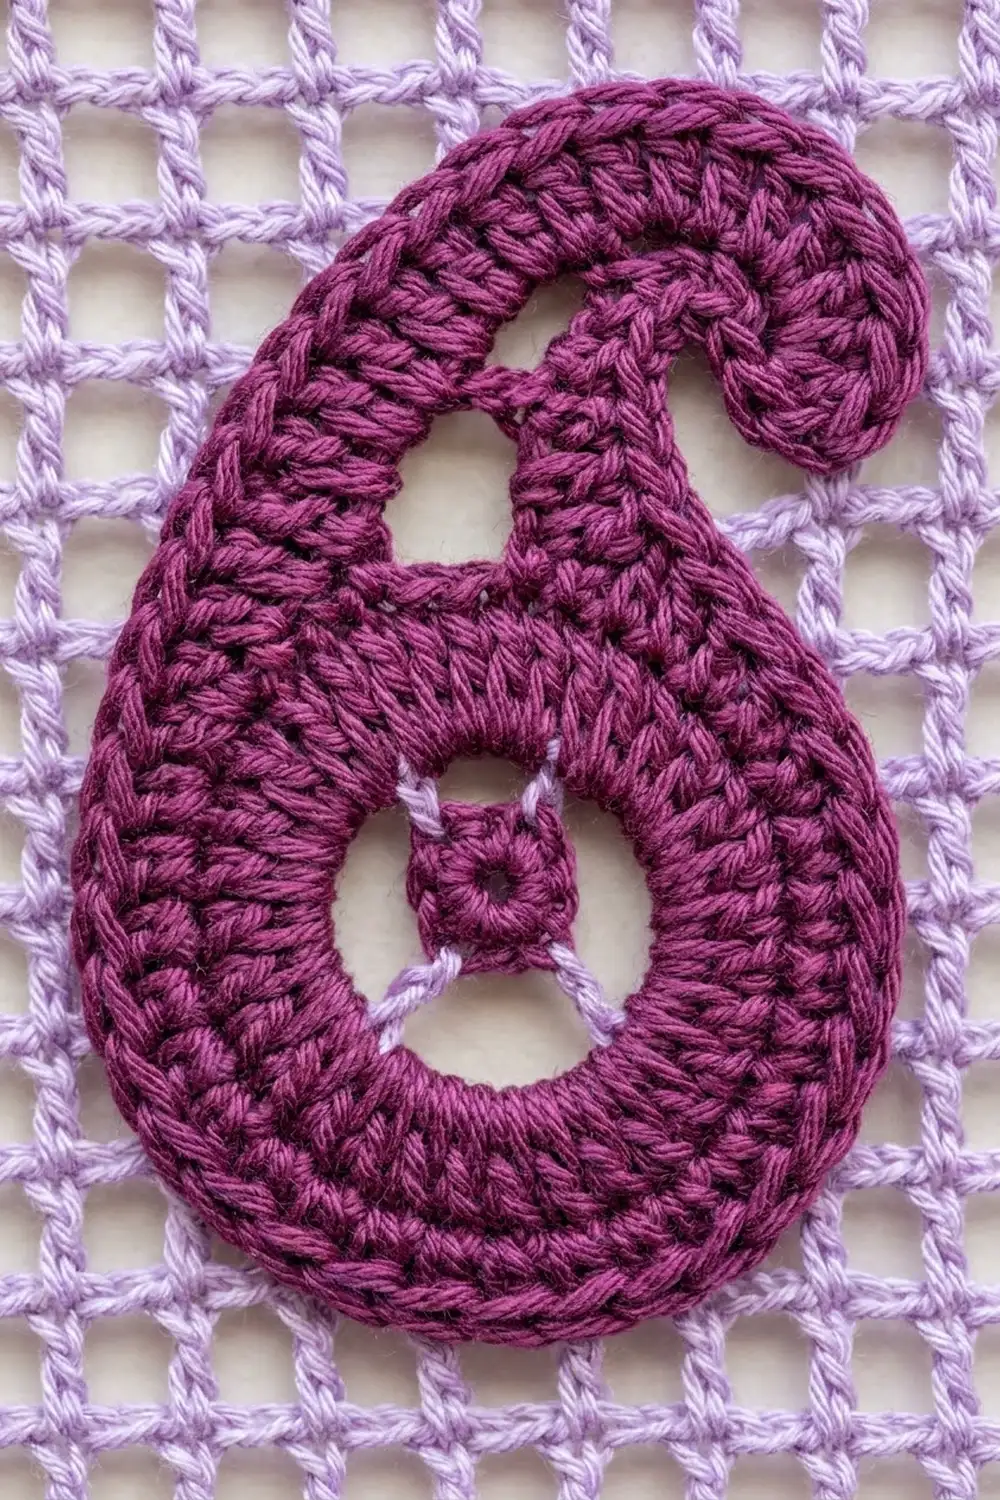
Paisley Strip (Make 3)
Using lavender, ch 42.
Row 1 (WS): Dc in the 4th ch from the hook (the skipped ch count as the first dc) and in each ch across. Turn. (40 dc)
Row 2 (RS): Ch 5 (counts as dc + ch 2), sk 2 dc, dc in the next dc. Ch 2, sk 2 dc, dc in the next dc; repeat from * across. Turn. (13 meshes: 14 dc + 13 ch-2 sps = 40 sts)*
Row 3 (WS): Ch 5, dc in the next dc. Ch 2, dc in the next dc; repeat from * across, working the last dc in the 3rd ch of the turning ch. Turn. (13 open meshes)*
Paisley Repeat (20 rows)
Work each row in the order written. Every row starts with ch 5 and ends with an open mesh, so the first and last mesh are always lavender.
- Join plum where a segment first appears. Cut it, leaving a 6 in (15.2 cm) tail, where the segment ends.
- Use one bobbin for each separate plum area. Row M6 needs three.
-
Carry lavender inside the plum dc of each block. Never carry plum across an open mesh.
-
M1 (RS): 5 O, 3 B, 5 O
- M2 (WS): 3 O, 7 B, 3 O
- M3: 2 O, 9 B, 2 O
- M4: 2 O, 3 B, 3 O, 3 B, 2 O
- M5: 1 O, 3 B, 5 O, 3 B, 1 O
- M6: 1 O, 2 B, 3 O, 1 B, 3 O, 2 B, 1 O
- M7: 1 O, 2 B, 2 O, 3 B, 2 O, 2 B, 1 O
- M8: Repeat M6.
- M9: Repeat M5.
- M10: Repeat M4.
- M11: 3 O, 3 B, 1 O, 3 B, 3 O
- M12: 4 O, 5 B, 4 O
- M13 (RS): 5 O, 3 B, 5 O
- M14 (WS): 4 O, 3 B, 6 O
- M15 (RS): 7 O, 3 B, 3 O
- M16 (WS): 2 O, 3 B, 8 O
- M17 (RS): 9 O, 2 B, 2 O
- M18 (WS): 2 O, 1 B, 10 O
- M19–M20: 13 O
Every row adds up to 13 meshes, or 40 sts. Rows M3–M12 form the teardrop body. The hole inside it is the inner ring, with the M6–M8 dot at its center. Rows M13–M18 step one mesh over each row to form the curled tail.
Rows 4–163: Work the Paisley Repeat 8 times in total. M1 always falls on a RS row. This gives 8 paisleys, each 9 in (22.9 cm) tall, spaced 10 in (25.4 cm) apart.
Row 164 (RS): Ch 3 (counts as dc). 2 dc in the ch-2 sp, dc in the next dc; repeat from * across. (40 dc)* Fasten off.
The strip should measure 6.5 in × 82 in (16.5 cm × 208.3 cm).
Plum Mesh Strip (Make 4)
Using plum, ch 18.
Row 1 (WS): Dc in the 4th ch from the hook and in each ch across. Turn. (16 dc)
Rows 2–163: Ch 5, sk 2 dc (in Row 2 only), dc in the next dc. Ch 2, dc in the next dc; repeat from * across. Turn. (5 meshes: 6 dc + 5 ch-2 sps = 16 sts)*
Row 164: Ch 3. 2 dc in the ch-2 sp, dc in the next dc; repeat from * across. (16 dc)* Fasten off.
The strip should measure 2.5 in × 82 in (6.4 cm × 208.3 cm), with 164 rows to match the paisley strips.
Make All Pieces
Per panel:
– Lavender with plum motifs: 3 paisley strips
– Plum: 4 mesh strips
For a pair: 6 paisley strips and 8 plum strips.
Layout from left to right (P = plum strip, L = paisley strip):
P | L | P | L | P | L | P
2.5 | 6.5 | 2.5 | 6.5 | 2.5 | 6.5 | 2.5  (in)
The total width is (4 × 2.5 in) + (3 × 6.5 in) = 29.5 in (74.9 cm).
Joining
- Lay the strips out in order. Make sure every paisley tail points the same way and the Row 1 edges are all at the bottom.
- Hold two neighboring strips with RS together, so the seam ridge ends up on the WS.
- Work with plum. Join with a sl st through both bottom corners.
- Work 2 sc through both layers in each row end.
- Match row to row: Row 1 to Row 1, Row 164 to Row 164. Each seam has 328 sc.
- Fasten off, then join the next strip. You need 6 seams in total.
- Place a marker every 20 rows on both strips before seaming so the edges can’t drift.
Tension: keep the seam sc as loose as your mesh. A tight seam will gather the panel and pucker the paisleys.
Size checkpoint: 29.5 in × 82 in (74.9 cm × 208.3 cm). The seams sit flat on the WS and add no stitches to the top or bottom edge.
Border
Border gauge: 6 sc = 1 in (2.5 cm).
Starting counts per side:
– Top and bottom: (4 × 16) + (3 × 40) = 184 sts. Work into the strip stitches only, never into the seams.
– Long sides: 164 row ends × 3 sc = 492 sc.
The corners are ch-2 spaces and are not counted in the side totals.
Rnd 1: With RS facing, join plum in the first st of the top edge.
– Sc in each st across the top. (184 sc)
– Ch 2 at the corner.
– Work 3 sc in each row end down the side. (492 sc)
– Ch 2 at the corner.
– Sc in the base of each foundation st across the bottom. (184 sc)
– Ch 2 at the corner.
– Work 3 sc in each row end up the second side. (492 sc)
– Ch 2 at the last corner. Sl st to the first sc.
Total: 1,352 sc + 4 corner ch-2 sps.
Rnd 2: Ch 1. Sc in each sc. Work (sc, ch 2, sc) in each corner sp. Sl st to join.
– Top and bottom: 186 sc each.
– Sides: 494 sc each.
– Total: 1,352 + 8 = 1,360 sc.
Rnd 3: Repeat Rnd 2.
– Top and bottom: 188 sc each.
– Sides: 496 sc each.
– Total: 1,360 + 8 = 1,368 sc.
Fasten off.
Why the math works: 184 sts across 29.5 in is about 6.2 sts per inch, close to the 6-per-inch border gauge, so the top stays flat. Along the sides, 3 sc per 0.5 in row gives exactly 6 per inch. Three rounds add 0.75 in (1.9 cm) on every side, so the panel grows to 31 in × 83.5 in (78.7 cm × 212.1 cm).
Hanging Tabs (Make 7)
Rnd 3 leaves 188 sts on the top edge. Plan the tabs as follows:
- Tabs: 7 tabs of 8 sts each = 56 sts
- Gaps: 6 gaps of 22 sts each = 132 sts
- Check: 56 + 132 = 188
Place a marker on the first st of each tab.
- Tab row 1: With RS facing, join plum in the first marked st. Ch 1, then work 1 sc in each of the next 8 sts. Turn. (8 sc)
- Tab rows 2–16: Ch 1, sc in each sc. Turn. (8 sc)
Each tab is about 1.3 in × 4 in (3.3 cm × 10.2 cm), and the gaps are about 3.7 in (9.4 cm).
Fold each tab to the WS around a curtain ring or the rod, then whipstitch its last row along the base of Rnd 1. The folded loop adds 2 in (5.1 cm), so the panel hangs 85.5 in (217.2 cm) from the top of the loop.
Final Blocking
- Weave in all ends inside plum blocks or along the seams.
- Soak the panel in cool water, then press the water out in a towel. Don’t wring it.
- Lay it flat on a clean surface, WS up.
- Pin the four corners to 31 in × 83.5 in (78.7 cm × 212.1 cm).
- Pin along each edge every 4 in (10.2 cm). Square up the mesh by eye along the seams.
- Nudge every paisley’s inner ring open with a fingertip.
- Let it dry completely, then unpin.
Final Quality-Control Checklist
- All 7 strips have 164 rows.
- Paisley strips have 40 sts across, and plum strips have 16.
- All 24 paisleys (8 per strip) face the same direction.
- Each seam has 328 sc and lies flat.
- Border Rnd 3: top and bottom 188 sc, sides 496 sc.
- 7 tabs, each 8 sts wide, with 22 sts between them.
- The panel measures 31 in × 83.5 in (78.7 cm × 212.1 cm).
Troubleshooting
- The mesh looks rectangular, not square: your dc are too tall or too short. Change how far you pull up each loop, keeping the stitch counts the same.
- Lavender shows through the plum blocks: carry the lavender lower and keep it snug against the stitch tops.
- A plum block sits one mesh off: count the meshes in each row before turning. Every row should be 13 meshes.
- The panel is wavy at the seams: the seam sc were too loose. Remove them and redo with 2 sc per row end.
- The border ruffles: go down a hook size for the border only.
- The border pulls in: go up a hook size for the border only.
Care
Hand wash in cool water with mild soap, then dry flat. Hang the curtain only once it is completely dry so the mesh doesn’t stretch.
Final Notes
Every measurement builds on the one before it:
- Gauge: one 0.5 in (1.3 cm) mesh.
- Strips: 13 meshes make a 6.5 in (16.5 cm) paisley strip, and 5 meshes make a 2.5 in (6.4 cm) plum strip. All strips are 164 rows, or 82 in (208.3 cm), long.
- Joining: seven strips give 29.5 in × 82 in (74.9 cm × 208.3 cm).
- Border: adds 0.75 in (1.9 cm) per side, for a finished panel of 31 in × 83.5 in (78.7 cm × 212.1 cm).
- Tabs: seven tabs hang it from the rod.
If you check your gauge on the test strip, every later count will fall into place.
Happy crocheting!