

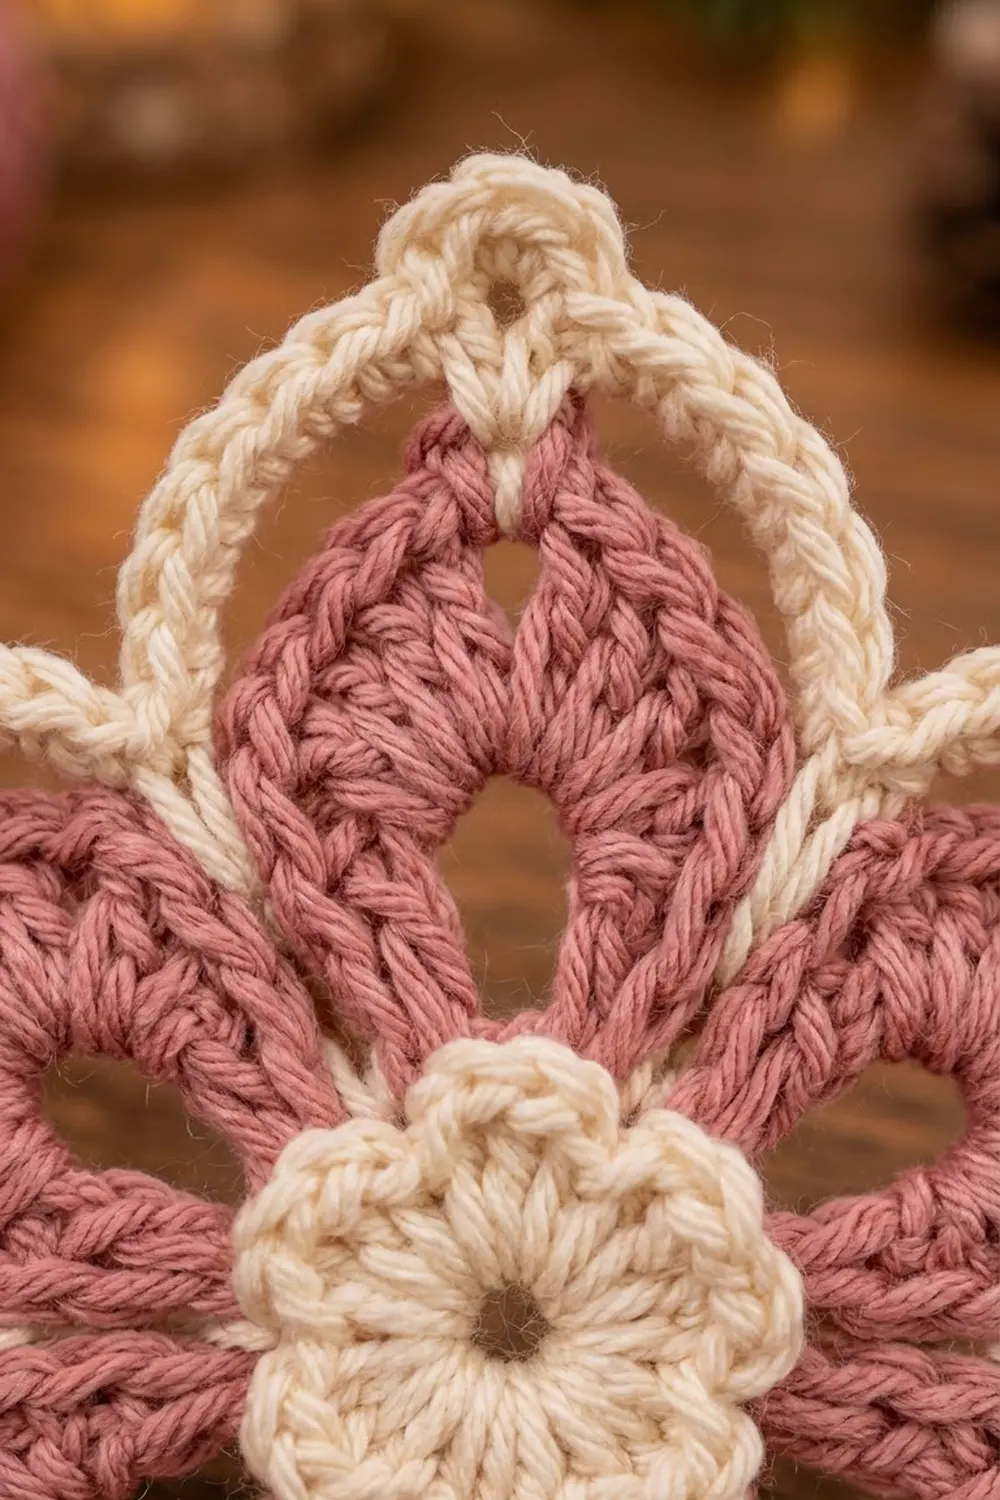
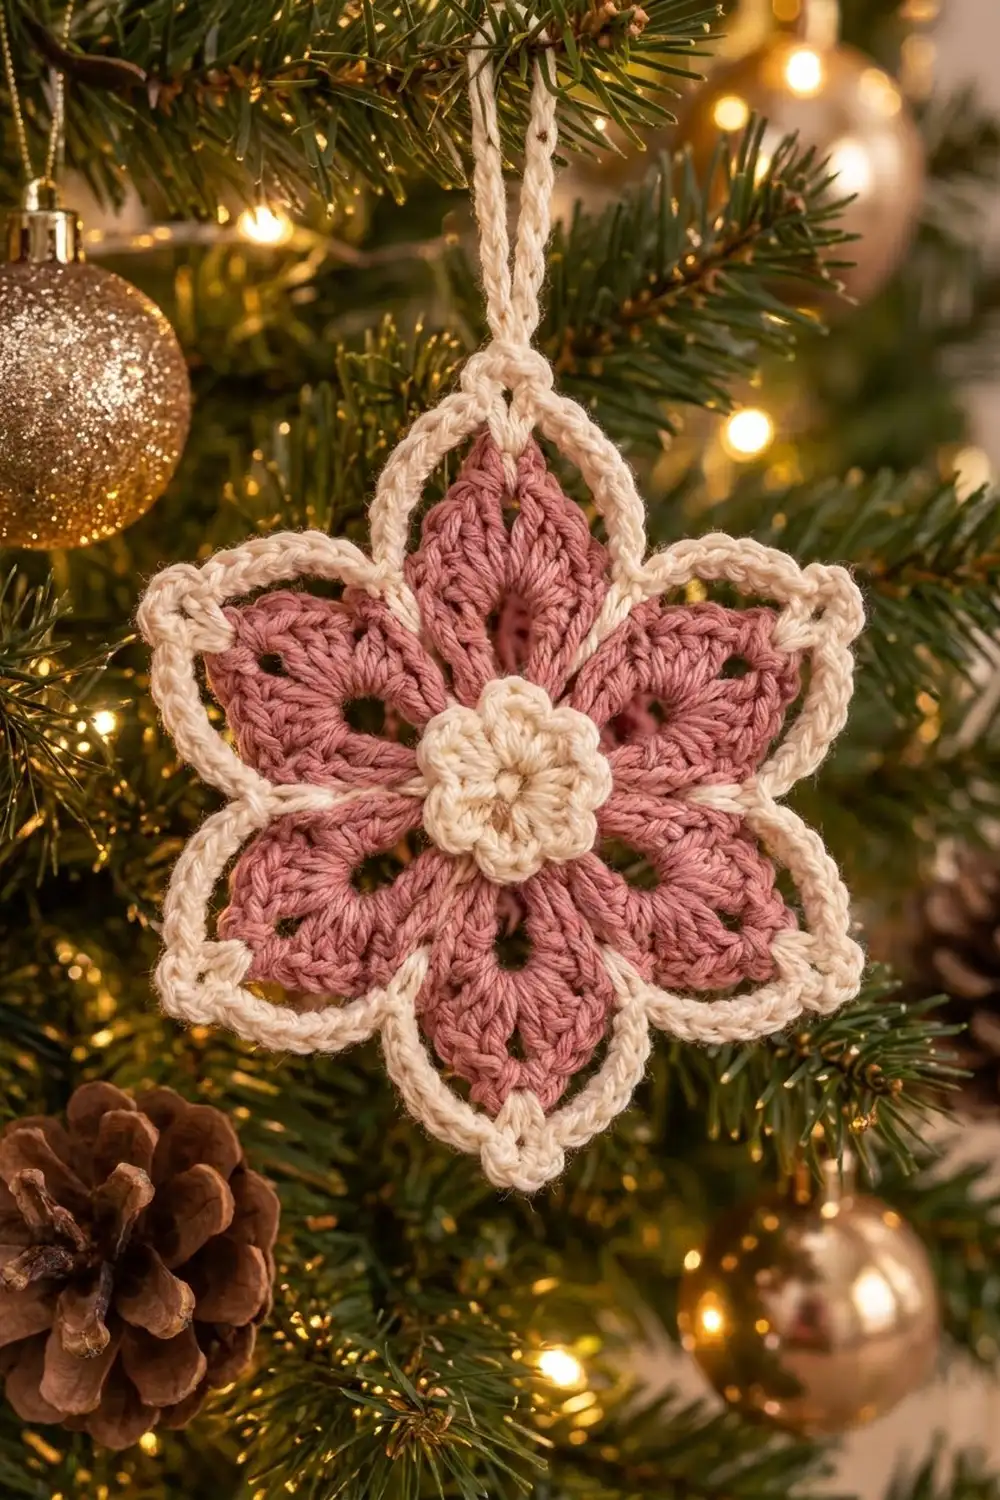
The Rosewood Petal Ornament is a single six-petal flower with a cream center, dusty rose lace petals, and a crisp cream outline. Each petal comes to a soft point. A small eyelet opens near its base, and tall, fanned stitches give it a ribbed texture. A cream chain loop on the top petal lets it hang from a branch, a gift box, or a window hook.
The palette is two colors. Cream is used for the center rosette and the outline, and dusty rose for the petals. The look is vintage and cozy, and it suits both a traditional tree and a softer neutral one.
This pattern uses US crochet terms. The finished ornament measures 4.5 in (11.4 cm) from petal tip to opposite petal tip. The hanging loop adds about 1.75 in (4.4 cm), so the ornament is about 6.25 in (15.9 cm) tall in total.
The ornament is worked in the round as one piece, and nothing needs sewing together. You start with a 12-dc cream ring and a scalloped round. Next come three rose rounds that build six petals. You finish with two cream rounds: a chain frame, then a single crochet outline with a picot at each tip and the hanging loop at the top tip.
Finished Size and Construction
- Finished size: 4.5 in (11.4 cm) tip to tip; about 6.25 in (15.9 cm) tall including the loop
- Skill level: Easy+ / Advanced Beginner
- Terminology: US crochet terms
- Yarn weight: DK / light worsted (#3), cotton or cotton blend
- Hook: 3.5 mm (US E-4)
- Number of pieces: 1 (one flower motif)
- Layout: Single motif, six petals, one petal pointing straight up to carry the loop
- Piece size: 4.5 in (11.4 cm) tip to tip
- Size before border: 3.75 in (9.5 cm) tip to tip after Round 5
- Border depth: about 0.375 in (1.0 cm) on each side (Rounds 6–7)
Materials
Choose a smooth mercerized cotton or a cotton blend in DK weight, about 50 g / 115 m per ball. Cotton gives clean stitch definition and holds the pointed tips well after blocking. Acrylic also works, but the outline will look softer and slightly rounder.
Yarn:
– Color A – Cream: 8 g, about 18 m (19.7 yd), for the center, outline, and hanging loop
– Color B – Dusty Rose: 10 g, about 23 m (25.2 yd), for the petals
These quantities include a margin for a gauge test and weaving in ends. One ball of each color makes several ornaments.
Tools:
– 3.5 mm (US E-4) crochet hook
– Tapestry needle
– Scissors
– Stitch marker (optional)
– Blocking mat or folded towel, plus rust-proof pins
– Spray bottle, plus spray starch if you want it (optional)
– Ruler or tape measure
Abbreviations (US Terms)
- ch – chain
- sl st – slip stitch
- sc – single crochet
- dc – double crochet
- tr – treble crochet (yarn over twice, insert hook, pull up a loop, [yarn over, pull through 2 loops] 3 times)
- sp – space
- st(s) – stitch(es)
- MR – magic ring
- [ ] – repeat the instructions inside the brackets as directed
Special stitch: Petal Tip Fan. Work (2 dc, 2 tr, ch 3, 2 tr, 2 dc) into the same space. This makes 8 stitches with a ch-3 point at the center, and it forms the pointed top of each petal.
Gauge and Checkpoints
Gauge is not critical for an ornament, but it controls the finished size and how well the outline lies flat. Make Rounds 1–2 first and measure them before you go on.
- Base gauge: Round 1 (12 dc in a magic ring) measures 1 in (2.5 cm) across.
- Border gauge: 6 sc = 1 in (2.5 cm) when worked over a chain.
Checkpoints:
– After Round 2: 1.25 in (3.2 cm) across
– After Round 3: 1.75 in (4.4 cm) across, measured to the outer edge of the ch-5 loops
– After Round 4: 2.25 in (5.7 cm) across
– After Round 5: 3.75 in (9.5 cm) tip to tip
– After Round 6: 4.25 in (10.8 cm) tip to tip
– After Round 7: 4.5 in (11.4 cm) tip to tip
A difference of up to 0.25 in (0.6 cm) is fine at the final stage.
Too big? Go down to a 3.25 mm hook, or tighten your chains. Loose chains in Rounds 3 and 6 are the most common cause.
Too small? Go up to a 3.75 mm hook. If only the outline is tight and cupping, change hooks for Rounds 6–7 alone.
Pattern
Center Rosette (Color A – Cream)
Round 1: Make a magic ring, ch 3 (counts as dc), 11 dc in the ring. Pull the ring closed and join with a sl st to the top of the beginning ch-3. (12 dc)
Round 2: Ch 1, sc in the same st, ch 2, [sc in next dc, ch 2] 11 times. Join with a sl st to the first sc. (12 sc, 12 ch-2 sps)
The ch-2 spaces make the small scalloped bumps around the center. Fasten off Color A and leave a 4 in (10.2 cm) tail.
Petals (Color B – Dusty Rose)
Round 3: Join Color B with a sl st in any ch-2 sp. Ch 1, sc in the same sp, [ch 5, skip next ch-2 sp, sc in next ch-2 sp] 5 times, ch 5, skip the last ch-2 sp. Join with a sl st to the first sc. (6 sc, 6 ch-5 loops)
The six skipped ch-2 bumps stay visible in cream between the petal bases, which gives the center its rosette look.
Round 4: Sl st into the next ch-5 loop. Ch 3 (counts as dc), (dc, ch 3, 2 dc) in the same loop, ch 1, [(2 dc, ch 3, 2 dc) in next ch-5 loop, ch 1] 5 times. Join with a sl st to the top of the beginning ch-3. (24 dc, 6 ch-3 sps, 6 ch-1 sps)
Each (2 dc, ch 3, 2 dc) V-shell is the base of one petal. The open ch-5 loop under each shell leaves the small eyelet near the base of the petal.
Round 5: Sl st in the next dc, then sl st into the ch-3 sp. Ch 3 (counts as dc), then work (dc, 2 tr, ch 3, 2 tr, 2 dc) in the same sp to complete the first Petal Tip Fan. Sc in the next ch-1 sp. [Petal Tip Fan in the next ch-3 sp, sc in the next ch-1 sp] 5 times. Join with a sl st to the top of the beginning ch-3. (24 dc + 24 tr + 6 sc = 54 sts, plus 6 ch-3 tips)
This is a growth round, and 54 sts plus 6 ch-3 tips is its full count. Each petal is 8 tall sts fanned from one space, so the stitch posts spread into the ribbed texture. The ch-3 at the center of each fan makes the pointed tip. The sc in each ch-1 sp pulls the valley between petals down. Fasten off Color B.
Checkpoint: 3.75 in (9.5 cm) tip to tip. Lay the flower flat. All six petals should be the same length, and the valleys should not pucker.
Border
The border is two cream rounds. Round 6 builds an open chain frame that sits slightly outside the petal edge. Round 7 covers that frame with single crochet, which gives the raised cream outline with a point at each tip.
Border gauge: 6 sc = 1 in (2.5 cm) worked over a chain.
Round 6 (frame): Join Color A with a sl st in the ch-3 tip of the petal you want at the top. Ch 1, (sc, ch 3, sc) in the same sp, ch 6, sc in the next valley sc (the Round 5 sc between petals), ch 6. [(Sc, ch 3, sc) in the next ch-3 tip, ch 6, sc in the next valley sc, ch 6] 5 times. Join with a sl st to the first sc. (18 sc, 6 ch-3 tips, 12 ch-6 sps)
Per petal, that is 2 sc at the tip, 1 sc in the valley, and one ch-6 along each side. Each ch-6 should lie along its petal edge without pulling it in.
Round 7 (outline): Sl st into the first ch-3 tip sp. Ch 1.
– Top tip (hanging loop): (2 sc, ch 30, 2 sc) in this ch-3 sp.
– 7 sc in the next ch-6 sp, sc in the valley sc, 7 sc in the next ch-6 sp.
– [(2 sc, ch 3, 2 sc) in the next ch-3 tip sp, 7 sc in the next ch-6 sp, sc in the valley sc, 7 sc in the next ch-6 sp] 5 times.
– Join with a sl st to the first sc.
Skip the 12 tip sc from Round 6. The tip stitches go into the ch-3 sp instead.
Count for Round 7 (conversion round): 6 sc worked one per existing stitch (into the 6 valley sc) + 108 sc added in spaces (12 ch-6 sps × 7 sc = 84, plus 6 tips × 4 sc = 24) = 114 sc, plus 5 ch-3 picots and 1 ch-30 hanging loop.
Per side: Each petal has two sides that run from tip to valley. One side has 2 tip sc + 7 sc + half of the valley sc, which is 9.5 sc. Twelve sides × 9.5 sc = 114 sc, which matches the round count.
Why the math works: Each petal side curves outward and is about 1.6 in (4.1 cm) long along the edge. At 6 sc per inch, 9.5 sc covers about 1.58 in (4.0 cm). That is close enough that the outline neither ruffles nor pulls the petal in. Putting 7 sc in each ch-6 sp, one more than the chain count, lets the outline turn around the curved edge. The single sc in each valley keeps the inside corners from bunching. The (2 sc, ch 3, 2 sc) at each tip adds just enough stitches to turn a sharp point.
Fasten off. Weave each tail through stitches of its own color so nothing shows through the lace.
Checkpoint: 4.5 in (11.4 cm) tip to tip. Thirty chains measure about 3.5 in (8.9 cm). Folded in half, they make a loop that hangs about 1.75 in (4.4 cm) above the top tip.
Final Blocking
- Weave in every end before blocking.
- Mist the ornament until it is evenly damp, or wet it fully and roll it in a towel to remove the extra water.
- Lay it face up on the mat with the hanging loop at the top.
- Pin the center rosette first so it stays round.
- Pin each of the six tips 2.25 in (5.7 cm) from the center, so the ornament is 4.5 in (11.4 cm) tip to tip. Space the tips evenly, at the 12, 2, 4, 6, 8, and 10 o’clock positions.
- Put a pin in each valley so the outline makes a clean inside angle.
- Push a pin through the top of each picot to sharpen it.
- For a stiffer ornament, spray lightly with starch.
- Let it dry completely, usually 6–12 hours, before you remove the pins.
Final Quality-Control Checklist
- The center rosette is round and shows 6 cream bumps between the petal bases.
- All six petals are the same length, each with a pointed tip and a small eyelet near its base.
- Round 5 has 54 sts plus 6 ch-3 tips.
- Round 7 has 114 sc, 5 picots, and 1 hanging loop.
- The outline lies flat, with no ruffling along the sides and no pulling at the valleys.
- The ornament measures 4.5 in (11.4 cm) tip to tip, within 0.25 in (0.6 cm).
- The loop is centered on the top tip and is about 1.75 in (4.4 cm) long.
- All ends are woven into stitches of the same color and trimmed.
Troubleshooting
The center cups or bulges. Round 1 is too tight. Keep the ring pulled closed but loosen your dc, or use a larger hook for Round 1 only.
The petals are uneven lengths. Check that every Petal Tip Fan has exactly 2 dc and 2 tr on each side of the ch-3. A dc worked where a tr belongs makes that petal short.
The outline ruffles. Change to a 3.25 mm hook for Round 7, or work 6 sc in each ch-6 sp. That gives 102 sc in total (6 valley sc + 72 + 24).
The outline pulls the petals into a cup. The Round 6 chains are too tight. Rework that round with looser chains, or go up a hook size for Rounds 6–7.
The tips look rounded. Make sure the ch-3 picot is worked at every tip, then pin each picot sharply while blocking.
The ornament tilts when hanging. The loop is off-center. Rework the top tip so the ch-30 sits exactly between the two pairs of sc.
Care
Hand wash in cool water with mild soap, press out the water in a towel, and dry it flat in shape. Store it flat or wrapped in tissue so the tips and loop keep their shape.
Final Notes
The measurement chain is short and easy to check. Round 1 is 1 in (2.5 cm), and Round 2 is 1.25 in (3.2 cm). The petals grow to 3.75 in (9.5 cm) tip to tip by Round 5. The two-round cream border adds about 0.375 in (1.0 cm) on each side, for a finished size of 4.5 in (11.4 cm). The 114-stitch outline comes from 12 petal sides of 9.5 sc each. Check your counts at Rounds 2, 5, and 7, and every ornament in your set will come out the same size and hang straight.
Happy crocheting!