

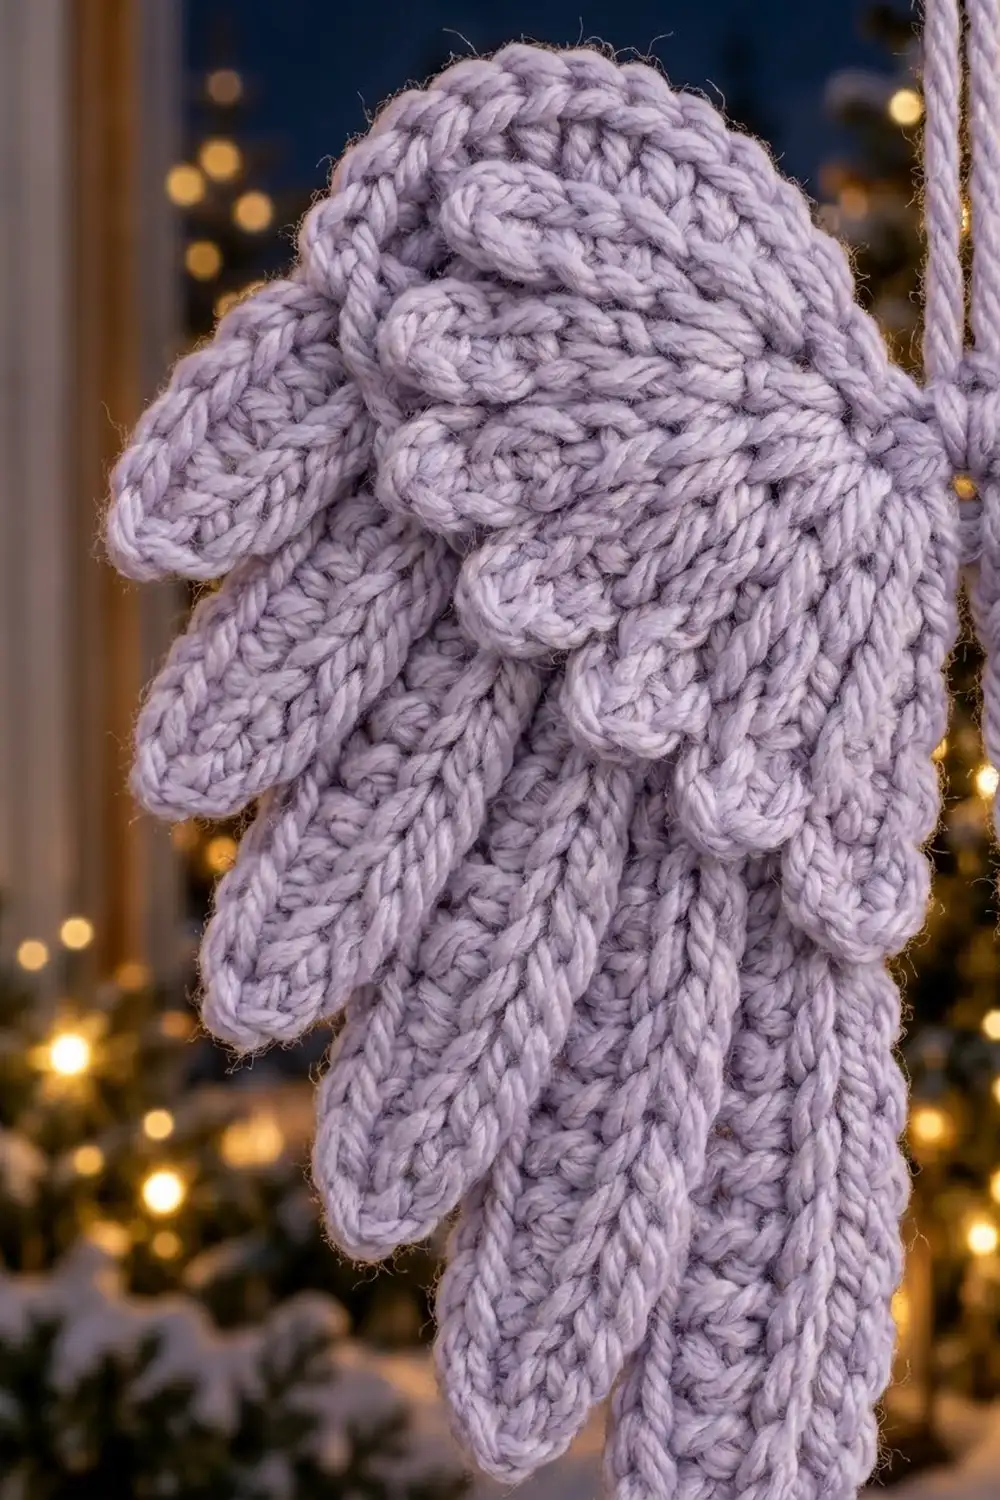
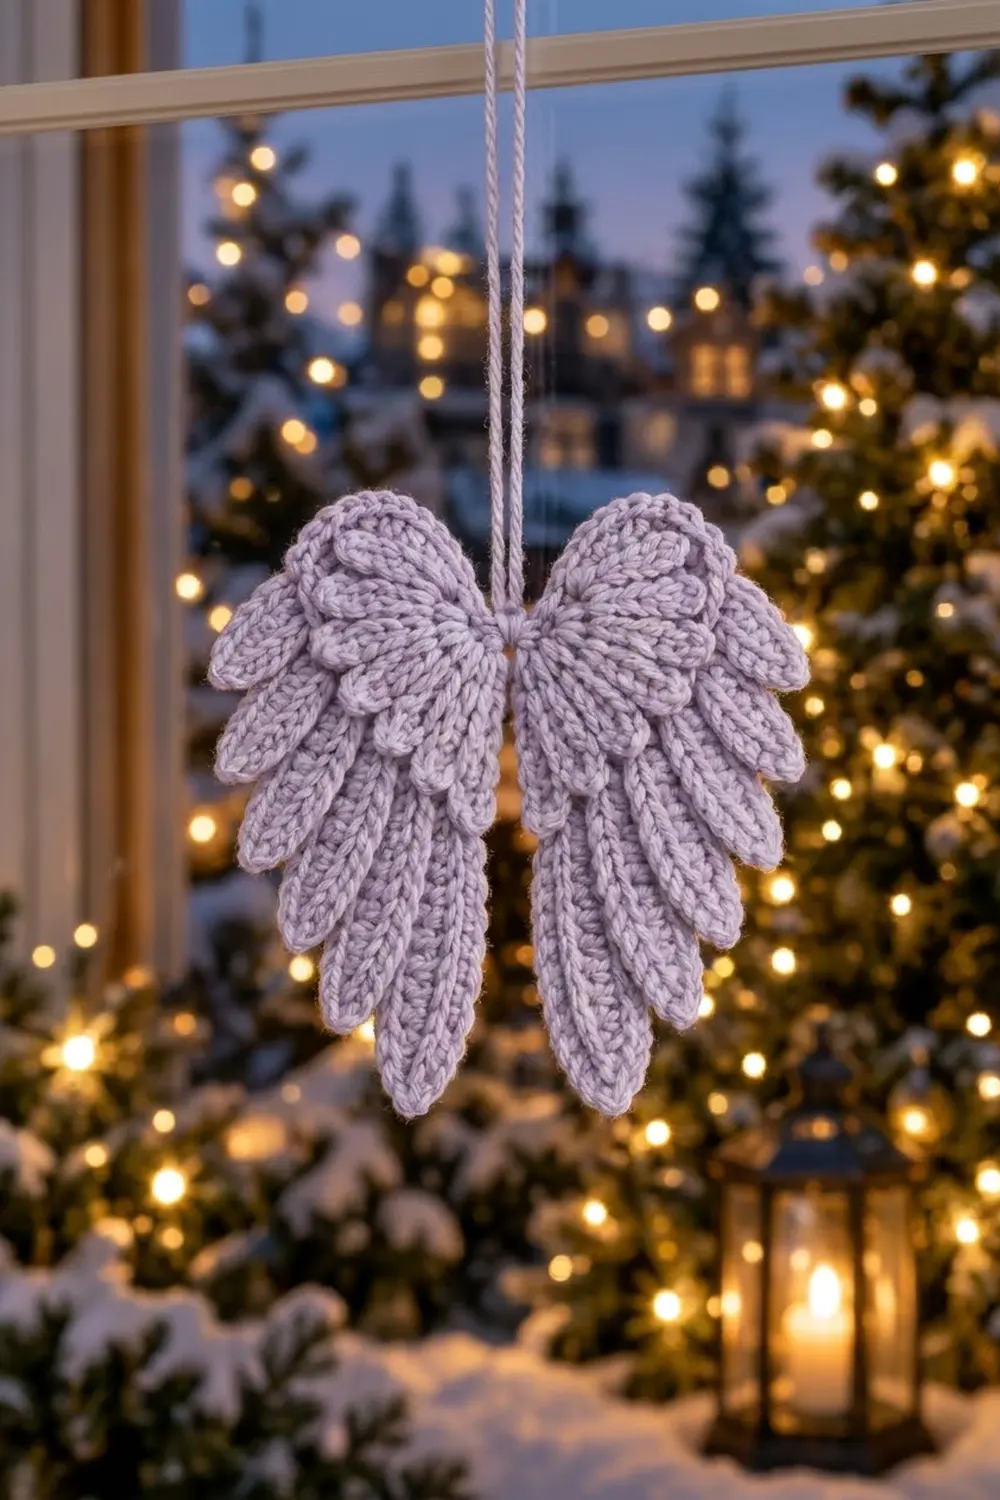
The Lavender Seraph is a small, layered pair of angel wings made to hang on a tree, in a window, or from a gift. Each wing has three rows of overlapping feathers: short rounded coverts at the shoulder, medium feathers in the middle, and long tapered primaries at the back that fan toward the center.
The ornament uses one soft lavender color, so the texture does the work. A slip-stitch outline around every feather gives a raised, braided-looking edge that catches the light, and the ribbed stitches inside each feather look like the shafts of real feathers.
This pattern uses US crochet terms. The finished ornament is about 5.5 in (14.0 cm) wide and 4.5 in (11.4 cm) tall, plus a hanging loop about 4 in (10.2 cm) long.
Construction is simple and repeatable. You make three tier strips for each wing. Each strip has a base row with five feathers chained out from it and is then outlined in slip stitch. You stack the three strips and sew them together to make a wing, make a mirror-image second wing, join the two wings at the center, and add a chain hanging loop.
Finished Size and Construction
- Finished size: 5.5 in × 4.5 in (14.0 cm × 11.4 cm), not counting the loop
- Skill level: Easy-Intermediate
- Terminology: US crochet terms
- Yarn weight: DK (#3, light)
- Hook: 3.5 mm (E-4)
- Number of pieces: 2 wings, each built from 3 tier strips (6 strips total)
- Layout: 2 wings side by side, joined at the top center
- Piece size (one wing): 2.75 in × 4.5 in (7.0 cm × 11.4 cm)
- Size before border: about 2.6 in × 4.4 in (6.6 cm × 11.2 cm) per wing
- Border depth: about 1/16 in (0.2 cm) on each feather edge
Materials
Yarn: Use a smooth DK yarn with good stitch definition. Mercerized cotton or a cotton blend gives the crispest feather outlines and blocks flat. A soft acrylic also works, but you may want a light fabric stiffener at the end. Avoid fuzzy or brushed yarns, because they hide the ribbed texture.
- Lavender: 10 g (about 25 m / 27 yd) per ornament
This amount includes a margin for your gauge swatch, sewing tails, and the hanging loop. One ornament actually uses about 7 g.
Tools:
- 3.5 mm (E-4) crochet hook
- Tapestry needle
- Scissors
- 2 stitch markers
- Blocking mat and rust-proof pins
- Spray bottle with water
- Optional: fabric stiffener, or a starch-and-water mix
Abbreviations (US Terms)
- ch – chain
- sl st – slip stitch
- sc – single crochet
- hdc – half double crochet
- dc – double crochet
- st(s) – stitch(es)
- sk – skip
- rep – repeat
- RS / WS – right side / wrong side
Special technique: Chain-out feather. Ch the number given. Working back along the chain toward the base, work the stated stitches in the back bumps of the chain, then sl st into the base row to anchor the feather. Leave the front loops of the chain free, because the border is worked into them later.
Anchor sl st: These are the sl sts in the base row that each feather starts from and ends in. Every tier has 6 of them.
Gauge and Checkpoints
Gauge: 18 sc and 20 rows = 4 in (10.2 cm) in sc. Each chain or stitch along a feather is about 0.22 in (0.6 cm) long.
Test one piece first. Make one Tier C (covert) strip as your swatch. It’s small and fast, and you’ll use it in the ornament if it measures correctly.
Checkpoints:
- After Row 1 of any tier: the base row of 11 sc measures 2.4 in (6.1 cm).
- After Row 2 of Tier C: the longest covert (5 sts) measures 1.1 in (2.8 cm).
- After Row 2 of Tier B: the longest middle feather (10 sts) measures 2.2 in (5.6 cm).
- After Row 2 of Tier A: the longest primary (16 sts) measures 3.5 in (8.9 cm). The shortest (11 sts) measures 2.4 in (6.1 cm).
- After assembly: each wing measures 2.75 in × 4.5 in (7.0 cm × 11.4 cm).
If your base row is too big: go down to a 3.25 mm (D-3) hook. Feathers that are too long and floppy will curl instead of lying layered.
If your base row is too small: go up to a 3.75 mm (F-5) hook. Feathers that are too tight will cup and won’t fan.
Being off by 1/8 in (0.3 cm) on the base row is fine. Being off by 1/4 in (0.6 cm) or more is worth fixing.
Tier Strips (Make 3 per Wing)
All three tiers use the same 11-st base and the same feather method. Only the feather lengths and stitch heights change.
Feather order: Lengths are listed in working order, for a right-handed crocheter.
- Left Wing: work feathers longest to shortest (inner to outer).
- Right Wing: work feathers shortest to longest (outer to inner).
Left-handed crocheters: your wings come out mirrored. Just swap the names.
Tier A – Long Primaries (Back Layer)
Row 1: Ch 12. Sc in 2nd ch from hook and in each ch across. Turn. (11 sc)
Row 2 (RS): Ch 1, sl st in first sc (anchor 1). Then work 5 feathers as follows.
Ch L+1. Sc in 2nd ch from hook, hdc in next ch, dc in each ch to the last 2 ch, hdc in next ch, sc in last ch (L sts on the feather). Sk next sc of Row 1, sl st in next sc (next anchor). Rep from * to * 4 more times, ending with a sl st in the 11th sc.
Feather lengths:
- Left Wing: L = 16, 15, 14, 13, 11
- Right Wing: L = 11, 13, 14, 15, 16
Anchors fall on sc 1, 3, 5, 7, 9, and 11.
Row 2 count: 16 + 15 + 14 + 13 + 11 = 69 feather sts, + 6 anchor sl sts = 75 sts. Turning chains and feather chains are not counted.
Do not fasten off. The border (Row 3) comes next. It’s written out in the Border section below.
Tier B – Middle Feathers
Row 1: Ch 12. Sc in 2nd ch from hook and in each ch across. Turn. (11 sc)
Row 2 (RS): Ch 1, sl st in first sc (anchor 1). Then work 5 feathers as follows.
Ch L+1. Sc in 2nd ch from hook, hdc in each ch to the last ch, sc in last ch (L sts). Sk next sc, sl st in next sc. Rep from * to * 4 more times.
Feather lengths:
- Left Wing: L = 10, 10, 9, 8, 7
- Right Wing: L = 7, 8, 9, 10, 10
Row 2 count: 44 feather sts + 6 anchors = 50 sts.
Tier C – Rounded Coverts (Front Layer)
Row 1: Ch 12. Sc in 2nd ch from hook and in each ch across. Turn. (11 sc)
Row 2 (RS): Work exactly as for Tier B, with these lengths:
- Left Wing: L = 5, 5, 5, 4, 4
- Right Wing: L = 4, 4, 5, 5, 5
A 5-st covert is sc, 3 hdc, sc. A 4-st covert is sc, 2 hdc, sc. These short feathers come out as soft, rounded scallops.
Row 2 count: 23 feather sts + 6 anchors = 29 sts.
Make All Pieces
Each ornament has 6 tier strips, all in lavender:
- Tier A: 2 strips (1 Left, 1 Right)
- Tier B: 2 strips (1 Left, 1 Right)
- Tier C: 2 strips (1 Left, 1 Right)
Layout, viewed from the front:
        hanging loop
             |
[ LEFT WING ]*[ RIGHT WING ]
 C  front     C  front
 B  middle    B  middle
 A  back      A  back
 (longest feathers at the center *)
Before you assemble, finish the border on all 6 strips and check the stitch counts for every strip.
Joining
Stacking each wing
- Lay Tier A RS up, with the base row at the top.
- Place Tier B RS up on top of it, so that Tier B’s base row sits 0.25 in (0.6 cm) above Tier A’s base row and both inner ends line up. Tier B’s feathers cover the upper part of the primaries.
- Place Tier C RS up on top, with its base row 0.25 in (0.6 cm) above Tier B’s base row. This puts Tier C’s base 0.5 in (1.3 cm) above Tier A’s base. The coverts form the rounded shoulder.
- Pin the three base rows in place.
Stitch-to-stitch logic: All three base rows have 11 sc, so they match one to one. Using a long tail, whipstitch along Tier C’s base row. Catch sc 1 through sc 11 of Tier C, taking each one into the matching sc of Tier B underneath and then into the matching sc of Tier A. That’s 11 stitches through all layers.
Sew only the base rows. Leave the feathers loose so they lift a little, giving the layered look.
Tension: Pull each stitch snug enough to close the gap, but not so tight that the base row bunches up. A sewn base should still measure 2.4 in (6.1 cm).
Joining the wings
Lay the wings side by side, RS up, with the longest feathers next to each other at the center. Line up the inner ends of the top base rows (the Tier C rows):
- Left Wing: the first-worked end (sc 1 and sc 2)
- Right Wing: the last-worked end (sc 10 and sc 11)
Whipstitch these 2 stitch pairs together through all layers. That gives a center seam 0.4 in (1.0 cm) long.
Hanging loop: At the top of the center seam, join yarn with a sl st. Ch 40, about 8 in (20.3 cm), then sl st back into the same spot. Fasten off and weave in the end. The doubled loop hangs about 4 in (10.2 cm).
Size checkpoint: The joined ornament measures 5.5 in (14.0 cm) across and 4.5 in (11.4 cm) from shoulder to the tip of the longest primary.
Border: Slip-Stitch Feather Outline (Row 3)
Every tier gets the same outline row. It makes the raised ridge you see around each feather.
Border gauge: Work the sl sts loosely enough that they don’t pull a feather shorter. Each edge should grow by only about 1/16 in (0.2 cm). If a feather shortens or curls, go up one hook size for this row only.
Row 3 (all tiers): Turn. Sl st in the anchor just made (anchor 6).
Then work each of the 5 feathers this way: Sl st in each of the L sts along the first long edge of the next feather. On one edge these are the free chain loops, and on the other edge they are the tops of the feather stitches. Work (sl st, ch 1, sl st) in the tip ch. Sl st in each of the L sts along the second long edge. Sl st in the next anchor. Rep from * to * 4 more times.
Fasten off, leaving a 10 in (25.4 cm) tail for sewing.
Counts per feather: L + 2 + L = 2L + 2 sl sts, plus 1 ch-1 at the tip.
Counts per tier:
- Tier A: (2 × 69) + (5 × 2) + 6 anchors = 154 sl sts + 5 ch-1 tips
- Tier B: (2 × 44) + 10 + 6 = 104 sl sts + 5 ch-1 tips
- Tier C: (2 × 23) + 10 + 6 = 62 sl sts + 5 ch-1 tips
That’s 320 sl sts per wing and 640 per ornament.
Why the math works: Each feather has exactly L working positions on each long edge. The chain gives L free loops, and the feather row gives L stitch tops. The tip chain takes two sl sts around a ch-1, so it turns the corner without pulling the point flat. The 6 anchors are shared between neighboring feathers, so each one is counted once, not twice. One sl st per position means the outline adds height and definition but no extra length.
Final Blocking
- Weave in all ends along the base rows, where they’re hidden under the coverts.
- Spritz the ornament until it’s damp, not soaked.
- Pin it RS up on the mat. Pin the center seam first, then pin each wing’s shoulder into a smooth curve.
- Fan the primaries gently outward so the tips are spaced evenly. Pin each tip at its point.
- Lift each layer of coverts and middle feathers slightly so they lie on top of the layer below instead of pressing flat into it.
- Check the size: 5.5 in × 4.5 in (14.0 cm × 11.4 cm).
- Optional: brush or spray a light coat of stiffener on the back.
- Let it dry completely, about 6–12 hours, before you unpin it.
Final Quality-Control Checklist
- The ornament is 5.5 in × 4.5 in (14.0 cm × 11.4 cm).
- Each wing has 15 feathers: 5 coverts, 5 middle feathers, and 5 primaries.
- The longest feathers sit at the center on both wings.
- Every feather has a continuous sl st outline and a neat pointed tip.
- The base rows are sewn through all three layers, and no seams show from the front.
- The center seam is 0.4 in (1.0 cm) and doesn’t gap.
- The hanging loop is secure and about 4 in (10.2 cm) long.
- All ends are woven in and trimmed.
Troubleshooting
Feathers twist into spirals. Your feather row is too tight. Work the chain-outs a little looser, or use a hook one size larger just for the chains.
Tips look blunt. Make sure you work (sl st, ch 1, sl st) into the tip ch itself and don’t skip it.
Wings are mirrored the same way. You used the same feather order for both wings. Rework the second wing using the order listed for the other wing.
Coverts hide the middle tier. Check the 0.25 in (0.6 cm) offsets between the base rows.
The ornament droops when hung. Use a cotton yarn or a light stiffener, and keep the center seam firm.
Your counts don’t match. Count your anchors first. There should be 6 per tier, on sc 1, 3, 5, 7, 9, and 11.
Care
Hand wash in cool water, press out the water gently, and dry flat. Reshape the feathers while damp. If you used stiffener, reapply it after washing.
Final Notes
The measurement chain runs like this:
- Gauge is 18 sc = 4 in (10.2 cm).
- That gives an 11-sc base of 2.4 in (6.1 cm).
- Feathers are 1.1 in (2.8 cm), 2.2 in (5.6 cm), and 3.5 in (8.9 cm) long.
- Each bordered wing is 2.75 in × 4.5 in (7.0 cm × 11.4 cm).
- The joined ornament is 5.5 in × 4.5 in (14.0 cm × 11.4 cm).
Check the base row first, and everything after it falls into place. Make a few sets for a window display or as gift toppers.
Happy crocheting!