

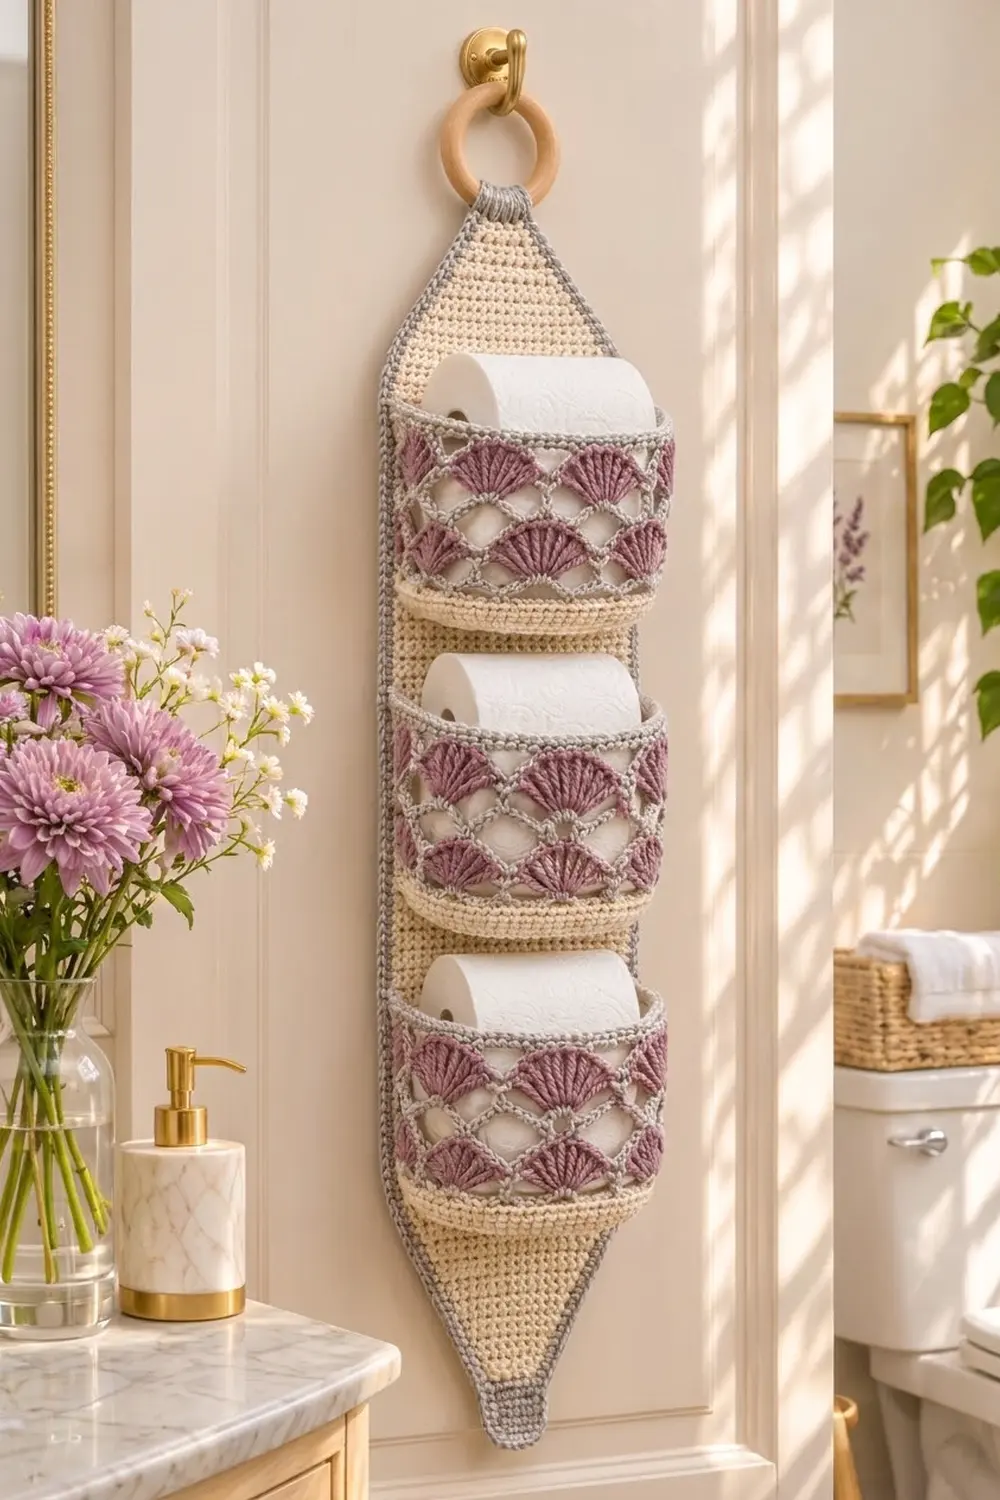
This hanging holder keeps three spare rolls tidy on a door, a hook, or the wall beside the toilet. A long cream backing panel carries three oval pockets. Each pocket is trimmed with mauve fans set in a pale gray lattice, and a wooden ring at the top gives it a clean, finished look.
The colors are soft and calm: cream for structure, mauve for the shells, and light gray for the lattice and borders. The style is cottage-bathroom: textured but neat, and sturdy enough for daily use.
All instructions use US crochet terms. The finished panel measures 6 in wide x 28.25 in long (15.2 x 71.8 cm). The hanging length is about 31 in (78.7 cm) including the ring. Each pocket base is 5.5 x 4 in (14.0 x 10.2 cm), and each pocket wall is 3.5 in (8.9 cm) tall.
You will work the backing panel in rows with a tapered top and a gray tab, then add a two-round gray border. The three pockets are worked in the round from an oval base. Last, you sew the pockets to the panel and wrap the tab around the ring.
Finished Size and Construction
- Finished size: panel 6 x 28.25 in (15.2 x 71.8 cm); about 31 in (78.7 cm) hanging length with the ring
- Skill level: Intermediate
- Terminology: US
- Yarn weight: Worsted (#4) cotton or cotton blend
- Hook: 4.5 mm (US 7)
- Number of pieces: 4 crocheted pieces (1 panel, 3 pockets) plus 1 wooden ring
- Layout: 3 pockets stacked in a single vertical column
- Pocket size: base 5.5 x 4 in (14.0 x 10.2 cm), wall 3.5 in (8.9 cm) tall
- Panel size before border: 5.5 x 28 in (14.0 x 71.1 cm), not counting the tab
- Border depth: 0.25 in (0.6 cm) per side
Materials
Choose a smooth, firm cotton. It holds the pocket shape, shows the fan stitches clearly, and handles bathroom humidity well. Acrylic also works, but the pockets will be softer.
- Cream: 250 g / about 425 m (panel and pocket bases)
- Mauve: 100 g / about 170 m (fans)
- Light gray: 100 g / about 170 m (lattice, rims, tab, border)
These amounts already include a margin of roughly 10-15% for swatching and differences in tension.
Tools:
- 4.5 mm (US 7) crochet hook
- Wooden ring, 2.5 in (6.4 cm) outer diameter
- Tapestry needle
- 6-8 locking stitch markers
- Rust-proof pins
- Tape measure
- Scissors
Abbreviations (US Terms)
- ch – chain
- sl st – slip stitch
- sc – single crochet
- dc – double crochet
- sc2tog – single crochet 2 together (decrease)
- BLO – back loop only
- rev sc – reverse single crochet (crab stitch)
- st(s) – stitch(es)
- sp – space
- rnd – round
- RS – right side
Shell: 7 dc in the same stitch.
Reverse sc: Work from left to right (for right-handers). Insert the hook into the next stitch to the right, yarn over, pull up a loop, yarn over, and pull through both loops. This makes a twisted, corded edge.
Gauge and Checkpoints
Gauge: 16 sc x 18 rows = 4 in (10.2 cm). That is 4 sts and 4.5 rows per inch.
Make one pocket first and use it as your gauge swatch. If the pocket measures correctly, the panel will match it, and the joining math depends on that match.
Checkpoints:
- Pocket base after Rnd 9: 5.5 x 4 in (14.0 x 10.2 cm)
- Cream wall after Rnd 13: about 0.9 in (2.3 cm) tall
- Finished pocket wall after Rnd 20: 3.5 in (8.9 cm)
- Panel after Row 20: 5.5 in (14.0 cm) wide
- Panel after Row 108: 24 in (61.0 cm) long
If your pieces come out too big, go down half a hook size. If they come out too small, go up half a size. Change the hook rather than the stitch counts, because the counts are tied to the seams.
Pocket (Make 3)
Work in joined rounds with the RS facing. Do not turn.
Oval Base (Cream)
Ch 9.
Rnd 1: Sc in 2nd ch from hook, sc in next 6 ch, 3 sc in last ch. Rotate and work along the other side of the chain: sc in next 6 ch, 2 sc in the last ch (the same ch as the first sc). Sl st to first sc. (18 sts: 6 per side, 3 per end)
Rnd 2: Ch 1, sc in next 6 sts, 2 sc in each of next 3 sts, sc in next 6 sts, 2 sc in each of next 3 sts. Sl st to first sc. (24 sts)
Rnd 3: Ch 1, sc in next 6 sts, (sc in next st, 2 sc in next st) 3 times, sc in next 6 sts, (sc in next st, 2 sc in next st) 3 times. Sl st to first sc. (30 sts)
Rnds 4-9: Keep the 6 side sts plain on every round. At each end, add one more plain sc before each increase than on the round before: 2 plain sc before each increase on Rnd 4, 3 on Rnd 5, and so on up to 7 on Rnd 9. Each round adds 6 sts.
- Rnd 4: 36 sts
- Rnd 5: 42 sts
- Rnd 6: 48 sts
- Rnd 7: 54 sts
- Rnd 8: 60 sts
- Rnd 9: 66 sts (6 per side, 27 per end)
The base should measure 5.5 x 4 in (14.0 x 10.2 cm).
Cream Wall
Rnd 10: Ch 1, sc in BLO of each st around. Sl st to first sc. (66 sts) The unused front loops of Rnd 9 form a ridge along the base edge.
Rnds 11-13: Ch 1, sc in each st around. Sl st to first sc. (66 sts) Fasten off cream.
Fan Lattice
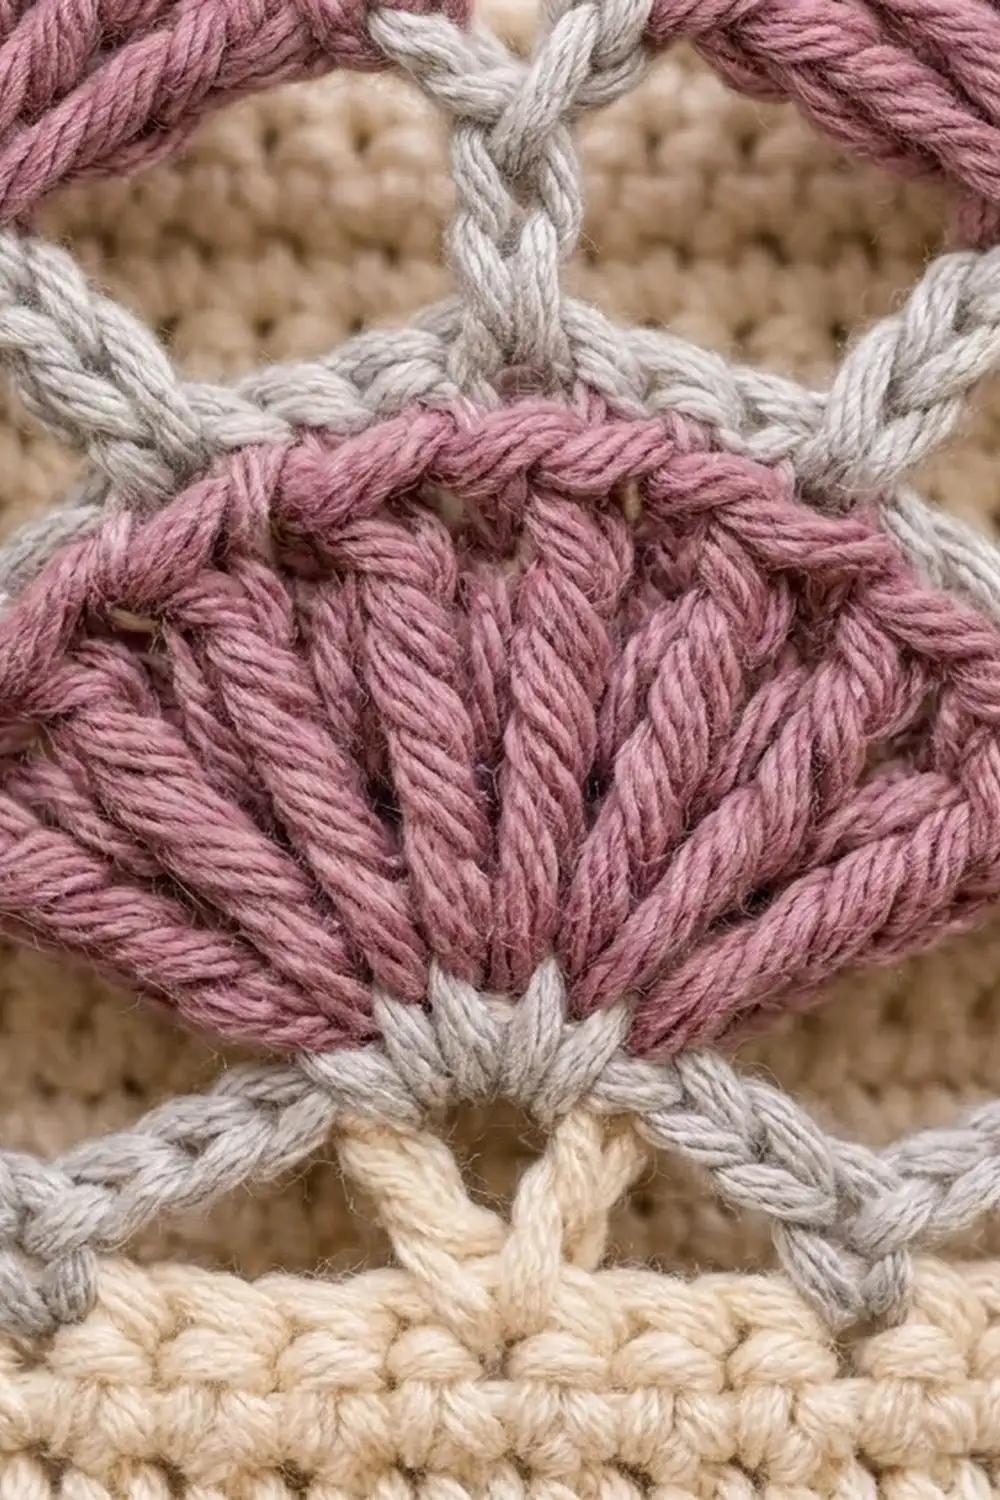
Rnd 14 (Mauve): Join mauve with sc in any st. Skip 2 sts, shell in next st, skip 2 sts, sc in next st. Repeat from * 9 more times, then skip 2 sts, shell in next st, skip 2 sts. Sl st to first sc. (11 shells, 11 sc = 88 sts) Fasten off.
The 6-stitch repeat divides evenly into 66 (66 / 6 = 11).
Rnd 15 (Gray): Join gray with sc in the 4th (center) dc of any shell. Ch 3, dc in next sc, ch 3, sc in center dc of next shell. Repeat around, ending with ch 3, dc in last sc, ch 3. Sl st to first sc. (11 sc, 11 dc, 22 ch-3 sps) Fasten off.
Rnd 16 (Mauve): Join mauve with sc in any sc of Rnd 15. Shell in next dc, sc in next sc. Repeat around, ending with a shell in the last dc. Sl st to first sc. (11 shells, 11 sc = 88 sts) Skip the chains. The fans sit in the gray V-shapes, offset from the first tier. Fasten off.
Rnd 17 (Gray): Work as for Rnd 15. (11 sc, 11 dc, 22 ch-3 sps) Do not fasten off.
Gray Rim
Rnd 18: Ch 1. Sc in sc, 2 sc in ch-3 sp, sc in dc, 2 sc in ch-3 sp. Repeat around. Sl st to first sc. (11 repeats x 6 = 66 sts)
This round brings the count back to 66 to match the base, so the walls stand straight instead of flaring.
Rnd 19: Ch 1, sc in each st around. Sl st to first sc. (66 sts)
Rnd 20: Ch 1, rev sc in each st around. Sl st to first st. (66 sts) Fasten off and weave in the ends.
Checkpoint: the wall is 3.5 in (8.9 cm) tall from the base ridge to the rim.
Backing Panel
Body (Cream)
Ch 23.
Row 1 (RS): Sc in 2nd ch from hook and in each ch across. (22 sts)
Rows 2-108: Ch 1, turn, sc in each st across. (22 sts)
The panel should measure 5.5 x 24 in (14.0 x 61.0 cm).
Taper (Cream)
Row 109 (decrease row): Ch 1, turn, sc2tog, sc to last 2 sts, sc2tog. (20 sts)
Row 110: Ch 1, turn, sc in each st across. (20 sts)
Rows 111-126: Repeat Rows 109-110 eight more times. The counts after each decrease row are 18, 16, 14, 12, 10, 8, 6, and 4 sts. Row 126 has 4 sts.
That is 9 decrease rows removing 18 sts (22 – 18 = 4) over 18 rows, so the taper is 4 in (10.2 cm) tall. The panel is now 28 in (71.1 cm) long.
Tab (Gray)
Change to gray.
Rows 127-138: Ch 1, turn, sc in each st across. (4 sts) Do not fasten off; go straight into the border.
Make All Pieces
- Cream: panel Rows 1-126, and Rnds 1-13 of each of the 3 pockets
- Mauve: Rnds 14 and 16 of each of the 3 pockets
- Gray: tab Rows 127-138, the panel border, and Rnds 15 and 17-20 of each of the 3 pockets
Layout (the row shown is where each pocket’s back seam goes):
        ( ring )
         [tab]
        / taper \        Rows 109-126
       |  open    |      Rows 92-108
       | Pocket 3 |      seam on Row 75
       |  gap     |
       | Pocket 2 |      seam on Row 39
       |  gap     |
       | Pocket 1 |      seam on Row 3
       |__________|
Border
Border gauge: 4 sc per inch (2.5 cm), the same as the panel.
Rnd 1 (Gray): Continue from the tab and work around the panel in this order:
- Work 10 sc evenly along the 12 row ends of the first tab side.
- Work 18 sc along the first taper (1 sc per row end).
- Work 96 sc down the first long side (Rows 108 to 1), skipping every 9th row end.
- Along the bottom edge: 3 sc in the corner st, sc in next 20 sts, 3 sc in the other corner st.
- Work 96 sc up the second long side.
- Work 18 sc along the second taper.
- Work 10 sc along the second tab side.
- Across the tab top: 2 sc in first st, sc in next 2 sts, 2 sc in last st.
- Sl st to first sc.
Per-side counts:
- Bottom edge: 22 worked 1-per-st + 4 extra corner sts = 26
- Each long side: 96
- Each taper: 18
- Each tab side: 10
- Tab top: 4 worked 1-per-st + 2 extra = 6
- Total: 26 + 96 + 96 + 18 + 18 + 10 + 10 + 6 = 280 sts
The bottom corner stitches are counted only in the bottom-edge count.
Rnd 2: Ch 1, rev sc in each st around. Sl st to first st. (280 sts) Fasten off.
Why the math works: 96 sc at 4 per inch is 24 in (61.0 cm), which matches 108 rows at 4.5 rows per inch. Each taper edge is a diagonal about 4.6 in (11.7 cm) long, running 2.25 in (5.7 cm) across and 4 in (10.2 cm) up. At 4 sts per inch, 18 sc fits that length. The bottom keeps all 22 sts, and the extra corner stitches let it turn without cupping. The border adds 0.25 in (0.6 cm) per side, for a finished width of 6 in (15.2 cm).
Joining
Method: Whipstitch with cream yarn and a tapestry needle.
- On each pocket, mark 22 consecutive front loops on the Rnd 9 ridge, centered on one straight side. That is the 6 side sts plus 8 sts from each end next to it. This becomes the back edge.
- Lay the panel RS up. Pin Pocket 1’s marked ridge along Row 3, matching 1 pocket st to 1 panel st across all 22 sts. Both measure 5.5 in (14.0 cm), so there is nothing to ease in.
- Whipstitch across those 22 sts.
- Sew each side of the pocket’s back wall straight up to the rim. Follow the column of the wall above the 1st and 22nd marked sts, and stitch it to the edge st of the cream panel (columns 1 and 22), just inside the gray border.
- Tack the rim to the panel at both side seams and at the center back.
- Repeat for Pocket 2 on Row 39 and Pocket 3 on Row 75. The seams are 36 rows, or 8 in (20.3 cm), apart.
Tension: Keep the stitches snug but not tight enough to pucker. The panel should stay flat under each seam.
Size checkpoint: The 44 free sts of each pocket bulge forward about 4.25 in (10.8 cm), which is deep enough for a standard roll. The panel should still measure 6 x 28.25 in (15.2 x 71.8 cm).
Ring: Fold the tab through the ring from front to back. Sew the end of the tab to the back of Rows 121-126.
Final Blocking
- Dampen the panel lightly or mist it with water.
- Lay it flat and pin it to 6 x 28.25 in (15.2 x 71.8 cm).
- Put a toilet roll or a rolled towel in each pocket.
- Shape the fans so they open evenly.
- Steam the rims gently, holding the iron above the yarn without touching it.
- Let everything dry completely before hanging.
Final Quality-Control Checklist
- Each pocket has 11 fans per tier, and the two tiers are offset.
- Each rim has 66 sts and stands straight.
- The panel is 22 sts wide and the taper ends at 4 sts.
- The border has 280 sts and its corners lie flat.
- The pocket seams are on Rows 3, 39, and 75.
- The ring tab is sewn down securely.
- All ends are woven in.
Troubleshooting
- Pocket walls flare: Check that Rnd 18 has 66 sts. Use a smaller hook for Rnds 14-17.
- Fans look crowded: Make sure you skip 2 sts on each side of every shell in Rnd 14.
- Border ripples: Remove a few sts evenly, taking the same number from both sides.
- Border cups: Add a few sts evenly, keeping both sides equal.
- Pocket sags: Tack the rim to the panel at more points.
- Panel is narrower than the pockets: Your panel gauge is tighter than your pocket gauge. Check it against the Row 20 checkpoint.
Care
Hand wash in cool water and lay flat to dry. Reshape the pockets while they are damp.
Final Notes
Here is how the measurements connect. A gauge of 4 sts per inch gives a 5.5 in (14.0 cm) pocket base and a 22-stitch panel of the same width, so the back seams match one-to-one. The 96-stitch border sides match 24 in (61.0 cm) of rows. The 0.25 in (0.6 cm) border brings the panel to 6 x 28.25 in (15.2 x 71.8 cm). Check each stage as you go, and the holder will hang straight and hold its rolls neatly.
Happy crocheting!