

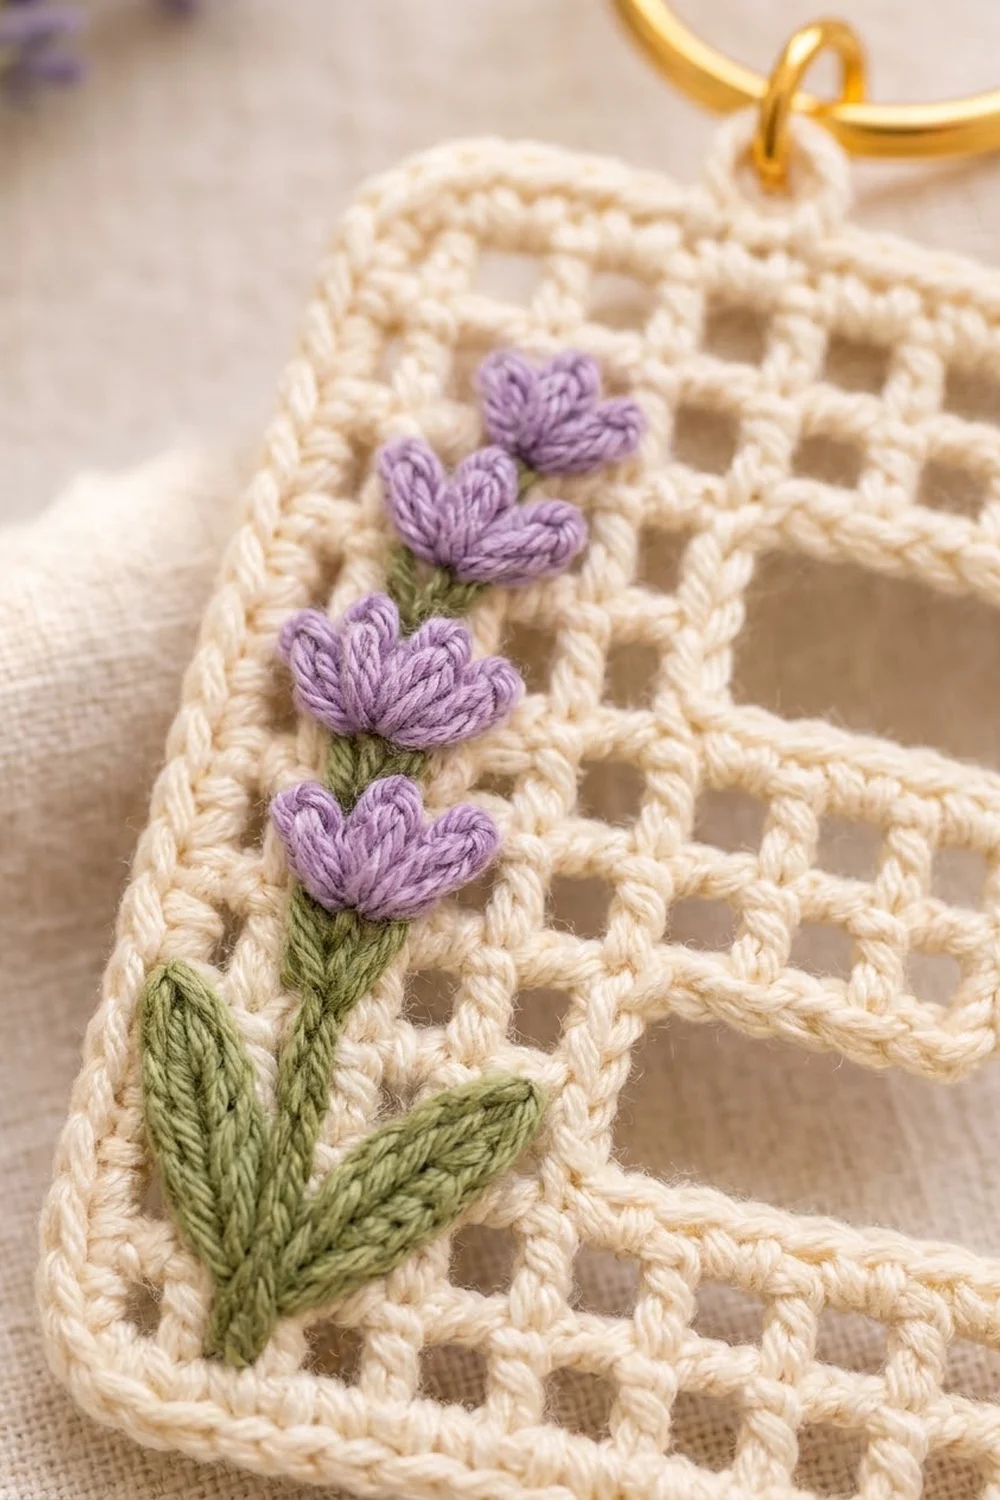
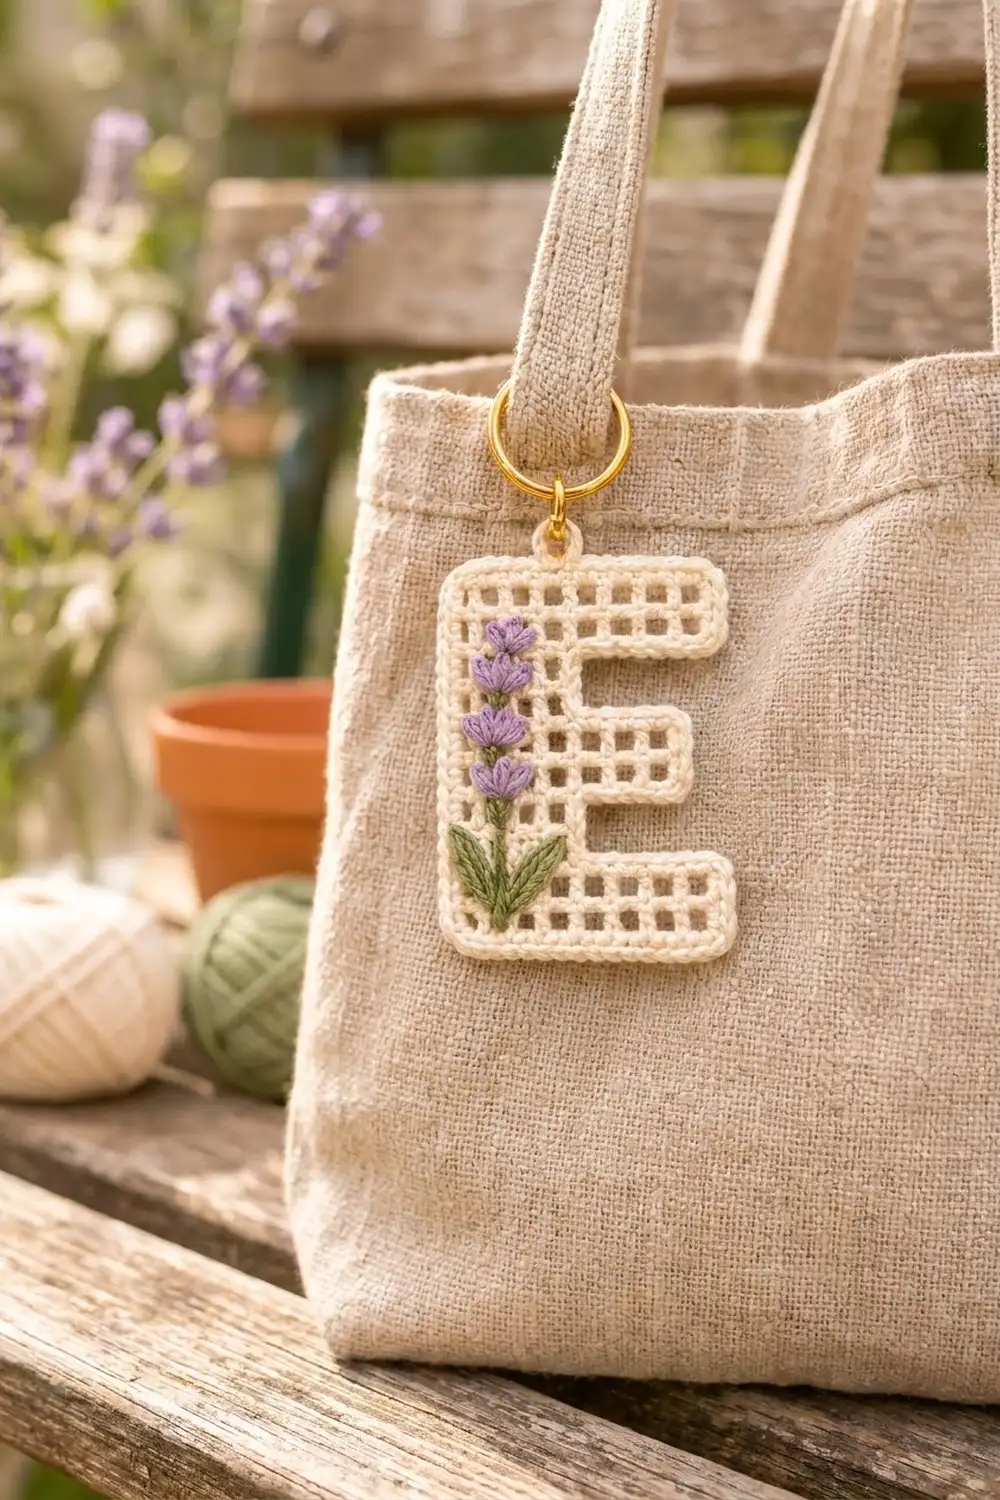
This little letter E is worked in open filet mesh. Its square windows give it a light, lacy look, and a firm corded edge makes it sturdy enough to swing from a bag handle every day. A lavender sprig runs up the spine of the letter, finished with two soft green leaves.
The palette is calm and natural: cream for the letter, lilac for the buds, and sage green for the stem and leaves. Gold hardware finishes it. The style is cottage-garden, a good fit for a personalized gift, a bridesmaid favor, or a quick treat for yourself.
The pattern uses US crochet terms. The finished keychain is 2.6 in (6.6 cm) wide and 3.5 in (8.9 cm) tall, not counting the ring.
You crochet the letter flat in rows, from the bottom arm up to the top arm. The arms are shaped with slip-stitch decreases and chained increases. You then add two border rounds (single crochet, then reverse single crochet), embroider the buds and stem, sew on two small crocheted leaves, block the piece, and attach the ring.
Finished Size and Construction
- Finished size: 2.6 in × 3.5 in (6.6 cm × 8.9 cm)
- Skill level: Intermediate
- Terminology: US
- Yarn weight: Sport (#2) cotton
- Hook: 3.0 mm
- Number of pieces: 1 letter plus 2 small leaf appliqués
- Layout: One single letter E; no joining
- Mesh size before border: 2.1 in × 3.0 in (5.3 cm × 7.6 cm), 6 squares wide and 10 rows tall
- Border depth: 0.25 in (0.6 cm) on each side
- Hanging length with ring: about 4.75 in (12.1 cm)
Materials
Use a smooth, mercerized sport-weight cotton of about 150 m per 50 g (164 yd per 1.75 oz). Mercerized cotton shows the mesh clearly and keeps its shape on a keychain. Avoid fuzzy yarns, which blur the square holes.
- Cream (letter and border): 5 g, about 15 m (16.4 yd)
- Lavender (buds): 2 g, about 6 m (6.6 yd)
- Sage green (stem and leaves): 2 g, about 6 m (6.6 yd)
Tools:
- 3.0 mm crochet hook
- Tapestry needle with a sharp-ish tip
- 1 gold split ring, 1 in (2.5 cm)
- 1 gold jump ring, 0.25 in (0.6 cm)
- 2 pairs of flat-nose pliers
- Rustproof pins, a blocking mat, and a spray bottle
- Stitch marker
- Ruler or tape measure
All quantities include a margin for swatching, tails, and embroidery practice.
Abbreviations (US Terms)
- ch: chain
- sl st: slip stitch
- sc: single crochet
- hdc: half double crochet
- dc: double crochet
- sk: skip
- sp: space
- RS / WS: right side / wrong side
- rev sc: reverse single crochet (crab stitch)
Mesh square: one dc plus one ch-1 sp. A row of N squares has N + 1 dc and N ch-1 sps, for 2N + 1 stitches.
Reverse sc: Working from left to right, insert the hook into the next stitch to the right, yarn over, pull up a loop, then yarn over and draw through both loops.
Lazy daisy: Bring the needle up at the base of the petal and go back down in the same spot, leaving a loop. Bring the needle up at the tip of the petal inside the loop, then go down just outside the loop to tack it in place.
Gauge and Checkpoints
The piece is small, so Rows 1–2 serve as your gauge swatch. Work them and measure before you continue.
- Mesh gauge: 1 square = 0.35 in (0.9 cm) wide; 1 row = 0.3 in (0.8 cm) tall
- After Row 2: 2.1 in (5.3 cm) wide, 0.6 in (1.5 cm) tall
- After Row 4: 1.2 in (3.0 cm) tall; spine is 0.7 in (1.8 cm) wide
- After Row 6: 1.8 in (4.6 cm) tall; middle arm is 1.75 in (4.4 cm) wide, including the spine
- After Row 8: 2.4 in (6.1 cm) tall
- After Row 10: 2.1 in × 3.0 in (5.3 cm × 7.6 cm)
If Row 2 is wider than 2.2 in (5.6 cm), go down to a 2.75 mm hook. If it is narrower than 2.0 in (5.1 cm), go up to a 3.25 mm hook. A difference of 0.1 in (0.3 cm) can be fixed when you block.
If the rows are too tall, shorten your turning chains or pull each dc snug before you finish it. If they are too short, use a looser yarn-over on the first loop.
Letter E Pattern
Row 1 is the RS. With the RS facing, the spine of the E is on the left, and odd rows start at the arm tips on the right.
Foundation: With cream, ch 15.
Row 1 (RS): Dc in the 5th ch from the hook (the skipped 4 ch count as dc and ch-1). Ch 1, sk next ch, dc in next ch. Repeat from * 4 more times. Turn. (6 squares; 7 dc and 6 ch-1 sps = 13 sts)
Row 2 (WS): Ch 3 (counts as dc throughout). Ch 1, sk ch-1 sp, dc in next dc. Repeat from * 4 more times. Ch 1, then dc in the 3rd of the 4 skipped chs at the edge. Turn. (6 squares; 13 sts)
Checkpoint: 2.1 in (5.3 cm) wide.
Row 3 (RS, lower gap): Sl st in the first dc. Sl st in next ch-1 sp, sl st in next dc. Repeat from * 3 more times. (9 sl sts; you are now on the dc between squares 2 and 3, counted from the spine.) Ch 3. Ch 1, sk sp, dc in next dc. Repeat from * once more. Turn. (2 squares; 5 sts)
The slip stitches will be hidden under the border later.
Row 4 (WS): Ch 3. Ch 1, sk sp, dc in next dc. Work this once, then ch 1, sk sp, and dc in the top of the turning ch. (2 squares; 5 sts) Do not turn yet. Ch 8 for the middle-arm extension, then turn.
Row 5 (RS, middle arm): Dc in the 5th ch from the hook. Ch 1, sk next ch, dc in next ch. Ch 1, sk last ch, dc in the edge dc of Row 4. Ch 1, sk sp, dc in next dc. Repeat from * once more, working the last dc in the top of the turning ch. Turn. (3 squares added + 2 existing = 5 squares; 6 dc and 5 ch-1 sps = 11 sts)
Row 6 (WS): Ch 3. Ch 1, sk sp, dc in next dc. Repeat from * 3 more times. Ch 1, then dc in the 3rd of the 4 skipped chs. Turn. (5 squares; 11 sts)
Checkpoint: 1.8 in (4.6 cm) tall.
Row 7 (RS, upper gap): Sl st in the first dc. Sl st in next ch-1 sp, sl st in next dc. Repeat from * 2 more times. (7 sl sts) Ch 3. Ch 1, sk sp, dc in next dc. Repeat from * once more. Turn. (2 squares; 5 sts)
Row 8 (WS): Work as Row 4. (2 squares; 5 sts) Do not turn yet. Ch 10 for the top-arm extension, then turn.
Row 9 (RS, top arm): Dc in the 5th ch from the hook. Ch 1, sk next ch, dc in next ch. Repeat from * once more. Ch 1, sk last ch, dc in the edge dc of Row 8. Ch 1, sk sp, dc in next dc. Repeat from * once more. Turn. (4 squares added + 2 existing = 6 squares; 7 dc and 6 ch-1 sps = 13 sts)
Row 10 (WS): Work as Row 2. (6 squares; 13 sts) Do not fasten off.
Checkpoint: 2.1 in × 3.0 in (5.3 cm × 7.6 cm).
Border
Border gauge: about 6 to 7 sc per 1 in (2.5 cm) along straight edges. Work 2 sc into each row end, and 1 sc into each stitch or chain along the top and bottom edges. Each of the 8 outer corners gets 3 sc in one stitch. The 4 inner corners get nothing extra.
Round 1 (RS): Ch 1, turn so the RS faces you. You are at the top-right corner. Work around the letter counterclockwise:
- Top edge: 3 sc in the first dc, 1 sc in each of the next 11 sts, then 3 sc in the top of the turning ch. (17 sc)
- Left spine edge: 2 sc in each row end, Rows 10 to 1. (20 sc)
- Bottom edge (working into the foundation chain): 3 sc in the corner ch (ch 15), 1 sc in each of the next 10 chs, then 3 sc in ch 4. (16 sc)
- Bottom-arm tip: 2 sc in each row end of Rows 1–2. (4 sc)
- Top of bottom arm: 3 sc in the edge dc of Row 2, then 1 sc in each of the next 7 sts. Insert the hook under the slip stitches as you go. (10 sc)
- Lower gap, spine side: 2 sc in each row end of Rows 3–4. (4 sc)
- Underside of middle arm: 1 sc in each of the 4 extension chs, then 3 sc in the corner ch. (7 sc)
- Middle-arm tip: 2 sc in each row end of Rows 5–6. (4 sc)
- Top of middle arm: 3 sc in the edge dc of Row 6, then 1 sc in each of the next 5 sts. (8 sc)
- Upper gap, spine side: 2 sc in each row end of Rows 7–8. (4 sc)
- Underside of top arm: 1 sc in each of the 6 extension chs, then 3 sc in the corner ch. (9 sc)
- Top-arm tip: 2 sc in each row end of Rows 9–10. (4 sc)
Join with a sl st to the first sc. (107 sc)
Round 2: Ch 1. Rev sc in each sc around. Join with a sl st to the first rev sc and fasten off. (107 rev sc)
Why the math works: The edge has 51 working positions along the top and bottom edges (13 + 12 + 8 + 5 + 6 + 7). The 20 row ends give another 40 sc. That makes 91 sc. The 8 outer corners each add 2 extra sc, which is 16 more, for 107 in total.
Reverse sc adds no stitches, so all the corner fullness has to come from Round 1. The two rounds together add 0.25 in (0.6 cm) on each side. That takes the 2.1 in × 3.0 in (5.3 cm × 7.6 cm) mesh to 2.6 in × 3.5 in (6.6 cm × 8.9 cm).
Leaves (make 2)
With sage green, ch 7.
Round 1: Sl st in the 2nd ch from the hook, sc in the next ch, hdc in the next ch, dc in the next ch, hdc in the next ch, 3 sc in the last ch. Now work along the other side of the chain: hdc in the next ch, dc in the next ch, hdc in the next ch, sc in the next ch, sl st in the next ch. Ch 2 and sl st in the first sl st to make the pointed tip. (13 sts plus the ch-2 tip)
Fasten off, leaving a 6 in (15.2 cm) tail. Each leaf measures about 0.75 in (1.9 cm) long.
Embroidery and Assembly
The center column of dc on the spine is a solid vertical line, so it is the anchor for the whole sprig.
- Stem: With sage green, work backstitch along the center dc column from the base of Row 2 to the top of Row 6. This makes a stem 1.5 in (3.8 cm) long. Whip the backstitch once for a rounder line.
- Buds: With lavender, make 5 buds, one centered on the center dc of each of Rows 6 through 10. For each bud, work three lazy daisy petals, each 0.2 in (0.5 cm) long: one pointing straight up, and two angled about 45 degrees out to the sides. Anchor every petal through a dc post or a chain, never across an open hole.
- Leaves: Pin the leaves at the base of the stem across Rows 1–3, with the rounded ends touching. Angle one leaf to the lower left and one to the lower right. Whipstitch around each leaf with its tail, catching only the cream stitches behind it.
- Ring: Open the jump ring sideways with two pliers. Pass it through both border rounds directly above the spine’s center dc column, which is the 2nd sc to the right of the top-left corner group. Add the split ring, then close the jump ring flush.
Final Blocking
- Weave in all ends along the dc posts, never across the open holes.
- Spray the keychain until it is evenly damp, but not dripping.
- Lay it RS up on the blocking mat.
- Pin the 4 outer corners of the overall outline to 2.6 in × 3.5 in (6.6 cm × 8.9 cm).
- Pin each arm tip so the arms are straight and parallel, and the gaps are 0.6 in (1.5 cm) tall before the border is added.
- Gently nudge each mesh square into a true square with your fingertip.
- Let it dry completely, usually 4 to 6 hours, then unpin.
Final Quality-Control Checklist
- The mesh is 6 squares wide at the top and bottom, 5 at the middle arm, and 2 at the spine.
- There are 10 rows in total, and each gap is 2 rows tall.
- Round 1 has exactly 107 sc, and Round 2 has 107 rev sc.
- The outer corners are sharp, and the inner corners lie flat without puckering.
- The border is an even 0.25 in (0.6 cm) all around.
- There are 5 buds, all evenly spaced and centered on the spine.
- The leaves are flat and secure, with no stitches showing on the WS.
- The jump ring is fully closed and sits above the spine.
- The finished size is 2.6 in × 3.5 in (6.6 cm × 8.9 cm).
Troubleshooting
- Squares lean or slant: Turn the work the same way every time, and keep the ch-1 the same size as the dc is wide.
- Arms come out uneven in length: Recount the extension chains (8 for the middle arm, 10 for the top arm) and the slip stitches (9 in Row 3, 7 in Row 7).
- Inner corners pucker: Make sure you did not add extra sc at an inner corner, then block those corners firmly.
- Outer corners curl: Make sure every outer corner has its 3 sc, and loosen your reverse sc.
- Border ruffles: Your sc tension is loose. Redo Round 1 with a hook 0.25 mm smaller.
- Embroidery pulls the mesh closed: Loosen the petals, and anchor them only through posts and chains.
- The ring twists the letter: Move the jump ring so it sits directly above the spine’s center column.
Care
Hand wash in cool water with mild soap, press out the water in a towel, and dry flat. Open the jump ring and remove the metal hardware before soaking to prevent tarnish.
Final Notes
The measurement chain is simple. Each square is 0.35 in (0.9 cm) wide and each row is 0.3 in (0.8 cm) tall, which gives a 2.1 in × 3.0 in (5.3 cm × 7.6 cm) mesh letter. The 107-stitch border adds 0.25 in (0.6 cm) on each side, bringing the keychain to 2.6 in × 3.5 in (6.6 cm × 8.9 cm). If you check Row 2 and Row 10 against those numbers, the border and blocking will fall into place. The lavender sprig is the last touch.
Happy crocheting!