

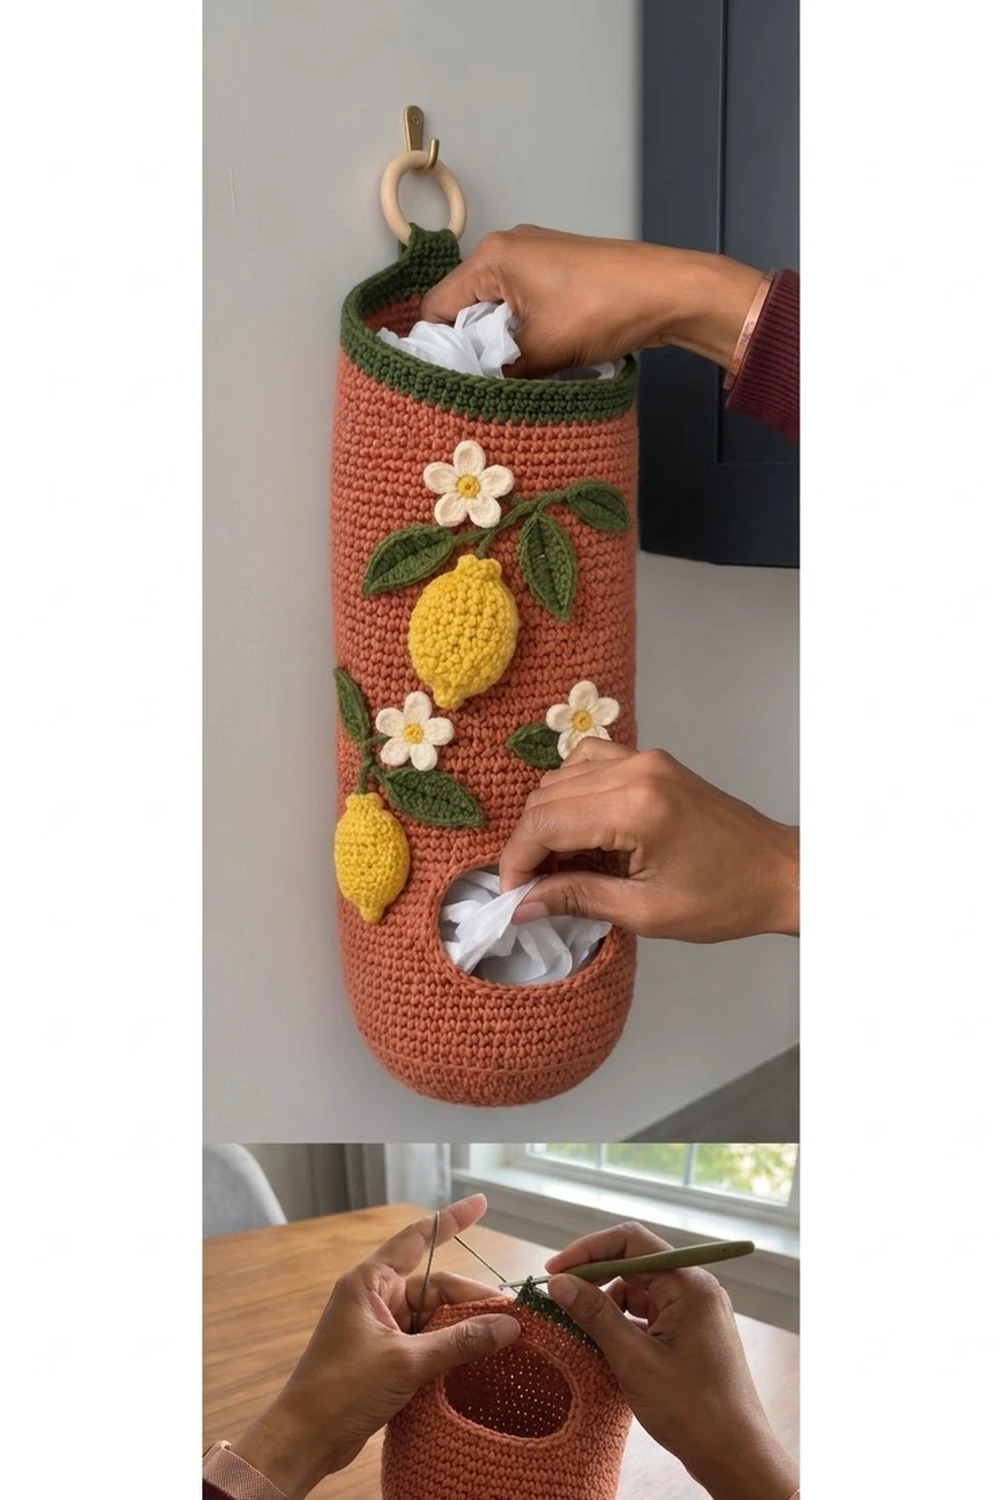
The Lemon Grove Bag Holder is a tall crochet tube that hangs on a wall and keeps plastic grocery bags out of sight. You push bags in at the top and pull them out one at a time through an oval opening near the bottom. It is warm and practical, and it brightens up a kitchen or pantry wall.
The body is worked in a terracotta orange and finished with a deep olive-green rim and hanging tab. Two lemon sprigs decorate the front. Each one has a cream five-petal flower with a yellow center, green veined leaves on a slip-stitched stem, and a lightly stuffed yellow lemon with pointed tips.
The pattern uses US crochet terms. The finished holder is 18 in (45.7 cm) tall, 6.4 in (16.3 cm) wide when laid flat, and about 4.1 in (10.4 cm) across the round base.
You work the body from the bottom up as one piece. You start with a flat circle base, then work straight joined rounds of single crochet. A few turned rows make the dispenser opening, and green rounds finish the rim. The appliqués are made separately and sewn on.
Finished Size and Construction
- Finished size: 18 in (45.7 cm) tall x 6.4 in (16.3 cm) flat width; base diameter 4.1 in (10.4 cm)
- Skill level: Easy to intermediate
- Terminology: US crochet terms
- Yarn weight: Worsted (#4), cotton or cotton blend
- Hook: 5.0 mm (H-8) for the body; 4.0 mm (G-6) for the appliqués
- Number of pieces: 1 body (worked in one piece) plus small sewn-on appliqués: 2 lemons, 2 flowers, 6 leaves
- Layout: Vertical tube, opening at center front near the bottom, hanging tab at center back
- Piece size: Circumference 12.8 in (32.5 cm), 48 sts per round
- Size before border: 17 in (43.2 cm) tall from the base ridge to the last terracotta round
- Border depth: 1 in (2.5 cm) green rim, plus a 1-round edging around the opening
Materials
Pick a smooth worsted cotton or cotton-acrylic blend. Cotton holds its shape well and won’t stretch out under the weight of the bags. Avoid fuzzy yarns, because they hide the stitch texture and make it hard to sew the appliqués on neatly.
- Terracotta (Color A): 120 g / 220 m
- Olive green (Color B): 30 g / 55 m
- Lemon yellow (Color C): 15 g / 28 m
- Cream (Color D): 10 g / 18 m
These amounts already include a margin of about 20% for your gauge swatch and small tension differences.
Tools:
- 5.0 mm (H-8) crochet hook
- 4.0 mm (G-6) crochet hook
- Tapestry needle
- 4 locking stitch markers
- A small handful of fiberfill
- One wooden ring, 2 in (5.1 cm) across
- Scissors and sewing pins
- Wall hook for hanging
Abbreviations (US Terms)
- ch – chain
- sl st – slip stitch
- sc – single crochet
- hdc – half double crochet
- dc – double crochet
- inc – 2 sc in the same stitch
- dec / sc2tog – single crochet 2 together
- BLO – back loop only
- MR – magic ring
- st(s) – stitch(es)
- rnd(s) – round(s)
Special stitch – surface slip stitch: Hold the yarn behind the fabric. Insert the hook from front to back between two stitches, pull up a loop, then insert into the next space along your line, pull up a loop and draw it through the loop on the hook. This makes a neat chain line on the surface, which is how the stems are made.
Gauge and Checkpoints
Gauge (body): 15 sc and 16 rnds = 4 in (10.2 cm) with the 5.0 mm hook. That means 1 rnd = 0.25 in (0.6 cm).
Work the base first and use it as your swatch. Check these points as you go:
- After Rnd 8 (base): The flat circle should measure 4.1 in (10.4 cm) across.
- After Rnd 15: The side should be 1.75 in (4.4 cm) tall, measured from the base ridge.
- After Rnd 24: The side should be 4 in (10.2 cm) tall.
- After Rnd 76: The side should be 17 in (43.2 cm) tall.
- After Rnd 80: The finished height should be 18 in (45.7 cm).
If your base is larger than 4.1 in (10.4 cm), go down half a hook size. If it is smaller, go up half a size. Get the base right before you start the sides, because the stitch count stays at 48 for the rest of the body.
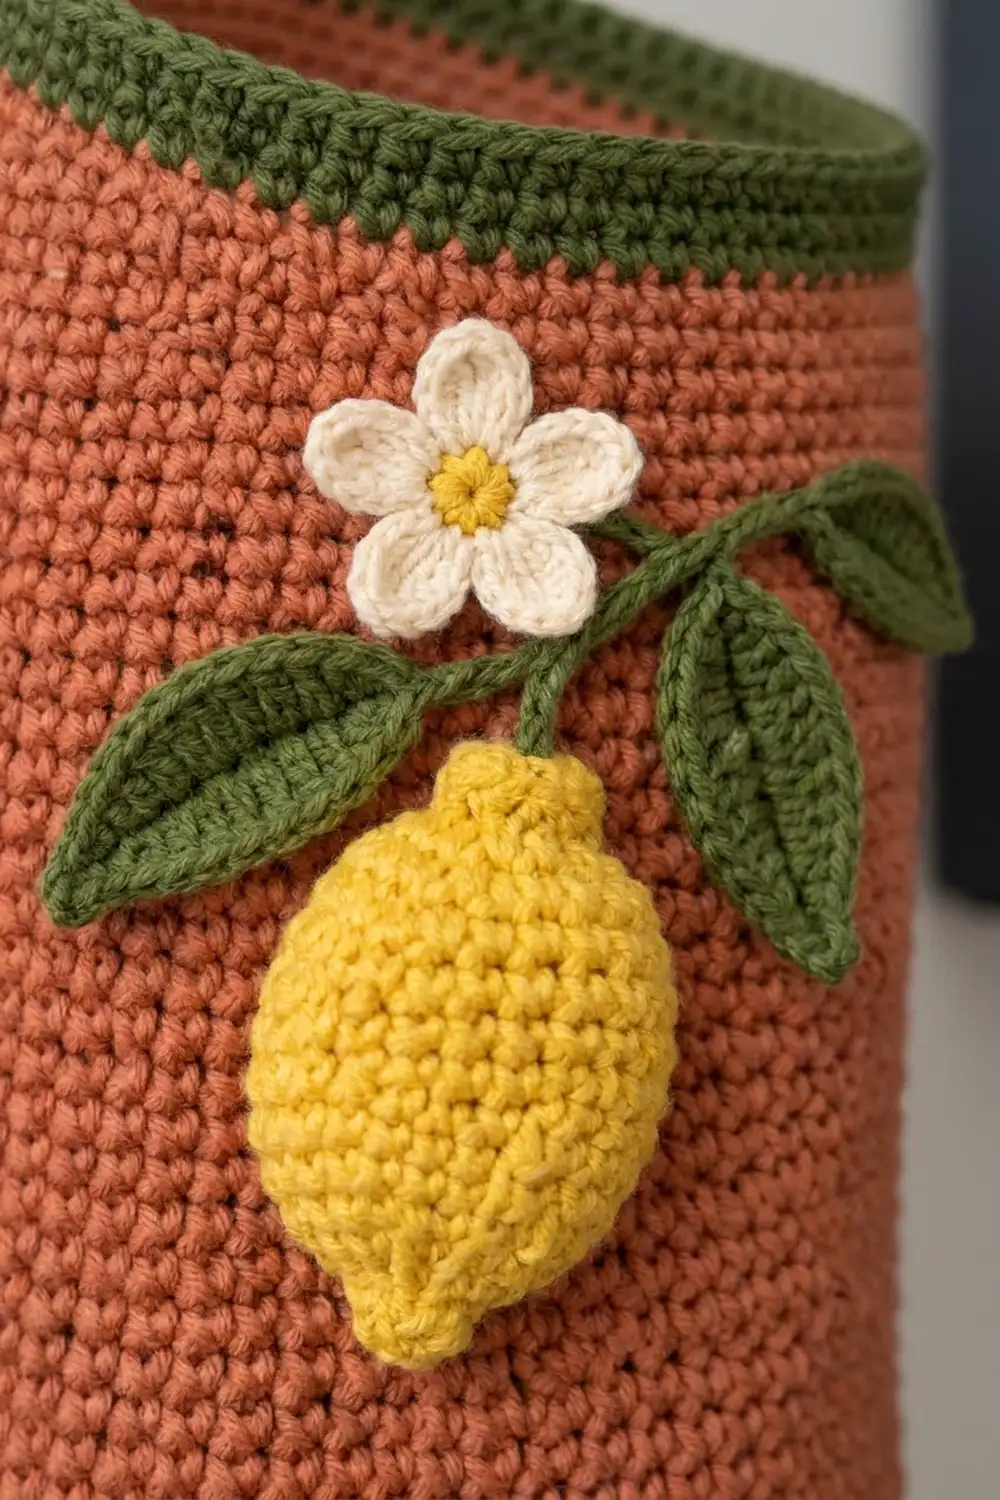
Body
Use Color A and the 5.0 mm hook. All rounds are joined: at the end of each rnd, sl st to the first sc and ch 1. The ch 1 does not count as a stitch. Work the first sc of each rnd into the same st as the join.
Base
- Rnd 1: In a MR, work 6 sc. (6)
- Rnd 2: Inc in each st around. (12)
- Rnd 3: (Sc 1, inc) 6 times. (18)
- Rnd 4: (Sc 2, inc) 6 times. (24)
- Rnd 5: (Sc 3, inc) 6 times. (30)
- Rnd 6: (Sc 4, inc) 6 times. (36)
- Rnd 7: (Sc 5, inc) 6 times. (42)
- Rnd 8: (Sc 6, inc) 6 times. (48)
Checkpoint: the base is 4.1 in (10.4 cm) across and lies flat.
Lower Sides
- Rnd 9: Sc in BLO of each st around. (48) This leaves a ridge that turns the base up into the sides.
- Rnds 10–15: Sc in each st around. (48)
Place a marker in sts 41 and 48 of Rnd 15. These 8 sts will form the bottom edge of the opening. The center of this group is the center front.
Dispenser Opening
For the next 7 rows you work back and forth over part of the round, so the opening stays free. Shaping at both edges of the gap rounds it into an oval.
- Row 16: Ch 1, sc in the first 40 sts. Leave the last 8 sts unworked. Turn. (40)
- Row 17: Ch 1, sc2tog, sc 36, sc2tog. Turn. (38)
- Row 18: Ch 1, sc2tog, sc 34, sc2tog. Turn. (36)
- Rows 19–20: Ch 1, sc in each st across. Turn. (36)
- Row 21: Ch 1, inc, sc 34, inc. Turn. (38)
- Row 22: Ch 1, inc, sc 36, inc. (40) Do not turn. Ch 8, then sl st to the first sc of Row 22 to close the round.
The gap is now 8 sts wide at the bottom, 12 sts wide at Rows 18–20, and 8 chains wide at the top. That makes an oval 3.2 in (8.1 cm) wide and 1.75 in (4.4 cm) tall.
- Rnd 23: Ch 1, sc in each of the 40 sc, then sc in each of the 8 ch. Join. (40 + 8 = 48)
- Rnd 24: Sc in each st around. (48)
Checkpoint: the side is 4 in (10.2 cm) tall. Rows 16 and 22 are worked in the same direction as the rounds, so the right side of the fabric stays facing out.
Upper Body
- Rnds 25–76: Sc in each st around. (48)
Fasten off Color A. Checkpoint: the side is 17 in (43.2 cm) tall, and the tube is 6.4 in (16.3 cm) wide when laid flat.
Appliqués
Use the 4.0 mm hook for all appliqués. The smaller hook makes firmer fabric with clearer texture. Leave a 12 in (30.5 cm) tail on each piece for sewing.
Lemon (make 2, Color C)
Work in continuous rounds, using a marker to keep track.
- Rnd 1: 4 sc in MR. (4)
- Rnd 2: (Sc 1, inc) twice. (6)
- Rnd 3: Inc in each st. (12)
- Rnd 4: (Sc 1, inc) 6 times. (18)
- Rnds 5–10: Sc in each st. (18)
- Rnd 11: (Sc 1, dec) 6 times. (12)
Stuff lightly. Each lemon should be plump but should flatten a little when pressed against the body.
- Rnd 12: Dec 6 times. (6)
- Rnd 13: (Sc 1, dec) twice. (4)
Close the hole and fasten off. Rnds 1–2 and 12–13 make the small pointed tips. Each lemon is about 2.75 in (7.0 cm) long and 1.75 in (4.4 cm) wide.
Flower (make 2)
- Center (Color C): 5 sc in MR, sl st to the first sc. Fasten off. (5)
- Petals (Color D): Join in any sc. *(Ch 2, 2 dc, ch 2, sl st) in the same st, sl st in the next st; repeat from * 4 more times, ending with a sl st in the first st. (5 petals)
Each flower is about 1.5 in (3.8 cm) across.
Leaf (make 6, Color B)
- Ch 9. Starting in the 2nd ch from the hook, work sc, hdc, dc, dc, dc, hdc, sc. (7 sts)
- In the last ch, work (sc, ch 2, sl st in the 2nd ch from the hook, sc) to make the pointed tip.
- Rotate and work along the other side of the foundation ch: sc, hdc, dc, dc, dc, hdc, sc. (7 sts) Sl st in the turning ch.
The foundation chain makes a raised center vein. Each leaf is about 2 in (5.1 cm) long.
Border: Green Rim, Hanging Tab, and Opening Edging
Border gauge: Same as the body: 15 sc and 16 rnds = 4 in (10.2 cm). Four rnds add 1 in (2.5 cm).
Rim
Join Color B in the first st of Rnd 76 using the 5.0 mm hook.
- Rnds 77–80: Sc in each st around. (48: 24 sts across the front half and 24 across the back half)
Fasten off.
Hanging Tab
Turn the tube so the opening faces away from you. Count to sts 18–23 of Rnd 80. These 6 sts sit at the center back, directly opposite the opening. Join Color B in st 18.
- Row 1: Ch 1, sc in sts 18–23. Turn. (6)
- Rows 2–14: Ch 1, sc 6. Turn. (6)
The tab is 3.5 in (8.9 cm) long. Thread it through the wooden ring from front to back. Fold it to the inside and sew Row 14 to the inside of Rnd 77. About 1.5 in (3.8 cm) of loop stays visible above the rim.
Opening Edging
Join Color A in the first unworked st of Rnd 15 (the marked st 41) using the 5.0 mm hook.
- Rnd 1: Sc 8 across the bottom (1 in each unworked st of Rnd 15). Work 7 sc up the first side (1 per row end of Rows 16–22). Sc 8 across the top (1 in the back of each ch). Work 7 sc down the second side. Join. (8 + 7 + 8 + 7 = 30)
Fasten off.
Why the math works: The rim keeps exactly 48 sts, 24 per half, so it continues the tube without flaring or pulling in. Around the opening, one sc per row end works because a sc row is 0.25 in (0.6 cm) tall and a sc is nearly the same width. The 30 sts match the edge length, so the edging lies flat.
Assembly of Appliqués
Lay the holder flat with the opening centered at the front.
- Upper sprig: Pin a flower 3 in (7.6 cm) below the rim, left of center. Surface slip stitch a stem in Color B, about 3.5 in (8.9 cm) long, curving down and to the right. Sew 3 leaves along the stem: 1 on the left, 2 on the right. Sew a lemon hanging from the end of the stem, centered at about Rnds 46–56.
- Lower sprig: Pin the second flower about 2.25 in (5.7 cm) above the top of the opening, left of center. Surface slip stitch a stem about 3 in (7.6 cm) long running down the left side. Sew on 3 leaves and the second lemon so that the lemon sits beside the upper left edge of the opening.
Sew around the outer edge of each lemon only, so it keeps its puffy shape. Weave all the ends in on the inside.
Final Blocking
- Fill the tube with a rolled towel so it holds a smooth cylinder shape.
- Shape the base flat and push the ridge from Rnd 9 outward.
- Pin the opening into a neat oval, 3.2 in (8.1 cm) wide.
- Steam lightly, holding the iron above the fabric. Don’t press the lemons or flowers.
- Check that the height is 18 in (45.7 cm) and the flat width is 6.4 in (16.3 cm).
- Let it dry completely before you remove the towel.
Final Quality-Control Checklist
- 48 sts in every body and rim round
- Base is 4.1 in (10.4 cm) across and sits flat
- Opening is centered at the front, 1.75 in (4.4 cm) above the base ridge
- Opening edging has 30 sts and lies flat
- Tab is centered at the back and firmly sewn behind the rim
- Lemons are lightly stuffed and attached all the way around
- No loose ends show on the outside
Troubleshooting
- Base cups upward: Your tension is too tight. Go up a hook size for Rnds 1–8.
- Tube slants or twists: This happens with spiral rounds. Use joined rounds as written.
- Opening looks like a slit: Check the sc2tog and inc at both edges of Rows 17–22.
- Opening edging ruffles: You have more than 30 sts. Work exactly 1 sc per row end.
- Rim flares: Go down half a hook size for Rnds 77–80.
- Lemons look flat: Add a little more stuffing before Rnd 12.
Care
Hand wash in cool water with mild soap. Press out the water, reshape the holder around a towel, and let it dry flat.
Final Notes
The measurement chain is simple. Check that the 4.1 in (10.4 cm) base gives you 48 sts. Those 48 sts keep a 12.8 in (32.5 cm) circumference all the way up. The opening sits 1.75 in (4.4 cm) above the base, and 68 side rounds take the body to 17 in (43.2 cm). Four green rounds bring it to 18 in (45.7 cm). If each checkpoint matches, the finished holder will match too.
Happy crocheting!