

The Lemon Lattice Bag Holder is a tapered, open-mesh dispenser for plastic grocery bags. You push bags in at the wide top and pull them out one at a time through a slot in the bottom. Two buttonhole tabs let it hang neatly from a pair of wall hooks.
The design alternates butter yellow and cream rounds of small triangular shells, which gives a soft, sunny, striped look. A solid yellow base and a solid yellow rim frame the mesh, and the cream tabs pick up the lighter stripe color.
This pattern uses US crochet terms. Laid flat, the finished body measures 6 in (15.2 cm) wide at the bottom, 9 in (22.9 cm) wide at the top and 10.83 in (27.5 cm) tall. With the tabs, the overall height is about 13.5 in (34.3 cm).
The body is worked bottom-up in joined rounds. You start with a chain ring that becomes the bag slot, work an oval single crochet base around it, then work the shell mesh, adding a few shells as you go up so the body widens. A solid rim finishes the top. The two tabs are worked flat in rows and sewn inside the back of the rim.
Finished Size and Construction
- Finished size (flat): 6 in (15.2 cm) bottom width, 9 in (22.9 cm) top width, 10.83 in (27.5 cm) body height, 13.5 in (34.3 cm) including tabs
- Skill level: Easy
- Terminology: US
- Yarn weight: Worsted (#4), cotton
- Hook: 4.0 mm (G-6)
- Number of pieces: 3 (1 body, 2 tabs)
- Layout: Body is a single tube; tabs are sewn to the inside back of the rim
- Tab size: 1.75 in × 4 in (4.4 cm × 10.2 cm)
- Size before border (rim): 9 in (22.9 cm) wide at the top × 9.5 in (24.1 cm) tall
- Border (rim) depth: 1.33 in (3.4 cm)
Materials
Use a smooth worsted-weight cotton or cotton blend. Cotton holds the mesh shape well, doesn’t stretch out under the weight of bags and washes easily.
- Color A, butter yellow: 85 g, about 145 m
- Color B, cream: 55 g, about 95 m
Tools:
- 4.0 mm (G-6) crochet hook
- 2 removable stitch markers
- Tapestry needle
- Scissors
- Measuring tape
- Pins and a blocking mat or folded towel
These yarn quantities include a margin of about 15% for your gauge swatch and weaving in ends.
Abbreviations (US Terms)
- ch – chain
- sl st – slip stitch
- sc – single crochet
- dc – double crochet
- sc2tog – single crochet 2 together
- BLO – back loop only
- sk – skip
- sp – space
- st(s) – stitch(es)
- rep – repeat
Special stitch: Shell. Work 3 dc in the same stitch or space. At the start of a round, ch 3 (counts as the first dc), then work 2 dc in the same place.
Gauge and Checkpoints
- Single crochet: 16 sc × 18 rounds = 4 in (10.2 cm)
- Shell mesh: 4 repeats (shell + ch 1) = 4 in (10.2 cm) around; 5 rounds = 3 in (7.6 cm) tall
Before you start the body, work the base (Rounds 1–7) as your gauge test. It’s small and tells you right away whether your sc gauge is correct.
Checkpoints:
- After Base Round 5, the outer edge of the oval measures 12 in (30.5 cm) around.
- After Mesh Round 3, the tube laid flat is 6 in (15.2 cm) wide.
- After Mesh Round 5, the mesh is 3 in (7.6 cm) tall.
- After Mesh Round 15, the top edge laid flat is 9 in (22.9 cm) wide and the mesh is 9 in (22.9 cm) tall.
If your piece is too big, go down a hook size (3.75 mm). If it’s too small, go up a size (4.5 mm). If only the mesh height is off, check that the ch 3 at the start of each round is the same height as your dc.
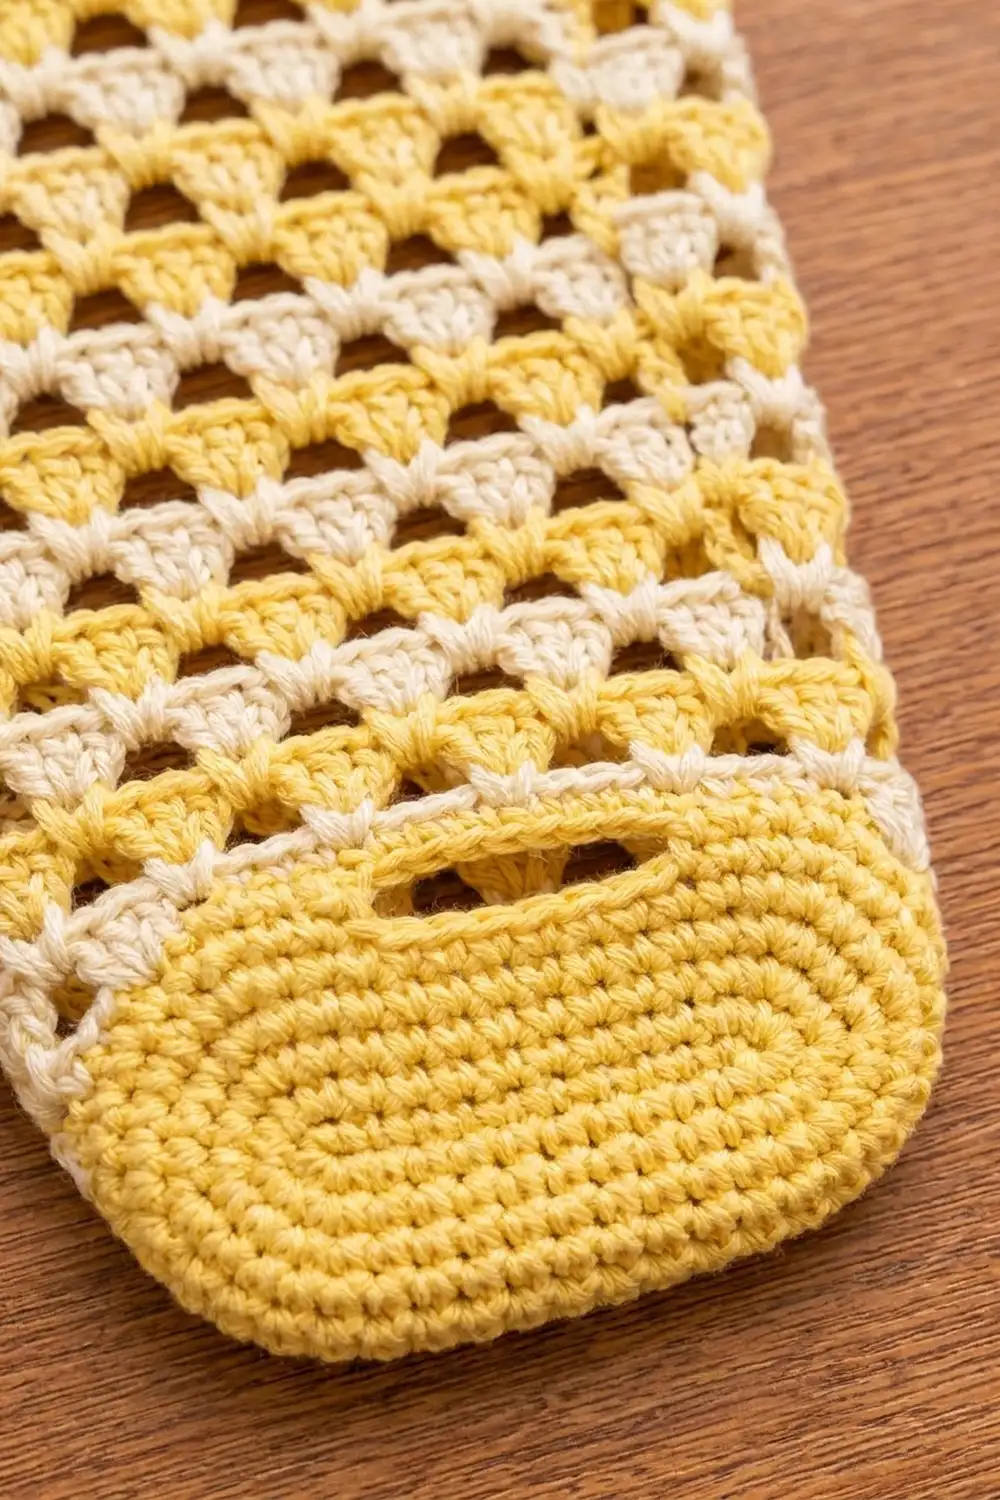
Body
Base (Color A)
Ch 24 and sl st to the first ch to form a ring, taking care not to twist it. This ring becomes the bag slot.
Think of the ring as two long sides of 9 sts and two ends of 3 sts each.
Round 1: Ch 1, sc in each ch around, then join with a sl st to the first sc. (24 sc)
Round 2: Ch 1, [sc in next 9 sts, 2 sc in each of next 3 sts] twice, join. (30 sc)
Round 3: Ch 1, [sc in next 9 sts, (sc in next st, 2 sc in next st) 3 times] twice, join. (36 sc)
Round 4: Ch 1, [sc in next 9 sts, (sc in next 2 sts, 2 sc in next st) 3 times] twice, join. (42 sc)
Round 5: Ch 1, [sc in next 9 sts, (sc in next 3 sts, 2 sc in next st) 3 times] twice, join. (48 sc)
You now have a flat oval with a slot in the center. Check that it measures 12 in (30.5 cm) around.
Round 6: Ch 1, sc in BLO of each st around, join. (48 sc) This turning round makes the sides start to rise.
Round 7: Ch 1, sc in each st around, join. (48 sc) Fasten off.
Fold the base flat with the slot centered. Place one marker at each folded side edge. You’ll move these markers up as you work so they always mark the sides.
Shell Mesh
The mesh rounds alternate colors. Odd rounds use Color B (cream) and even rounds use Color A (yellow). Fasten off at the end of each round and join the new color at a different point each time so the joins don’t stack up in one line.
Mesh Round 1 (B): Join B with a sl st in any sc. Ch 3, 2 dc in the same st (first shell), ch 1, sk next 3 sts, shell in next st, ch 1, sk next 3 sts; rep from * around, then join to the top of the beginning ch-3. (12 shells, 12 ch-1 sps; 36 dc + 12 ch = 48 sts)*
Mesh Round 2 (A): Join A with a sl st in any ch-1 sp. Ch 3, 2 dc in the same sp, ch 1, shell in next ch-1 sp, ch 1; rep from * around, join. (12 shells; 48 sts)*
Each new shell sits in the gap between two shells of the round below. This offset creates the triangle lattice.
Mesh Round 3 (B): Repeat Round 2. (12 shells; 48 sts)
Mesh Round 4 (A), increase round: Work as Round 2, but in the ch-1 sp nearest each side marker, work (shell, ch 1, shell). (14 shells, 14 ch-1 sps; 42 dc + 14 ch = 56 sts)
Mesh Rounds 5–7: Repeat Round 2, continuing to alternate colors. (14 shells; 56 sts each) The tube should now measure 7 in (17.8 cm) wide laid flat.
Mesh Round 8 (A), increase round: Work as Round 4. (16 shells; 48 dc + 16 ch = 64 sts)
Mesh Rounds 9–11: Repeat Round 2. (16 shells; 64 sts each) The tube should now measure 8 in (20.3 cm) wide laid flat.
Mesh Round 12 (A), increase round: Work as Round 4. (18 shells; 54 dc + 18 ch = 72 sts)
Mesh Rounds 13–15: Repeat Round 2. Round 15 is worked in B. (18 shells; 72 sts each)
At this point the body is 9 in (22.9 cm) wide at the top and about 9.5 in (24.1 cm) tall including the base band. Weave in all ends along the dc posts so they disappear into the shells.
Tabs (Make 2, Color B)
Ch 8.
Row 1: Sc in the 2nd ch from the hook and in each ch across, turn. (7 sc)
Rows 2–13: Ch 1, sc in each st across, turn. (7 sc)
Row 14 (buttonhole): Ch 1, sc in next 2 sts, ch 3, sk next 3 sts, sc in last 2 sts, turn. (4 sc + 3 ch = 7 sts)
Row 15: Ch 1, sc in next 2 sts, 3 sc in ch-3 sp, sc in last 2 sts, turn. (7 sc)
Row 16: Ch 1, sc in each st across, turn. (7 sc)
Row 17: Ch 1, sc2tog, sc in next 3 sts, sc2tog, turn. (5 sts)
Row 18: Ch 1, sc2tog, sc in next st, sc2tog. (3 sts) Fasten off and leave a 12 in (30.5 cm) tail for sewing.
Each tab measures 1.75 in × 4 in (4.4 cm × 10.2 cm), and the buttonhole is 0.75 in (1.9 cm) wide.
Make All Pieces
- Body: 1, in Color A (base, even mesh rounds and rim) and Color B (odd mesh rounds)
- Tabs: 2, in Color B
Tab placement on the back half of the rim (36 sts). Count from the left side marker:
| 5 sts | TAB (7 sts) | 12 sts gap | TAB (7 sts) | 5 sts |
  1.25 in   1.75 in        3 in        1.75 in    1.25 in
  (3.2 cm)  (4.4 cm)     (7.6 cm)      (4.4 cm)   (3.2 cm)
5 + 7 + 12 + 7 + 5 = 36 sts, which is exactly the back half of the rim.
Border (Rim)
Border gauge: 16 sc = 4 in (10.2 cm), the same as the base.
Rim Round 1 (A), conversion round: Join A in any dc. Ch 1, then sc in each dc and in each ch-1 sp around, join. (54 sc in dc + 18 sc in ch-1 sps = 72 sc)
That gives 36 sc per side when the body is flattened, because 9 shell repeats × 4 sts = 36.
Rim Rounds 2–6: Ch 1, sc in each st around, join. (72 sc each; 36 per side)
Fasten off and weave in the ends.
Why the math works: Mesh Round 15 has 18 repeats of 4 sts each (3 dc + 1 ch), for 72 sts. The conversion round places exactly one sc on each of those 72 sts, so nothing is added and nothing is lost. 72 sc at 4 sc per inch is 18 in (45.7 cm) around, which is 9 in (22.9 cm) laid flat, the same as the mesh width below it. Six rounds at 18 rounds per 4 in gives a 1.33 in (3.4 cm) rim. The rim doesn’t flare or pull in.
Joining the Tabs
- Flatten the body with the side markers at the folds. Choose the back face.
- Find the tab positions on the inside of the back rim using the layout grid.
- Slide Rows 1–6 of each tab down inside the rim so that 6 rows (1.33 in / 3.4 cm) overlap the 6 rim rounds. Pin each tab in place.
- With the tab tail, whipstitch around three edges of the overlap: down one side, across the bottom of Row 1 and up the other side. Each tab row should match one rim round, with one whipstitch per row along the sides and one per stitch along the bottom.
- Add a second line of stitching across the top edge of the rim through the tab. This takes the load when the holder is full.
Keep your tension firm but not tight, so the rim doesn’t pucker on the outside. Check that the stitching is barely visible from the front.
Size checkpoint: Rows 7–18 of each tab stand 2.67 in (6.8 cm) above the rim. The overall height is 13.5 in (34.3 cm).
Final Blocking
- Lightly spray the holder with water until it’s evenly damp.
- Lay it flat with the side markers at the folds and the bag slot centered at the bottom.
- Gently ease the shape to 6 in (15.2 cm) at the bottom, 9 in (22.9 cm) at the top and 10.83 in (27.5 cm) tall.
- Open each shell with your fingers so the triangles point evenly and the holes line up.
- Pin the tabs straight up and parallel, 3 in (7.6 cm) apart.
- Let it dry completely before removing the pins and markers.
Final Quality-Control Checklist
- Base Round 5 measures 12 in (30.5 cm) around, and the slot is centered.
- Each mesh round has the correct shell count: 12, 14, 16 and then 18.
- The colors alternate cream and yellow with no two neighboring rounds in the same color.
- The increases sit at the side folds, so the front and back look symmetrical.
- The rim has 72 sc in every round and lies flat.
- The tabs are 3 in (7.6 cm) apart and 1.25 in (3.2 cm) from each side.
- All ends are woven in securely.
Troubleshooting
The base cups too much. Your sc may be tight. Loosen up or go up a hook size for Rounds 1–5 only.
The base ruffles. Check that you made exactly 3 increases per end in each round.
The mesh slants or twists. Make sure every shell goes into a ch-1 sp, never into a dc.
The body widens unevenly. You may have increased away from the markers. Move each marker up after every round.
The rim flares. You probably added sts in Rim Round 1. Recount to 72.
The tabs droop forward. Add a second line of whipstitches along the top edge of the rim.
Bags slip out on their own. Work an extra round of sc around the slot ring in Color A to tighten it.
Care
Machine wash cold on a gentle cycle in a mesh bag, then lay flat to dry and reshape. Avoid hot dryers, which can shrink cotton unevenly.
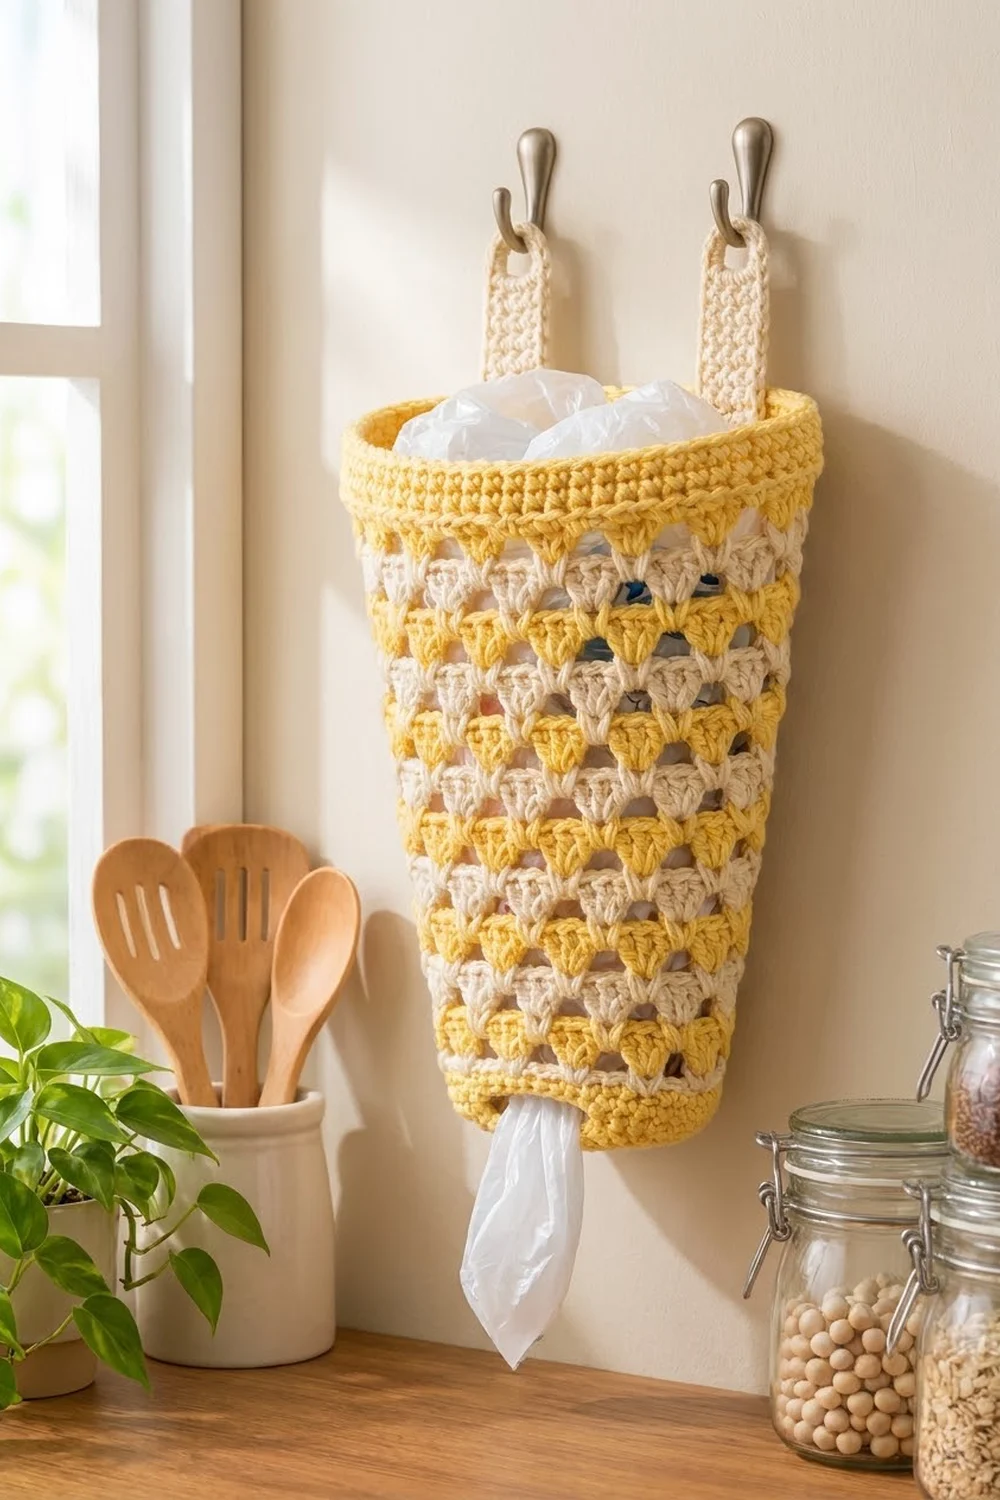
Final Notes
The measurement chain is simple. The 48-st base gives a 6 in (15.2 cm) bottom. Three increase rounds take the mesh from 12 to 18 shells and widen the top to 9 in (22.9 cm). The 72-st rim matches the final mesh exactly, and the tabs add 2.67 in (6.8 cm) for an overall height of 13.5 in (34.3 cm). Check each stage and the finished holder will hang straight and dispense bags smoothly.
Happy crocheting!