

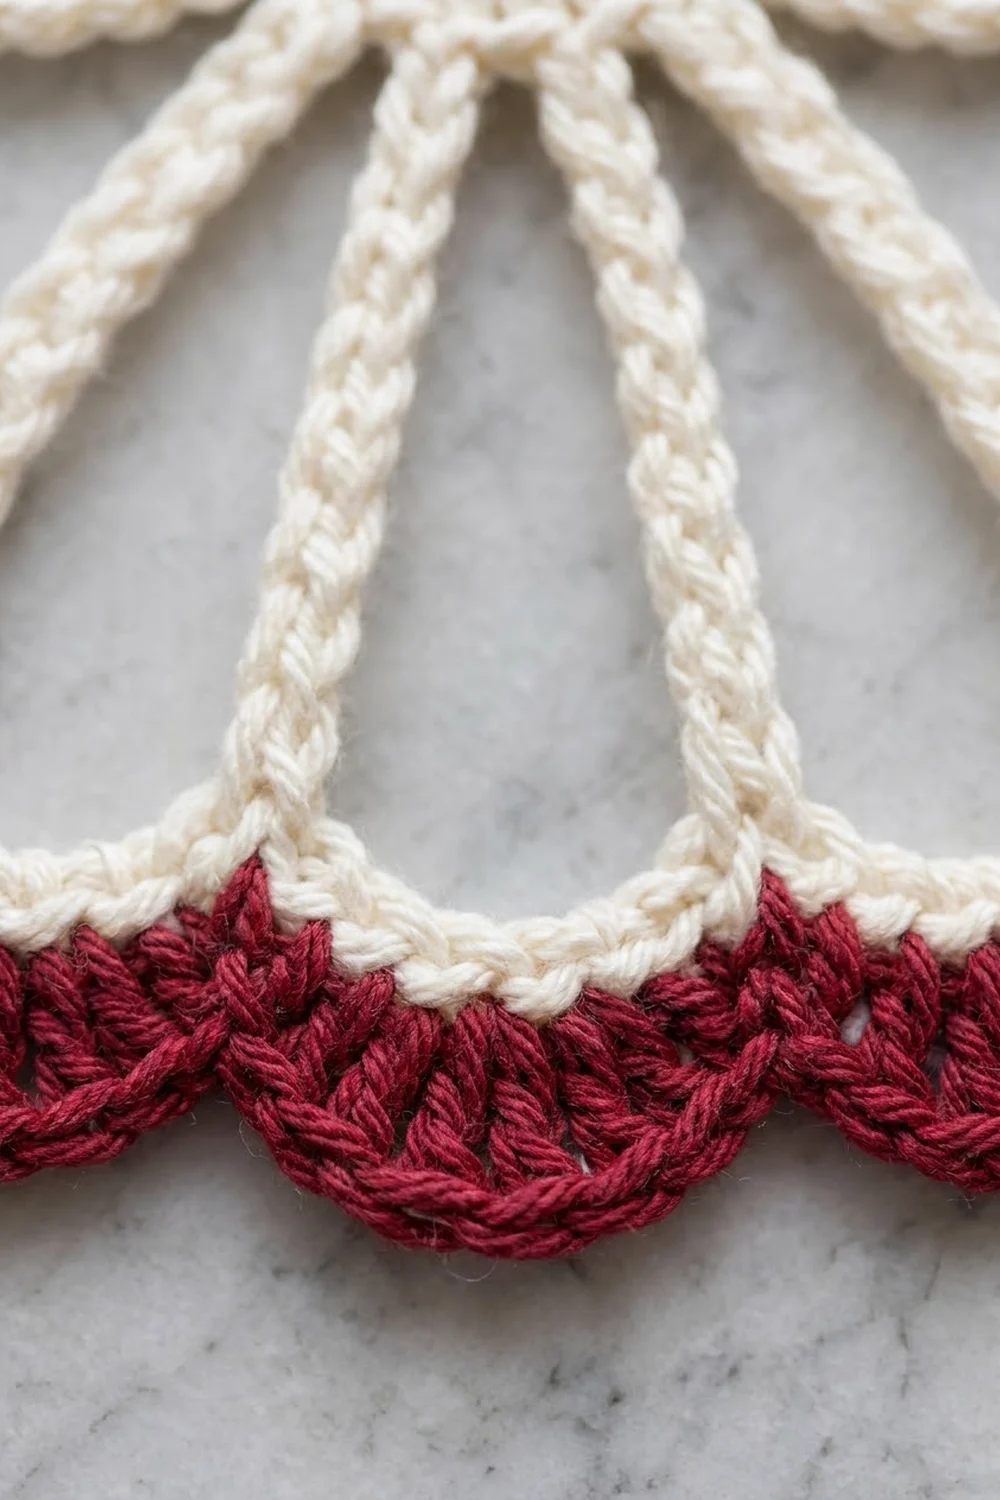
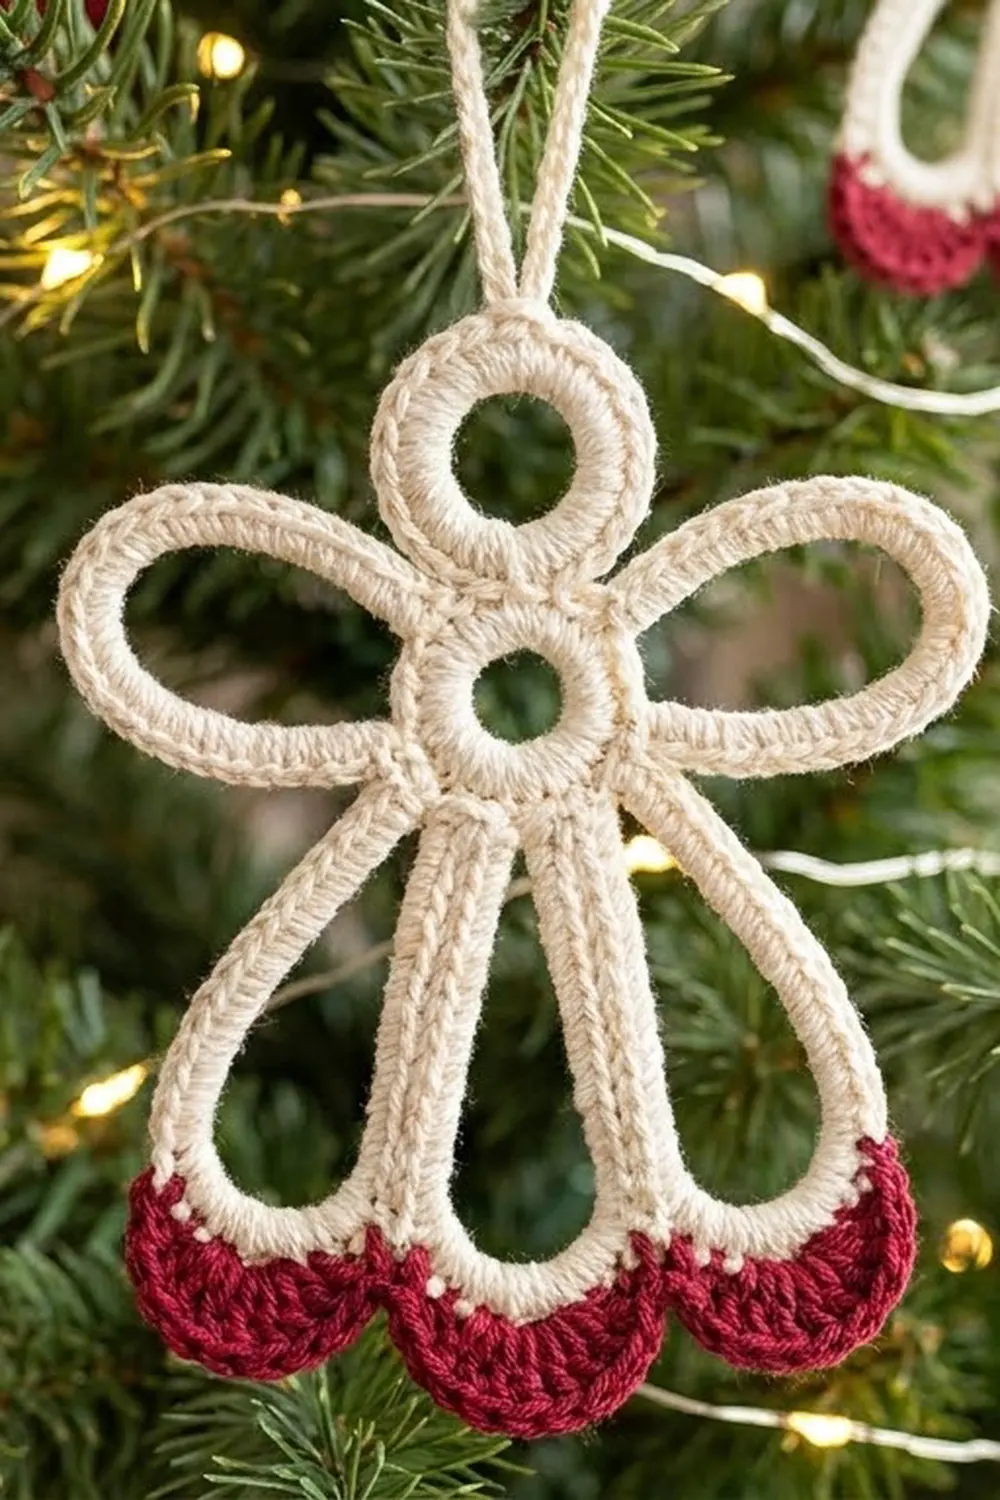
This little angel is made from nothing but rings and loops. A round head sits on a small open center ring, two oval wings reach out to the sides, and three long narrow loops fall into a bell-shaped skirt. A cranberry scalloped hem finishes the bottom edge.
The palette is simple and classic: soft cream for the whole figure and a deep cranberry red for the hem. Every loop is fully covered in single crochet, so the outlines look like smooth, rope-like strokes. The style is light and lacy but firm enough to hang flat on a tree.
The pattern uses US crochet terms. The finished angel measures about 4.5 in (11.4 cm) wide and 5.5 in (14.0 cm) tall, plus a 1.5 in (3.8 cm) hanging loop.
You work the angel in one piece. First the head ring, then the center ring right below it, then the wings and skirt loops worked straight off the center ring. A cream foundation row ties the three skirt loops together, and a red scallop row finishes the hem. The last step is a chain hanging loop at the top of the head.
Finished Size and Construction
- Finished size: 4.5 in (11.4 cm) wide x 5.5 in (14.0 cm) tall, not counting the hanging loop
- Skill level: Easy to intermediate
- Terminology: US crochet terms
- Yarn weight: Fine (#2, sport) cotton
- Hook: 3.0 mm (C/D)
- Number of pieces: 1 (worked in one piece, no joining)
- Layout: Head ring on top, center ring below, 2 side wings, 3 skirt loops, scalloped hem
- Piece size: Same as the finished size, since the angel is a single piece
- Size before border (hem): 4.5 in (11.4 cm) wide at the wings x 4.8 in (12.2 cm) tall
- Border (hem) depth: 0.7 in (1.8 cm)
Materials
Use a smooth mercerized or soft cotton in fine (#2, sport) weight. Cotton holds its shape well, shows the covered loops clearly, and takes starch nicely. Avoid fuzzy or very stretchy yarns, because the loops will lose their clean outline.
- Cream: about 9 g / 30 m (33 yd)
- Cranberry red: about 2 g / 7 m (8 yd)
These amounts include a margin for gauge differences and a test piece. One standard ball of each color will make many angels.
Tools:
- 3.0 mm (C/D) crochet hook
- Tapestry needle
- 4 locking stitch markers
- Scissors
- Blocking mat and rustproof pins
- Optional: fabric stiffener or spray starch
Abbreviations (US Terms)
- ch – chain
- sl st – slip stitch
- sc – single crochet
- dc – double crochet
- st(s) – stitch(es)
- sk – skip
- RS – right side
- [ ] – repeat the instructions inside the brackets as directed
Special technique – sc into a loop: Insert the hook under the whole chain loop (into the open center), not into the individual chains, and work the sc around the chain. Push the stitches together as you go so the chain is fully hidden.
Gauge and Checkpoints
Gauge: 6 sc = 1 in (2.5 cm), and 7 ch = 1 in (2.5 cm), worked firmly with a 3.0 mm hook.
Gauge matters here because the loop lengths set the whole shape. Make the head ring and center ring first as a test, and measure them before you go on.
Checkpoints:
- Head ring: 1.2 in (3.0 cm) outer diameter
- Center ring: 0.9 in (2.3 cm) outer diameter
- Each wing: 1.8 in (4.6 cm) long from the center ring edge to the wing tip
- Each skirt loop: 2.7 in (6.9 cm) long from the center ring edge to the bottom of the loop
- Before the hem: 4.5 in (11.4 cm) wide x 4.8 in (12.2 cm) tall
- Finished: 4.5 in (11.4 cm) wide x 5.5 in (14.0 cm) tall
If your rings are too big, go down to a 2.75 mm hook or tighten your tension. If they are too small, go up to a 3.25 mm hook. Keep the chain and stitch counts the same and change only the hook, so the counts stay correct.
Pattern
Head Ring
With cream, ch 14, sl st in the first ch to form a ring.
Round 1: Ch 1, work 22 sc into the ring (see the special technique). Sl st in the first sc to join. (22 sc)
The first sc of this round is head stitch 1. It sits at the bottom of the head, where the center ring will attach. Head stitch 12 is the top of the head, directly opposite. Place a marker in head stitch 12 for the hanging loop later.
Checkpoint: 1.2 in (3.0 cm) outer diameter, with a round open center.
Center Ring
Do not fasten off.
Ring: Ch 8, sl st in the 8th ch from the hook (the first ch you just made). This forms a small ring directly below the head.
Round 1: Ch 1, work 16 sc into the ring. Sl st in the first sc to join. (16 sc)
Number these stitches 1 to 16 in working order. Stitch 1 sits at the top, touching the head. Stitch 5 is one side, stitch 9 is the bottom, and stitch 13 is the other side.
Checkpoint: 0.9 in (2.3 cm) outer diameter, with a small round hole in the middle. The head and center ring should look like a figure 8.
First Wing
Move into place: Sl st in each of the next 4 sts. You are now in stitch 5.
Chain loop: Ch 24, sl st in the same stitch 5. This forms a long chain loop.
Cover the loop: Work 36 sc into the ch-24 loop. Sl st in stitch 5 again to anchor. (36 sc)
The 36 sc over 24 chains (1.5 sc per chain) fill the loop out into a smooth oval instead of a thin circle. Pinch the tip flat with your fingers.
Checkpoint: 1.8 in (4.6 cm) long, a narrow oval with a slim open center.
Skirt Loops
The skirt is three long loops worked from stitches 7, 9, and 11 of the center ring.
Skirt Loop A: Sl st in stitches 6 and 7. Ch 38, sl st in the same stitch 7. Work 54 sc into the ch-38 loop. Sl st in stitch 7 again. (54 sc)
Skirt Loop B (middle): Sl st in stitches 8 and 9. Ch 38, sl st in the same stitch 9. Work 54 sc into the loop. Sl st in stitch 9 again. (54 sc)
Skirt Loop C: Sl st in stitches 10 and 11. Ch 38, sl st in the same stitch 11. Work 54 sc into the loop. Sl st in stitch 11 again. (54 sc)
Stitch map of each skirt loop: Count the 54 sc in the order you made them. Stitches 1–23 run down one side, stitches 24–31 are the 8 “foot” stitches across the bottom curve, and stitches 32–54 run back up the other side (23 + 8 + 23 = 54).
Checkpoint: Each loop is 2.7 in (6.9 cm) long, a long narrow teardrop.
Second Wing
Sl st in stitches 12 and 13. Ch 24, sl st in the same stitch 13. Work 36 sc into the loop. Sl st in stitch 13 again. (36 sc)
Fasten off and weave in the ends along the back of the center ring.
Checkpoint before the hem: Lay the angel flat, RS up. Spread the two outer skirt loops so they angle outward and their bottoms sit side by side with the middle loop, forming a bell shape. The angel should measure 4.5 in (11.4 cm) across the wings and 4.8 in (12.2 cm) from the top of the head to the bottom of the skirt loops.
Border: Scalloped Hem
The hem is the border of this piece. It runs across the bottom only and joins the three skirt loops.
Border gauge: The cream foundation row uses the main gauge, 6 sc = 1 in (2.5 cm). Each red scallop uses 8 foundation stitches and is about 1.5 in (3.8 cm) wide after blocking.
Prepare: With the angel flat and RS up, find the 8 foot stitches (stitches 24–31) at the bottom of each skirt loop. Place a marker in the first and last foot stitch of the right-hand loop and of the left-hand loop. The bottoms of the three loops should touch with no gaps.
Row 1 (cream, foundation): With RS facing, join cream in the first foot stitch at the right edge. Ch 1, sc in the same st and in the next 7 foot sts of the right loop (8 sc). Continue straight into the middle loop: sc in each of its 8 foot sts (8 sc). Continue into the left loop: sc in each of the next 7 foot sts, then 2 sc in the last foot st (9 sc).
Count: 24 sts worked one per existing stitch + 1 extra stitch in the last stitch = 25 sc.
In the last sc, change to red: insert the hook, pull up a loop in cream, then finish the stitch with red. Fasten off cream.
Checkpoint: Row 1 is 4.2 in (10.7 cm) wide and 0.2 in (0.5 cm) deep. It should pull the three loops into a smooth, flat bottom edge.
Row 2 (red, scallops): Ch 1, turn. Sc in the first st, [sk 3 sts, 9 dc in the next st, sk 3 sts, sc in the next st] 3 times. Fasten off.
Count: 3 scallops of 9 dc each + 4 sc = 27 dc and 4 sc. Each scallop uses exactly 8 foundation stitches.
Why the math works: The foundation row has 25 sts. The row starts with 1 sc, then each repeat uses 8 sts (3 skipped + 1 dc st + 3 skipped + 1 sc). That is 1 + (3 x 8) = 25, so the last sc lands exactly in the last foundation stitch. The dc groups land in foundation stitches 5, 13, and 21, which sit near the middle of each skirt loop’s foot. That way the three scallops line up with the three loops.
Checkpoint: The finished hem is 0.7 in (1.8 cm) deep and about 4.5 in (11.4 cm) wide, matching the wingspan.
Hanging Loop
Join cream in the marked head stitch 12 at the top of the head. Ch 20, sl st in the same stitch. Fasten off and weave in the ends.
Checkpoint: The hanging loop is 1.5 in (3.8 cm) tall.
Final Blocking
- Weave in all remaining ends. Hide them inside the sc coverings so they don’t show through the open spaces.
- Wet the angel in cool water, or spray it evenly until damp. Press gently in a towel to remove extra water.
- Lay it RS up on a blocking mat.
- Pin the head and center ring into true circles. A round pen or straw through each hole helps.
- Pin each wing tip so the wings are level and each wing is 1.8 in (4.6 cm) long.
- Pin the bottom of the skirt so the hem is straight and 4.5 in (11.4 cm) wide. Angle the outer skirt loops evenly to form a symmetrical bell.
- Pin the top of each scallop so all three are the same size and shape.
- Check the total height: 5.5 in (14.0 cm) from the top of the head to the bottom of the hem.
- For a stiffer ornament, brush or spray fabric stiffener on while it is pinned.
- Let it dry completely before unpinning.
Final Quality-Control Checklist
- Head ring has 22 sc and measures 1.2 in (3.0 cm).
- Center ring has 16 sc and measures 0.9 in (2.3 cm).
- Each wing has 36 sc and measures 1.8 in (4.6 cm).
- Each skirt loop has 54 sc and measures 2.7 in (6.9 cm).
- No chain shows through any of the sc coverings.
- Hem Row 1 has 25 sc; Row 2 has 3 scallops of 9 dc.
- Finished angel is 4.5 in (11.4 cm) wide and 5.5 in (14.0 cm) tall.
- Hanging loop is 1.5 in (3.8 cm) tall and centered at the top of the head.
- All ends are woven in and hidden.
Troubleshooting
Chain shows through the sc covering. Push the stitches closer together along the loop. If gaps remain, your sc may be too short; try a firmer tension or a smaller hook.
Loops twist or curl. Make sure the chain isn’t twisted before you sl st to close it. Blocking will flatten a mild twist.
Wings or skirt loops are too round instead of long. The loop was covered with too many sc. Count again: 36 sc per wing and 54 sc per skirt loop.
Skirt loops are uneven lengths. Count the chains on each loop. All three need exactly 38 ch.
Foot stitches are hard to find. Count 23 sc from the anchor along one side; the next 8 sts are the foot.
Hem ripples or pulls in. Check that Row 1 has 25 sc and that you skipped exactly 3 sts on each side of every scallop.
Scallops lean to one side. Make sure each 9 dc group goes into a single stitch, the 4th stitch of each 8-stitch repeat.
Care
Hand wash in cool water with mild soap, reshape, and dry flat. If you used stiffener, re-block and re-stiffen after washing.
Final Notes
The size of this angel comes from a short measurement chain. A gauge of 6 sc = 1 in (2.5 cm) gives a 1.2 in (3.0 cm) head ring and a 0.9 in (2.3 cm) center ring. The 1.8 in (4.6 cm) wings on each side of the center ring give a 4.5 in (11.4 cm) span. The 2.7 in (6.9 cm) skirt loops bring the height to 4.8 in (12.2 cm), and the 0.7 in (1.8 cm) hem finishes the angel at 5.5 in (14.0 cm) tall. Check each stage, and the finished angel will hang flat and even.
Happy crocheting!