

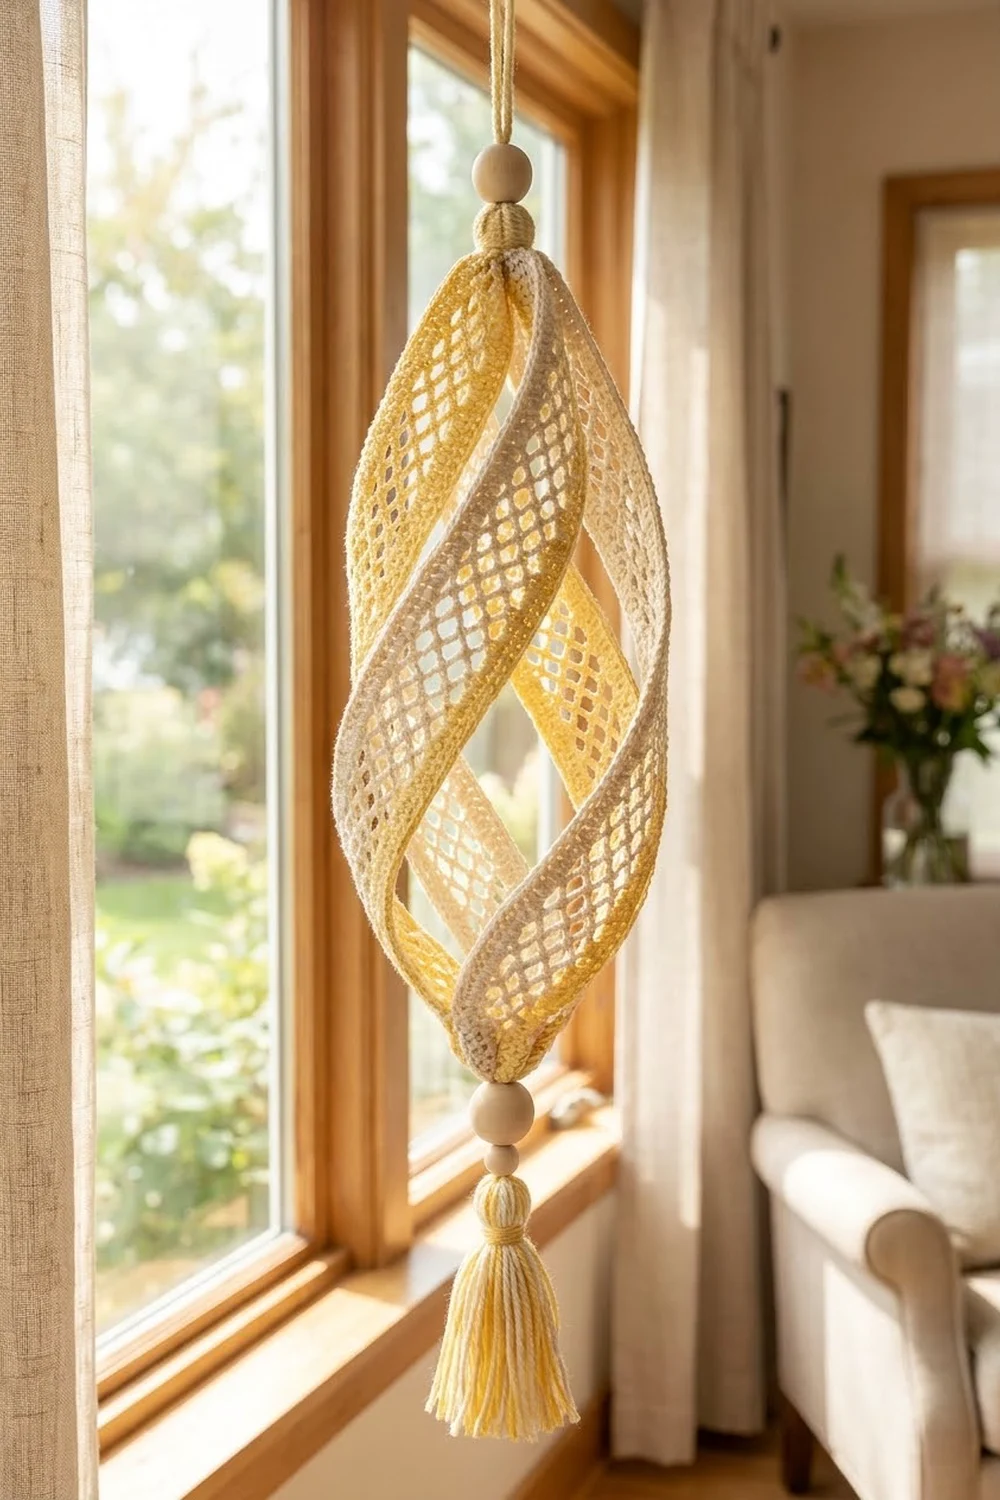
The Lemon Swirl is a light, airy hanging ornament. It’s made from four lacy mesh strips that twist around each other in a soft spiral. Two strips are pale butter yellow and two are cream, so the colors alternate as the spiral turns.
Each strip is a narrow rectangle. It has solid single crochet bands along both long edges and an open net of chain loops in the middle. The four strips are gathered at the top and bottom, finished with natural wooden beads, and anchored with a two-tone tassel. It looks lovely in a sunny window or on a curtain rod.
This pattern uses US crochet terms. The finished body is about 8 in (20.3 cm) tall and 3 in (7.6 cm) across at its widest point. With the loop, beads, and a 3 in (7.6 cm) tassel, the ornament hangs about 14.5 in (36.8 cm) long.
Construction overview:
1. Crochet four flat strips lengthwise.
2. Edge each strip with one round of sc.
3. Gather the short ends into two clusters on a central cord.
4. Twist one full turn and stiffen.
Finished Size and Construction
- Finished size: body 8 in (20.3 cm) tall × 3 in (7.6 cm) wide; total length about 14.5 in (36.8 cm)
- Skill level: Easy / advanced beginner
- Terminology: US crochet terms
- Yarn weight: Sport weight (#2) cotton
- Hook: 2.75 mm (C-2)
- Number of pieces: 4 mesh strips, plus a cord and a tassel
- Layout: the strips form a ring, alternating yellow, cream, yellow, cream
- Strip size (bordered): 10.5 in × 1.5 in (26.7 cm × 3.8 cm)
- Strip size before border: 10.2 in × 1.2 in (25.9 cm × 3.0 cm)
- Border depth: 1 round of sc, about 0.15 in (0.4 cm) per edge
Materials
Choose a smooth, mercerized sport-weight cotton (about 155 m per 50 g). Cotton holds a stiffened spiral far better than acrylic, and it gives crisp, clear mesh openings.
- Color A, Butter Yellow: 15 g (about 46 m)
- Color B, Cream: 15 g (about 46 m)
These quantities include a comfortable margin for the gauge check, tassel, center cord, and gathering strands.
Tools:
- 2.75 mm (C-2) crochet hook
- Tapestry needle with an eye small enough to pass through the bead holes
- 2 natural wooden beads, 16 mm, with holes at least 4 mm wide
- 1 natural wooden bead, 12 mm, with a hole at least 4 mm wide
- Stiff card, 3.5 in (8.9 cm) wide, for the tassel
- Fabric stiffener (or 1:1 white glue and water)
- 1 small balloon and 1 small plastic bag
- Scissors, stitch markers, ruler, rust-proof pins
Abbreviations (US Terms)
- ch: chain
- sc: single crochet
- dc: double crochet
- sk: skip
- sl st: slip stitch
- sp: space
- st(s): stitch(es)
- RS: right side
- tch: turning chain
Special stitch, ch-4 net loop: ch 4, then sc into the indicated st or ch-4 sp. When these loops are worked in offset rows, they form the open diamond net.
Gauge and Checkpoints
Gauge: 24 sc and 28 rows = 4 in (10.2 cm) in sc.
Make one complete strip, including the border, before starting the others. That strip is your real gauge test.
Checkpoints:
- After Row 1: 61 sc measure 10.2 in (25.9 cm).
- After Row 7: the strip measures 10.2 in × 1.2 in (25.9 cm × 3.0 cm).
- After the Border: the strip measures 10.5 in × 1.5 in (26.7 cm × 3.8 cm).
- After Joining: the clusters sit 8 in (20.3 cm) apart, and the spiral is 3 in (7.6 cm) wide.
If Row 1 is longer than 10.2 in (25.9 cm), go down 0.25 mm in hook size. If it’s shorter, go up 0.25 mm. Differences of up to 0.25 in (0.6 cm) are fine, as long as all four strips match each other.
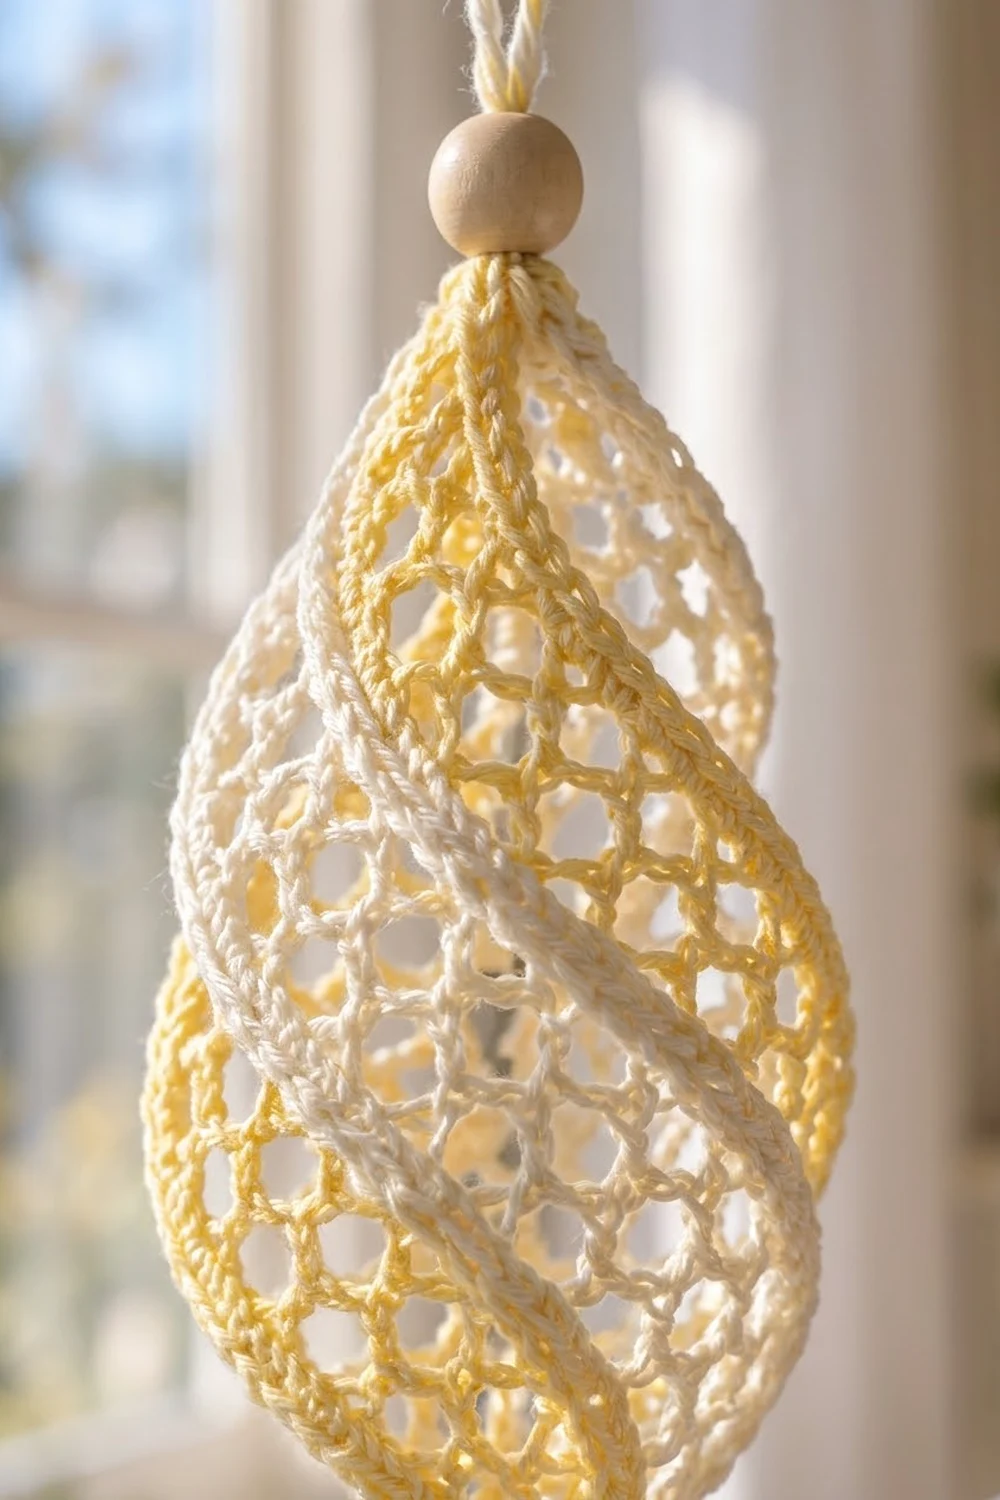
Mesh Strip Pattern
Each strip is worked lengthwise in rows. You’ll edge it with one round later (see Border).
Foundation: Ch 62.
Row 1 (RS): Sc in 2nd ch from hook and in each ch across, turn. (61 sc)
Row 2: Ch 1 (does not count as a st here and throughout), sc in each st across, turn. (61 sc)
Rows 1 and 2 form the first solid edge band.
Row 3: Ch 1, sc in first st, ch 4, sk 3 sts, sc in next st; repeat from * 14 more times, turn. (16 sc, 15 ch-4 sps)
Row 4: Ch 5 (counts as dc + ch 2), sc in first ch-4 sp, ch 4, sc in next ch-4 sp; repeat from * 13 more times, ch 2, dc in last sc, turn. (15 sc, 14 ch-4 sps, 2 ch-2 sps, 2 dc including tch)
This row shifts the loops by half a repeat, which creates the diamond net.
Row 5: Ch 1, sc in first dc, ch 4, sc in next ch-4 sp; repeat from * 13 more times, ch 4, sc in 3rd ch of tch, turn. (16 sc, 15 ch-4 sps)
You skip the two ch-2 sps in this row. The loops now line up with the loops of Row 3 again.
Row 6 (conversion row): Ch 1, sc in first sc, 3 sc in next ch-4 sp, sc in next sc; repeat from * 14 more times, turn. (16 sc worked 1 per existing sc + 45 sc worked into the 15 spaces = 61 sc)
Row 7: Ch 1, sc in each st across. (61 sc) Fasten off and leave a 6 in (15.2 cm) tail.
Rows 6 and 7 form the second solid edge band, matching Rows 1 and 2. The strip now measures 10.2 in × 1.2 in (25.9 cm × 3.0 cm).
Make All Pieces
Strips:
- Color A (Butter Yellow): 2 strips
- Color B (Cream): 2 strips
Work the Border round on all 4 strips before you join them. The Border has its own section below because the same counts apply to every strip.
Center cord: Cut 1 strand of Color A and 1 strand of Color B, each 36 in (91.4 cm) long. Hold them together and fold in half to make a 4-strand cord.
Tassel: You’ll make it during Final Blocking.
Layout (strips around the ring, viewed from above, clockwise):
RING: YELLOW CREAM YELLOW CREAM
Keep the RS of every strip facing outward.
Joining
The strips are joined only at their short ends, which are gathered into a top cluster and a bottom cluster. The long edges stay free so they can spiral.
Stitch-to-stitch logic: Each bordered short end has 10 sts: 8 short-end sc plus the 2 corner center sc. Four strips give 4 × 10 = 40 sts per cluster.
- Lay the 4 strips side by side, RS up, in layout order. Line up the top short ends.
- Thread a 20 in (50.8 cm) strand of Color B. Run the needle through the 10 short-end sts of the first strip. Continue through the 10 sts of each following strip until all 40 sts are on the strand.
- Bring the 4th strip around to meet the 1st to form a ring. Before gathering, the ring measures 4 × 1.5 in = 6 in (15.2 cm) around.
- Pull the strand firmly to close the ring into a tight cluster. Pass the needle through all 40 sts a second time and knot securely.
- Repeat at the bottom ends. Make sure no strip is twisted along its length yet.
Tension advice: Pull until the cluster is about 0.5 in (1.3 cm) across, which is small enough to tuck under a 16 mm bead. Don’t pull harder than that, because cotton can snap. A second pass through the stitches holds better than extra force.
Assembling the cord:
- Thread all 4 cord strands onto the needle, leaving a 2 in (5.1 cm) loop at the fold.
- Pass the strands through one 16 mm bead, then down through the center of the top cluster.
- Run the cord down inside the ornament and out through the center of the bottom cluster.
- Tie an overhand knot under the bottom cluster so the two clusters sit 8 in (20.3 cm) apart.
- Thread on the second 16 mm bead, then the 12 mm bead, and knot below them.
Size checkpoint: The strips are 10.5 in (26.7 cm) long and the clusters are 8 in (20.3 cm) apart, so each strip bows outward. Hold the top bead and turn the bottom cluster one full turn clockwise. The strips wrap into a spiral about 3 in (7.6 cm) wide, with each strip slightly overlapping the next.
Border
Work the border on each strip, in that strip’s own color, before joining.
Border gauge: Same as the body, 24 sc = 4 in (10.2 cm).
Round 1: With RS facing, join yarn with a sl st in the first st of Row 7. Ch 1.
- Long side 1: 3 sc in the first st (corner), sc in next 59 sts, 3 sc in last st (corner).
- Short side 1: Work 8 sc along the row ends: 1 sc each in the ends of Rows 6, 5, 3, 2 and 1, 2 sc around the end of Row 4, and 1 sc in the side of the foundation edge.
- Long side 2: Working in the bases of the foundation ch, 3 sc in the first base (corner), sc in next 59, 3 sc in the last base (corner).
- Short side 2: Work 8 sc along the row ends, mirroring short side 1.
Join with a sl st to the first sc. Fasten off and weave in ends. (146 sc)
Counts per side, including corner center sts:
- Long sides: 61 sts each (1 corner + 59 + 1 corner)
- Short sides: 10 sts each (1 corner + 8 + 1 corner)
Why the math works:
– Each long side places exactly 1 sc on each of the 61 sts of Row 7 or the foundation, so the edge lies flat without ruffling.
– Each 3-sc corner adds 2 extra sts, which lets the corners turn cleanly.
– The short ends are 1.2 in (3.0 cm) tall. At 6 sc per inch, 8 sc fit that height well enough to stay flat.
– Total check: (2 × 59) + (2 × 8) + (4 × 3) = 118 + 16 + 12 = 146 sc.
The bordered strip measures 10.5 in × 1.5 in (26.7 cm × 3.8 cm).
Final Blocking
The spiral holds its shape best when the ornament is stiffened.
- Make the tassel. Hold Color A and Color B together and wrap them 20 times around the 3.5 in (8.9 cm) card. Use the cord tails below the 12 mm bead to tie the wraps together at the top. Cut the bottom loops. Wrap the tassel neck 0.5 in (1.3 cm) below the top, then trim the ends to a 3 in (7.6 cm) length.
- Protect the tassel. Slip the plastic bag over the tassel so it stays soft.
- Stiffen. Dip the ornament body in fabric stiffener. Gently squeeze out the excess so the mesh openings stay open.
- Support the shape. Push the balloon between two strips and inflate it inside to about 3 in (7.6 cm) wide. Tie it off.
- Reset the twist. Check that the bottom cluster is still one full turn from the top and that the strips are evenly spaced.
- Open the mesh. Use a pin to clear any stiffener film from the net loops.
- Dry. Hang the ornament by its loop for 24 hours.
- Release. Pop the balloon and draw it out between two strips. Remove the bag and comb the tassel strands straight.
Final Quality-Control Checklist
- Each strip has 61 sc in Rows 1, 2, 6 and 7.
- Rows 3 and 5 have 15 ch-4 loops. Row 4 has 14 ch-4 loops plus 2 ch-2 sps.
- Each bordered strip has 146 sc and measures 10.5 in × 1.5 in (26.7 cm × 3.8 cm).
- All 4 strips match in length within 0.25 in (0.6 cm).
- Colors alternate yellow, cream, yellow, cream around the ring.
- Every strip has its RS facing out.
- The top and bottom clusters are tight and hidden under the beads.
- The clusters are 8 in (20.3 cm) apart, with one full twist.
- The body is about 3 in (7.6 cm) wide, and the tassel is 3 in (7.6 cm) long.
- All ends are woven in, and the mesh openings are clear.
Troubleshooting
Strip edges ruffle. There are extra sc on a long side. Each long edge needs exactly 61 sts, including the corners.
Strip curves like a banana. The foundation chain is too tight. Make the chain with a hook one size larger, then switch back for Row 1.
Net looks lopsided. Check Row 4. It must start with ch 5 and end with ch 2, dc, so the loops shift by half a repeat.
Row 6 is too short or too long. Work exactly 3 sc in every ch-4 sp. Putting 2 or 4 sc in even one space changes the total.
Spiral collapses. The stiffener was too thin or the balloon was too small. Re-dip the ornament and dry it over a fuller balloon.
Gaps show at a cluster. Pass the gathering strand through all 40 sts again and pull snug.
Strips are different widths. Your tension may differ between colors. Remake the odd strip with an adjusted hook size.
Care
Dust with a soft, dry brush, or use a hairdryer on its cool setting. Avoid washing. If the ornament gets wet, reshape it over a balloon and stiffen it again.
Final Notes
Here is the full measurement chain:
– A gauge of 24 sc = 4 in (10.2 cm) gives 61 sc = 10.2 in (25.9 cm).
– Seven rows make a strip 1.2 in (3.0 cm) wide. One sc border round brings it to 10.5 in × 1.5 in (26.7 cm × 3.8 cm).
– Four strips form a 6 in (15.2 cm) ring that gathers into a 0.5 in (1.3 cm) cluster.
– Clusters set 8 in (20.3 cm) apart and twisted once make the strips bow into a 3 in (7.6 cm) wide spiral.
– The beads and a 3 in (7.6 cm) tassel bring the total length to about 14.5 in (36.8 cm).
Once you’ve made one, try a few more in other color pairs to fill a sunny window.
Happy crocheting!