

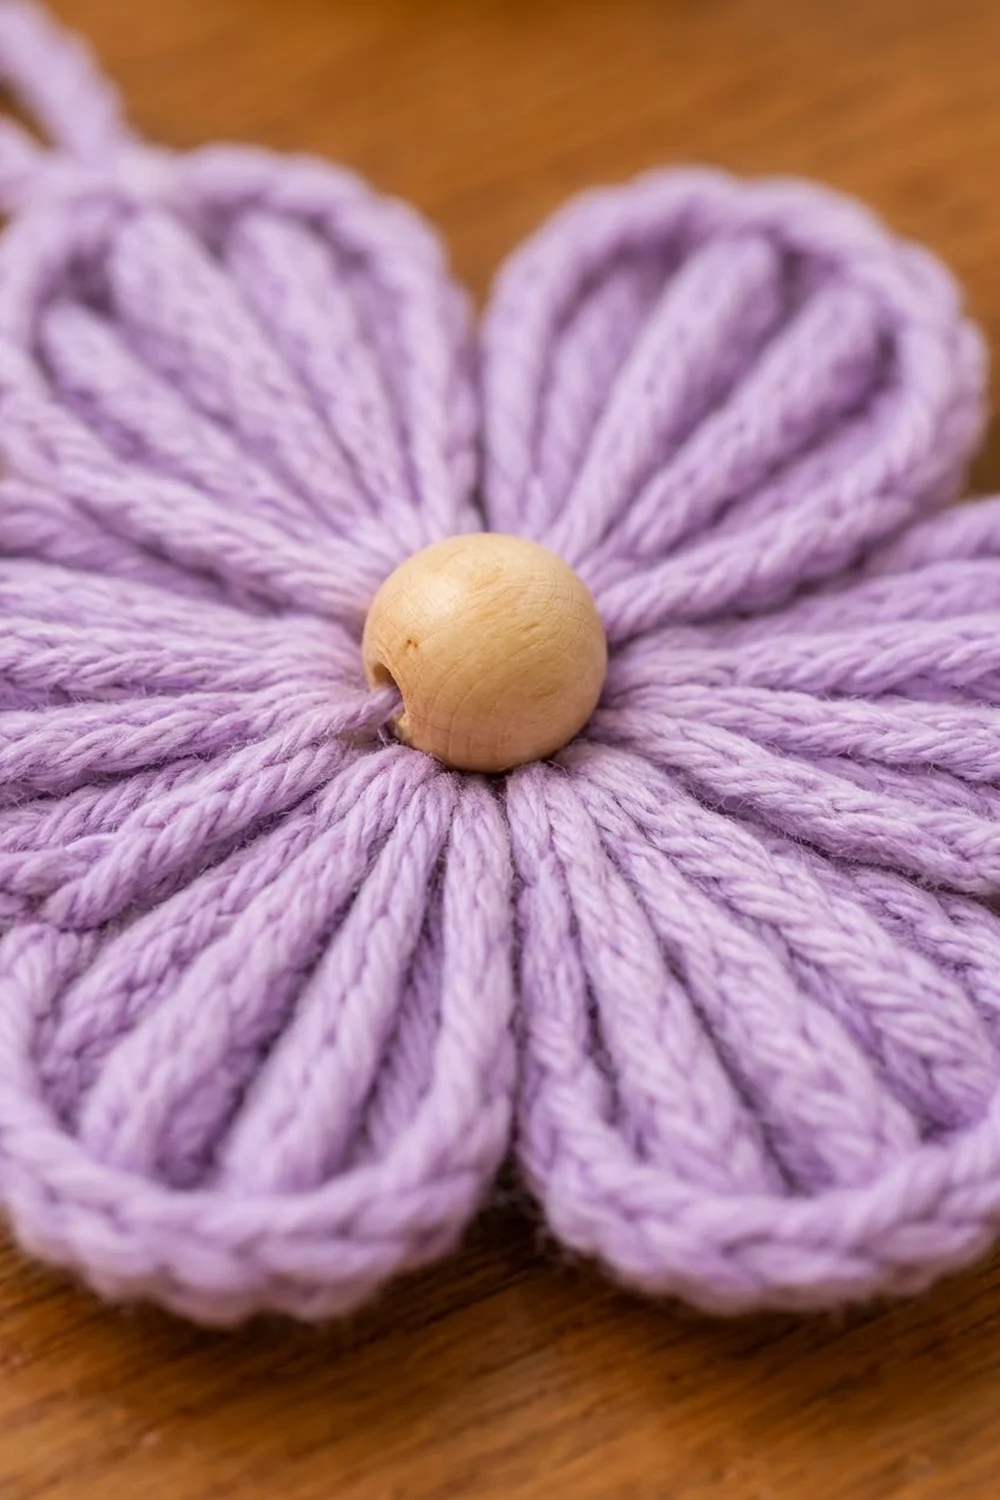
The Lilac Bloom Flower Ornament is a small, flat flower with six rounded petals and a wooden bead in the center. Each petal is a fan of tall stitches that fans out from the middle, so the ribs on the front catch the light. A corded outline frames every petal and gives the flower a clean, finished edge.
The sample is made in one soft lavender shade, and the bead is left natural. The look is calm and Scandinavian-inspired. It works as a Christmas tree ornament, a gift-tag topper, or a spring decoration if you hang it in a window.
This pattern uses US crochet terms. The finished flower measures about 4 in (10.2 cm) from petal tip to petal tip. The hanging loop adds about 1.5 in (3.8 cm).
The whole flower is worked in the round as one piece. You start with a magic ring, build a small center, and work six petal fans in one round. Then you add a single crochet round and a reverse single crochet (crab stitch) round to make the corded outline. After that, you add a slip-stitched hanging loop and sew the bead to the center.
Finished Size and Construction
- Finished size: 4 in (10.2 cm) across, tip to tip
- Loop height: 1.5 in (3.8 cm) above the top petal
- Skill level: Easy / advanced beginner
- Terminology: US crochet terms
- Yarn weight: Worsted (CYC 4)
- Hook: 4.0 mm (G-6)
- Number of pieces: 1 (single motif)
- Layout: Single flower, six petals, one loop at the top petal tip
- Piece size: 4 in (10.2 cm)
- Size before border: 3.5 in (8.9 cm) after the petal round
- Border depth: 0.25 in (0.6 cm) per side (2 rounds)
Materials
Yarn: Choose a smooth worsted-weight yarn with clear stitch definition. Cotton, a cotton blend, or a firm acrylic will all show the petal ribs well. Very fuzzy or brushed yarns will hide the ridges and the corded outline.
- Lavender (Color A): 12 g / about 24 m (26 yd) per ornament
The quantity includes a margin of roughly 30% for your gauge swatch, the loop, and sewing tails. If you make a set of ornaments, multiply by the number of flowers.
Tools:
- 4.0 mm (G-6) crochet hook
- One natural wooden bead, 5/8 in (1.6 cm), with a hole wide enough for a tapestry needle or sewing thread
- Tapestry needle
- Optional: matching sewing thread and a fine needle for the bead
- Scissors
- Rust-proof pins and a blocking mat or foam board
- Spray bottle with water
Abbreviations (US Terms)
- ch – chain
- sl st – slip stitch
- sc – single crochet
- tr – treble crochet (yarn over twice, insert hook, pull up a loop, [yarn over, pull through 2 loops] 3 times)
- rev sc – reverse single crochet
- st(s) – stitch(es)
- rnd – round
- MR – magic ring
Special stitch: Reverse single crochet (rev sc / crab stitch). Don’t turn your work. Work from left to right (right to left if you crochet left-handed). Insert the hook into the next stitch to the right, yarn over, pull up a loop, then yarn over and pull through both loops. The stitch twists over itself and makes the raised, rope-like cord that outlines each petal.
Gauge and Checkpoints
Gauge isn’t critical for an ornament, but it controls the final size and how flat the petals lie. Make one complete flower first and measure it before you start a batch.
Checkpoints:
- After Rnd 1: 0.75 in (1.9 cm) across
- After Rnd 2: 1.25 in (3.2 cm) across
- After Rnd 3: 3.5 in (8.9 cm) tip to tip. Each petal is about 1.125 in (2.9 cm) long from the edge of the center.
- After Rnd 4: 3.75 in (9.5 cm) tip to tip
- After Rnd 5: 4 in (10.2 cm) tip to tip
If your flower is too big (over 4.25 in / 10.8 cm), go down to a 3.5 mm (E-4) hook. Big petals often also ruffle.
If your flower is too small (under 3.75 in / 9.5 cm after Rnd 5), go up to a 4.5 mm (7) hook. Small petals often cup instead of lying flat.
Your treble crochet height affects size more than anything else. If your trebles are short and tight, loosen the first yarn-over wraps a little.
Pattern
Center
Rnd 1: Make a MR. Ch 1 (does not count as a st), work 12 sc into the ring. Pull the tail firmly to close the center completely. Sl st to the first sc to join. (12 sts)
Close the ring tightly. The bead will cover the center, but a gap would let the bead tilt.
Rnd 2: Ch 1 (does not count as a st), 2 sc in each st around. Sl st to the first sc to join. (24 sts)
The center is now a flat disc 1.25 in (3.2 cm) across.
Petals
Each petal uses exactly 4 stitches of Rnd 2: one skipped stitch, one stitch holding the fan, one skipped stitch, and one slip-stitch anchor. That gives 6 petals × 4 sts = 24 sts.
Rnd 3: Don’t chain. Skip the next st, work 7 tr in the next st, skip the next st, sl st in the next st. Repeat from * 5 more times. The final sl st lands in the last stitch of Rnd 2 (the joining sl st position), which closes the round. (6 petals; 7 tr per petal; 42 tr + 6 sl sts)
All seven trebles come out of one stitch, so each petal is narrow at the base and spreads into a rounded fan. That is the teardrop shape. Each treble sits upright and forms one of the raised vertical ridges you see on the front.
Pull the sl st between petals snug. This makes the clear dip between petals and keeps them separate.
Checkpoint: The flower should measure 3.5 in (8.9 cm) tip to tip. If the fans buckle, your trebles are too long for the 4-stitch spacing. Go down a hook size for this round only.
Border
The border is two rounds, Rnd 4 and Rnd 5. Together they add 0.25 in (0.6 cm) to each petal tip, so 3.5 in + 0.25 in + 0.25 in = 4 in (8.9 cm + 0.6 cm + 0.6 cm ≈ 10.2 cm).
Border gauge: About 5 sc per 1 in (2.5 cm) along the curved petal edge.
In this flower, the “sides” are the petals. Each petal is worked separately and has exact counts.
Rnd 4 (sc trim round): Ch 1 (does not count as a st). Work around each petal as follows:
1 sc in each of the first 2 tr, 2 sc in each of the next 3 tr, 1 sc in each of the last 2 tr, sl st in the sl st between petals. Repeat from * 5 more times. Join with sl st to the first sc.
Per petal: 7 tr worked 1-per-stitch = 7 sc, plus 3 extra sc added at the tip = 10 sc, plus 1 sl st between petals.
Round total: 60 sc + 6 sl sts = 66 sts
The extra 3 sc go only into the middle three trebles, where the curve is widest. The edge of a fan is longer than its base. Without these increases, the trim would pull the petal tip inward and cup it. With them, the edge stays flat and smooth. The sl st between petals adds no width, so the dips between petals stay deep and clear.
Rnd 5 (corded outline): Ch 1 (does not count as a st). Don’t turn. Working in the reverse direction:
1 rev sc in each of the 10 sc of the petal, then sl st in the sl st between petals. Repeat around all 6 petals. Join with sl st to the first rev sc and fasten off. Leave a 6 in (15.2 cm) tail.
Per petal: 10 sc worked 1-per-stitch = 10 rev sc, with nothing added. Plus 1 sl st between petals.
Round total: 60 rev sc + 6 sl sts = 66 sts
The counts match Rnd 4 one-to-one. Reverse single crochet takes about the same edge length as sc, so you don’t need extra stitches. The twist of each rev sc makes the raised, cord-like rim that runs around every petal and into each dip.
Checkpoint: 4 in (10.2 cm) tip to tip.
Hanging Loop
Choose a petal for the top. On that petal, the tip falls between the 5th and 6th rev sc, counting from the first rev sc of the petal.
- Join the yarn with a sl st into the 5th rev sc of the top petal.
- Ch 14.
- Sl st into the 6th rev sc of the same petal to form the loop.
- Don’t turn. Sl st into each of the 14 ch back across the loop, working into the back bump of each chain. (14 sl sts)
- Sl st into the 5th rev sc again and fasten off. Leave an 8 in (20.3 cm) tail.
The slip stitches cover the chain and give the loop a firm, braided-looking cord that matches the petal outline. The finished loop stands about 1.5 in (3.8 cm) above the petal tip.
Attaching the Bead
- Thread the 8 in (20.3 cm) magic-ring tail, or a separate length of yarn, onto a tapestry needle. If the bead hole is too narrow for yarn, use matching sewing thread.
- From the back, bring the needle up through the center of the flower, just beside the closed magic ring.
- Pass the needle through the bead hole. Lay the bead with its hole running horizontally across the center.
- Take the needle back down through the center on the other side of the bead.
- Repeat 2 more times so the bead sits tight with no wobble.
- Knot on the back and weave in the end.
The bead should cover all of Rnd 1 and the inner part of Rnd 2. It should not overlap the bases of the petals.
Final Blocking
- Weave in all ends on the back first. Run the tails through the backs of the Rnd 4 stitches so they don’t show between the ribs.
- Lay the flower face up on a blocking mat.
- Pin the center lightly, then pin each petal tip so the flower measures 4 in (10.2 cm) across. Each opposite pair of tips should be the same distance apart.
- Pin each dip between petals toward the center so the petals stay rounded and separate.
- Mist with water until damp, not soaked. For acrylic, you can steam lightly from 1 in (2.5 cm) above instead. Never touch the yarn with the iron.
- Straighten the tr ribs with your fingertip so they radiate evenly from the center.
- Pin the loop straight up and let it dry fully, which takes about 2–4 hours.
- Unpin. If you used acrylic and the bead is lightweight wood, you can block before or after attaching the bead. Remove the bead first if you plan to wet-block cotton heavily.
Final Quality-Control Checklist
- Rnd 1 has 12 sc and the magic ring is fully closed
- Rnd 2 has 24 sc
- 6 petals, each with exactly 7 tr from one stitch
- Rnd 4 has 10 sc per petal (66 sts in total, including sl sts)
- Rnd 5 has 10 rev sc per petal (66 sts in total, including sl sts)
- The flower measures 4 in (10.2 cm) tip to tip
- The loop is centered on one petal tip and stands 1.5 in (3.8 cm) tall
- The 5/8 in (1.6 cm) bead sits flat and centered with no wobble
- All ends are woven in on the back and none show on the front
Troubleshooting
Petals cup forward. You probably skipped the Rnd 4 increases, or your trebles are tight. Check that you have 10 sc per petal, then block flat.
Petals ruffle or wave. The trebles are too long or loose. Go down a hook size for Rnd 3.
Gaps between the ribs. Some yarns separate on tall stitches. Use a smaller hook, or pull each treble’s final loop snug.
Crab stitch looks messy. Keep every rev sc the same height. Don’t pull up long loops, and keep the hook working in the same direction the whole round.
Center hole shows around the bead. Re-tighten the magic ring tail before sewing on the bead, or use a slightly larger bead, up to 3/4 in (1.9 cm).
Loop leans to one side. Make sure it starts and ends in the 5th and 6th rev sc, which sit on either side of the exact tip.
Flower is too large or small. Change hook size as described in the gauge section and re-check at Rnd 3.
Care
Spot clean with cool water and mild soap, press out the water in a towel, and lay flat to dry. Don’t machine wash, because the wooden bead can swell or crack.

Final Notes
The size of this ornament comes from a short, simple measurement chain:
- 12 sc center (0.75 in / 1.9 cm)
- 24 sc disc (1.25 in / 3.2 cm)
- Six 7-tr petals (3.5 in / 8.9 cm)
- 10 sc per petal (3.75 in / 9.5 cm)
- 10 rev sc per petal (4 in / 10.2 cm)
If you hit each checkpoint, every flower in your set will match. Make one, measure it, then make as many as your tree needs.
Happy crocheting!