

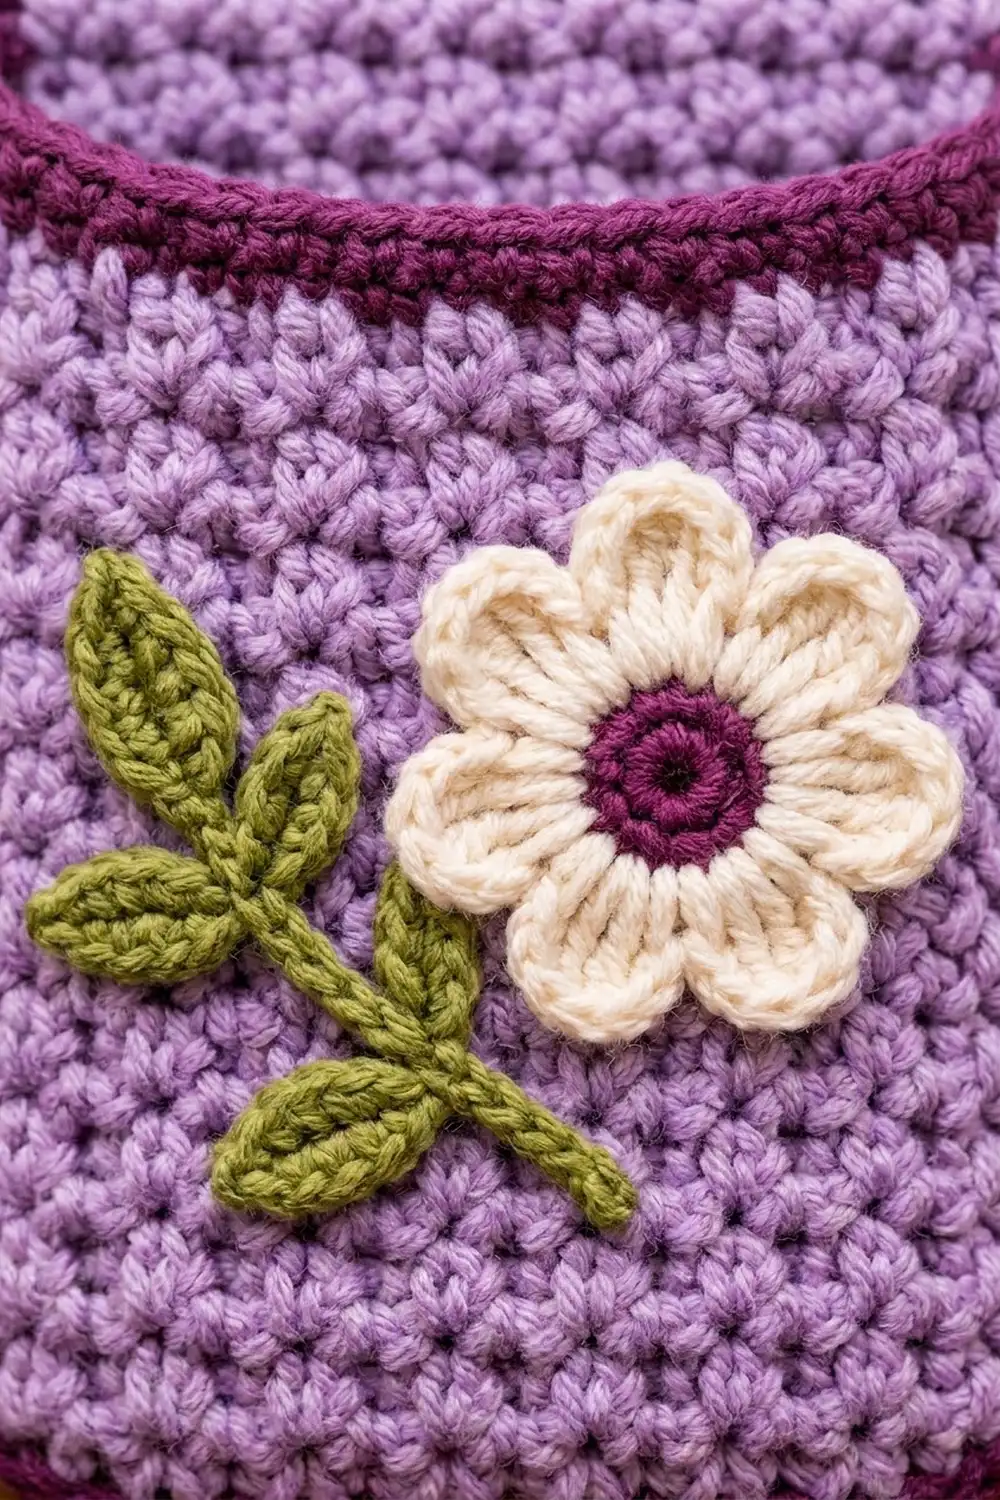
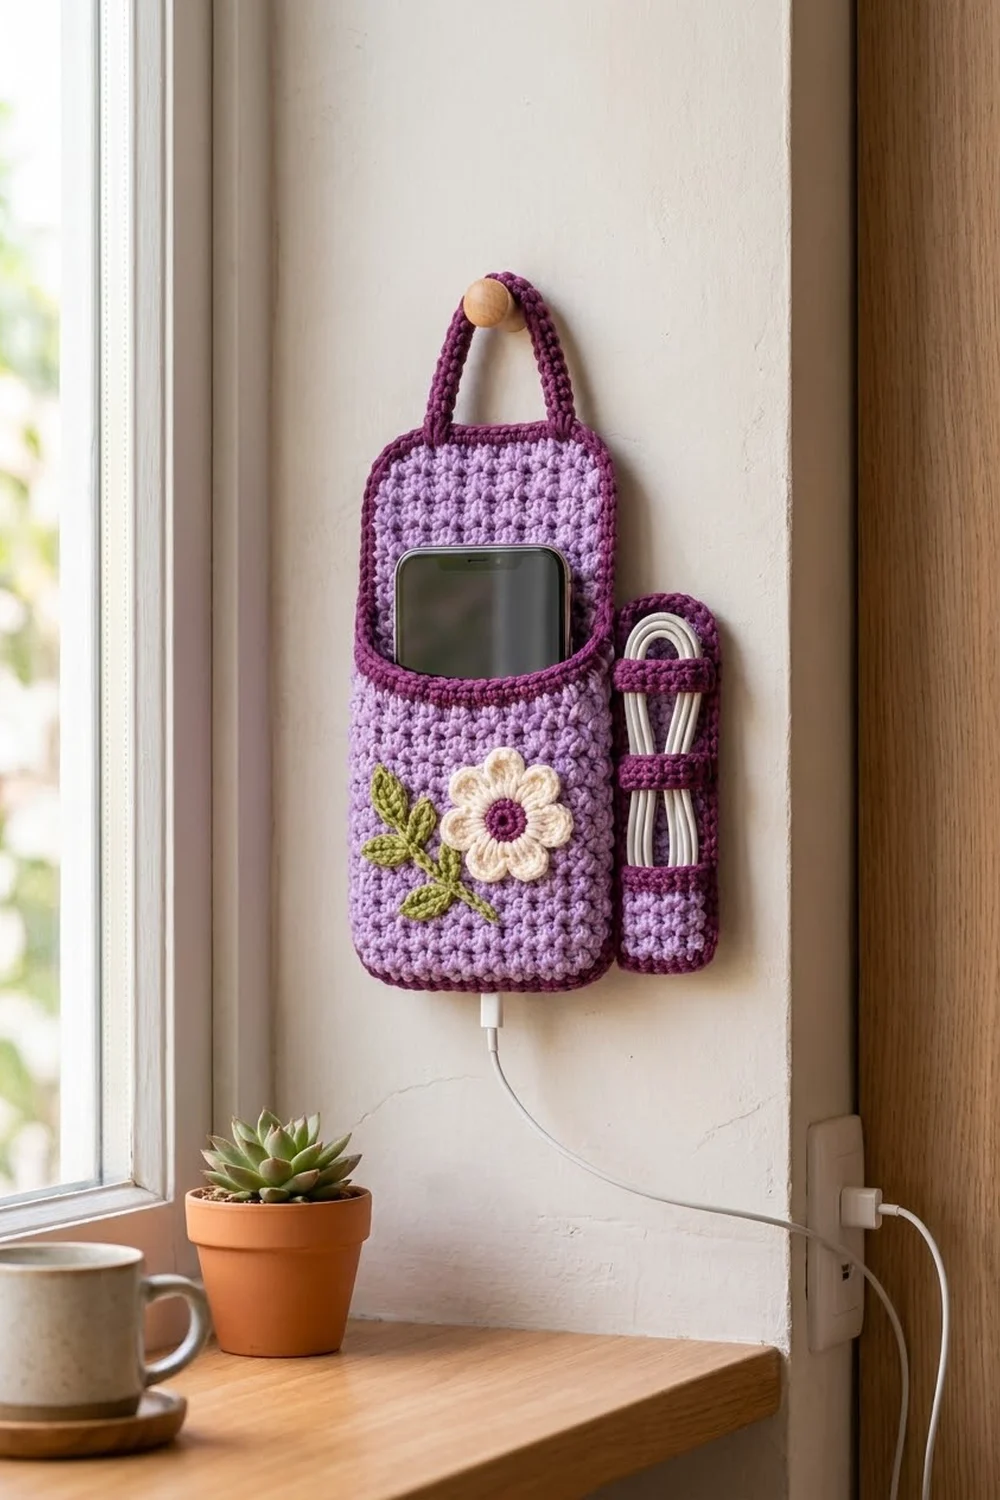
This wall-hanging phone charging holder keeps your phone off the floor while it charges. A narrow side pocket holds the coiled cable. The textured lavender panels have a plum corded edge, and a cream flower and a green leaf sprig decorate the front pocket.
It has a cozy, cottage-style look and uses four colors: lavender for the panels; plum for the edges, handle, straps and flower center; cream for the petals; and olive green for the leaves. All instructions use US crochet terms.
The assembled holder measures 7 in (17.8 cm) wide and 8.5 in (21.6 cm) tall without the handle. With the handle arch, it is about 12 in (30.5 cm) tall.
Everything is worked flat. You crochet three rectangular panels in griddle stitch and edge each one with plum single crochet and reverse single crochet. Then you sew the front pocket and side cord pocket onto the tall back panel. A folded plum handle, two plum straps and the appliqués finish the piece.
Finished Size and Construction
- Finished size: 7 x 8.5 in (17.8 x 21.6 cm); about 12 in (30.5 cm) tall with handle
- Skill level: Easy/Intermediate (includes reverse single crochet)
- Terminology: US crochet terms
- Yarn weight: Worsted (#4)
- Hook: 5 mm (US H-8)
- Number of pieces: 8 (back panel, front pocket, side cord pocket, 2 straps, handle, flower, leaf sprig)
- Layout: front pocket over the lower back panel; side cord pocket on the right
- Panel sizes before border: back 4.5 x 8 in (11.4 x 20.3 cm); front pocket 4.5 x 5 in (11.4 x 12.7 cm); side pocket 1.5 x 6 in (3.8 x 15.2 cm)
- Panel sizes after border: back 5 x 8.5 in (12.7 x 21.6 cm); front pocket 5 x 5.5 in (12.7 x 14.0 cm); side pocket 2 x 6.5 in (5.1 x 16.5 cm)
- Border depth: 0.25 in (0.6 cm) on every edge
Materials
Use a smooth worsted-weight cotton or cotton blend. Cotton keeps its shape when the holder carries a phone, and it shows the griddle texture clearly. Acrylic also works, but it stretches a little more.
- Lavender (A): 55 g, about 100 m
- Plum (B): 25 g, about 45 m
- Cream (C): 10 g, about 18 m
- Olive green (D): 5 g, about 9 m
These amounts include a margin of about 15 percent for your gauge swatch and differences in tension.
Tools:
- 5 mm (US H-8) crochet hook
- Tapestry needle
- Stitch markers (4)
- Scissors and measuring tape
- Rust-proof pins and a blocking mat
Abbreviations (US Terms)
- ch – chain
- sl st – slip stitch
- sc – single crochet
- hdc – half double crochet
- dc – double crochet
- rev sc – reverse single crochet (crab stitch)
- MR – magic ring
- st(s) – stitch(es)
- sp – space
- RS / WS – right side / wrong side
Special stitch – reverse single crochet (rev sc): Work from left to right (if you’re right-handed). Insert the hook into the next stitch to the right, yarn over and pull up a loop, then yarn over and pull through both loops. This makes the raised, rope-like plum edge.
Griddle stitch: Alternate sc and dc across the row. On every row after that, work sc into each dc and dc into each sc.
Gauge and Checkpoints
16 sts and 16 rows = 4 in (10.2 cm) in griddle stitch with a 5 mm hook. Border sc: 4 sts = 1 in (2.5 cm).
Make the side cord pocket first. It is the smallest panel, so it doubles as your swatch.
Checkpoints:
- Side pocket after Row 24: 1.5 x 6 in (3.8 x 15.2 cm)
- Back panel after Row 8: 4.5 in (11.4 cm) wide
- Back panel after Row 16: 4 in (10.2 cm) tall
- Back panel after Row 32: 4.5 x 8 in (11.4 x 20.3 cm)
- Any panel after its border: 0.5 in (1.3 cm) larger in each direction
If your piece is too big, go down one hook size. If it is too small, go up one hook size. Row height matters as much as width, because the pockets must line up with the back panel.
Back Panel
With A, ch 19.
Row 1 (RS): Sc in 2nd ch from hook, *dc in next ch, sc in next ch; rep from * to last ch, dc in last ch. (18 sts: 9 sc, 9 dc)
Row 2: Ch 1 (does not count as a st), turn. *Sc in next dc, dc in next sc; rep from * across. (18 sts)
Rows 3–32: Rep Row 2. (18 sts each row)
Fasten off. The panel should measure 4.5 x 8 in (11.4 x 20.3 cm).
Front Pocket
With A, ch 19.
Rows 1–2: Work as for the Back Panel. (18 sts)
Rows 3–20: Rep Row 2. (18 sts each row)
Fasten off. The pocket should measure 4.5 x 5 in (11.4 x 12.7 cm).
Side Cord Pocket
With A, ch 7.
Row 1 (RS): Sc in 2nd ch from hook, *dc in next ch, sc in next ch; rep from * to last ch, dc in last ch. (6 sts)
Rows 2–24: Ch 1, turn. *Sc in next dc, dc in next sc; rep from * across. (6 sts each row)
Fasten off. The panel should measure 1.5 x 6 in (3.8 x 15.2 cm).
Straps (make 2)
With B, ch 10.
Row 1: Sc in 2nd ch from hook and in each ch across. (9 sts)
Row 2: Ch 1, turn, sc in each st across. (9 sts)
Fasten off and leave a 6 in (15.2 cm) tail. Each strap measures 2.25 x 0.5 in (5.7 x 1.3 cm). It is 0.25 in (0.6 cm) wider than the side pocket, which leaves a little slack for the cable.
Handle
With B, ch 41.
Row 1: Sc in 2nd ch from hook and in each ch across. (40 sts)
Rows 2–3: Ch 1, turn, sc in each st across. (40 sts each row)
Don’t fasten off. Fold the strip in half lengthwise so the foundation edge meets the top of Row 3. Ch 1, then sl st through both long edges together along the whole length. (40 sl sts)
Fasten off and leave a 10 in (25.4 cm) tail. You now have a firm cord about 10 in (25.4 cm) long and 0.4 in (1.0 cm) thick.
Flower Appliqué
Rnd 1: With B, make an MR and work 12 sc in the ring. Join with a sl st to the first sc and pull the ring closed. Fasten off. (12 sts)
Rnd 2: Join C in any st. *Sc in next st, ch 3, skip next st; rep from * 5 more times. Join with a sl st to the first sc. (6 sc, 6 ch-3 sps)
Rnd 3: *In next ch-3 sp work (sc, hdc, 3 dc, hdc, sc); rep from * 5 more times. Join with a sl st to the first sc. (6 petals of 7 sts each = 42 sts)
Fasten off and leave a 12 in (30.5 cm) tail. The flower is about 2.5 in (6.4 cm) across, with a 0.75 in (1.9 cm) plum center.
Leaf Sprig
With D, ch 11.
Sl st in 2nd ch from hook (this end becomes the stem base) and in the next ch. (2 stem sl sts)
Leaf: Ch 6, sc in 2nd ch from hook, hdc in next ch, dc in next ch, hdc in next ch, sc in last ch (5 leaf sts). Sl st into the same stem ch as the last stem sl st, then sl st in the next 2 stem chs. Rep from * to * 3 more times. (4 side leaves, 10 stem sl sts)
Tip leaf: Ch 6, sc in 2nd ch from hook, hdc in next ch, dc in next ch, hdc in next ch, sc in last ch. Sl st into the end of the stem.
Fasten off and leave a 10 in (25.4 cm) tail. The sprig has 5 leaves and is about 3.75 in (9.5 cm) long. Each leaf is attached at only one point, so when you sew the sprig down, you can turn every other leaf to the opposite side of the stem.
Make All Pieces
Before you assemble the holder, check that you have:
- Lavender (A): 1 back panel, 1 front pocket, 1 side cord pocket
- Plum (B): 2 straps, 1 handle, the flower center and all panel borders
- Cream (C): 1 flower (petal rounds)
- Olive green (D): 1 leaf sprig
Work the Border (below) on all three lavender panels before joining.
Layout (front view):
         ( HANDLE )
+------------------+
|    BACK PANEL    |
|                  |+----+
+------------------+|SIDE|
|   FRONT POCKET   ||====|
|  sprig  flower   ||    |
|                  ||====|
+------------------++----+
The front pocket covers the lower 5.5 in (14.0 cm) of the back panel. The side pocket lines up with the bottom edge and rises 1 in (2.5 cm) above the top of the front pocket. “====” marks the straps.
Joining
Both border rounds must be finished on all panels before you join them. Use B and a tapestry needle. Whipstitch through the outer loop of the rev sc round on each piece, matching stitch to stitch.
Front pocket to back panel: Lay the pocket RS up on the back panel with the bottoms and sides lined up. Join in this order:
- Left side: 18 pocket sts to the lowest 18 back-panel side sts
- Bottom-left corner: 3 sts to 3 sts
- Bottom: 16 sts to 16 sts
- Bottom-right corner: 3 sts to 3 sts
- Right side: 18 sts to 18 sts
That joins 58 sts. The pocket’s top 16 sts and its two top corner groups (22 sts) stay free to form the opening. Check: 58 + 22 = 80, the pocket’s full border count.
Side cord pocket: Place it to the right of the back panel with the bottoms lined up. Whipstitch its bottom-left corner (3 sts) to the back panel’s bottom-right corner (3 sts). Then join its left side (22 sts) to the lowest 22 sts of the back panel’s right side. Where the front pocket edge overlaps, sew through all three layers.
Keep the tension snug enough that the edges touch, but not so tight that the seam puckers. Lay the piece flat every few inches to check.
Size checkpoint: The joined body should measure 7 in (17.8 cm) wide (5 in + 2 in) and 8.5 in (21.6 cm) tall.
Straps: Lay one strap across the side pocket 1.5 in (3.8 cm) below its top edge, and the other 1.5 in (3.8 cm) above its bottom edge. Sew only the strap ends to the long edges of the side pocket, so the middle bows slightly.
Handle: On the WS of the back panel, place each handle end 1 in (2.5 cm) in from a side edge, overlapping the panel by 0.75 in (1.9 cm) from the top. Sew securely. The ends sit 3 in (7.6 cm) apart, and the handle rises about 3.5 in (8.9 cm).
Appliqués: Pin the flower at the center-right of the front pocket, about 2 in (5.1 cm) above the bottom edge. Tuck the base of the sprig under the left petals and angle the sprig down to the left, turning the leaves to alternate sides. Sew through the front pocket only, so the pocket stays open.
Border
Work this on each of the three lavender panels before joining.
Border gauge: 4 sc = 1 in (2.5 cm). This matches the panel gauge of 4 sts and 4 rows per inch, so 1 sc per stitch and 1 sc per row end will lie flat.
Rnd 1: With RS facing, join B in the last st of the final row and work 3 sc in that st (corner). Sc in each st across the top edge to the last st, then work 3 sc in the last st (corner). Work 1 sc in the end of each row down the side, skipping the first and last rows because the corners cover them. Work 3 sc in the first foundation ch (corner). Sc in each foundation ch across to the last ch, then work 3 sc in the last ch (corner). Work 1 sc in each row end up the second side, again skipping the first and last rows. Join with a sl st to the first sc.
Rnd 2: Ch 1, rev sc in each st around. Join with a sl st to the first rev sc. Fasten off and weave in the ends.
Corner groups are counted separately here, not as part of the sides:
| Panel | Top | Bottom | Each long side | Corners | Rnd 1 | Rnd 2 |
|---|---|---|---|---|---|---|
| Back | 16 | 16 | 30 | 4 x 3 | 104 | 104 |
| Front pocket | 16 | 16 | 18 | 4 x 3 | 80 | 80 |
| Side pocket | 4 | 4 | 22 | 4 x 3 | 64 | 64 |
Why the math works: On the back panel, 16 + 16 + 30 + 30 + 12 = 104. Each long side has 30 sts plus one corner st at each end, for 32 sts. At 4 sts per inch, that is 8 in (20.3 cm), which matches the panel’s 32 rows. Each round adds about 0.125 in (0.3 cm) per edge, so the two rounds add 0.25 in (0.6 cm) per edge and 0.5 in (1.3 cm) in total. The rev sc round softens the 3-sc corners into rounded corners.
Final Blocking
- Lightly mist the holder with water, or soak it and press the water out in a towel.
- Lay it RS up on the blocking mat.
- Pin the outer corners to 7 in (17.8 cm) wide and 8.5 in (21.6 cm) tall.
- Pin the top edge of the front pocket straight, keeping the opening relaxed.
- Shape the petals and leaves with your fingers.
- Let it dry completely before you remove the pins. Don’t press the rev sc edge flat; it should stay raised.
Final Quality-Control Checklist
- Back panel 5 x 8.5 in (12.7 x 21.6 cm); front pocket 5 x 5.5 in (12.7 x 14.0 cm); side pocket 2 x 6.5 in (5.1 x 16.5 cm)
- Border counts match the table
- Pocket opening is free across 22 sts
- Seams lie flat without puckering
- Straps hold a coiled cable snugly
- Handle ends are secure and level
- Appliqués are sewn through the front pocket only
- All ends are woven in
Troubleshooting
Panel is wider than 4.5 in (11.4 cm): Go down a hook size, and make sure you aren’t adding a stitch at the row ends.
Texture looks striped, not bumpy: You are working sc into sc. Always work sc into dc and dc into sc.
Border ruffles: You are working more than 1 sc per row end. Recount against the table.
Border cups: Your border tension is too tight. Use a hook one size larger for Rnd 1 only.
Pocket sits higher than the back panel: Unpick the seam and rejoin, starting from the bottom corners and working up the sides.
Care
Remove the phone and cable, then hand wash in cool water with mild soap. Lay flat to dry.
Final Notes
The measurements build from one gauge. At 16 sts and 16 rows = 4 in (10.2 cm), you get a back panel of 4.5 x 8 in (11.4 x 20.3 cm), a front pocket of 4.5 x 5 in (11.4 x 12.7 cm) and a side pocket of 1.5 x 6 in (3.8 x 15.2 cm). Two border rounds add 0.5 in (1.3 cm) to each panel, and the joined holder ends up 7 x 8.5 in (17.8 x 21.6 cm). Check your swatch and your border counts, and the pieces will line up.
Happy crocheting!