

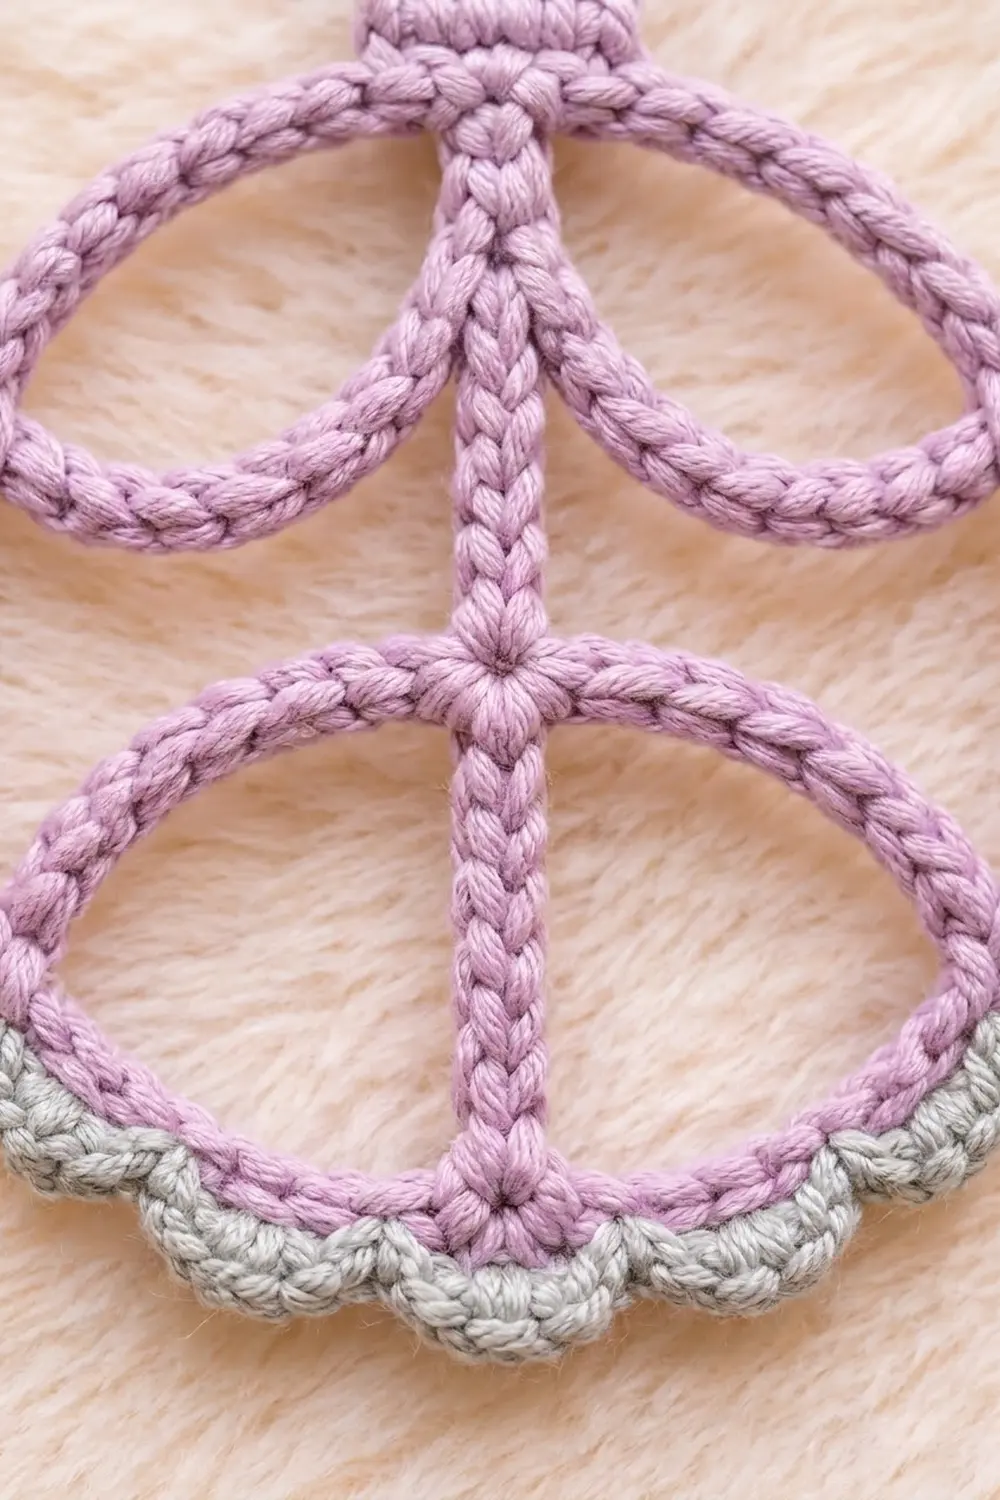
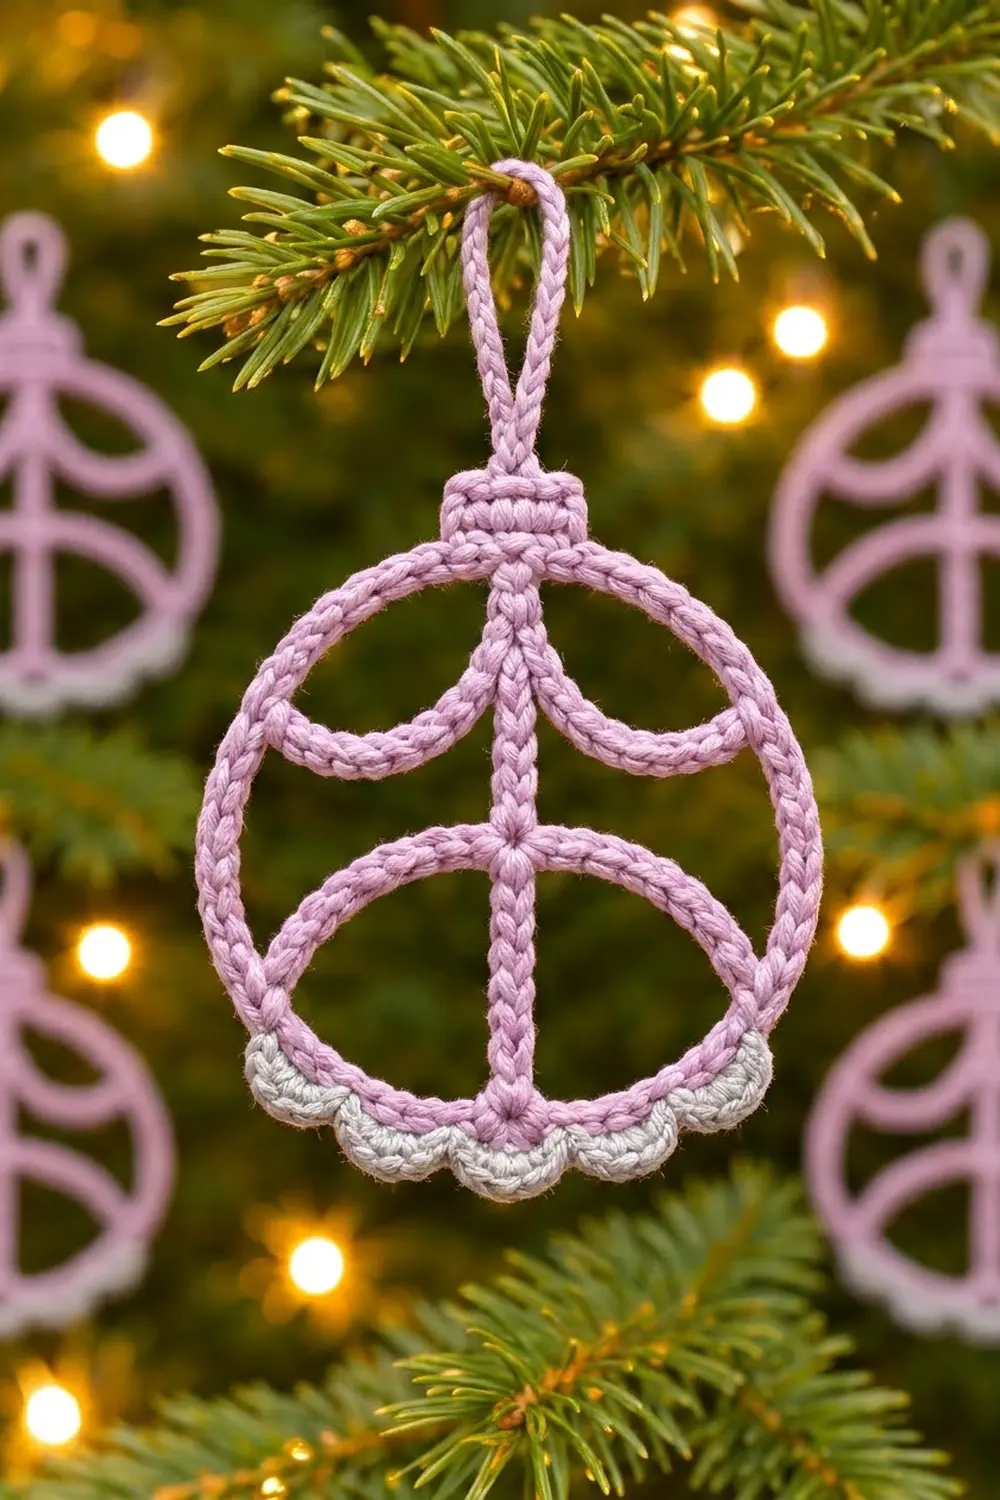
The Lilac Lattice Bauble is a flat, openwork Christmas ornament. Rounded cords outline a classic bauble shape. A lilac ring forms the outline. Inside it, a center bar, two hanging swags and one rising arch make a simple lattice that looks a bit like stained glass. A small lilac cap and hanging loop sit on top, and a soft gray scallop trims the lower edge.
The palette is calm and wintry: dusty lilac for the frame and gray for the scallops. The look is light and modern, and it reads well against dark green branches.
This pattern uses US crochet terms. The finished ornament is 3.75 in (9.5 cm) wide and about 5.75 in (14.6 cm) tall including the loop.
The ornament is one piece. You chain a ring and cover it with single crochet, then add the cap and loop on top. Next come the center bar, the swags and the arch. Each is a chain that you anchor to the ring and then cover with single crochet on the way back. The gray scallop trim goes on last.
Finished Size and Construction
- Finished size: 3.75 in (9.5 cm) wide × 5.75 in (14.6 cm) tall, including the loop
- Skill level: Easy / advanced beginner
- Terminology: US crochet terms
- Yarn weight: DK (#3) cotton or cotton blend
- Hook: 3.5 mm (E-4)
- Number of pieces: 1 (single ornament)
- Layout: Single motif. No joining.
- Ring size: 3.75 in (9.5 cm) outer diameter
- Size before border: 3.75 in (9.5 cm) wide × 5.25 in (13.3 cm) tall, including the cap and loop
- Border depth: 0.5 in (1.3 cm), on the lower edge only
Materials
Choose a smooth, tightly plied cotton in DK weight. Mercerized cotton gives the crisp, braided cord look in the photo and holds its shape after blocking. Fuzzy or very splitty yarns will blur the lines.
- Lilac (Color A): 10 g, about 24 m (26 yd)
- Gray (Color B): 3 g, about 7 m (8 yd)
Both quantities include a safety margin for the gauge swatch and weaving in ends.
Tools:
– 3.5 mm (E-4) crochet hook
– Tapestry needle
– Scissors
– 4 stitch markers
– Blocking board or foam mat and rustproof pins
– Spray starch or a fabric stiffener (optional)
Abbreviations (US Terms)
- ch: chain
- sc: single crochet
- dc: double crochet
- sl st: slip stitch
- sk: skip
- st(s): stitch(es)
- RS: right side
Special stitch: Cord (ch-and-return). Chain the number of stitches given and anchor the chain with a sl st where stated. Then work 1 sc into each chain back toward your starting point. This gives a firm, rounded cord with a braided surface. Every line in this ornament is built this way.
Shell: 5 dc in the same stitch.
Gauge and Checkpoints
Gauge: 5 sc = 1 in (2.5 cm) along a cord.
To check it, ch 20 and work 1 sc in each ch back along the chain (20 sc). The cord should measure 4 in (10.2 cm) and be about 0.2 in (0.5 cm) thick.
Make the ring as a test piece first, because every other part depends on its size.
Checkpoints:
1. After the ring (Rnd 1): Lay it flat as a circle. The outer diameter should be 3.75 in (9.5 cm).
2. After the cap and loop: The cap should measure 1 in (2.5 cm) wide × 0.6 in (1.5 cm) tall. The loop should stand about 0.9 in (2.3 cm) above the cap.
3. After the center bar: The bar should sit straight and just snug, without puckering the ring into an oval.
4. After the trim: The total height should be about 5.75 in (14.6 cm).
If your ring is too big: Go down to a 3.25 mm (D-3) hook, or crochet more tightly.
If your ring is too small: Go up to a 3.75 mm (F-5) hook.
Don’t change the stitch counts. All the anchor points are worked out from 56 ring stitches.
Ring
With Color A:
Foundation: Ch 56. Join with a sl st to the first ch to form a ring. Check that the chain isn’t twisted.
Rnd 1: Ch 1, sc in each ch around. Join with a sl st to the first sc. (56 sc) Fasten off.
The ring cord is 56 sts ÷ 5 = 11.2 in (28.4 cm) around. That gives a center-line diameter of about 3.56 in (9 cm). Add the cord’s thickness and the outer diameter is 3.75 in (9.5 cm).
Number the ring stitches. Lay the ring flat and pick the seam-free stitch at the top center. That stitch is st 1. Count clockwise around the ring so that:
– st 1 = top center (cap)
– st 10 = right swag anchor (about 2 o’clock)
– st 18 = right arch anchor (about 4 o’clock)
– st 29 = bottom center
– st 40 = left arch anchor (about 8 o’clock)
– st 48 = left swag anchor (about 10 o’clock)
Mark sts 10, 18, 40 and 48 with stitch markers. Each pair is mirrored around st 1:
– 10 − 1 = 9 and 57 − 48 = 9
– 18 − 1 = 17 and 57 − 40 = 17
The single crochet tops face the outside of the ring, so that is the outer edge. The foundation chain faces the center, so that is the inner edge. The cap and the trim go into the outer edge. The bar, swags and arch anchor into the inner edge.
Cap and Hanging Loop
With Color A and RS facing:
Row 1: Join in st 55 (outer edge), ch 1. Sc in sts 55, 56, 1, 2 and 3. (5 sc)
Row 2: Ch 1, turn, sc in each sc across. (5 sc)
Row 3: Ch 1, turn, sc in each sc across. (5 sc)
The cap is centered on st 1, with 2 stitches on each side. It measures 1 in (2.5 cm) wide × 0.6 in (1.5 cm) tall.
Loop: Turn. Sl st in each of the first 2 sc, then sl st in the next sc (the center sc). Ch 10, then sl st in the same center sc to close the loop. Work 1 sc in each of the 10 ch of the loop. (10 sc) Sl st in the center sc and fasten off.
The loop is 10 sts, or 2 in (5.1 cm), around. It stands about 0.9 in (2.3 cm) tall.
Center Bar
With Color A:
Step 1: Join with a sl st in the inner edge at the base of st 1, directly below the cap. Ch 17.
Step 2: Sl st in the inner edge at the base of st 29, the bottom center.
Step 3: Turn. Work 1 sc in each ch back up the bar, then sl st in the base of st 1. (17 sc) Fasten off.
The inner diameter is about 3.36 in (8.5 cm). 17 sts at 5 per inch is 3.4 in (8.6 cm), so the bar sits straight with no slack.
Number the bar stitches from the top: bar sc 1 is closest to the cap. Place a marker in bar sc 3 (the swag junction) and in bar sc 7 (the arch junction).
Swags
The two swags hang down from bar sc 3 and curve out to meet the ring at about 10 and 2 o’clock.
With Color A:
Step 1: Join with a sl st in the inner edge at st 48 (left marker). Ch 9.
Step 2: Sl st in the side of bar sc 3. Ch 9, then sl st in the inner edge at st 10 (right marker).
Step 3: Turn. Sc in each of the next 9 ch. Sl st in bar sc 3 again. Sc in each of the next 9 ch, then sl st in st 48.
Stitch count: 18 sc (9 per swag). Fasten off.
Each swag chain is 1.8 in (4.6 cm) long. The straight distance from bar sc 3 to each anchor is about 1.6 in (4.1 cm). The extra 0.2 in (0.5 cm) makes the soft downward curve. Ease each swag into a smooth “U” with your fingers before you continue.
Arch
The arch rises from the 8 o’clock point, crosses the bar at bar sc 7 and comes down to the 4 o’clock point.
With Color A:
Step 1: Join with a sl st in the inner edge at st 40. Ch 10.
Step 2: Sl st in the side of bar sc 7. Ch 10, then sl st in the inner edge at st 18.
Step 3: Turn. Sc in each of the next 10 ch. Sl st in bar sc 7 again. Sc in each of the next 10 ch, then sl st in st 40.
Stitch count: 20 sc (10 per half). Fasten off.
Bar sc 7 sits about 0.4 in (1 cm) above the ring’s center. The two anchors sit about 0.6 in (1.5 cm) below the center. So the arch peaks at the bar and slopes down to each side like a dome. Remove the markers from sts 10, 18, 40 and 48.
Border: Gray Scallop Trim
The trim covers the lower outer edge from st 19 to st 39. It starts just past the right arch anchor and ends just before the left one.
Border gauge: One scallop repeat (sk 1, shell, sk 1, sc) uses 4 ring stitches. That is 0.8 in (2 cm) of cord. Each shell sits about 0.3 in (0.8 cm) deep.
With Color B and RS facing:
Row 1: Join in st 19 (outer edge), ch 1. Sc in sts 19 through 39. (21 sc)
Row 2: Ch 1, turn. Sc in the first sc. Sk 1 sc, shell in the next sc, sk 1 sc, sc in the next sc. Repeat from * to * 4 more times, for 5 repeats in total. (25 dc + 6 sc = 31 sts, 5 shells) Fasten off.
Why the math works:
– Row 1 spans 21 stitches. The 5 repeats use 5 × 4 = 20 stitches, and the starting sc uses 1 more, so 20 + 1 = 21.
– The shells land on Row 1 stitches 3, 7, 11, 15 and 19. Those sit above ring sts 21, 25, 29, 33 and 37.
– The middle shell sits exactly at the bottom center (st 29). The other shells are spaced evenly on each side, so the trim is symmetrical.
– Row 1 adds about 0.2 in (0.5 cm) and the shells add about 0.3 in (0.8 cm). That makes the border depth 0.5 in (1.3 cm).
Final Blocking
- Weave in all ends along the inside of the nearest cord, in matching colors. Trim them close.
- Wet the ornament in cool water, then press it between towels. Don’t wring it.
- Pin it on a gridded board. Put one pin at the top center below the cap, one at the bottom center, and one at each of the 2, 4, 8 and 10 o’clock anchors.
- Check the circle. Measure 3.75 in (9.5 cm) across in both directions.
- Shape the lines. Straighten the center bar, shape the swags into matching “U” curves, and smooth the arch into an even dome.
- Open each shell gently with a fingertip.
- Stiffen if you like. Mist with spray starch, or brush on diluted stiffener, for an ornament that keeps its shape.
- Let it dry fully on the board, at least 6 hours, before you unpin it.
Final Quality-Control Checklist
- [ ] The ring has 56 sc and measures 3.75 in (9.5 cm) across.
- [ ] The cap is 5 sc wide, 3 rows tall and centered over st 1.
- [ ] The loop has 10 sc, is centered and is not twisted.
- [ ] The center bar has 17 sc and lies straight with no puckering.
- [ ] Both swags have 9 sc, meet at bar sc 3 and are mirror images.
- [ ] Both arch halves have 10 sc and meet at bar sc 7.
- [ ] The trim spans sts 19 to 39 with 5 even shells, and the middle shell is at the bottom center.
- [ ] All ends are hidden and the ornament lies flat.
- [ ] The total height is about 5.75 in (14.6 cm).
Troubleshooting
The ring turns into an oval. The center bar is too tight or too loose. Re-chain it with 16 or 18 ch to fit your tension.
The swags pull the ring inward. Your chains are tighter than your sc. Go up a hook size for the chains only.
The arch looks flat. Check that you joined at bar sc 7, counting from the top, and not bar sc 7 counting from the bottom.
The scallops ruffle. Work Row 1 more firmly, or use a 3.25 mm (D-3) hook for the gray trim.
The ring is twisted. Undo it and rejoin the 56-ch foundation, checking that the chain lies flat first.
The loop leans to one side. Make sure both ends of the loop are anchored in the same center cap sc.
Care
Hand wash in cool water and lay flat to dry, re-pinning the curves if needed. Store flat or hung by the loop so the cords keep their shape.
Final Notes
Each part of this ornament is sized from the one before it:
– Gauge: 5 sc per 1 in (2.5 cm).
– Ring: 56 stitches give a ring 3.75 in (9.5 cm) across.
– Cap and loop: The 5-stitch cap sits centered on st 1, with the loop above it.
– Center bar: 17 stitches fit the inner diameter exactly.
– Swags and arch: Their 9- and 10-stitch halves meet the bar at sc 3 and sc 7, mirrored around the ring.
– Trim: 21 stitches hold exactly 5 repeats of 4, plus 1.
If you match the gauge and check each checkpoint, you’ll end up with a crisp lilac bauble 3.75 in (9.5 cm) wide and 5.75 in (14.6 cm) tall.
Happy crocheting!