

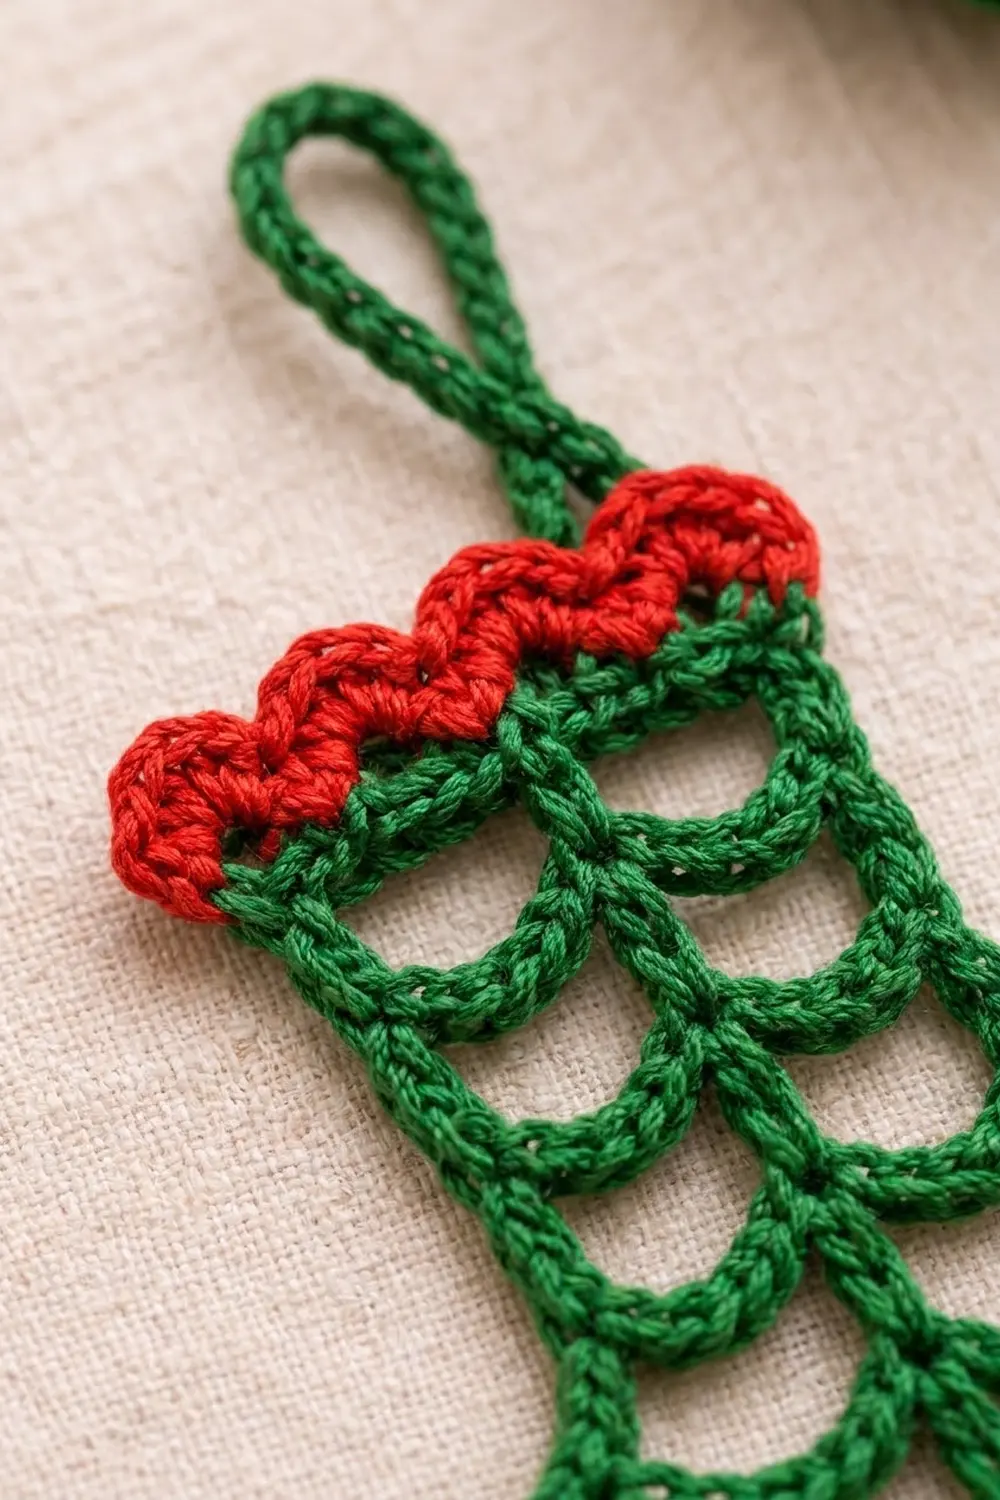
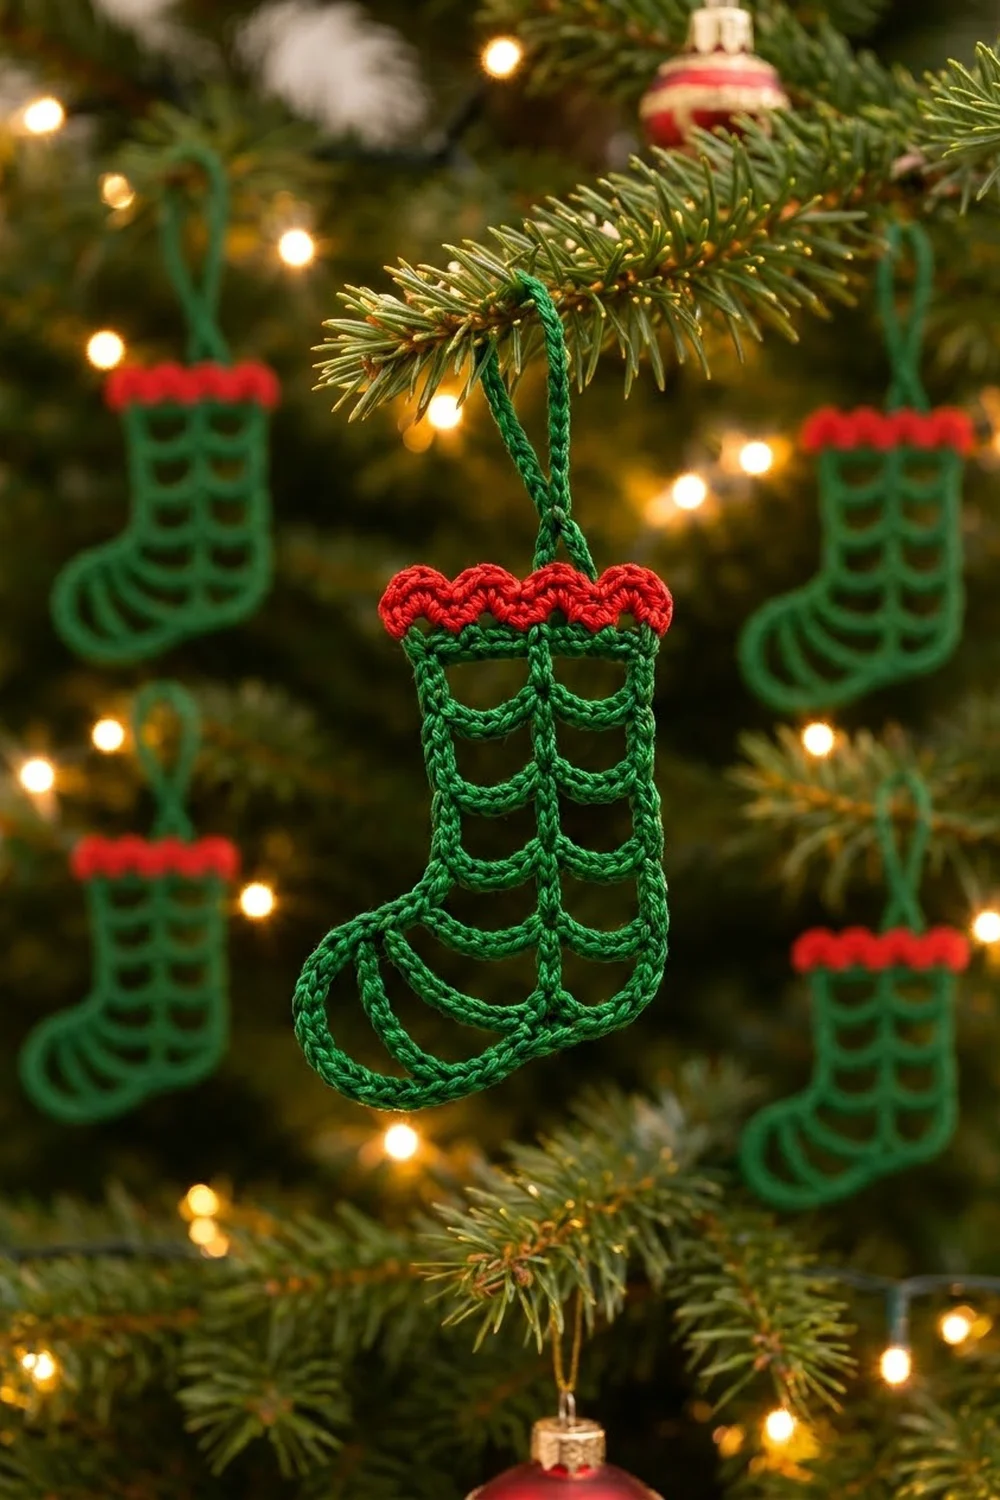
The Lattice Lantern Stocking is a small, airy Christmas ornament made from rounded green cords. It has no solid fabric. Instead, the stocking is an open frame: a straight outline, a center “spine” down the leg, and soft chain arcs that curve between them like the ribs of a paper lantern. Two more arcs in the foot fan from the instep down to the sole.
The colors are classic holiday. Deep forest green makes the frame and hanging loop, and bright Christmas red makes the scalloped cuff. Because the ornament is so open, it looks lovely against tree lights, in a window, or tied onto a gift.
This pattern uses US crochet terms. The finished stocking is about 1.8 in (4.6 cm) wide across the leg, 2.6 in (6.6 cm) from heel to toe, and 3.6 in (9.1 cm) from cuff top to sole. With the hanging loop, it hangs about 4.8 in (12.2 cm) long.
You work it in one piece from the top down. First comes a short single crochet row that becomes the top of the leg. Then you work four open mesh rows of treble posts and chain arcs. A chain loop forms the foot outline, a single crochet row firms up the sole, and two chain arcs fill the foot. Last, you work a red scalloped cuff into the foundation chain and add a green loop for hanging.
Finished Size and Construction
- Finished size: 1.8 in (4.6 cm) wide x 3.6 in (9.1 cm) tall, plus a 1.2 in (3.0 cm) loop
- Foot length: 2.6 in (6.6 cm) heel to toe
- Skill level: Easy / advanced beginner
- Terminology: US crochet terms
- Yarn weight: Sport weight (#2); mercerized cotton recommended
- Hook: 3.0 mm
- Number of pieces: 1 (a single ornament, no joining)
- Layout: Leg with a center spine and 4 tiers of arcs on each side; foot with an outline and 2 inner arcs
- Piece size before cuff: 1.8 in (4.6 cm) wide x 3.2 in (8.1 cm) tall
- Cuff (“border”) depth: 0.4 in (1.0 cm)
Materials
Choose a smooth, tightly plied sport weight cotton. Mercerized cotton gives the crisp, rounded cord look and holds its shape after blocking. Fuzzy or loosely spun yarns will blur the arcs.
- Green (frame and loop): 5 g, about 14 m
- Red (cuff): 2 g, about 6 m
These amounts include a margin of about 30 percent for a test ornament and weaving in ends. One 50 g ball of each color will make many ornaments.
Tools:
- 3.0 mm crochet hook
- Tapestry needle
- Scissors
- Blocking board or foam mat
- 8-10 rust-proof pins
- Spray bottle with water (or starch spray, optional)
- Ruler or tape measure
Abbreviations (US Terms)
- ch – chain
- sl st – slip stitch
- sc – single crochet
- dc – double crochet
- tr – treble crochet (yarn over twice)
- sk – skip
- st(s) – stitch(es)
- sp(s) – space(s)
Special stitch – Scallop: 3 dc worked into the same stitch.
Note on turning chains: In the mesh rows, the ch 4 at the start of a row counts as the first tr.
Gauge and Checkpoints
Exact gauge doesn’t matter much for an ornament, but it does control the shape. If your cords are too loose, the arcs droop and the stocking loses its crisp outline.
- Gauge: 6 sc = 1 in (2.5 cm); 1 tr row = 0.5 in (1.3 cm) tall; about 7 ch = 1 in (2.5 cm).
Make one test ornament first and measure at each checkpoint:
- After Row 1: the sc row measures 1.8 in (4.6 cm) wide.
- After Row 5: the leg measures 1.8 in (4.6 cm) wide x 2.2 in (5.6 cm) tall.
- After the foot: the body measures 3.2 in (8.1 cm) from the foundation chain to the sole, and 2.6 in (6.6 cm) from heel to toe once pinned.
- After the cuff: total height is 3.6 in (9.1 cm).
- After the loop: total hanging length is 4.8 in (12.2 cm).
If your piece is too big: go down to a 2.75 mm hook, or tighten your chains. Loose chain arcs are the most common cause.
If your piece is too small: go up to a 3.25 mm hook. Don’t add stitches; the counts are matched to the arc and cuff math.
Leg
With green, ch 12.
Row 1: Sc in 2nd ch from hook and in each ch across. (11 sc)
The edge where you just finished is the toe side. The edge where your slipknot sits is the heel side. Keep track of these, because the foot depends on them.
Row 2: Ch 4 (counts as tr), turn. Ch 5, sk next 4 sc, tr in next sc (the 6th sc, the center), ch 5, sk next 4 sc, tr in last sc. (3 tr, 2 ch-5 sps)
The middle tr starts the center spine, and the two outer tr form the side edges. Each ch-5 spans a gap of 4 stitches. Because the chain is a little longer than the gap, it naturally curves into a soft arc.
Row 3: Ch 4 (counts as tr), turn. Ch 5, tr in center tr, ch 5, tr in top of turning ch. (3 tr, 2 ch-5 sps)
Rows 4-5: Repeat Row 3. (3 tr, 2 ch-5 sps in each row)
You now have 4 tiers of arcs on each side of the spine. Row 5 ends at the toe side. Don’t fasten off.
Checkpoint: 1.8 in (4.6 cm) wide x 2.2 in (5.6 cm) tall from the foundation chain to the bottom of Row 5. That is Row 1 at 0.2 in (0.5 cm) plus 4 tr rows at 0.5 in (1.3 cm) each.
Foot
The foot has three parts: a chain outline that loops down and out to form the toe, sole, and heel; a sc row that thickens the sole; and two inner arcs.
Row 6 (foot outline): Ch 24, sl st in top of the turning ch-4 at the start of Row 5 (the heel-side corner). (1 ch-24 loop)
Let the loop hang below the leg. You will shape it into the toe and sole during blocking.
Row 7 (sole): Ch 1, turn. Working from the heel corner toward the toe, sc in each of the 24 ch. Sl st in top of the last tr of Row 5 (the toe-side corner). (24 sc)
Sc 1 now sits at the heel and sc 24 sits at the toe-side corner. Sc 1-12 form the flat sole, and sc 13-24 curve around the toe and up to the instep.
Row 8 (instep arcs): From the toe-side corner, ch 12 and sl st in sc 8 (counted from the heel end). Sl st in each of sc 9, 10, 11, 12, and 13, so you travel 5 sl st along the sole. Ch 9, then sl st again in top of the toe-side tr of Row 5. Fasten off. (2 instep arcs: ch-12 and ch-9)
The ch-12 arc reaches farther back toward the heel and becomes the outer of the two inner foot curves. The ch-9 arc sits inside it, nearer the toe. Together with the outline, they make the three nested curves of the foot.
Checkpoint: with the foot loop gently straightened downward, the body measures about 3.2 in (8.1 cm) from the foundation chain to the bottom of the sole.
Border: Red Scalloped Cuff and Hanging Loop
On this ornament, the only border is the red cuff along the top of the leg, plus the green hanging loop. There is no edging around the sides or foot; the open frame is the design.
Border gauge: you work the cuff 1 stitch per foundation loop, so its base matches Row 1’s gauge of 6 sts = 1 in (2.5 cm) exactly. It adds 0.4 in (1.0 cm) of height.
Cuff Row 1: Turn the stocking so the foundation chain is on top. Join red in the free loop of the foundation ch at the toe side. Ch 1, then sc in the same loop and in each free loop across. (11 sc)
The free loops sit at the base of the 11 Row 1 sc. So this row is 11 sc worked 1-per-existing-stitch, plus 0 extra stitches.
Cuff Row 2: Ch 1, turn. Sc in first sc, *3 dc in next sc (scallop), sc in next sc; repeat from * 4 more times. Fasten off. (5 scallops; 6 sc + 15 dc = 21 sts)
Why the math works: each scallop repeat uses 2 stitches (1 scallop stitch + 1 sc), and the row needs 1 extra sc at the start. That gives 1 + (5 x 2) = 11 stitches, exactly the count of Cuff Row 1. The row begins and ends with a sc, so both corners sit flat. The 5 scallops are centered over the spine: the 3rd scallop lands on sc 6, directly above the center tr.
Hanging loop: Join green in the first sc of Cuff Row 2 (the heel-side corner). Ch 20, then sl st in the same sc to form a loop. Sl st into the back bump of each of the 20 ch around the loop, then sl st into the base sc. Fasten off. (1 loop: 20 ch + 20 sl st)
The sl st pass turns the loop into a thick cord that matches the frame. The loop stands about 1.2 in (3.0 cm) tall.
Weave in all ends along the cords, following the existing stitches so they stay hidden from both sides.
Final Blocking
Blocking turns the floppy chain frame into a crisp stocking shape. Don’t skip it.
- Lightly mist the ornament with water until it is damp, not dripping. Starch spray makes a stiffer ornament.
- Lay it face up on a blocking board with the toe pointing left (or right, for a mirror image).
- Pin the four leg corners first: both cuff corners and both Row 5 corners. Check that the width is 1.8 in (4.6 cm).
- Run a ruler down the spine and make sure it is straight and centered.
- Pull the foot outline down and out. Pin the heel corner, the bottom of the sole, and the tip of the toe so the foot is 2.6 in (6.6 cm) long from heel to toe.
- Ease each ch-5 arc into a gentle downward curve. All 8 leg arcs should be equally deep.
- Shape the two instep arcs so they fan evenly between the instep and the sole.
- Pin the hanging loop into a neat teardrop 1.2 in (3.0 cm) tall.
- Let it dry completely, at least 4-6 hours, before unpinning.
Final Quality-Control Checklist
- Row 1 has 11 sc and measures 1.8 in (4.6 cm).
- Rows 2-5 each have 3 tr and 2 ch-5 sps.
- The spine is one straight line of 4 stacked tr.
- There are 4 arcs on each side of the spine (8 total).
- The sole row has 24 sc.
- The instep arcs land in sc 8 and leave from sc 13.
- The cuff has 11 sc in Row 1 and 5 scallops in Row 2.
- The hanging loop is at the heel-side corner.
- Total size is 1.8 in (4.6 cm) x 3.6 in (9.1 cm), or 4.8 in (12.2 cm) long with the loop.
- All ends are woven in and hidden.
Troubleshooting
The arcs sag into long loops. Your chains are too loose. Tighten your chain tension or use a smaller hook. You can also try ch 4 instead of ch 5, but keep all arcs the same length.
The arcs are flat and straight. Your chains are too tight. Go up one hook size for the chains only.
The spine wanders off-center. Make sure each center tr goes into the top of the center tr below it, not into a chain beside it.
The foot looks too short or stubby. Re-block with more stretch toward the toe. If it is still short, your ch-24 was too tight; rework Row 6 more loosely.
The cuff ruffles. Your dc are too loose. Try 3 hdc per scallop for a flatter cuff.
The cuff pulls the leg in. Work Cuff Row 1 more loosely, or use a hook 0.25 mm larger for the red rows.
The ornament tilts when hanging. By design, the loop sits at the heel corner, so the toe hangs slightly lower. For a straight hang, attach the loop over sc 6 of the cuff instead.
Care
Hand wash in cool water, roll in a towel to remove water, and re-block flat with pins to restore the shape. Store flat or loosely wrapped in tissue so the arcs aren’t crushed.
Final Notes
The whole ornament comes down to one simple chain of measurements. Row 1 sets the width: 11 sc at 6 sts per inch gives 1.8 in (4.6 cm). Four tr rows add 2.0 in (5.1 cm) of leg, for 2.2 in (5.6 cm) total. The foot loop brings the body to 3.2 in (8.1 cm). The 11-stitch cuff, matched exactly to Row 1, adds 0.4 in (1.0 cm), for a finished height of 3.6 in (9.1 cm). The loop adds 1.2 in (3.0 cm), for 4.8 in (12.2 cm) overall.
Check those numbers on your first ornament and adjust your hook if needed; the rest will follow. You can make several in an afternoon and fill your tree with little green lanterns.
Happy crocheting!