

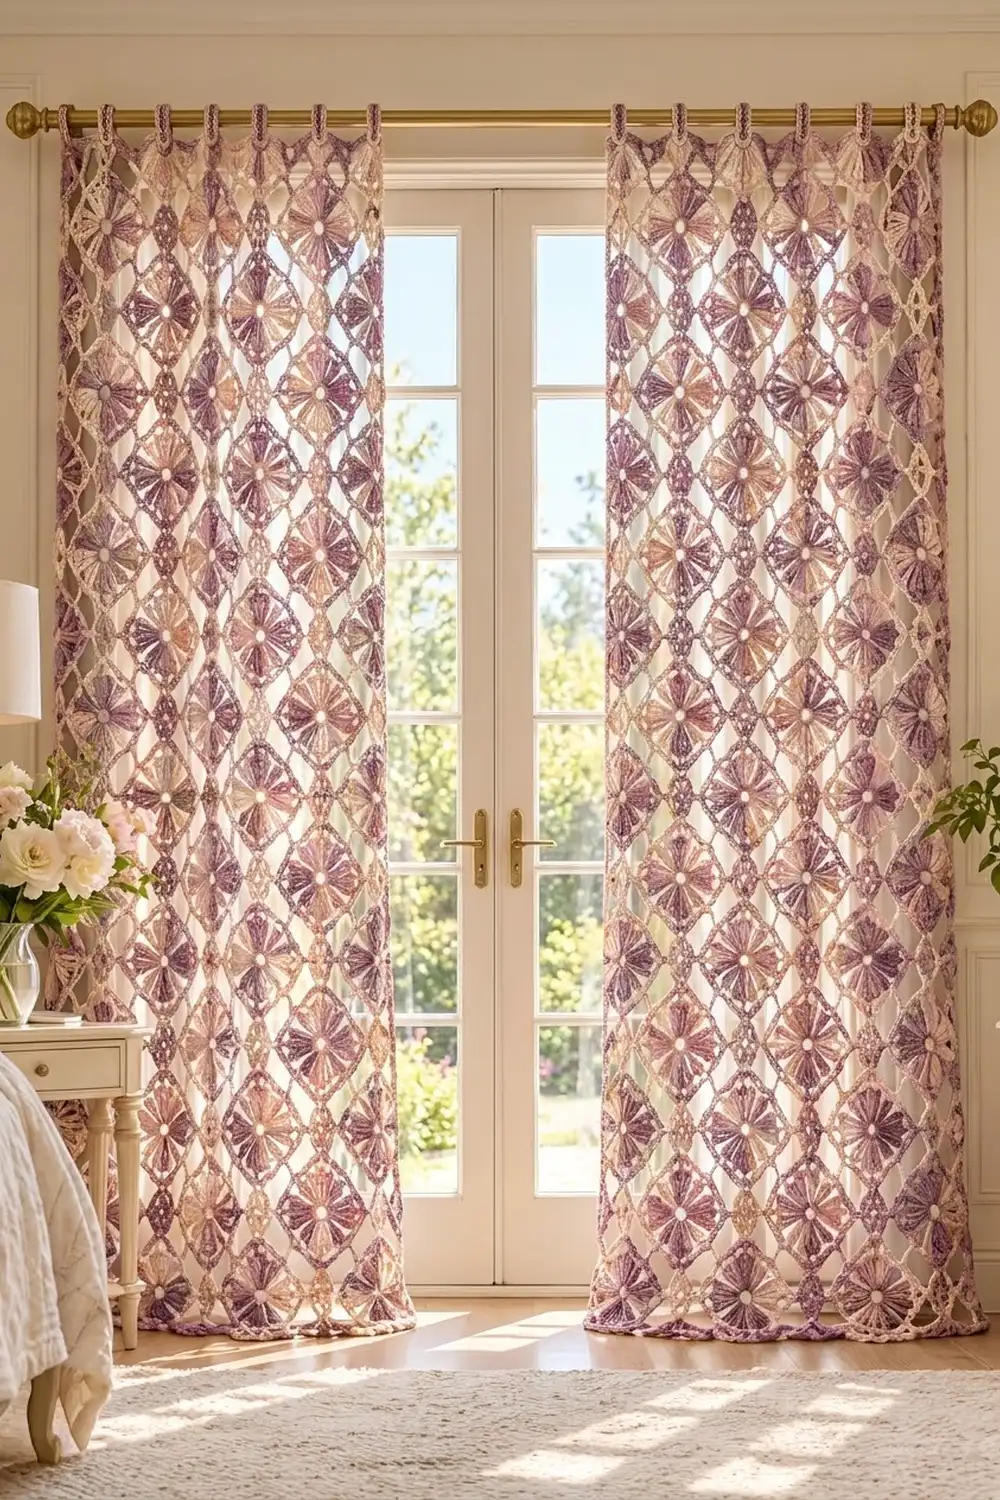
These curtains are built from airy diamond motifs. Each motif has a soft cream center ring, four fans of long stitches and an open chain-loop frame. Hung in a window, the motifs form a lattice of plum, lavender, dusty pink and cream that lets plenty of light through.
The colors come from one long-repeat variegated yarn plus a solid cream. Cream is used for every center ring and for the finishing border. The style is romantic and vintage-inspired, but the construction is simple and repetitive. This pattern uses US crochet terms throughout.
Each finished panel measures 44 in × 86 in (111.8 cm × 218.4 cm), not counting the hanging loops. You make 98 motifs per panel and join them as you go in a 7 × 14 grid. Then you add a three-round cream border with eight hanging loops along the top edge. The pattern covers one panel; make two for a pair.
You work each motif in six rounds. The joining happens during the last round, so there is no separate seaming. The border is worked last, once the grid is complete.
Finished Size and Construction
- Finished panel size: 44 in × 86 in (111.8 cm × 218.4 cm), excluding hanging loops
- Skill level: Intermediate
- Terminology: US crochet terms
- Yarn weight: Worsted (#4), cotton or cotton blend
- Hook: 5.0 mm (H-8)
- Number of pieces: 98 motifs per panel (196 for a pair)
- Layout: 7 motifs wide × 14 motifs tall
- Motif size: 6 in (15.2 cm) square after blocking
- Panel size before border: 42 in × 84 in (106.7 cm × 213.4 cm)
- Border depth: 1 in (2.5 cm) on each side
Materials
Yarn: Use a smooth worsted cotton or cotton blend. Cotton holds its shape when hung and blocks crisply. For Color B, choose a yarn with long color changes, so each fan shows a gradual shift rather than spots of color. The quantities below assume about 180 m per 100 g.
For a pair of panels:
- Color A (Cream): 375 g / 675 m, for the center rings and the border
- Color B (Plum-Lavender-Pink Variegated): 1,650 g / 2,970 m, for the fans and the mesh
For one panel, halve these amounts. All quantities include a margin of about 15% for gauge differences and swatching.
Tools:
- 5.0 mm (H-8) crochet hook
- Tapestry needle
- Scissors
- Stitch markers
- Measuring tape
- Rust-proof pins and blocking mats, or a clean towel-covered floor
- Spray bottle
Abbreviations (US Terms)
- ch – chain
- sl st – slip stitch
- sc – single crochet
- dc – double crochet
- tr – treble crochet
- sp(s) – space(s)
- sk – skip
- st(s) – stitch(es)
- rep – repeat
Special stitches
- Picot: Ch 3, then sl st into the front loop and the left leg of the sc just made.
- Hanging loop (HL): Ch 24, sl st into the sc just made, work 32 sc into the loop, then sl st into the same sc again. The loop is about 3 in (7.6 cm) long when flattened.
Gauge and Checkpoints
Make one complete motif and block it before you start the panel. All later measurements depend on this one piece.
Checkpoints for one motif:
- After Round 2: The center ring is about 1.25 in (3.2 cm) across.
- After Round 4: The motif is about 4.5 in (11.4 cm) across, measured between the tips of two opposite fans.
- After Round 6 and blocking: Each side is 6 in (15.2 cm), measured corner to corner.
If your motif is too big (6.25 in / 15.9 cm or more per side), switch to a 4.5 mm hook, or tighten your chains.
If your motif is too small (5.75 in / 14.6 cm or less per side), switch to a 5.5 mm hook.
A difference of 0.25 in (0.6 cm) per motif adds up to 1.75 in (4.4 cm) across the width and 3.5 in (8.9 cm) down the length. Fix it at the motif stage.
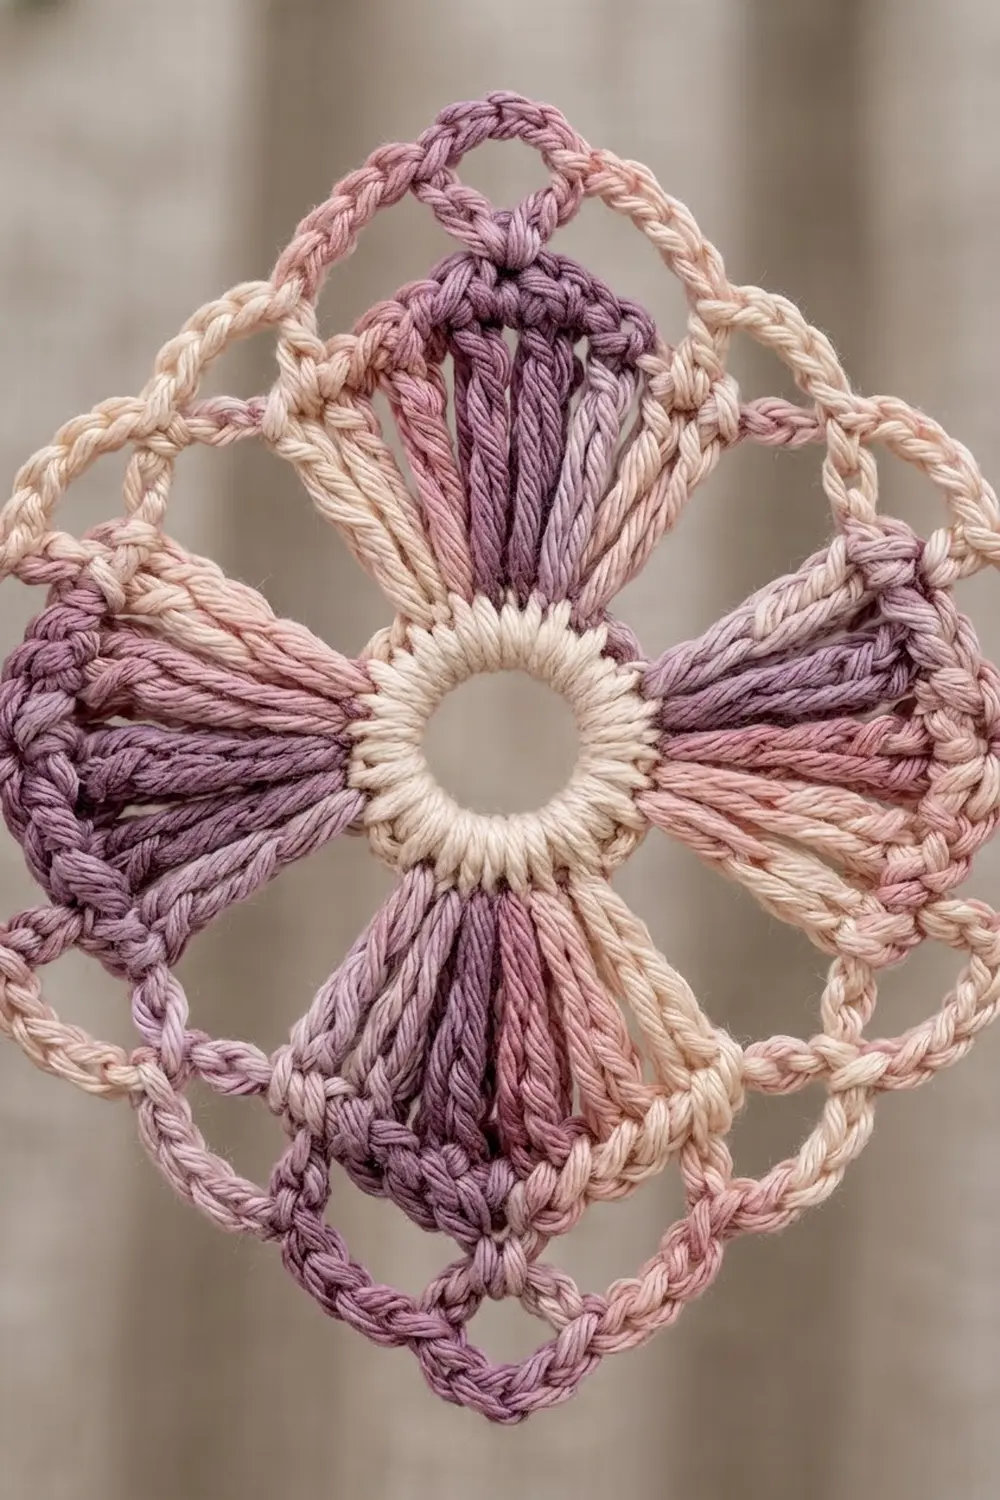
Motif (Make 98 per Panel)
Round 1 (Color A): Ch 6 and sl st to the first ch to form a ring. Ch 1 and work 16 sc into the ring. Sl st to the first sc. (16 sc)
Round 2 (Color A): Ch 1. Sc in each st around and sl st to the first sc. (16 sc) Fasten off Color A.
These two rounds of sc make the padded cream ring.
Round 3 (Color B): Join B in any sc. Ch 3 (counts as the first dc), dc in the same st, 2 dc in the next st, ch 3, sk 2 sts.
*[2 dc in the next st] twice, ch 3, sk 2 sts. Rep from * twice more. Sl st to the top of the beginning ch-3.
(16 dc in 4 groups of 4, and 4 ch-3 sps)
Round 4 (Fans): Ch 4 (counts as the first tr) and work 1 tr in the same st. Work 2 tr in each of the next 3 dc. Ch 4, sc in the next ch-3 sp, ch 4.
*2 tr in each of the next 4 dc, ch 4, sc in the next ch-3 sp, ch 4. Rep from * twice more. Sl st to the top of the beginning ch-4.
(32 tr in 4 fans of 8, 4 sc and 8 ch-4 sps)
Each fan is a wedge that widens outward. The ch-4, sc, ch-4 between fans is an open spoke reaching back to the ring.
Round 5: Ch 1. Sc in the same st and in each of the next 3 tr. Ch 5 for the corner. Sc in each of the next 4 tr. Then work the side: ch 5, sc in the next ch-4 sp, ch 5, sc in the next ch-4 sp, ch 5.
*Sc in each of the next 4 tr, ch 5 for the corner, sc in each of the next 4 tr, then ch 5, sc in the next ch-4 sp, ch 5, sc in the next ch-4 sp, ch 5. Rep from * twice more. Sl st to the first sc.
(40 sc and 16 ch-5 sps: 4 corner sps and 3 sps on each side)
Each corner loop sits at the center tip of a fan, so every fan points straight at a corner.
Round 6 (first motif only): Sl st in each of the next 3 sc, then sl st into the corner ch-5 sp. Ch 1 and work (sc, ch 5, sc) in the same sp.
Work the side: ch 4, sk 4 sc, sc in the next ch-5 sp. [Ch 4, sc in the next ch-5 sp] twice. Ch 4, sk 4 sc.
*Work (sc, ch 5, sc) in the corner ch-5 sp, then repeat the side. Rep from * twice more. Sl st to the first sc and fasten off.
(20 sc, 4 corner ch-5 loops and 16 ch-4 loops, so 4 ch-4 loops per side)
On every later motif, Round 6 is also the joining round. See Joining below.
Weave in ends as you go. Doing this later for 98 motifs is miserable.
Make All Pieces
Each panel needs 98 motifs, and each motif uses both colors:
- Color A: Rounds 1–2 on all 98 motifs
- Color B: Rounds 3–6 on all 98 motifs
Batching tip: You can make all the centers (Rounds 1–2) and all the fan rounds (Rounds 3–5) ahead of time. Then work Round 6 one motif at a time as you join.
Layout grid (7 columns × 14 rows; M = motif):
Row  1:  M  M  M  M  M  M  M
Row  2:  M  M  M  M  M  M  M
Row  3:  M  M  M  M  M  M  M
  ...    (repeat for rows 4–13)
Row 14:  M  M  M  M  M  M  M
Row 1 is the top edge, which gets the hanging loops.
Joining
Method: Join as you go during Round 6, connecting loop to loop. Work along the grid from left to right, then move down to the next row.
Stitch-to-stitch logic: Each motif has 4 ch-4 side loops and 1 corner loop at each end of each side. Neighboring motifs meet loop to loop, with the same count on every side, so the loops always line up.
To join a side, work Round 6 as written until you reach the side to be joined.
- Corner: Sc in the corner sp, ch 2, sl st into the neighbor’s corner ch-5 loop, ch 2, sc back in your own corner sp.
- Each of the 4 side loops: Ch 2, sl st into the matching ch-4 loop on the neighbor, ch 2, then continue with the next sc as written.
- Next corner: Join it the same way as the first corner.
Joining order:
- First motif of Row 1: Work it unjoined.
- Rest of Row 1: Join each motif along its left side.
- First motif of each later row: Join along its top side.
- All other motifs: Join along both the top and left sides.
Four-way corners: Where four motifs meet, make the sl st into the sl st of the corner join that is already there, not into a fresh loop. This keeps the center point neat.
Tension: Keep the ch-2 halves relaxed, so each joined loop is the same size as a free ch-4 loop. Tight joins pull the motifs into wavy edges that won’t block flat.
Size checkpoints:
- After Row 1: the strip measures 42 in (106.7 cm) wide.
- After 4 rows: the panel measures 24 in (61.0 cm) tall.
- After all 14 rows: the panel measures 42 in × 84 in (106.7 cm × 213.4 cm).
Border
The border is worked in Color A, all the way around the panel.
Border gauge: Round 1 has 22 sc per motif edge, about 3.67 sc per inch (2.54 cm), or 11 sc per 3 in (7.6 cm).
How each motif edge is counted: Each motif side along the outside edge gives 22 border sts:
- 1 sc in its first corner loop
- 5 sc in each of its 4 ch-4 loops (20 sc)
- 1 sc in its last corner loop
Those 22 sts already include the side’s 2 corner stitches. At a seam, each of the two motifs gets 1 sc in its own corner loop on its own side of the joining sl st. Nothing extra is added at the seams.
Round 1: Join A in the top-right corner loop of the panel.
- Each panel corner (an unjoined corner ch-5 loop): work (sc, ch 2, sc). The two sc are the end sts of the two sides that meet there, and the ch-2 is the corner sp.
- Short sides (top and bottom): 7 motifs × 22 = 154 sc each.
- Long sides: 14 motifs × 22 = 308 sc each.
Sl st to the first sc.
Round 2: Ch 3 (counts as the first dc).
- Along each side: Dc in each sc.
- Each corner ch-2 sp: Work (dc, ch 2, dc).
This is a conversion round: each side gets 1 dc per existing sc plus 1 added dc at each end.
- Short sides: 154 + 2 = 156 dc each.
- Long sides: 308 + 2 = 310 dc each.
Sl st to the top of the ch-3.
Round 3:
- Top side (156 sts): Sc in the first st, then work a picot or HL. *Sc in the next 2 sts, then work a picot or HL. Rep from * 76 more times. Sc in the last st.
- That gives 78 picot positions.
- At positions 1, 12, 23, 34, 45, 56, 67 and 78, work an HL instead of a picot.
- The result is 8 hanging loops and 70 picots, with 10 picots between each pair of loops.
- Bottom side (156 sts): Work the same as the top, but make every position a picot (78 picots).
- Long sides (310 sts): Sc in the first st, picot. Sc in the next 2 sts, picot. Rep from * 153 more times. Sc in the last st. (155 picots per side)*
- Each corner ch-2 sp: Work (sc, ch 3, sc).
Sl st to the first sc and fasten off.
Why the math works:
- Round 1: 154 sc across 42 in (106.7 cm) is 3.67 sc per inch, the same as 22 sc per 6 in (15.2 cm) motif. The border matches the motifs exactly, so the edge won’t ruffle or cup.
- Round 2: It adds only 2 sts per side at the corners, which lets the corners turn without growing the straight edges.
- Round 3 picots: Each side has 1 + (2 × repeats) + 1 sts. That gives 156 = 1 + 154 + 1 and 310 = 1 + 308 + 1, so every side starts and ends evenly.
- Round 3 hanging loops: They sit 22 sts apart, about one loop every 6 in (15.2 cm), and each end loop is the same distance from its corner.
- Border depth: About 0.25 in (0.6 cm) of sc, 0.5 in (1.3 cm) of dc and 0.25 in (0.6 cm) of picot edge make 1 in (2.5 cm) per side. That brings the panel to 44 in × 86 in (111.8 cm × 218.4 cm).
Final Blocking
- Soak the panel in cool water with a little wool wash for 15 minutes. Press out the water; don’t wring it.
- Roll it in towels to remove more moisture.
- Lay it flat on mats or a towel-covered floor. Work in sections if you don’t have space for the whole panel.
- Pin the four corners to 44 in × 86 in (111.8 cm × 218.4 cm).
- Pin each motif seam line straight, checking every 12 in (30.5 cm).
- Pin open each corner loop and the fan tips so the diamond lattice is clear.
- Pin out the bottom picots. Leave the hanging loops unpinned.
- Let it dry completely, then unpin. Repeat for the second panel.
Final Quality-Control Checklist
- 98 motifs in 7 × 14 rows, with every fan pointing to a corner
- Each motif measures 6 in (15.2 cm) per side
- Each joined loop is the same size as a free ch-4 loop
- Every four-way corner is joined into one point
- Border Round 1 has 154 sc on the short sides and 308 on the long sides
- Border Round 2 has 156 dc on the short sides and 310 on the long sides
- 8 hanging loops along the top, evenly spaced
- Blocked panel measures 44 in × 86 in (111.8 cm × 218.4 cm)
- All ends are woven in and trimmed
Troubleshooting
- The fans lean or twist: Check that you skipped exactly 2 sts in Round 3 and worked 2 tr into each of the 4 dc in Round 4.
- The corners aren’t square: Make sure each Round 5 corner ch-5 sits between the 4th and 5th tr of a fan.
- The panel narrows at the joins: Your ch-2 halves are too tight. Loosen them, or chain 3 on each half instead.
- The border ruffles: You probably worked 6 sc into some loops. Recount to 22 sts per motif edge.
- The border cups: You skipped corner-loop sts. Add 1 sc per corner loop on each side of every seam.
- The panel sags between hanging loops: Your rod is too heavy, or the loops are too long. Use 20 ch and 28 sc per HL.
Care
Hand wash cool, or machine wash on a gentle cycle in a mesh bag. Lay flat to dry and reshape, and don’t hang it while wet, because the lace will stretch.
Final Notes
The size of the finished curtain comes down to the size of one motif. Each motif is 6 in (15.2 cm), seven of them make 42 in (106.7 cm) across, and fourteen make 84 in (213.4 cm) down. Every outside motif edge gives 22 sc to the border, and the 1 in (2.5 cm) border brings the panel to 44 in × 86 in (111.8 cm × 218.4 cm). Measure your first motif carefully and the rest of the panel will follow.
Happy crocheting!