

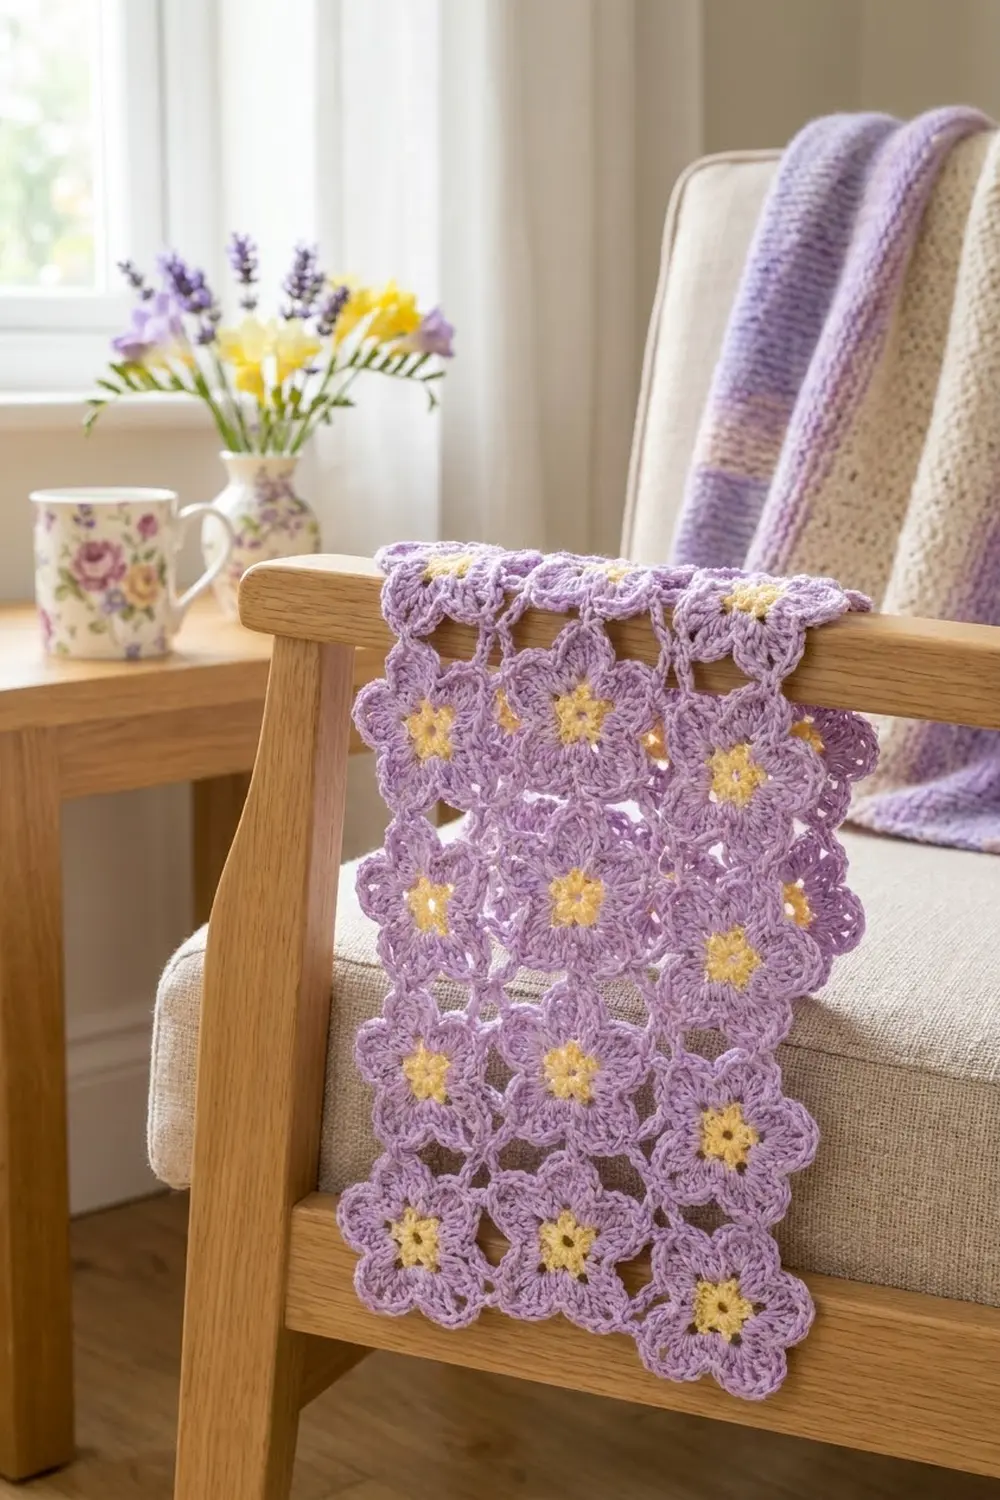
The Lilac Meadow Flower Panel is a small, airy mat made of fifteen five-petal flowers joined into an open lace grid. Each flower has a bright yellow center and soft lavender petals with a neat raised outline, so you can see each bloom clearly even from across the room.
The style is light and cottage-like. The flowers sit three across and five down. They touch only at petal tips and short chain bridges, which leaves small open windows between them. The outer edge stays scalloped because the border follows every exposed petal instead of squaring the piece off. Use it as a dresser mat, a tray liner, or a small centerpiece under a vase.
This pattern uses US crochet terms. The finished panel measures about 8.75 in wide x 14.1 in tall (22.2 cm x 35.8 cm) after a one-round border and blocking.
The construction is simple. You make one complete flower, then join each new flower to its neighbors during that flower’s last round (join-as-you-go). When all 15 flowers are connected, one round of single crochet outlines the whole edge.
Finished Size and Construction
- Finished size: 8.75 in x 14.1 in (22.2 cm x 35.8 cm)
- Skill level: Easy-intermediate
- Terminology: US crochet terms
- Yarn weight: DK (#3) cotton or cotton blend
- Hook: 4.0 mm (US G-6)
- Number of pieces: 15 flower motifs
- Layout: 3 flowers across x 5 flowers down
- Single flower size: 2.75 in (7.0 cm) wide x 2.6 in (6.6 cm) tall
- Size before border: 8.25 in x 13.6 in (21.0 cm x 34.5 cm)
- Border depth: 0.25 in (0.6 cm) per side
Materials
Choose a smooth cotton in DK weight, either mercerized or matte, with about 250 m per 100 g. Cotton gives crisp petal outlines and blocks flat. Acrylic also works, but the petals will be softer and the tips less sharp. Pick a lavender that is clearly lighter than a true purple so the yellow centers stand out.
- Lavender (petals, joins, border): 70 g, about 175 m
- Yellow (centers): 10 g, about 25 m
Tools:
- 4.0 mm (US G-6) crochet hook
- Tapestry needle
- Scissors
- Stitch markers (4 or 5)
- Rust-proof pins and a blocking mat
- Spray bottle with clean water
- Ruler or tape measure
The quantities include a margin of about 15 percent for your gauge swatch and for weaving in ends.
Abbreviations (US Terms)
- ch – chain
- sl st – slip stitch
- sc – single crochet
- hdc – half double crochet
- dc – double crochet
- st(s) – stitch(es)
- sp – space
- rnd – round
- MR – magic ring
Special stitches
- Tip: (sc, ch 2, sc) all in the same st. This makes the pointed petal tip.
- Side join tip: sc in st, ch 1, sl st into the ch-2 sp of the matching tip on the neighboring flower, ch 1, sc in the same st as the first sc.
- Top join tip: sc in st, ch 3, sl st into the valley between the two lower petals of the flower above (between its two sl sts), ch 3, sc in the same st as the first sc.
Gauge and Checkpoints
Make one complete flower before you start the panel. It serves as your gauge swatch and becomes your first motif.
- After Rnd 1: the yellow center measures 0.75 in (1.9 cm) across.
- After Rnd 2: 1.25 in (3.2 cm) across the chain loops.
- After Rnd 3: 2.25 in (5.7 cm) across the petals.
- After Rnd 4: 2.75 in (7.0 cm) wide from the upper-left tip to the upper-right tip, and 2.6 in (6.6 cm) tall.
- Border gauge: 16 sc = 4 in (10.2 cm).
If your flower is larger than 2.75 in (7.0 cm), switch to a 3.75 mm hook. If it is smaller, switch to a 4.5 mm hook. Pin the test flower flat before you measure, because cotton petals curl slightly until they are blocked.
Recheck one flower after every five you make. Tension often loosens as you relax into a project.
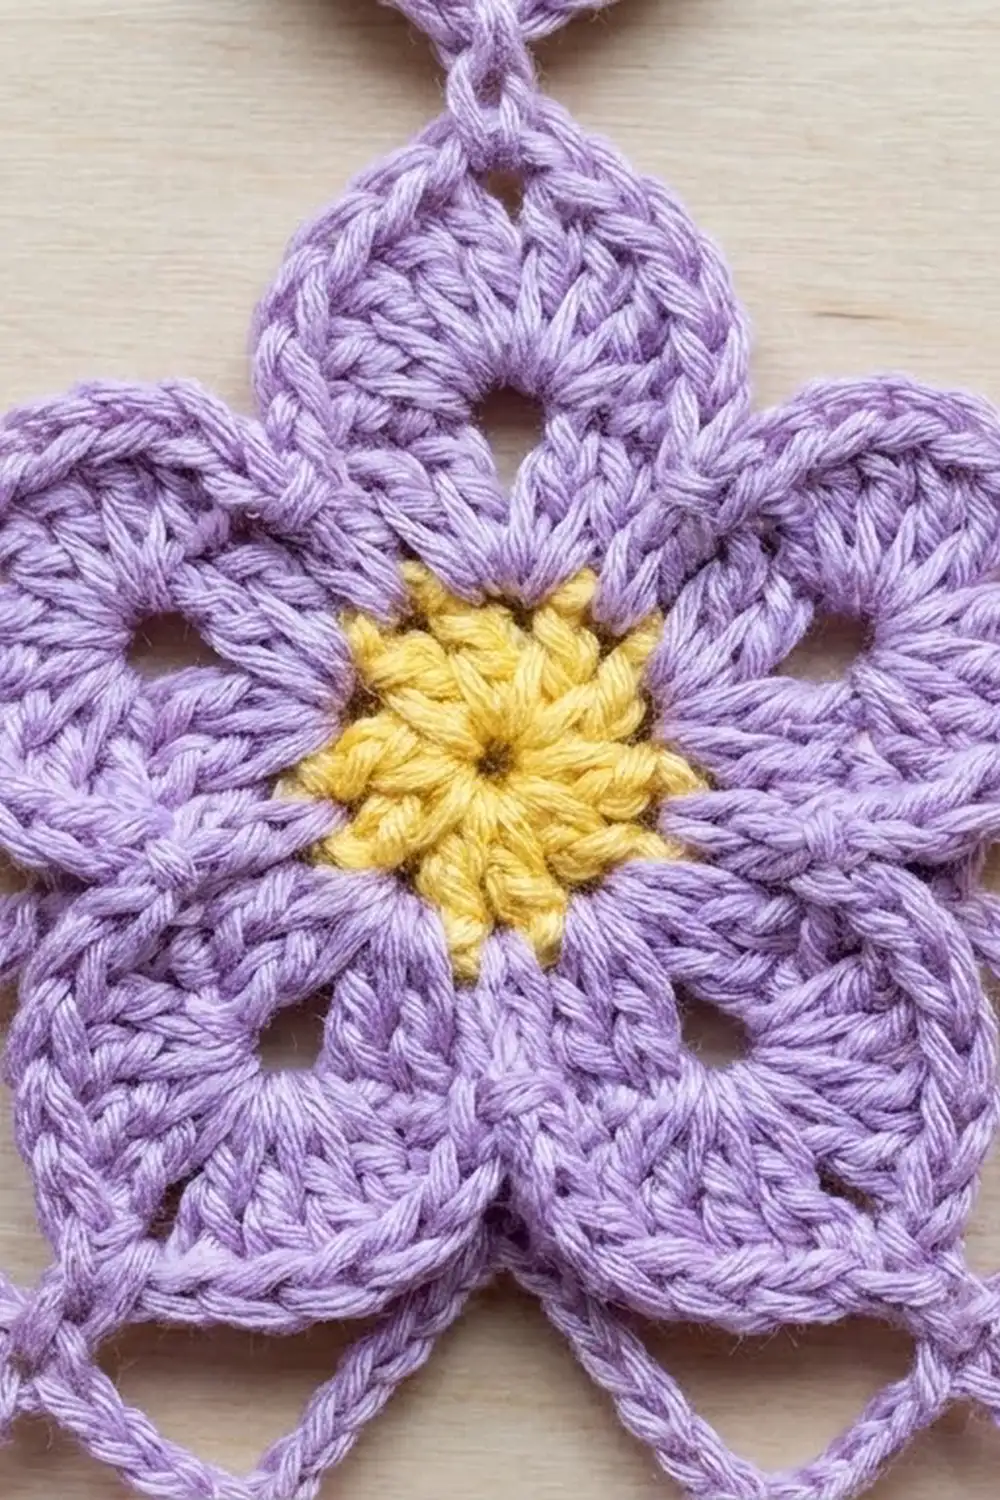
Flower Motif
Turn each flower so that one petal points straight up. Name the petals clockwise around the flower: Top (T), Upper Right (UR), Lower Right (LR), Lower Left (LL), Upper Left (UL). You will need these names for joining.
Rnd 1 (yellow): MR, ch 1, 10 sc in ring, sl st to first sc to join. Pull the ring closed tightly. Fasten off. (10 sc)
Rnd 2 (lavender): Join lavender with a sl st in any sc. Ch 1, sc in same st, ch 3, skip next sc, sc in next sc, ch 3, skip next sc; repeat from * 3 more times, sl st to first sc. (5 sc, 5 ch-3 sps)*
Rnd 3: Sl st into first ch-3 sp. Ch 1, (sc, hdc, 5 dc, hdc, sc) in ch-3 sp; repeat from * in each ch-3 sp around, sl st to first sc. (5 petals of 9 sts each; 45 sts)*
The middle (3rd) dc of each 5-dc group is that petal’s center dc.
Rnd 4 (outline): Ch 1. For each petal: sl st in sc, sc in hdc, sc in next 2 dc, Tip in center dc, sc in next 2 dc, sc in hdc, sl st in sc. Repeat for all 5 petals, then sl st to first sl st. Fasten off and weave in ends.
(Each petal: 10 sts plus 1 ch-2 tip; 50 sts and 5 ch-2 tips per flower)
Each petal now has two halves of 5 sts each (sl st, sc, sc, sc, tip sc), with the ch-2 tip between them. The two sl sts where petals meet form the valley. This raised sc outline gives the petals their defined rim.
Weave the yellow tail only behind the yellow center so it doesn’t show through the lavender petals.
Make All Pieces
You need 15 flowers in total.
- Yellow: 15 centers (Rnd 1)
- Lavender: Rnds 2–4 on all 15 flowers
Make Flower 1 completely. Work Flowers 2–15 through the end of Rnd 3, then join them during Rnd 4.
Layout (the numbers show the working order):
[ 1] [ 2] [ 3]
[ 4] [ 5] [ 6]
[ 7] [ 8] [ 9]
[10] [11] [12]
[13] [14] [15]
Joining
Flowers join only at their tips. Work Rnd 4 exactly as written, but on any tip that meets an existing flower, replace the Tip with the matching join tip.
Horizontal joins (side by side): A flower’s UL tip joins to the UR tip of the flower on its left, and its LL tip joins to the LR tip of the flower on its left. Use the Side join tip for both.
Vertical joins (stacked): A flower’s T tip joins to the valley between the LL and LR petals of the flower directly above. Use the Top join tip.
Joins for each position:
- Flower 1: none.
- Flowers 2 and 3: UL and LL to the flower on the left (2 joins each).
- Flowers 4, 7, 10, 13: T to the flower above (1 join each).
- All other flowers: T to the flower above, plus UL and LL to the flower on the left (3 joins each).
Total: 20 side joins and 12 top joins, 32 joins in all.
Stitch logic: Each join replaces only the ch 2 of a tip. You still work both sc of the tip, so every petal keeps exactly 10 sts and the border counts stay correct.
Tension: Work the ch 1 and ch 3 at the same tension as your other chains. Tight joins pucker the petals, and loose ones let the grid sag. After every join, lay the work flat and check that both flowers sit level with all T petals pointing up.
Size checkpoint: Two flowers side by side measure 5.5 in (14.0 cm) wide. Two stacked flowers measure 5.35 in (13.6 cm) tall, because each new row adds 2.75 in (7.0 cm) of vertical spacing. With all 15 flowers joined, the panel measures 8.25 in x 13.6 in (21.0 cm x 34.5 cm).
Border
The border is one round of lavender sc that traces every exposed petal edge. It keeps the scallops and adds 0.25 in (0.6 cm) on each side.
Border gauge: 16 sc = 4 in (10.2 cm).
Border rules:
- 1 sc in each exposed Rnd 4 st, including the valley sl sts.
- (sc, ch 2, sc) in each free ch-2 tip that points outward.
- 1 sc through both joined tips wherever two flowers meet on the edge.
- 1 sc in a free side tip that leads into a gap, then ch 6 to bridge the gap, then 1 sc in the next free tip.
Corners: The four corners are the UL tip of Flower 1, the UR tip of Flower 3, the LR tip of Flower 15, and the LL tip of Flower 13. Work (sc, ch 2, sc) in each one. The first sc belongs to the side before the corner and the second sc to the side after it, so each side count below already includes its 2 corner sc.
Rnd 1: Join lavender with a sl st in the ch-2 sp of Flower 1’s UL tip. Work clockwise around the panel as follows.
Top side (Flowers 1, 2, 3): Corner sc. For each flower: sc in 5 sts (inner half of UL), sc in 5 sts (first half of T), (sc, ch 2, sc) in T tip, sc in 5 sts (second half of T), sc in 5 sts (inner half of UR). Between flowers, work 1 sc through the joined tips. End with the corner sc and ch 2 at Flower 3’s UR tip.
Count: 1 + (3 x 22) + 2 + 1 = 70 sc, plus 3 ch-2 tips.
Right side (Flowers 3, 6, 9, 12, 15): Corner sc. For each flower: sc in 5 sts (outer half of UR) and in 5 sts (outer half of LR). Between flowers: sc in LR tip, ch 6, sc in UR tip of the flower below. End with the corner sc and ch 2 at Flower 15’s LR tip.
Count: 1 + (5 x 10) + (4 x 2) + 1 = 60 sc, plus 4 ch-6 bridges.
Bottom side (Flowers 15, 14, 13): Corner sc. For each flower: sc in 5 sts (inner half of LR) and in 5 sts (inner half of LL). Between flowers, work 1 sc through the joined tips. End with the corner sc and ch 2 at Flower 13’s LL tip.
Count: 1 + (3 x 10) + 2 + 1 = 34 sc.
Left side (Flowers 13, 10, 7, 4, 1): Corner sc. For each flower: sc in 5 sts (outer half of LL) and in 5 sts (outer half of UL). Between flowers: sc in UL tip, ch 6, sc in LL tip of the flower above. End with the corner sc in Flower 1’s UL tip, ch 2, and sl st to the first sc.
Count: 1 + (5 x 10) + (4 x 2) + 1 = 60 sc, plus 4 ch-6 bridges.
Round total: 70 + 60 + 34 + 60 = 224 sc, plus 4 corner ch-2 sps, 3 top ch-2 tips, and 8 ch-6 bridges. Fasten off and weave in ends.
Why the math works: Every petal half in Rnd 4 has exactly 5 sts, so each exposed half takes exactly 5 sc. Single crochet worked 1-for-1 over sc adds height but not width, so the scallops lie flat instead of ruffling. Each ch-6 bridge spans a 1.2 in (3.0 cm) gap on a long side at about 5 chains per inch, so the long edges stay straight without pulling.
Final Blocking
- Weave in all remaining ends along the back of the petal outlines.
- Lay the panel face down on a blocking mat.
- Mist it evenly with clean water until damp but not soaked.
- Pin the four corner tips first to 8.75 in x 14.1 in (22.2 cm x 35.8 cm).
- Pin the three top T tips and the bottom join points along straight lines.
- Pin each outward petal tip on the long sides, keeping the ch-6 bridges straight.
- Gently press each flower center flat with your fingertips.
- Let the panel dry completely, for at least 12 hours, before you unpin it.
Final Quality-Control Checklist
- 15 flowers, arranged 3 across and 5 down.
- Every flower has a yellow center and 5 lavender petals, and all T petals point up.
- Each petal has 10 outline sts plus its tip.
- 32 joins in total: 20 side joins and 12 top joins.
- The border has 70 / 60 / 34 / 60 sc on the top / right / bottom / left.
- The panel measures 8.75 in x 14.1 in (22.2 cm x 35.8 cm) after blocking.
- No twisted flowers and no loose ends showing on the front.
Troubleshooting
- Petals cup upward: Rnd 3 is too tight. Go up one hook size for Rnd 3 only.
- Petals ruffle: Rnd 4 is too loose. Go down one hook size for Rnd 4.
- A flower is rotated: Check that the T petal points up before joining. Undo Rnd 4 and rejoin if needed.
- The grid pulls out of square: The top-join chains are too tight. Rework them with a looser ch 3.
- The long sides wave: Your ch-6 bridges are too long. Use ch 5 on both sides.
- The center hole is open: Pull the magic ring tighter and secure the tail with a backstitch.
- Yellow shows through the petals: Weave the yellow tails only behind the yellow center.
Care
Hand wash in cool water with mild soap, then roll the panel in a towel to remove moisture. Dry it flat, re-pinning the tips if needed, and do not tumble dry.
Final Notes
The measurements build in a short chain that is easy to check. Rnd 1 is 0.75 in (1.9 cm), Rnd 3 is 2.25 in (5.7 cm), and the finished flower is 2.75 in (7.0 cm) wide. Three flowers across make 8.25 in (21.0 cm), and five down make 13.6 in (34.5 cm). The border adds 0.25 in (0.6 cm) per side, for a final size of 8.75 in x 14.1 in (22.2 cm x 35.8 cm).
If your first flower matches its checkpoints, the rest of the panel will too.
Happy crocheting!