

The Blush Blossom Hexagon Panel is a small, airy rectangle made of 15 flower motifs. Each motif has a soft pink five-petal flower with an open center, set inside a lacy blue hexagonal frame. The panel has a pointed, zigzag outline, and small diamond-shaped windows open up between the motifs.
The palette is just two colors: blush pink for the flowers and dusty denim blue for the frames and border. The look is vintage and cottage-style, so the panel works well as a table mat, dresser scarf, or wall hanging.
This pattern uses US crochet terms. The finished panel measures about 14.3″ x 20.5″ (36.3 cm x 52.1 cm) after the border and blocking.
You crochet the first motif in the round. Each later motif joins to its neighbors on its last round (join-as-you-go), building 3 columns and 5 rows. One round of blue single crochet finishes the edge.
Finished Size and Construction
- Finished size: 14.3″ x 20.5″ (36.3 cm x 52.1 cm)
- Skill level: Intermediate
- Terminology: US crochet terms
- Yarn weight: DK (light worsted, #3)
- Hook: 4.0 mm (US G-6)
- Number of pieces: 15 hexagon motifs, joined into one panel
- Layout: 3 motifs wide x 5 motifs tall
- Motif size: 4″ (10.2 cm) flat side to flat side; 4.6″ (11.7 cm) point to point; each side about 2.3″ (5.8 cm)
- Size before border: 13.8″ x 20″ (35.1 cm x 50.8 cm)
- Border depth: 1 round, about 0.25″ (0.6 cm) on every edge
Materials
Choose a smooth DK cotton or cotton blend. Cotton gives crisp petals and blocks flat. Avoid fuzzy yarn, because it hides the open frame loops.
- Color A, blush pink (flowers): 60 g, about 140 m (153 yd)
- Color B, dusty blue (frames and border): 100 g, about 230 m (252 yd)
These amounts assume about 2.3 m per gram, which is typical for DK cotton. They include a margin of roughly 25% for swatching, ends, and differences in gauge.
Tools:
- 4.0 mm (US G-6) crochet hook
- Tapestry needle
- Scissors
- Locking stitch markers
- Tape measure
- Blocking mat, rust-proof pins, and a spray bottle
Abbreviations (US Terms)
- ch: chain
- sl st: slip stitch
- sc: single crochet
- hdc: half double crochet
- dc: double crochet
- tr: treble crochet
- sk: skip
- sp(s): space(s)
- RS: right side
Special stitch: sc2tog-sp (border valley decrease). Insert your hook into the first space, yarn over, and pull up a loop. Insert your hook into the second space, yarn over, and pull up a loop. Yarn over and pull through all 3 loops. This counts as 1 sc.
Joining loop (JL): Ch 1, sl st into the matching ch-3 sp of the neighbor motif, ch 1. A JL replaces one ch-3.
Joining corner (JC): In the corner stitch, work sc, ch 1, sl st into the neighbor’s matching corner ch-3 sp, ch 1, sc. A JC replaces (sc, ch 3, sc).
Gauge and Checkpoints
Make one complete motif before you start the panel. With 15 motifs, any small error gets multiplied.
- After Round 3 (flower): 3″ (7.6 cm) across, petal tip to petal tip
- After Round 5 (blue ring): 3.5″ (8.9 cm) across
- After Round 6 (hexagon): 4″ (10.2 cm) flat side to flat side, and 4.6″ (11.7 cm) point to point
If your motif is too big: Go down to a 3.75 mm hook.
If your motif is too small: Go up to a 4.5 mm hook.
Being off by 0.25″ (0.6 cm) per motif adds up to 0.75″ (1.9 cm) across the width and 1.25″ (3.2 cm) down the length, so fix your gauge before going on.
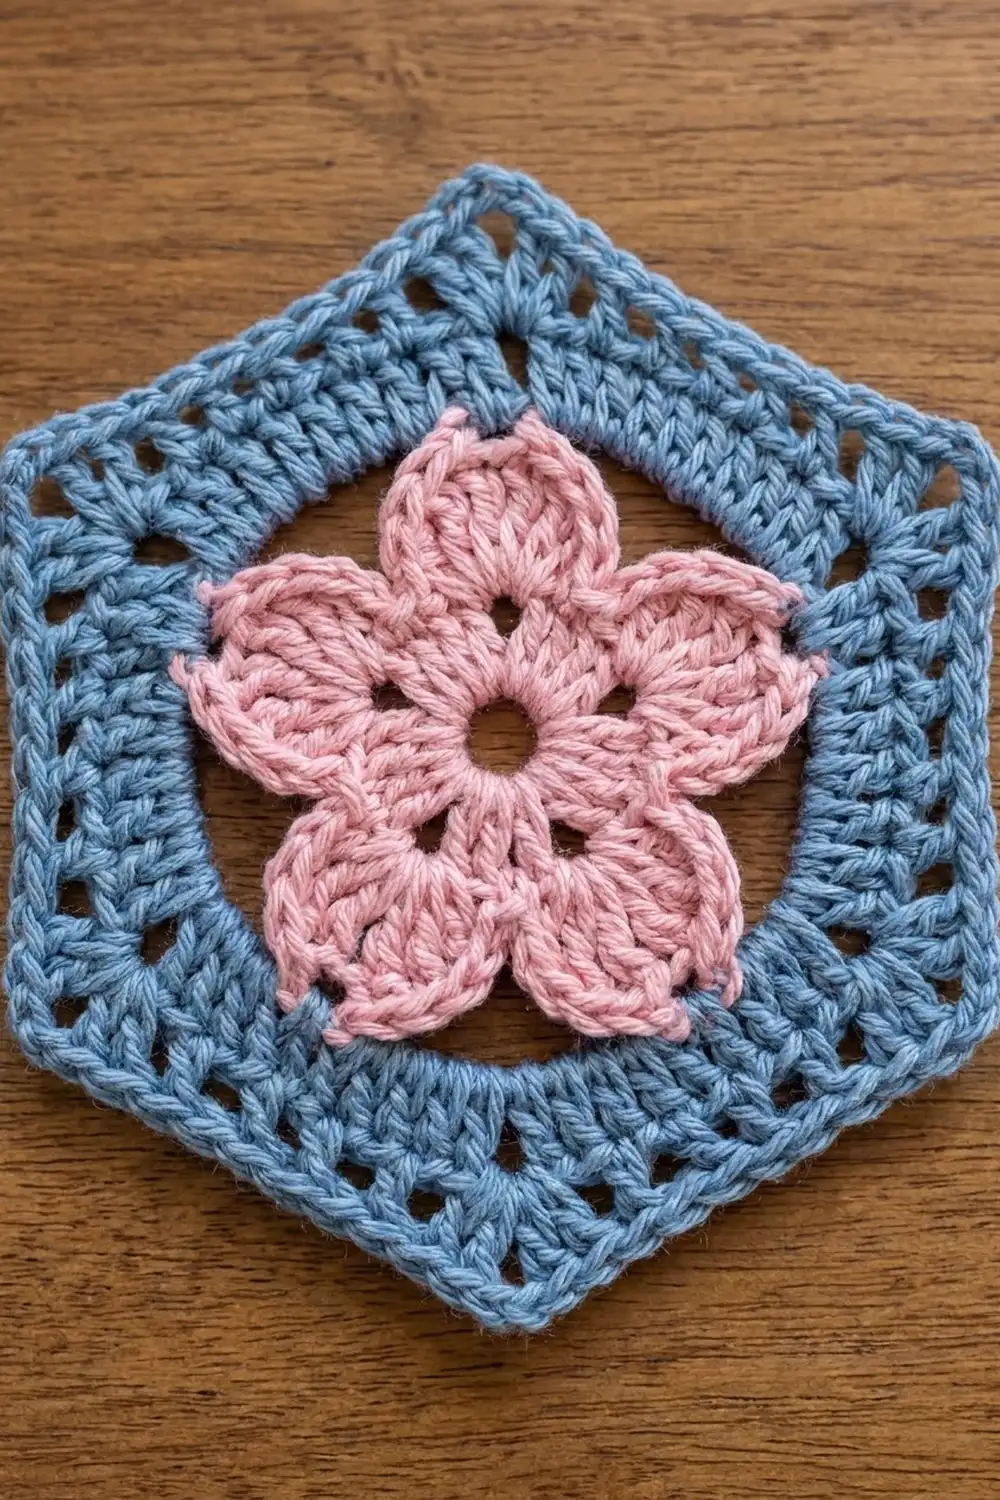
Motif Pattern
Work in the round with the RS facing. Do not turn.
Rounds 1–3: The Flower (Color A)
Round 1: Make a magic ring. Ch 1, then work 10 sc into the ring. Close the ring, but leave a hole about 0.25″ (0.6 cm) wide for the open center. Sl st to the first sc. (10 sc)
Round 2: Ch 1. Sc in next st, ch 3, sk next st; repeat from * 4 more times. Sl st to the first sc. (5 sc, 5 ch-3 sps)
Round 3 (petals): Sl st into the first ch-3 sp. In each ch-3 sp, work (sc, hdc, 2 dc, tr, 2 dc, hdc, sc). Sl st to the first sc. (5 petals x 9 sts = 45 sts)
The tr forms a soft point at each petal tip. The sc at each end keeps the petals apart, and the Round 2 sc stays visible between them. Fasten off and weave in the ends.
Checkpoint: 3″ (7.6 cm) across.
Rounds 4–5: The Blue Ring (Color B)
Round 4: Join Color B with a sc in the tr of any petal. Ch 5, dc in the Round 2 sc between petals (working behind the petals), ch 5, sc in the tr of the next petal; repeat from * 4 more times, but skip the last sc. Sl st to the first sc. (5 sc, 5 dc, 10 ch-5 sps)
Round 5: Sl st into the first ch-5 sp. Ch 1, then work 6 sc in each ch-5 sp around. Sl st to the first sc. (10 sps x 6 sc = 60 sc)
Checkpoint: 3.5″ (8.9 cm) across, lying flat.
Round 6: The Hexagon Frame (Color B)
Each of the 6 sides uses 10 stitches from Round 5 (6 x 10 = 60).
Round 6 (first motif): Ch 1. (Sc, ch 3, sc) in next st for the corner, [ch 3, sk next st, sc in next st] 4 times, ch 3, sk next st; repeat from * 5 more times. Sl st to the first sc.
Per side: 1 corner ch-3 sp, 2 corner sc, 4 side sc, and 5 side ch-3 sps.
Round total: 36 sc and 36 ch-3 sps (6 corner sps + 30 side sps).
Checkpoint: 4″ (10.2 cm) flat side to flat side, and 4.6″ (11.7 cm) point to point. Fasten off.
Naming the parts: Turn the motif so one flat side is at the top. Going around, the sides are top, upper right, lower right, bottom, lower left, and upper left. The corners that stick out at the far left and far right are the left point and right point.
Make All Motifs
Make 15 motifs in total. Rounds 1–5 are the same on every motif. Only Round 6 changes, and only where the new motif meets one that is already finished.
- Color A: 15 flowers (Rounds 1–3)
- Color B: 15 frames (Rounds 4–6), plus the border
Layout grid (each cell is one identical motif):
     A    B    C
1  [A1] [B1] [C1]
2  [A2] [B2] [C2]
3  [A3] [B3] [C3]
4  [A4] [B4] [C4]
5  [A5] [B5] [C5]
Work left to right, one row at a time, starting with the top row.
Joining
All joining happens on Round 6. Work the free sides as written. Where the new motif meets a finished one, use a JL or JC in place of the usual chain or corner.
Side-by-side neighbors
Motifs in the same row touch at a single point. Where the new motif’s left point meets the right point of the motif beside it, work a JC instead of the usual corner. That’s 2 joins per row x 5 rows = 10 joins. Joining only at the points is what leaves the diamond windows open.
Above-and-below neighbors
From row 2 on, each motif shares its whole top side with the bottom side of the motif above it. Join them in this order:
- JC at the top left corner
- 5 JLs, matching the side spaces in order
- JC at the top right corner
Stitch-to-stitch logic: Each of the two sides has 5 side spaces between 2 corner spaces, so every space has a partner. No stitches are added at the seam. That’s 3 columns x 4 seams = 12 joins.
Motifs in columns B and C, rows 2–5, join both above and to the left in the same round. The left point and the top left corner are separate corners, so no corner ever joins more than one motif.
Tension
Make the ch 1 on each side of a joining sl st the same size as your normal chains. If you pull the joins tight, the seams pucker and the diamond windows close up.
Size Checkpoint
Before you add the border, the panel should measure 13.8″ (35.1 cm) wide, point to point (3 x 4.6″ / 11.7 cm). It should be 20″ (50.8 cm) tall (5 x 4″ / 10.2 cm).
Border
Border gauge: 2 sc per ch-3 sp, about 5 sc per 1″ (2.5 cm) along the edge.
What’s on each edge:
- Top and bottom edges: 3 motifs each. Every motif shows 3 sides (15 ch-3 sps) and 2 free corners, so each edge has 45 sps and 6 corners. There are also 2 valleys where side-by-side motifs meet.
- Each long side: 5 outward points, 40 ch-3 sps (8 sides x 5), and 4 valleys between motifs.
Border Round
With the RS facing, join Color B in any ch-3 sp. Work the following all the way around:
- Each side ch-3 sp: 2 sc
- Each outward corner sp: (2 sc, ch 2, 2 sc)
- Each valley: sc2tog-sp, with one leg in each of the two joined corner sps
Sl st to the first sc and fasten off.
Exact Counts
- Top edge: 90 sc (45 sps x 2) + 24 sc (6 corners x 4) + 2 sc (2 valleys x 1) = 116 sc, 6 ch-2 corners
- Bottom edge: 116 sc, 6 ch-2 corners
- Each long side: 80 sc (40 sps x 2) + 20 sc (5 points x 4) + 4 sc (4 valleys x 1) = 104 sc, 5 ch-2 corners
- Whole round: 116 + 104 + 116 + 104 = 440 sc, 22 ch-2 corners
Why the Math Works
One motif along the top edge gives 38 sc: 30 sc from its 15 sps and 8 sc from its 2 corners. Three motifs give 3 x 38 = 114 sc. The only seam stitches are the 2 valley decreases, shown separately, for a total of 116.
The long sides work the same way. The spaces and points belong to the 5 edge motifs, and the 4 valleys are the only seam stitches.
Two sc per space matches the width of each loop, so the edge stays flat. The single round adds 0.25″ (0.6 cm) on every edge. That takes the panel from 13.8″ x 20″ (35.1 cm x 50.8 cm) to 14.3″ x 20.5″ (36.3 cm x 52.1 cm).
Final Blocking
- Weave in all the ends, keeping each one in its own color.
- Soak the panel in cool water for 10 minutes, then press the water out gently. Don’t wring it.
- Roll it in a towel to remove extra water.
- Lay it RS up on the blocking mat.
- Pin the 4 outer corners to 14.3″ x 20.5″ (36.3 cm x 52.1 cm).
- Pin every outward point and every valley.
- Open each flower’s center and smooth each petal into a point.
- Ease each diamond window open.
- Let it dry for at least 24 hours before you unpin it.
Final Quality-Control Checklist
- 15 motifs, 3 wide x 5 tall
- 5 petals and an open center on every flower
- 36 ch-3 sps (or joins) in every Round 6
- 12 above-and-below seams, each with 5 JLs and 2 JCs
- 10 side-by-side point joins
- 8 open diamond windows
- Border of 116 / 104 / 116 / 104 sc, 440 in total
- 22 sharp outward points
- Final size: 14.3″ x 20.5″ (36.3 cm x 52.1 cm)
Troubleshooting
Petals look cupped: Loosen your Round 2 chains.
Round 5 ruffles: Count your stitches. You may have extra sc. There should be 60.
Round 5 cups: Make looser ch-5 loops on Round 4.
Hexagon looks round: Make sure each corner is worked in a single stitch, and pin the points firmly when blocking.
Seams pucker: Relax the ch 1 on each side of every joining sl st.
Windows are lopsided: A point join went into the wrong corner. Count from the top side to find the true left point.
Border flares: Use 2 sc per space, not 3.
Care
Hand wash in cool water with a mild soap. Lay flat to dry, reshaping it while it’s damp.
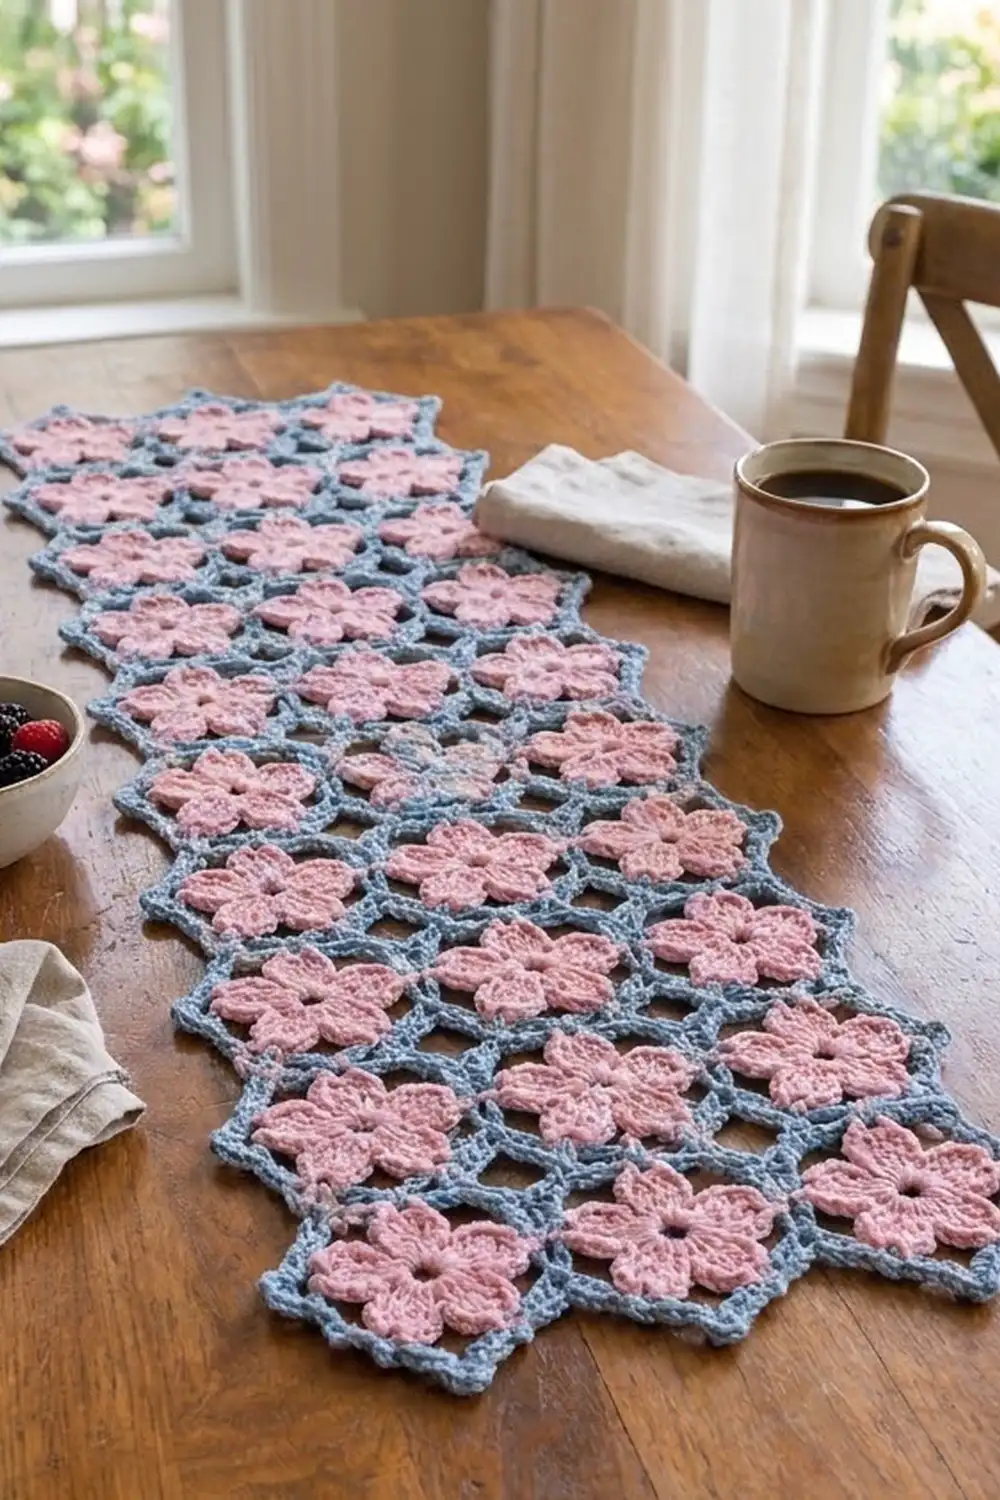
Final Notes
Here is the measurement chain:
- A 3″ (7.6 cm) flower
- A 3.5″ (8.9 cm) blue ring
- A 4″ (10.2 cm) hexagon, 4.6″ (11.7 cm) point to point
- 15 joined motifs making a 13.8″ x 20″ (35.1 cm x 50.8 cm) panel
- One border round bringing it to 14.3″ x 20.5″ (36.3 cm x 52.1 cm)
Check each stage as you go, and the panel will block flat and even.
Happy crocheting!