

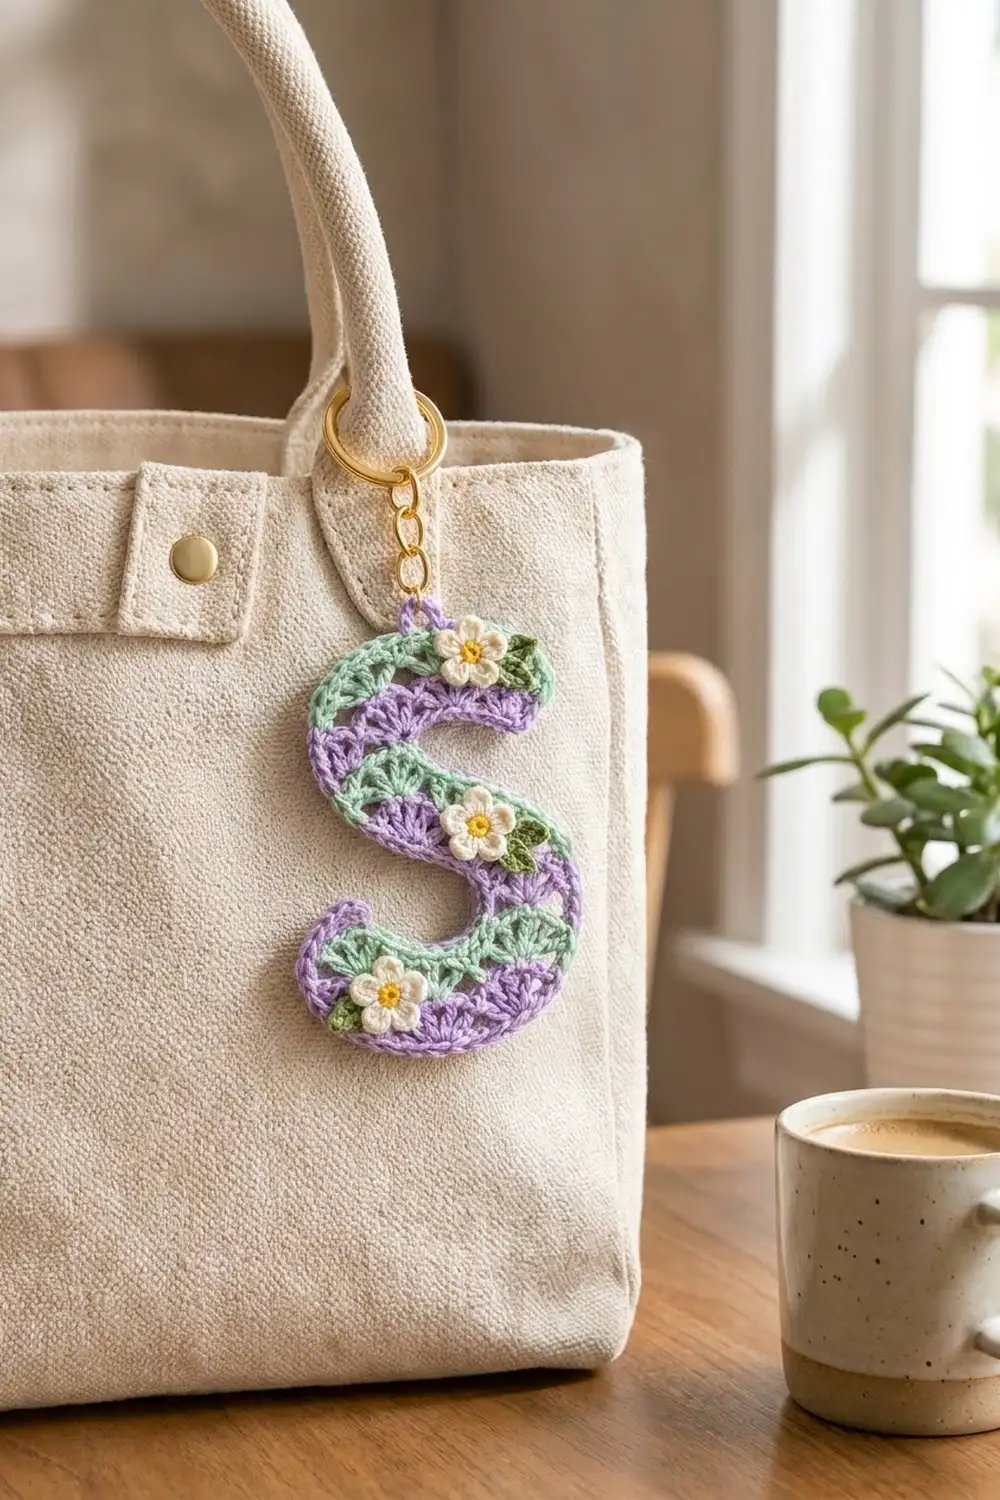
The Lilac Meadow Letter S Keychain is a small, lacy initial worked in two soft pastels. Lavender and mint shell stripes run along the full curve of the letter, so the colors follow the S like ribbon. Three tiny cream flowers with sunny yellow centers and green leaves sit on the top end, the middle curve, and the bottom end.
The finished S measures about 4.5 in (11.4 cm) tall and 3.25 in (8.3 cm) wide, with a stroke about 1.125 in (2.9 cm) wide. A gold split ring on a short chain clips it to a tote bag, backpack, or set of keys. The pattern uses US crochet terms throughout.
The letter is one main piece. You work a single straight strip lengthwise in four rows, but the shells change size along the strip. On one half the mint edge grows longer than the lavender edge; on the other half the reverse happens. That difference makes the strip curve one way, then the other, and it settles into an S on its own.
A lavender border, a built-in hanging loop, three flowers, and three leaves finish it off. Expect to spend one relaxed evening on it.
Finished Size and Construction
- Finished size: 4.5 in (11.4 cm) tall x 3.25 in (8.3 cm) wide, not counting hardware
- Skill level: Easy+ (shells, simple shaping, small appliqués)
- Terminology: US crochet terms
- Yarn weight: Super fine / fingering (#1) cotton
- Hook: 2.5 mm (US B-1 or C-2)
- Number of pieces: 1 letter piece, plus 3 flowers and 3 leaves sewn on
- Layout: one curved strip, mint edge along the outside of the top curve, lavender edge along the outside of the bottom curve
- Strip size before border: 8.75 in (22.2 cm) long x 1 in (2.5 cm) wide, measured straight along the foundation
- Border depth: 0.125 in (0.3 cm) on the lavender edge and both ends
- Stroke width after border: 1.125 in (2.9 cm)
Materials
Use a smooth mercerized cotton or cotton blend in fingering weight. Cotton holds the shell lace crisp and stands up to life on a keyring. Avoid fuzzy or very stretchy yarns, because the curve depends on the shells keeping their shape.
- Lavender (Color A): 5 g, about 17 m
- Mint (Color B): 4 g, about 14 m
- Cream (Color C): 1 g, about 4 m
- Yellow (Color D): 0.5 g, about 2 m
- Leaf green (Color E): 0.5 g, about 2 m
All quantities include a margin of about 25% for swatching and weaving in ends.
Tools:
- 2.5 mm crochet hook
- Tapestry needle
- Scissors
- Stitch markers (3)
- Gold split keyring, 1 in (2.5 cm), with a short chain about 1.5 in (3.8 cm) long
- 1 gold jump ring, 0.25 in (0.6 cm), and two pairs of flat pliers
- Rust-proof pins and a foam blocking board
- Spray bottle with water
Abbreviations (US Terms)
- ch – chain
- sl st – slip stitch
- sc – single crochet
- hdc – half double crochet
- dc – double crochet
- sc2tog – single crochet 2 together
- st(s) – stitch(es)
- MR – magic ring
Special stitch – Shell: Work the stated number of dc (3, 5, or 7) all into the same stitch. A 3-dc shell is narrow, a 5-dc shell is medium, and a 7-dc shell is wide. The width of each shell controls how much each edge of the strip stretches.
Gauge and Checkpoints
Gauge: 7 sc = 1 in (2.5 cm). Rows 1–4 together measure 1 in (2.5 cm) deep.
Gauge matters here because the strip length decides the height of the S. Before starting, chain 15 and work 14 sc. That row should measure 2 in (5.1 cm). If it does, start the real piece.
Checkpoints:
- After Row 1: 61 sc, about 8.75 in (22.2 cm) long
- After Row 2: strip about 0.5 in (1.3 cm) deep, still flat and straight
- After Row 3: strip about 0.875 in (2.2 cm) deep; it should already curl in opposite directions at each end
- After Row 4: strip 1 in (2.5 cm) deep, with a clear S shape starting when laid down
- After border and blocking: 4.5 in (11.4 cm) tall x 3.25 in (8.3 cm) wide
If Row 1 is longer than 9 in (22.9 cm), go down to a 2.25 mm hook. If it is shorter than 8.5 in (21.6 cm), go up to a 2.75 mm hook. A small difference in length changes the S proportions more than the width does.

The Letter Strip
Work in rows. Turn at the end of each row. The beginning ch-3 counts as a dc; the beginning ch-1 does not count as a stitch.
Direction note: Row 1 starts at the right end of the chain. The right end becomes the top end of the S, where the hanging loop goes. The left end becomes the curled bottom end.
Foundation: With lavender, ch 62.
Row 1 (lavender): Sc in 2nd ch from hook and in each ch across. Turn. (61 sc)
Row 2 (lavender): Ch 1, sc in first sc, skip 2 sc, 5 dc in next sc, skip 2 sc, sc in next sc; repeat from * 9 more times. (10 shells and 11 sc = 61 sts)
Number the shells 1 to 10 in the order you made them. Shell 10 is at the right (top) end. Fasten off lavender, leaving a 4 in (10.2 cm) tail.
Row 3 (mint): Turn the work. Join mint in the last sc of Row 2 (the top end). Ch 3, 2 dc in same sc (wide half-shell). Sc in center dc of shell 10.
7 dc in next sc, sc in center dc of next shell; repeat from * 3 more times. (4 wide shells, over the top half)
5 dc in next sc (transition shell), sc in center dc of next shell.
3 dc in next sc, sc in center dc of next shell; repeat from * 3 more times. (4 narrow shells, over the bottom half)
2 dc in last sc. Turn.
Row 3 count: 3 (start half-shell) + 10 sc + 28 dc (wide shells) + 5 dc (transition) + 12 dc (narrow shells) + 2 dc (end half-shell) = 60 sts
This row creates the S shape. Over the top half, the wide 7-dc shells make the mint edge longer than the lavender edge, so the mint side becomes the outside of the top curve. Over the bottom half, the narrow 3-dc shells make the mint edge shorter, so the lavender side becomes the outside of the bottom curve. The 5-dc shell in the middle is the turning point of the S.
Row 4 (mint): Ch 1, sc in each st across, working into the top of every dc and every sc. (60 sc)
This trim row closes the top of the mint shells. It gives the mint edge a firm, smooth line and finishes at the right (top) end. Fasten off mint.
Lay the strip down. The left half should bend with the lavender edge on the outside, and the right half should bend the other way. Don’t flatten it yet.
Border
Border gauge: The border is a single round of lavender sc, 0.125 in (0.3 cm) deep. Work it along the top end, the lavender foundation edge, and the bottom end. Do not work it along the mint edge, which is already finished with Row 4.
Hanging loop: Join lavender with a sl st in the last sc of Row 4 at the top end. Ch 8, sl st in the same sc. (ch-8 loop, about 0.5 in / 1.3 cm)
Top end: Ch 1. Working into row ends down the short side, work 1 sc in the end of Row 4, 2 sc in the end of Row 3, 2 sc in the end of Row 2, and 1 sc in the end of Row 1. (6 sc)
Foundation edge: Work into the opposite side of the foundation chain, starting at the top-end corner. There are 61 chain loops.
- Top corner (ch 1): 3 sc in the first ch. (3 sc)
- Top half, inner curve (next 30 ch): Sc in next 4 ch, sc2tog; repeat from * 4 more times. (25 sc)
- Bottom half, outer curve (next 29 ch): Sc in next 3 ch, 2 sc in next ch; repeat from * 6 more times, sc in next ch. (36 sc)
- Bottom corner (last ch): 3 sc in the last ch. (3 sc)
Foundation edge count: 3 + 25 + 36 + 3 = 67 sc over 1 + 30 + 29 + 1 = 61 chains
Bottom end: Working up the short side, 1 sc in the end of Row 1, 2 sc in the end of Row 2, 2 sc in the end of Row 3, and 1 sc in the end of Row 4. (6 sc)
Sl st in the first sc of Row 4 to anchor the border. Fasten off.
Border total: 6 + 67 + 6 = 79 sc, plus the ch-8 loop
Why the math works: The top half of the foundation edge is the inside of the top curve, so it loses 5 stitches (30 chains become 25 sc). The bottom half is the outside of the bottom curve, so it gains 7 stitches (29 chains become 36 sc). This matches what the mint shells did in Row 3, so both edges bend each half the same way. The 3-sc corners round off both ends of the letter. Two sc per dc row end and one sc per sc row end keep the short sides flat.
Flowers (Make 3)
Rnd 1 (yellow): MR, 5 sc in ring. Pull the ring closed and sl st in first sc. Fasten off yellow. (5 sc)
Rnd 2 (cream): Join cream in any sc. (Sl st, ch 2, 2 dc, ch 2, sl st) all in the same sc; repeat in each remaining sc. Fasten off, leaving a 10 in (25.4 cm) tail for sewing. (5 petals)
Each flower measures about 0.75 in (1.9 cm) across.
Leaves (Make 3)
With green, ch 6. Sl st in 2nd ch from hook, sc in next ch, hdc in next ch, dc in next ch, sl st in last ch. Fasten off, leaving an 8 in (20.3 cm) tail. (5 sts)
Each leaf measures about 0.5 in (1.3 cm) long.
Final Blocking
Block the letter before sewing on the flowers. They are easier to place on a flat, set shape.
- Weave in all strip and border ends along stitches of the same color.
- Mist the letter evenly until it is damp but not dripping.
- Lay it on the blocking board and ease it into an S. The mint edge sits on the outside of the top curve; the lavender edge sits on the outside of the bottom curve.
- Pin the outer edge of each curve first, placing a pin at every shell point.
- Check the size: 4.5 in (11.4 cm) tall and 3.25 in (8.3 cm) wide.
- Open each shell gently with your fingertip so the fan shapes and spaces are clear.
- Curl the bottom end slightly upward into a small hook, and pin it.
- Let it dry completely, at least 4 hours.
- Unpin. Sew one flower near the top end, just below the loop, with a leaf tucked to its right. Sew one on the middle curve, at the right side of the S, with a leaf to its right. Sew one on the bottom end, with a leaf to its left.
- Tuck each leaf partly under its flower and stitch through both layers. Weave the tails in on the back.
- Open the jump ring with two pliers, thread it through the ch-8 loop and the end link of the keyring chain, and close it fully.
Final Quality-Control Checklist
- Row 1 has 61 sc and Row 4 has 60 sc
- Row 3 has 4 wide shells, 1 transition shell, and 4 narrow shells
- The mint edge is the outside of the top curve
- The lavender edge is the outside of the bottom curve
- The border has 79 sc and a secure ch-8 loop
- The S measures 4.5 in (11.4 cm) x 3.25 in (8.3 cm)
- Each flower has 5 even petals around a yellow center
- Flowers and leaves are sewn through both layers, with no tails showing
- The jump ring is fully closed and doesn’t snag the yarn
Troubleshooting
The strip curves only one way. Check Row 3. The wide shells must be over the top half and the narrow shells over the bottom half. If they are all the same size, the strip will curve evenly or stay straight.
The S looks stretched and too tall. Row 1 is probably too long. Remake it with a smaller hook, or block it more firmly into tighter curves.
The S looks squashed. Row 1 is too short, or the border is tight. Use a larger hook for the border only.
The foundation edge ripples on the bottom curve. Your border is too loose. In one of the seven repeats, work a single sc in place of the “2 sc in next ch” increase.
The top curve cups. The sc2tog decreases are pulling too hard. Work one of the five repeats as 5 plain sc instead.
Petals look uneven. Keep each ch-2 the same height, and pull the magic ring fully closed before Rnd 2.
The loop feels loose. Work one more sl st into the top-end sc before fastening off, and check that the jump ring sits snugly.
Care
Hand wash in cool water with mild soap, press out the water in a towel, and dry flat in the S shape. Remove the metal hardware before washing so it doesn’t tarnish or stain the yarn.
Final Notes
The size of the letter comes from a short chain of measurements. A gauge of 7 sc per 1 in (2.5 cm) gives a 61-sc Row 1 of 8.75 in (22.2 cm). Rows 1–4 build a strip 1 in (2.5 cm) wide, and the shaped shells in Row 3 bend the two halves in opposite directions. The 79-sc border adds 0.125 in (0.3 cm) and brings the stroke to 1.125 in (2.9 cm). After blocking, the letter settles at 4.5 in (11.4 cm) tall and 3.25 in (8.3 cm) wide, ready for three little flowers and a gold keyring.
Once you’ve made one, the same shell-shaping idea works for other curved letters. Just remember to change which edge gets the wide shells.
Happy crocheting!