

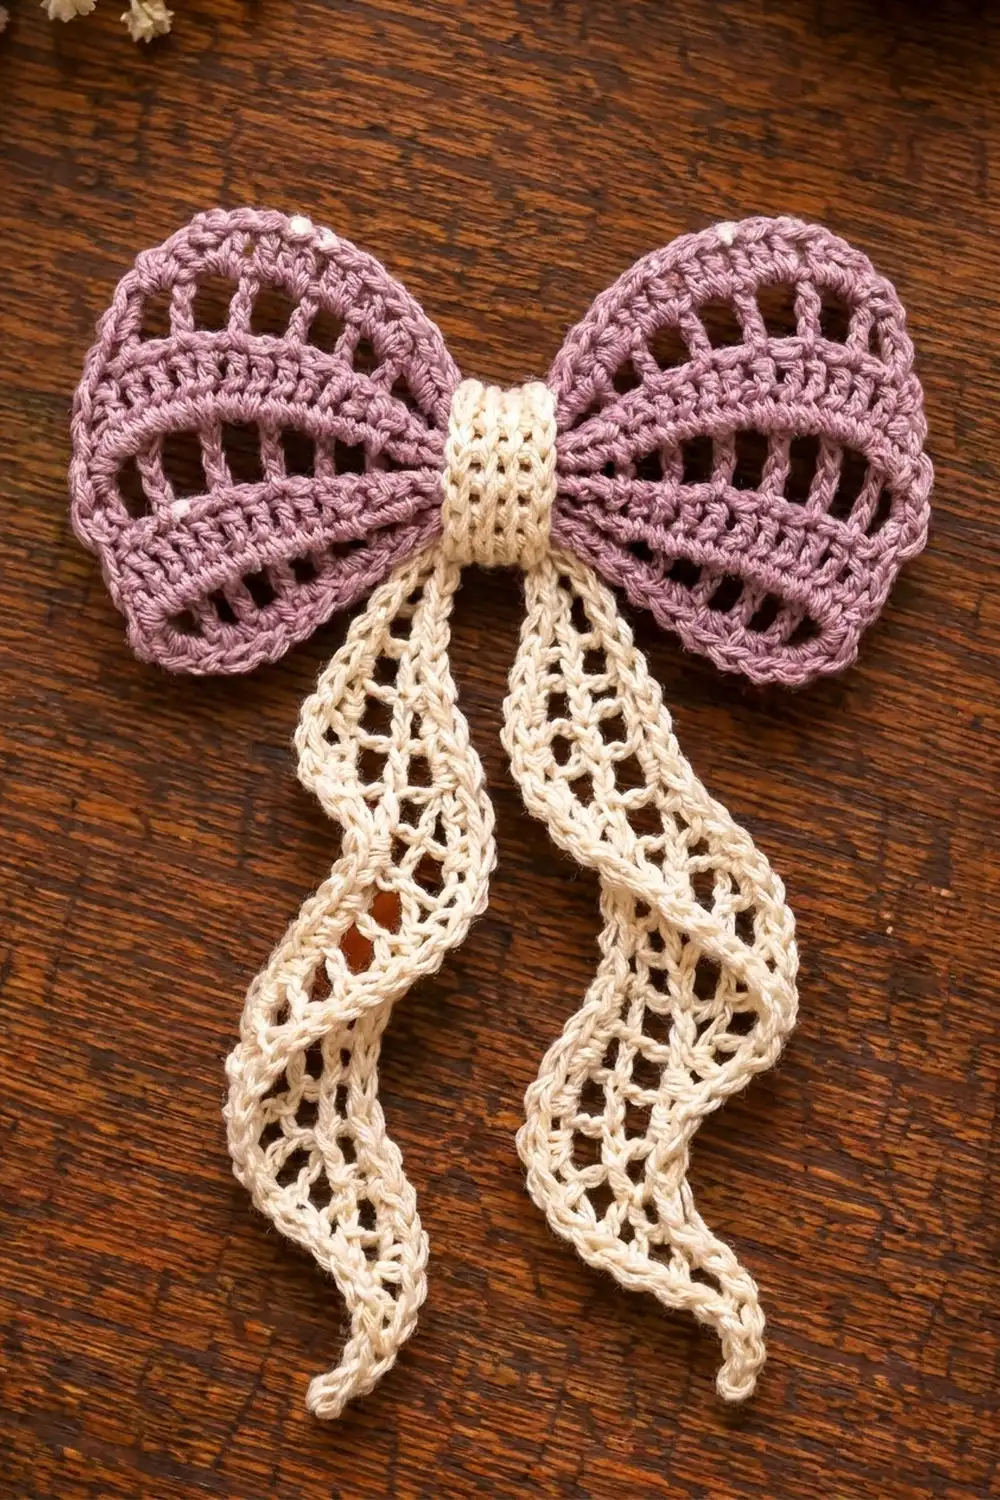
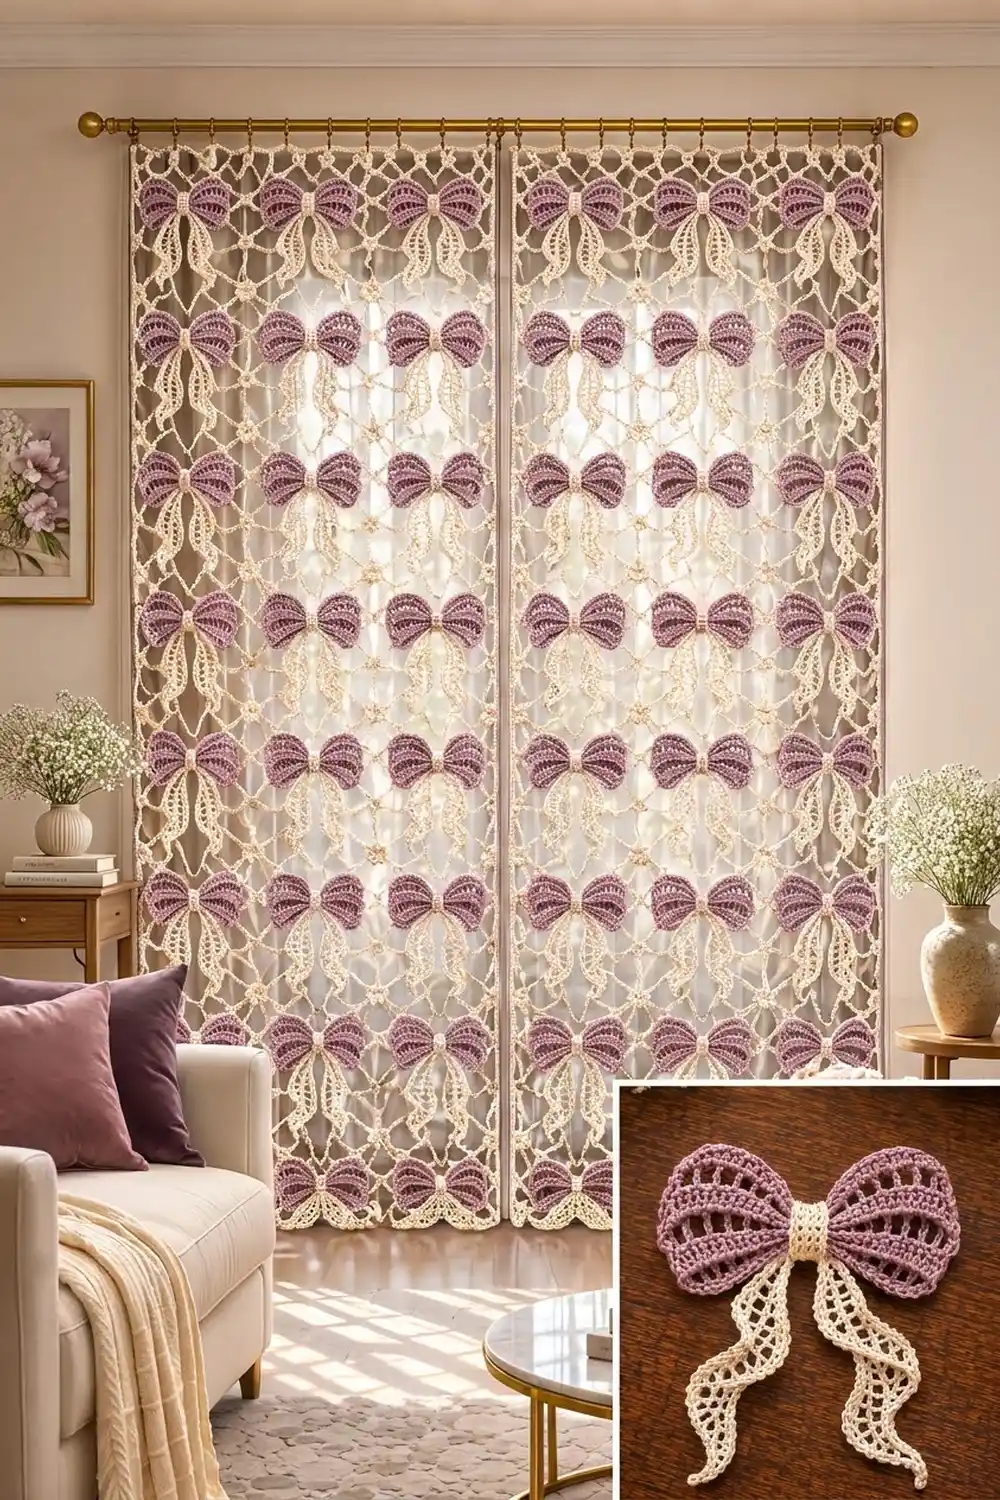
This curtain pairs soft lilac bows with a light, airy cream lattice. Each bow has two fan-shaped wings made of open bar rows and solid ridges, a ribbed cream knot, and two wavy cream lace tails. The bows are set in a repeating grid against an open diamond net, and tiny cream flowers sit where the net blocks meet.
The palette is just two colors: dusty lilac for the bow wings and warm cream for everything else. The look is romantic and vintage, with enough open space to let daylight through.
The pattern uses US crochet terms. Each finished panel measures 25 x 61 in (63.5 x 154.9 cm), and the set is two matching panels hung side by side.
Construction is modular. You crochet square net blocks in rounds, appliqué a bow onto each block, join the blocks into a 4 x 10 grid with slip stitches, sew flowers onto the inner junctions, then work a three-round border with a picot edge.
Finished Size and Construction
- Finished size (each panel): 25 x 61 in (63.5 x 154.9 cm)
- Skill level: Intermediate
- Terminology: US
- Yarn weight: Fingering (1), mercerized cotton
- Hook: 2.5 mm
- Number of pieces: 2 panels; each panel has 40 blocks, 40 bows, and 27 flowers
- Layout: 4 blocks across x 10 blocks down per panel
- Block size: 6 x 6 in (15.2 x 15.2 cm)
- Size before border: 24 x 60 in (61.0 x 152.4 cm)
- Border depth: 1/2 in (1.3 cm) on each side
Materials
Use a smooth mercerized cotton for crisp stitch definition and a drape that hangs straight. The quantities below assume about 170 m per 50 g.
- Color A, Lilac: 350 g (1,190 m), for 160 bow wings
- Color B, Cream: 700 g (2,380 m), for blocks, knots, tails, flowers, and borders
The quantities cover both panels and include roughly 10% extra for your gauge swatch and any differences in tension.
Tools:
- 2.5 mm crochet hook
- Tapestry needle
- Stitch markers
- Rust-proof pins and blocking mats
- Spray bottle
- Measuring tape
- 20 clip curtain rings (10 per panel) and a curtain rod
Abbreviations (US Terms)
- ch: chain
- sl st: slip stitch
- sc: single crochet
- dc: double crochet
- sk: skip
- sp: space
- BLO: back loop only
- rev sc: reverse single crochet (crab stitch)
- RS / WS: right side / wrong side
Special stitch: Reverse sc (rev sc). Work from left to right (right to left if you crochet left-handed). Insert the hook into the next stitch to the right, yarn over, pull up a loop, yarn over, and pull through both loops. This makes the beaded edge on the wings.
Gauge and Checkpoints
Gauge: 6 sc = 1 in (2.5 cm) in Color B.
Make one complete block and one complete bow before anything else. This block is your real gauge swatch.
- After Rnd 1: the ring measures about 3/4 in (1.9 cm) across.
- After Rnd 5: each side measures about 3 1/4 in (8.3 cm).
- After Rnd 8: each side measures about 5 1/2 in (14.0 cm).
- After Rnd 9: each side measures 6 in (15.2 cm).
- Finished bow: about 4 1/2 in (11.4 cm) wide across the wings.
If your block is too big, go down to a 2.25 mm hook, or shorten every ch-5 to ch-4 and every corner ch-7 to ch-6. If it’s too small, go up to a 2.75 mm hook. Whatever you change, the final per-side count must stay at 36 sc, so the joining and border math still works.
Lattice Block (make 40 per panel)
Use Color B.
Rnd 1: Ch 5 and sl st to the first ch to form a ring. Ch 1, work 16 sc in the ring, and sl st to the first sc. (16 sc)
Rnd 2: Ch 1. Sc in the first sc, ch 5, sk 1 sc, sc in the next sc. Repeat from * to * 6 more times, then ch 5, sk the last sc, and sl st to the first sc. (8 sc, 8 ch-5 loops)
Rnd 3: Sl st in the next 3 ch to reach the center of the first loop. Ch 1 and sc in the same loop. Ch 7, sc in the next loop, ch 5, sc in the next loop. Repeat from * to * 3 more times, leaving off the final sc of the last repeat, and sl st to the first sc. (8 loops: 4 corner ch-7 loops, 4 side ch-5 loops)
Rnd 4: Sl st in the next 4 ch to reach the center of the corner loop. Ch 1 and work (sc, ch 7, sc) in the same loop. [Ch 5, sc in the next ch-5 loop] across the side, ch 5, (sc, ch 7, sc) in the next corner loop. Repeat from * to * around, leaving off the last corner group, then ch 5 and sl st to the first sc. (12 loops: 4 corners, 2 ch-5 loops per side)
Rnds 5–8: Repeat Rnd 4. Each round adds one ch-5 loop per side.
- Rnd 5: 16 loops (4 corners, 3 per side)
- Rnd 6: 20 loops (4 corners, 4 per side)
- Rnd 7: 24 loops (4 corners, 5 per side)
- Rnd 8: 28 loops (4 corners, 6 per side)
The (sc, ch 7, sc) corners turn the net into diamonds that stay square.
Rnd 9 (conversion round): Sl st in the next 4 ch to reach the center of the corner loop. Ch 1 and work (3 sc, ch 2, 3 sc) in the same loop. Work 5 sc in each of the next 6 ch-5 loops, then (3 sc, ch 2, 3 sc) in the corner loop. Repeat from * to * around, leaving off the last corner group, and sl st to the first sc. Fasten off.
Count per side: (6 loops x 5 sc = 30) + (3 + 3 corner sc = 6) = 36 sc. In this pattern, “per side” means the 36 sc between two corner ch-2 spaces. The ch-2 spaces aren’t stitches.
Round total: 144 sc and 4 ch-2 corner spaces.
Bow (make 40 per panel)
Wing (make 2 per bow, Color A)
Row 1 (RS): Ch 5. Dc in the 5th ch from the hook (the skipped ch count as dc + ch-1), then work [ch 1, dc in the same ch] 4 times. Turn. (6 dc, 5 ch-1 sp)
Row 2: Ch 1 and sc in the first dc. 2 sc in the next ch-1 sp, sc in the next dc. Repeat from * to * 4 more times; the last sc goes in the 3rd ch of the turning ch. Turn. (16 sc)
Row 3: Ch 4 (counts as dc + ch 1). [Dc in the next sc, ch 1] 14 times, then dc in the last sc. Turn. (16 dc, 15 ch-1 sp)
Row 4: Ch 1 and sc in the first dc. [Sc in the next ch-1 sp, sc in the next dc] 15 times. Turn. (31 sc)
Row 5: Ch 5 (counts as dc + ch 2) and sk the next sc. [Dc in the next sc, ch 2, sk the next sc] 14 times, then dc in the last sc. Turn. (16 dc, 15 ch-2 sp)
Row 6: Ch 1 and sc in the first dc. [2 sc in the next ch-2 sp, sc in the next dc] 15 times. (46 sc) Do not turn.
Row 7: Ch 1 and rev sc in each sc across. (46 rev sc) Fasten off.
The wing is a fan about 2 in (5.1 cm) from the starting point to the beaded edge. The extra fullness in Rows 5–6 makes it cup slightly, which gives the rounded, dimensional look.
Tail (make 2 per bow, Color B)
Row 1: Ch 26. Sc in the 2nd ch from the hook and in each ch across. Turn. (25 sc)
Row 2: Ch 4 (counts as dc + ch 1) and sk the next sc. [Dc in the next sc, ch 1, sk the next sc] 11 times, then dc in the last sc. Turn. (13 dc, 12 ch-1 sp)
Row 3: Ch 1. Sc in each dc and in each ch-1 sp across. Turn. (25 sc)
Row 4: Ch 1 and sc in the first sc. [Ch 3, sk 1 sc, sc in the next sc] 12 times. (13 sc, 12 ch-3 loops) Do not fasten off.
Edge 2: Rotate the piece to work along the foundation chain. Ch 1 and sc in the first ch. [Ch 3, sk 1 ch, sc in the next ch] 12 times. (13 sc, 12 ch-3 loops) Fasten off.
The tail measures about 4 1/4 in (10.8 cm) long and 1 in (2.5 cm) wide, with lacy loops on both long edges.
Knot (make 1 per bow, Color B)
Row 1: Ch 6. Sc in the 2nd ch from the hook and across. Turn. (5 sc)
Rows 2–12: Ch 1 and sc in the BLO across. Turn. (5 sc)
The knot is a ribbed band 0.8 in (2.0 cm) wide and 1 1/2 in (3.8 cm) long. Leave a 10 in (25.4 cm) tail for sewing.
Assemble the Bow
- Lay the two wings RS up with their starting points touching at the center and the beaded edges facing outward.
- Pinch the center so the wings gather slightly.
- Place the top ends of both tails behind the center, angled into a narrow V.
- Wrap the knot around everything, with the ribs running vertically, and sew its short ends together at the back.
- Add a few stitches through all layers to lock them in place.
Flower (make 27 per panel, Color B)
Rnd 1: Ch 4 and sl st to form a ring. Ch 1, work 10 sc in the ring, and sl st to the first sc. (10 sc)
Rnd 2: [Ch 3, sl st in each of the next 2 sc] 5 times. (5 petals) Fasten off and leave a sewing tail.
The flower measures about 3/4 in (1.9 cm) across.
Make All Pieces
Per panel:
- 40 lattice blocks (Color B)
- 80 wings (Color A)
- 80 tails (Color B)
- 40 knots (Color B)
- 27 flowers (Color B)
For two panels: double every number.
Appliqué each bow: Center the bow horizontally on the RS of a block, with the knot 2 in (5.1 cm) below the top edge. Sew the wings down along their base rows and at a few points on the beaded edge. Sew the tails in a gentle S-curve so each tip ends about 1/4 in (0.6 cm) above the bottom edge. Sew the tails at the loops, and let the net show through.
Layout (per panel, RS up, all bows pointing up):
Row 1:   B  B  B  B
           *  *  *
Row 2:   B  B  B  B
           *  *  *
Row 3:   B  B  B  B
  ... continue the same pattern ...
Row 10:  B  B  B  B
B = bow block, * = flower at an inner four-block junction. That makes 3 flowers x 9 junction rows = 27 flowers.
Joining
Hold two blocks WS together with the edges aligned. Working from the RS, sl st through the BLO of both layers.
- Start in the matching corner ch-2 spaces.
- Work one sl st through each pair of matching sc, for 36 sl sts per seam.
- End in the next pair of corner ch-2 spaces.
One stitch pairs with one stitch, so the seams add no width.
- Join 10 blocks into a vertical strip. Checkpoint: the strip is 60 in (152.4 cm) long.
- Make 4 strips, then join them side by side with the same method. Work straight through the corner spaces where four blocks meet.
- Checkpoint: the panel measures 24 x 60 in (61.0 x 152.4 cm).
Keep your sl sts as loose as the sc beneath them. If the seams pucker, go up one hook size for joining only. Sew a flower over each inner junction to hide the meeting point.
Border
Border gauge: 6 sc = 1 in (2.5 cm), the same as the blocks.
Rnd 1: Join Color B in any outer corner ch-2 space. Ch 1. Work 1 sc in each sc along the edge, and nothing in the joined corner spaces at the seams. At each outer corner, work (sc, ch 2, sc) in the ch-2 sp. Sl st to the first sc.
- Short sides: 4 blocks x 36 = 144 sc, plus 2 corner sc = 146 sc
- Long sides: 10 x 36 = 360 sc, plus 2 corner sc = 362 sc
- Total: 1,016 sc and 4 ch-2 sp
Rnd 2: Ch 1. Sc in each sc around, with (sc, ch 2, sc) in each corner ch-2 sp. Sl st to the first sc. (148 sc per short side, 364 sc per long side)
Rnd 3 (picot edge): Ch 1. Along each side, work [sc in the next 4 sc, ch 3, sl st in the top of the last sc] across. Work (sc, ch 3, sc) in each corner ch-2 sp. Sl st to the first sc and fasten off.
- Short sides: 148 ÷ 4 = 37 picots
- Long sides: 364 ÷ 4 = 91 picots
Why the math works: At 6 sc per inch, 144 sc is exactly 24 in (61.0 cm) and 360 sc is exactly 60 in (152.4 cm). The border’s starting count matches the edge one-to-one, so it can’t ruffle or pull in. The only added stitches are at the corners, where they let the border turn flat. Both 148 and 364 divide evenly by 4, so the picots fall evenly from corner to corner.
Final Blocking
- Weave in all ends, running them back through the solid sc rows.
- Lay the panel RS up on blocking mats.
- Pin the corners first to 25 x 61 in (63.5 x 154.9 cm).
- Pin along each edge every 2 in (5.1 cm), with a pin through each picot along the edge.
- Pin each block corner so the seams run straight.
- Mist the panel until it’s evenly damp. Don’t soak it.
- Shape each bow by hand: cup the wings and straighten the tail waves.
- Let it dry completely before you unpin. Repeat for the second panel.
Final Quality-Control Checklist
- Every block has 36 sc per side.
- Every wing has 46 rev sc on the beaded edge.
- All bows point the same way and sit at the same height.
- There are 27 flowers per panel, one at every inner junction.
- Border Rnd 1 has 146 / 362 sc per side.
- Rnd 3 has 37 / 91 picots per side.
- The blocked panel measures 25 x 61 in (63.5 x 154.9 cm).
- Both panels match in length to within 1/2 in (1.3 cm).
Troubleshooting
- The block curls into a bowl: your ch-5 loops are too tight. Loosen your chains or go up a hook size.
- The block ruffles: your chains are too loose. Go down a hook size.
- Blocks don’t line up when joined: recount Rnd 9; it must be exactly 36 sc per side.
- The wing lies flat with no cup: your Row 6 is too loose. Work it with a smaller hook.
- The tails twist on their own: steam-block them flat before sewing, then set the curve with pins.
- The border waves: you’ve added stitches at the seams. Rnd 1 needs exactly 144 / 360 sc plus the corner sc.
Care
Hand wash in cool water with mild soap, then press out the water in a towel. Lay the panels flat to dry, re-pin them if needed, and keep them out of harsh direct sun to prevent the lilac from fading.
Final Notes
Here’s how the measurements connect:
- 6 sc = 1 in (2.5 cm).
- Each block finishes at 36 sc per side, or 6 in (15.2 cm).
- Four blocks give 144 sc, or 24 in (61.0 cm), across.
- Ten blocks give 360 sc, or 60 in (152.4 cm), down.
- The border adds 1/2 in (1.3 cm) on every side, for a finished panel of 25 x 61 in (63.5 x 154.9 cm).
If your first block hits 6 in (15.2 cm), everything after it will fit.
Happy crocheting!