

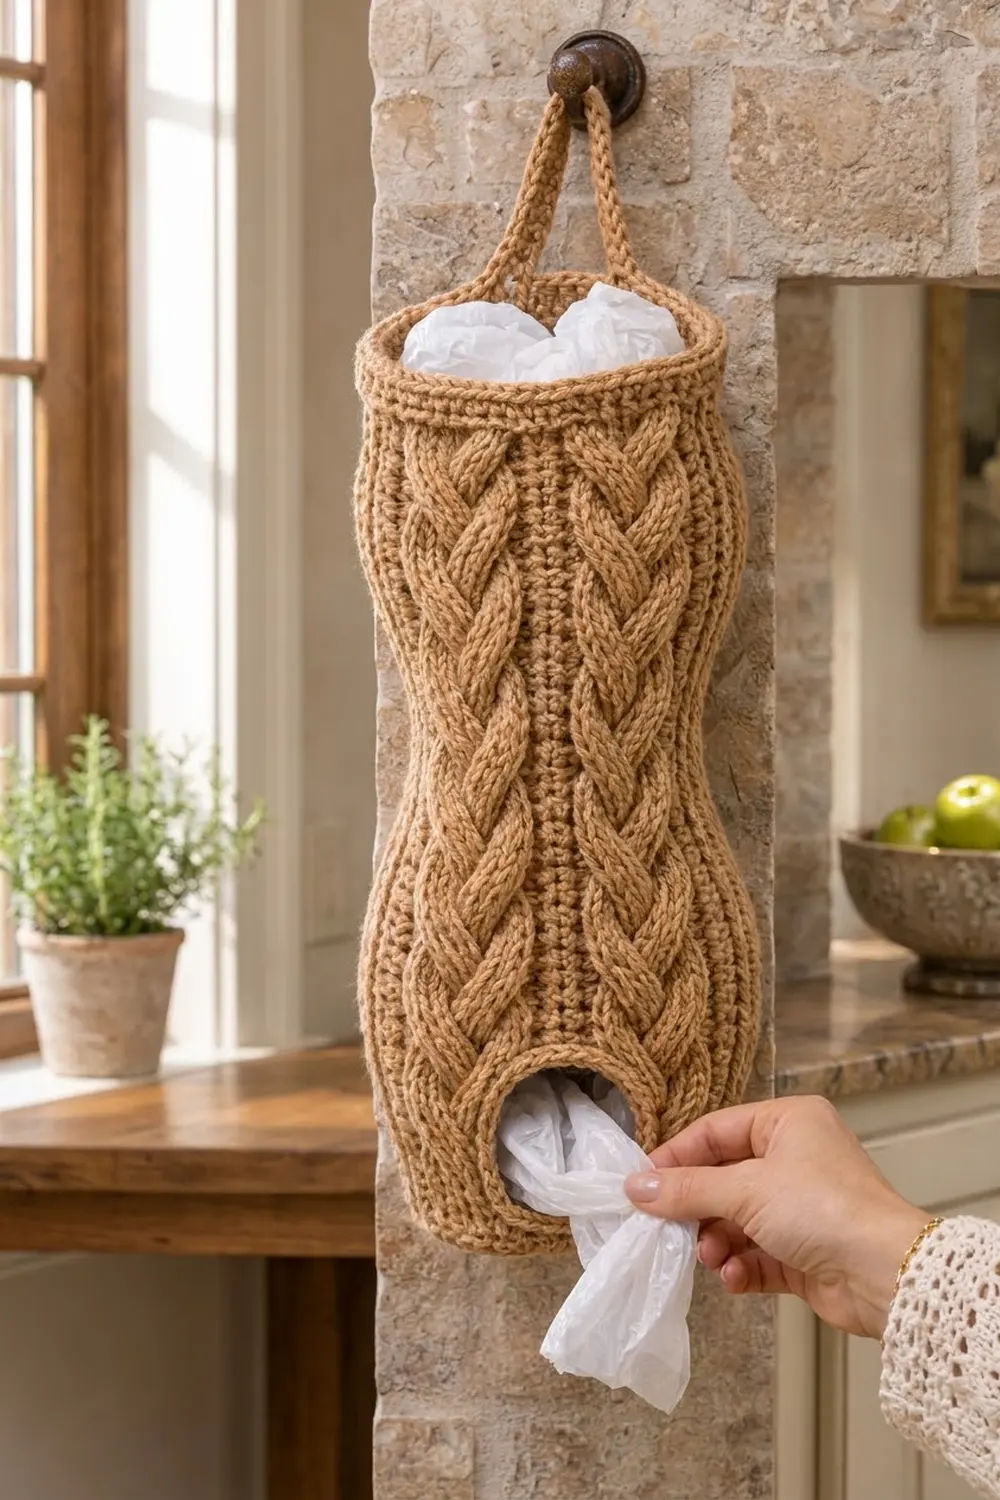
Plastic grocery bags pile up fast. This holder keeps them in one tidy, good-looking place. The Harvest Braid holder is a tall cabled tube. Bags go in at the top and come out through a rounded hole at the bottom front.
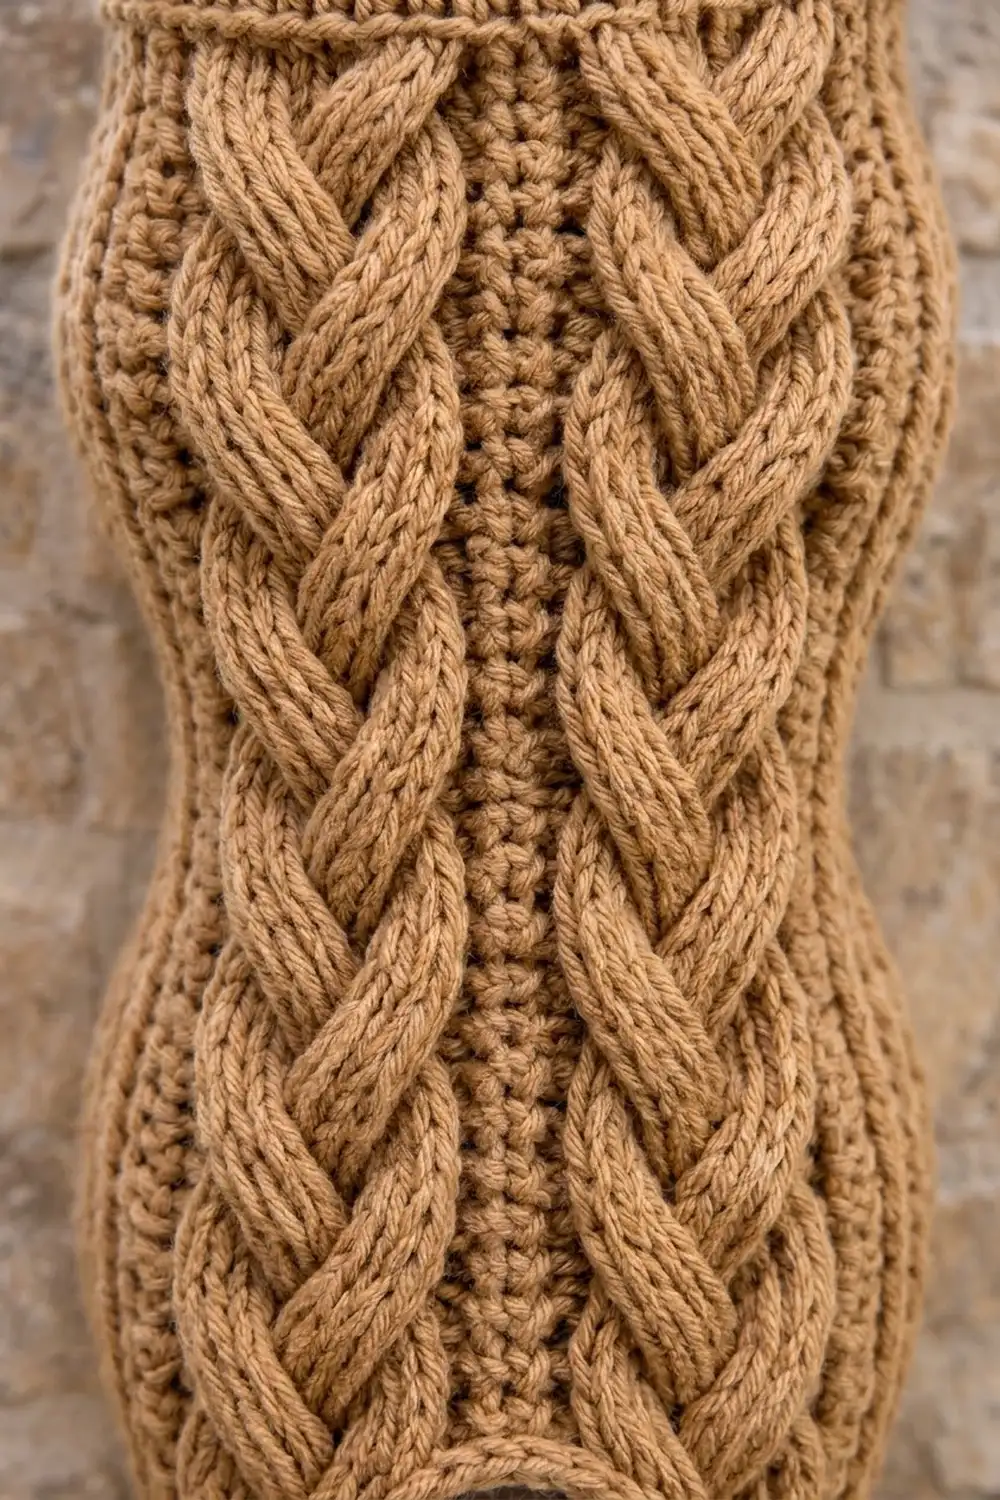
The sample is worked in a warm camel tan, and the deep cables look a bit like a fisherman sweater. A navy version looks just as good in a blue-and-white kitchen. Six braided cables run around the tube, separated by narrow rib columns. Changing the width of those rib columns gives the holder its soft hourglass curve.
This pattern uses US crochet terms. The finished holder is 18 in (45.7 cm) tall. With the loop it is about 21 in (53.3 cm) overall. Laid flat, it measures 10.5 in (26.7 cm) wide at the bottom band and 8.25 in (21.0 cm) wide at the waist.
You start with a flat oval base, then work the body upward in joined rounds. A short section is worked in turned rows to leave the dispensing hole. Then come the braid rounds, a sc rim and the strap. There is no sewing except for one end of the strap.
Finished Size and Construction
- Finished size: 18 in (45.7 cm) tall, plus a 3 in (7.6 cm) loop
- Flat widths: bottom band 10.5 in (26.7 cm); waist 8.25 in (21.0 cm); upper cables 9.75 in (24.8 cm); rim 9 in (22.9 cm)
- Skill level: Intermediate (post stitch cables)
- Terminology: US
- Yarn weight: Worsted/aran (#4)
- Hook: 5.0 mm (H-8)
- Number of pieces: 1 (base, body and strap are worked as one piece)
- Layout: a single vertical tube; hole centered at the front, strap centered at the back
- Base size: 8.5 x 4 in (21.6 x 10.2 cm)
- Size before rim (border): 17.25 in (43.8 cm) tall
- Rim depth: 0.75 in (1.9 cm)
Materials
Yarn: Use a smooth worsted or aran yarn with good stitch definition, such as acrylic, a cotton blend or a sturdy wool blend. Fuzzy or very loose-plied yarns hide the braids. Cables use a lot of yarn, so buy enough from one dye lot.
- Camel/tan (main color): 360 g, about 650 m (711 yd). That is four 100 g / 180 m (197 yd) skeins.
These quantities include about a 10% margin for gauge swatches and tension differences.
Tools:
– 5.0 mm (H-8) crochet hook
– 6 stitch markers
– Tapestry needle
– Scissors
– Measuring tape
– Blocking mat and pins, or a spray bottle
Abbreviations (US Terms)
- ch – chain
- sl st – slip stitch
- sc – single crochet
- sc2tog – single crochet 2 together
- dc – double crochet
- FPdc / BPdc – front / back post double crochet
- FPtr – front post treble crochet
- BLO – back loop only
- st(s) – stitch(es)
- RS / WS – right side / wrong side
Special stitches
- FPdc3tog: [Yo, insert hook from the front around the post of the next st, yo, pull up a loop, yo, pull through 2] 3 times. Yo and pull through all 4 loops.
- Rib increase: Work (FPdc, BPdc, FPdc) all around the post of the same st. This turns 1 st into 3.
- Right Cross (RC): Skip 3 sts. FPtr around each of the next 3 sts. Then, working in front of the sts just made, FPtr around each of the 3 skipped sts.
- Left Cross (LC): Skip 3 sts. FPtr around each of the next 3 sts. Then, working behind the sts just made, FPtr around each of the 3 skipped sts.
Braid panel (9 sts, 4-round repeat)
– Braid A: RC over the first 6 sts, then FPdc in the next 3.
– Braid B: FPdc in each of the 9 sts.
– Braid C: FPdc in the first 3 sts, then LC over the next 6.
– Braid D: FPdc in each of the 9 sts.
Gauge and Checkpoints
- Plain dc: 16 dc and 8 rnds = 4 in (10.2 cm)
- FPdc/BPdc rib: 16 sts = 4 in (10.2 cm), so 4 sts = 1 in (2.5 cm)
- One braid panel (9 sts): 2 in (5.1 cm) wide
- Sc: 16 sc and 16 rows = 4 in (10.2 cm)
Test first: The base is your gauge swatch. When it’s done, measure it before you start the body.
Checkpoints:
1. Base after Rnd 4: 8.5 x 4 in (21.6 x 10.2 cm)
2. After Rnd 3 of body: 1.25 in (3.2 cm) tall
3. After Rnd 10 (hole closed): 4.75 in (12.1 cm) tall
4. After Rnd 19: 9.25 in (23.5 cm) tall, 9.75 in (24.8 cm) flat width
5. After Rnd 28: 13.75 in (34.9 cm) tall, 8.25 in (21.0 cm) flat width
6. After Rnd 35: 17.25 in (43.8 cm) tall
7. After Rnd 38: 18 in (45.7 cm) tall, 9 in (22.9 cm) flat rim width
Too big? Go down 0.5 mm. Too small? Go up 0.5 mm. If only the cable rounds are off, check that your FPtr sts are pulled up to the full height of the round instead of squashed.
Base
Ch 22.
Rnd 1: 6 dc in 3rd ch from hook (the skipped ch don’t count as a st). Dc in each of the next 18 ch. Work 6 dc in the last ch. Rotate and work along the opposite side of the foundation ch: dc in each of the next 18 ch. Sl st to first dc. (48 dc: 6 per end, 18 per side)
Rnd 2: Ch 2 (doesn’t count here or in later rounds). [2 dc in each of the next 6 sts, dc in each of the next 18 sts] twice. Sl st to first dc. (60 dc)
Rnd 3: Ch 2. [(Dc in next st, 2 dc in next st) 6 times, dc in each of the next 18 sts] twice. Sl st to first dc. (72 dc)
Rnd 4: Ch 2. [(Dc in each of the next 2 sts, 2 dc in next st) 6 times, dc in each of the next 18 sts] twice. Sl st to first dc. (84 dc)
Checkpoint: the oval measures 8.5 x 4 in (21.6 x 10.2 cm) and lies flat.
Body: Bottom Band and Dispensing Hole
Rnd 1: Ch 1. Sc BLO in each st around. Sl st to first sc. (84 sc) The unworked front loops make a crisp fold, and the sides turn upward.
Rnd 2: Ch 2. [FPdc, BPdc] around. Sl st to first st. (84 sts: 42 FPdc, 42 BPdc)
Rnd 3: Ch 2. [FPdc around FPdc, BPdc around BPdc] around. Sl st to first st. (84 sts) Fasten off.
Lay the piece flat with the base’s straight sides at the front and back. On the front, place markers on the 10 center sts of Rnd 3. Those 10 sts stay unworked and become the bottom edge of the hole.
Row 4 (RS): Join yarn in the first st after the marked sts. Ch 2. Work the rib as set (FPdc over FPdc, BPdc over BPdc) across 74 sts, stopping before the marked sts. Turn. (74 sts)
Rows 5–8: Ch 2. Work across all 74 sts as they face you: on WS rows, work BPdc over sts that look raised and FPdc over sts that look recessed, so the RS ribs keep their texture. Turn at the end of Rows 5–7. Do not turn after Row 8 (RS). (74 sts per row)
Bridge: Ch 10. Sl st to the top of the first st of Row 8. This closes the round over the hole.
Rnd 9: Ch 2. Work the rib across the 74 sts. Dc in each of the 10 bridge ch. Sl st to first st. (84 sts: 74 post sts + 10 dc)
Rnd 10: Ch 2. [FPdc, BPdc] around, matching the established ribs. Over the 10 new dc, continue alternating. Sl st to first st. (84 sts)
Checkpoint: the hole is about 2.5 in (6.4 cm) wide and 2.5 in (6.4 cm) tall, and the body measures 4.75 in (12.1 cm) tall.
Body: Braided Cables
Rnd 9 started at the left edge of the hole, so the 10 sts over the hole are the last sts of each round. The setup below centers the last braid of the round above the hole.
Rnd 11 (setup): Ch 2. [BPdc, FPdc, BPdc, FPdc, BPdc, FPdc in each of the next 9 sts] 6 times. Sl st to first st. (84 sts: six 5-st rib columns + six 9-st braid panels) Place a marker in each braid panel’s first st if that helps you.
In all the cable rounds, work each rib column as set: BPdc over BPdc and FPdc over FPdc.
Rnd 12: Ch 2. [Rib 5, Braid A] 6 times. Sl st. (84 sts)
Rnd 13: Ch 2. [Rib 5, Braid B] 6 times. Sl st. (84 sts)
Rnd 14: Ch 2. [Rib 5, Braid C] 6 times. Sl st. (84 sts)
Rnd 15: Ch 2. [Rib 5, Braid D] 6 times. Sl st. (84 sts)
Rnds 16–19: Repeat Rnds 12–15. (84 sts per round)
Checkpoint: 9.25 in (23.5 cm) tall, 9.75 in (24.8 cm) flat width. (6 braids x 2 in + 6 ribs x 1.25 in = 19.5 in (49.5 cm) around, which is 9.75 in (24.8 cm) flat.)
Rnd 20 (decrease): Ch 2. [BPdc, FPdc3tog, BPdc, Braid A] 6 times. Sl st. (72 sts: 6 x (3 rib + 9 braid)) In this round, each rib column changes from 5 sts to 3. The FPdc3tog is worked over the FPdc, BPdc and FPdc in the middle of the column.
Rnds 21–28: Continue the braid sequence with Braid B, C, D, A, B, C, D, A, working [Rib 3, braid] 6 times each round. (72 sts per round)
Checkpoint: 13.75 in (34.9 cm) tall, 8.25 in (21.0 cm) flat width. (6 x 2 in + 6 x 0.75 in = 16.5 in (41.9 cm) around.)
Rnd 29 (increase): Ch 2. [BPdc, rib increase in the next FPdc, BPdc, Braid B] 6 times. Sl st. (84 sts: 6 x (5 rib + 9 braid))
Rnds 30–35: Continue the braid sequence with Braid C, D, A, B, C, D, working [Rib 5, braid] 6 times each round. (84 sts per round)
Checkpoint: 17.25 in (43.8 cm) tall, 9.75 in (24.8 cm) flat width. The braids have now gone through 6 full repeats (Rnds 12–35).
Border: Top Rim and Hole Edging
The rim and hole edging use the sc gauge of 16 sc = 4 in (10.2 cm), or 4 sc per inch.
Top rim
Rnd 36: Ch 1. [Sc in each of the next 5 sts, sc2tog] 12 times. Sl st to first sc. (72 sc: 60 worked 1-per-stitch + 12 sc2tog over the remaining 24 sts)
Rnds 37–38: Ch 1. Sc in each st around. Sl st. (72 sc)
Why the math works: 72 sc ÷ 4 sc per inch = 18 in (45.7 cm) around, or 9 in (22.9 cm) flat. That is slightly narrower than the 9.75 in (24.8 cm) cable section, so the rim pulls in gently, as in the photo. Three sc rounds at 0.25 in (0.6 cm) each add the 0.75 in (1.9 cm) rim, which brings the holder to 18 in (45.7 cm).
Hanging strap
Flatten the holder with the hole centered at the front. At the center back of Rnd 38, mark 14 sts.
Row 1: With RS facing, join yarn in the first marked st. Ch 1. Sc in the same st and the next 3. Turn. (4 sc)
Rows 2–28: Ch 1. Sc in each of the 4 sts. Turn. (4 sc)
Fasten off, leaving a 12 in (30.5 cm) tail. Sew the last row to the last 4 marked sts, which leaves 6 sts (1.5 in / 3.8 cm) between the two ends. The 7 in (17.8 cm) strap arches into a loop about 3 in (7.6 cm) high.
Hole edging
Rnd 1: With RS facing, join yarn at the bottom right corner of the hole. Ch 1. Work 10 sc along the bottom edge (in the unworked Rnd 3 sts), 10 sc up the side (2 per row end), 10 sc across the top (in the base of the Rnd 9 dc), and 10 sc down the other side. Sl st. (40 sc: 10 per side)
Rnd 2: Ch 1. [Sc2tog over the corner (the last st of one side and the first st of the next), sc in each of the next 8 sts] 4 times. Sl st. (36 sc: 9 per side)
Why the math works: The hole is 10 sts wide and 5 rows tall. That’s 2.5 in (6.4 cm) each way, so 10 sc per side keeps it square to start. Rnd 2 removes one stitch at each corner, which rounds the corners. The finished opening is about 2 in (5.1 cm) across. Fasten off and weave in all ends.
Final Blocking
- Mist the holder evenly with water, or steam it lightly if the yarn is acrylic. Keep the iron from touching the yarn.
- Lightly stuff it with a towel to fill out the tube.
- Shape the waist to 8.25 in (21.0 cm) flat and the bottom band to 10.5 in (26.7 cm) flat.
- Straighten the braids so they run vertically, and pat the rib columns flat.
- Shape the hole into a smooth circle.
- Pin the strap flat and leave everything to dry completely.
Final Quality-Control Checklist
- Height is 18 in (45.7 cm), and the loop rises about 3 in (7.6 cm).
- There are six braids around the tube, and one is centered above the hole.
- Each braid alternates front and back crosses with no skipped crosses.
- The rib columns are 5 sts at the bottom and top, 3 sts at the waist.
- The hole edging has 36 sc and lies flat.
- The strap is centered at the back and firmly sewn.
- All ends are woven in on the inside.
Troubleshooting
- Braids look flat: Pull every FPtr up to its full height, and don’t skip the plain FPdc rounds.
- Holes behind the crosses: Work the post sts of the round below snugly, and keep the dc tension even.
- Body flares: Check your stitch count; 84 sts in the waist section means Rnd 20 was missed.
- Hole puckers: Work exactly 2 sc per row end, no more.
- The holder twists: Join each round with a sl st, and start each round in the first st, not the joining st.
- The strap stretches: Use a smaller hook for the strap, or line it with a row of sl sts.
Care
Hand wash in cool water and lay flat to dry. Shake out crumbs from the bags now and then.
Final Notes
Here is the whole measurement chain. The 84-st base measures 8.5 x 4 in (21.6 x 10.2 cm). The bottom band is 10.5 in (26.7 cm) flat. The braids start at 9.75 in (24.8 cm) wide, pull in to an 8.25 in (21.0 cm) waist and widen again to 9.75 in (24.8 cm). The rim finishes at 9 in (22.9 cm), and the total height is 18 in (45.7 cm), plus the 3 in (7.6 cm) loop. If you check each of those numbers as you go, your Harvest Braid holder will hang straight and look tidy for years.
Happy crocheting!