

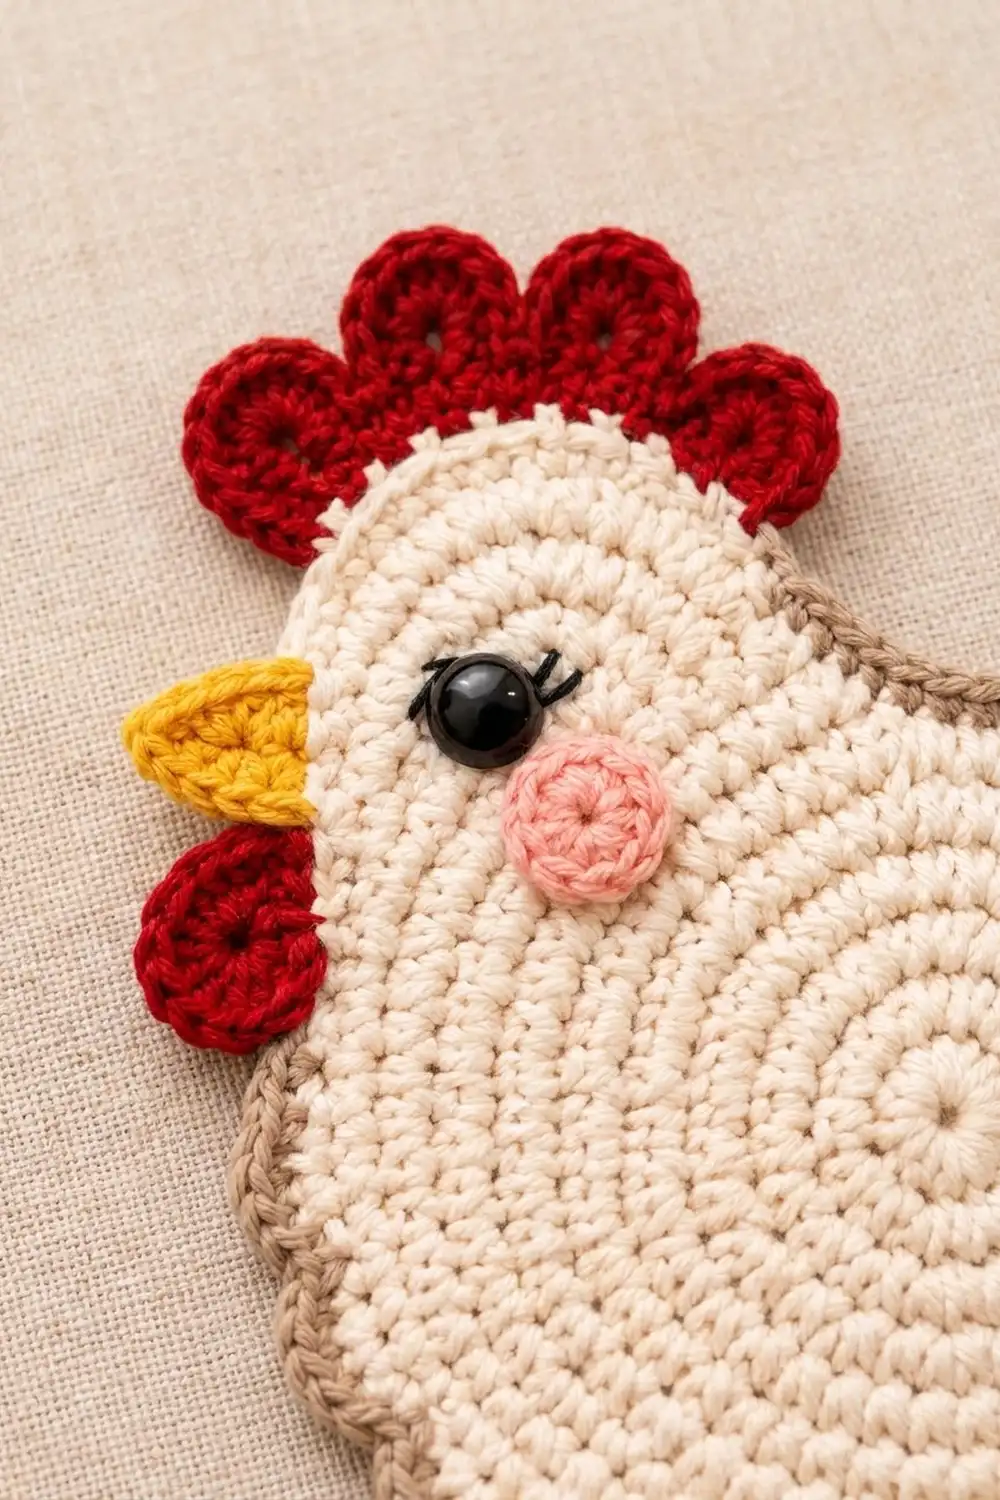
The Little Hen Coaster is a flat, one-piece chicken. You start with a single crochet circle that spirals out from the center, then work a small head and a tail onto its top edge. A taupe scalloped edge runs from the back of the head, over the tail, and around the round belly. Small red, yellow, pink and black pieces finish the face.
The colors are soft and farmhouse-style: a cream body, a taupe edge, a red comb and wattle, a yellow beak, a pink cheek, and one black eye with an embroidered lash. Use it under a mug, on an Easter table, or as a kitchen decoration.
This pattern uses US crochet terms. The finished hen is about 6.5 in (16.5 cm) wide and 6.75 in (17.1 cm) tall without the comb, or 7.25 in (18.4 cm) tall with the comb.
The construction is simple. You crochet a 10-round single crochet circle, then work short rows onto it for the head and the tail. One cream round neatens the whole outline, and a taupe round adds the scallops. Last, you make the comb, wattle, beak and cheek separately and sew them on.
Finished Size and Construction
- Finished size: 6.5 in (16.5 cm) wide x 6.75 in (17.1 cm) tall; 7.25 in (18.4 cm) tall including the comb
- Skill level: Easy / advanced beginner
- Terminology: US crochet terms
- Yarn weight: Worsted (#4) cotton
- Hook: 4.0 mm (US G-6)
- Number of pieces: One body piece, plus 8 small sewn-on pieces (5 comb circles, 1 wattle, 1 beak, 1 cheek)
- Layout: One chicken shape; no body pieces to join
- Body circle size: 5 in (12.7 cm) across after Round 10
- Size before border: about 5.5 in (14.0 cm) wide x 6 in (15.2 cm) tall with the head and tail added
- Border depth: about 0.5 in (1.3 cm) along the scalloped edge (cream edge round plus taupe scallops)
Materials
Use a smooth mercerized or combed cotton in worsted weight. Cotton holds its shape, copes with a warm mug, and shows the spiral rings clearly. Acrylic is fine for a decoration but handles heat less well.
- Cream (body): 30 g, about 55 m
- Taupe (scalloped edge): 6 g, about 12 m
- Red (comb and wattle): 5 g, about 10 m
- Yellow (beak): 2 g, about 3 m
- Pink (cheek): 2 g, about 3 m
- Black: a 12 in (30.5 cm) length of embroidery floss or yarn for the eyelash
Tools:
- 4.0 mm (US G-6) crochet hook
- One 10 mm black safety eye (or a flat black button or an embroidered eye if you want the coaster to lie flatter)
- 4 stitch markers
- Tapestry needle
- Scissors
- Pins, a ruler and a blocking mat
The yarn amounts above include a small extra margin for your gauge check and yarn tails.
Abbreviations (US Terms)
- ch: chain
- sl st: slip stitch
- sc: single crochet
- hdc: half double crochet
- dc: double crochet
- sc2tog: single crochet 2 together
- st(s): stitch(es)
- RS / WS: right side / wrong side
- MR: magic ring
Special stitch: Scallop. Skip 1 st, 5 hdc in the next st, skip 1 st, sl st in the next st. Each scallop uses 4 sts of the previous round and makes 6 new sts (5 hdc + 1 sl st).
Gauge and Checkpoints
Gauge matters here because the head, tail and border are all counted from the circle. Crochet the circle first and measure it before you go on.
- Circle gauge: Rounds 1–4 measure 2 in (5.1 cm) across.
- Row gauge: 4 sc rows = 1 in (2.5 cm).
Checkpoints:
- After Round 4: 2 in (5.1 cm) across
- After Round 8: 4 in (10.2 cm) across
- After Round 10: 5 in (12.7 cm) across
- After the head and tail: about 5.5 in (14.0 cm) x 6 in (15.2 cm)
- After the border: 6.5 in (16.5 cm) x 6.75 in (17.1 cm)
If your circle is too big, go down half a hook size. If it is too small, go up half a hook size. If the circle ruffles, your increases are too tight compared with your plain sts. If it cups, your tension is tight overall. Fix the circle before you work the head, because every later count depends on the 60 sts of Round 10.
Body Circle
With cream, work in joined rounds. The ch 1 at the start of each round does not count as a stitch. Join each round with a sl st to the first sc.
Round 1: MR, ch 1, 6 sc in ring, join. (6 sts)
Round 2: Ch 1, 2 sc in each st around, join. (12 sts)
Round 3: Ch 1, (sc in next st, 2 sc in next st) x 6, join. (18 sts)
Round 4: Ch 1, (sc in next st, 2 sc in next st, sc in next st) x 6, join. (24 sts)
Round 5: Ch 1, (sc in next 3 sts, 2 sc in next st) x 6, join. (30 sts)
Round 6: Ch 1, (sc in next 2 sts, 2 sc in next st, sc in next 2 sts) x 6, join. (36 sts)
Round 7: Ch 1, (sc in next 5 sts, 2 sc in next st) x 6, join. (42 sts)
Round 8: Ch 1, (sc in next 3 sts, 2 sc in next st, sc in next 3 sts) x 6, join. (48 sts)
Round 9: Ch 1, (sc in next 7 sts, 2 sc in next st) x 6, join. (54 sts)
Round 10: Ch 1, (sc in next 4 sts, 2 sc in next st, sc in next 4 sts) x 6, join. (60 sts)
Fasten off. The increases move position from round to round, which keeps the circle round instead of six-sided and keeps the rings smooth.
Marking the Circle
Lay the circle RS up with the join at the bottom (6 o’clock). Number the sts of Round 10 from 1 to 60 in the direction you crochet. St 60 is the last st before the join.
- Marker A: st 15 (9 o’clock, the chest side)
- Marker B: st 30 (12 o’clock)
- Marker C: st 45 (3 o’clock, the tail side)
Stitch map:
- Sts 16–18: left unworked (chest, below the head)
- Sts 19–30: head (12 sts)
- Sts 31–34: left unworked (the dip in the back)
- Sts 35–44: tail (10 sts)
- Sts 45–60 and 1–18: unworked belly and chest
That leaves 38 sts of Round 10 unworked: 4 in the back dip and 34 around the belly and chest.
Head
Work in rows with cream. The ch 1 at the start of each row does not count as a stitch.
Row 1 (RS): Join cream in st 19, ch 1, sc in sts 19–30. (12 sts)
Row 2: Ch 1, turn, sc in each st across. (12 sts)
Row 3: Ch 1, turn, sc2tog, sc in next 8 sts, sc2tog. (10 sts)
Row 4: Ch 1, turn, sc in each st across. (10 sts)
Row 5: Ch 1, turn, sc2tog, sc in next 6 sts, sc2tog. (8 sts)
Row 6: Ch 1, turn, sc2tog, sc in next 4 sts, sc2tog. (6 sts)
Fasten off. The head is 6 rows, about 1.5 in (3.8 cm) tall, and makes the rounded bump at the upper left.
Tail
Row 1 (RS): Join cream in st 35, ch 1, sc in sts 35–44. (10 sts)
Row 2: Ch 1, turn, sc in each st across. (10 sts)
Row 3: Ch 1, turn, sc2tog, sc in next 6 sts, sc2tog. (8 sts)
Row 4: Ch 1, turn, sc2tog, sc in next 4 sts, sc2tog. (6 sts)
Fasten off. The tail is 4 rows, about 1 in (2.5 cm) tall. The 4 unworked sts between the head and tail make the dip in the back.
Checkpoint: The piece should now measure about 5.5 in (14.0 cm) wide x 6 in (15.2 cm) tall.
Comb (Make 5, Red)
Round 1: MR, ch 2 (does not count), 10 dc in ring, pull the ring closed, join with a sl st to the first dc. (10 sts)
Fasten off, leaving an 8 in (20.3 cm) tail for sewing. Each circle is about 1 in (2.5 cm) across.
Wattle (Make 1, Red)
Round 1: Work as for a comb circle. (10 sts)
Round 2: Ch 1, (sc in next st, 2 sc in next st) x 5, join. (15 sts)
Fasten off, leaving a tail for sewing. The wattle is about 1.25 in (3.2 cm) across.
Beak (Make 1, Yellow)
Row 1: Ch 4, sc in 2nd ch from hook and in next 2 ch. (3 sts)
Row 2: Ch 1, turn, sc2tog, sc in last st. (2 sts)
Row 3: Ch 1, turn, sc2tog. (1 st)
Fasten off, leaving a tail for sewing. The beak is a small triangle about 0.75 in (1.9 cm) long.
Cheek (Make 1, Pink)
Round 1: MR, ch 1, 6 sc in ring, join. (6 sts)
Round 2: Ch 1, 2 sc in each st around, join. (12 sts)
Fasten off, leaving a tail for sewing. The cheek is about 1 in (2.5 cm) across.
Border
The border has two rounds. First, a cream edge round goes around the whole outline. Then a taupe round runs from the back of the head, over the tail, and around the belly to the chest.
Border gauge: The cream edge round adds about 0.25 in (0.6 cm). Each scallop is about 1 in (2.5 cm) wide and adds another 0.25 in (0.6 cm) of depth.
Edge Round (cream, trim round): With RS facing, join cream in st 45 (marker C). Ch 1, then work:
- 34 sc along the belly and chest (sts 45–60, then sts 1–18)
- 6 sc up the front side of the head (1 per row end)
- Across the head top: 2 sc in the first st, sc in the next 4 sts, 2 sc in the last st (8 sc)
- 6 sc down the back side of the head (1 per row end)
- 4 sc in the back dip (sts 31–34)
- 4 sc up the inner side of the tail (1 per row end)
- Across the tail top: 2 sc in the first st, sc in the next 4 sts, 2 sc in the last st (8 sc)
- 4 sc down the outer side of the tail (1 per row end)
Join with a sl st to the first sc. Count: 70 sts worked 1 per existing st or row end + 4 corner increases = 74 sts. Fasten off.
Scallop Round (taupe, partial round): With RS facing, join taupe in the first sc on the back side of the head (just after the head-top section). Ch 1, then work:
- 14 sc: 6 down the back of the head, 4 across the dip, 4 up the inner side of the tail
- 10 Scallops over the next 40 sts: 8 sts of the tail top, 4 sts of the outer tail, and the first 28 sts of the belly section
- 6 sc in the last 6 sts of the belly section (the chest)
Fasten off. Count: 14 sc + (10 scallops x 6 sts) + 6 sc = 80 sts, worked over 60 edge sts. The other 14 edge sts (6 on the front of the head + 8 on the head top) stay cream.
Why the math works: The edge round has 74 sts. The taupe round covers 14 + 40 + 6 = 60 of them, and 60 + 14 cream sts = 74. The scalloped section is 40 sts, which divides exactly by 4, so all 10 scallops fit with no partial scallop.
Assembly
- Eye: Insert the 10 mm safety eye on the head between Rows 2 and 3, about 1 in (2.5 cm) in from the front edge. Secure the washer on the WS. If you want a flatter coaster, sew on a flat button or embroider a black satin-stitch eye instead.
- Eyelash: With black, make 2 short straight stitches angled up and back from the outer top of the eye.
- Cheek: Place the cheek just below the eye and slightly toward the front. Whipstitch around its edge.
- Comb: Arrange the 5 circles in a fan across the top of the head, each overlapping the next by about one-third. Sew the circles to each other, then sew the fan to the WS of the head so the upper half of each circle shows above the cream edge.
- Beak: Sew the base of the beak to the WS at the front of the head, with the point facing forward.
- Wattle: Sew the wattle to the WS just below the beak, so about two-thirds of it shows below the front of the head and above the taupe chest edge.
Weave in all ends on the WS.
Final Blocking
- Soak the coaster in cool water and press out the extra water in a towel. Do not wring.
- Lay it RS up on a blocking mat.
- Shape the circle evenly and pin the whole hen to 6.5 in (16.5 cm) wide.
- Pin the tip of each scallop gently outward so all 10 scallops are even.
- Shape the head bump and the tail tip so the dip in the back is clear.
- Flatten the comb circles and wattle with your fingers.
- Let it dry completely, then remove the pins.
Final Quality-Control Checklist
- Round 10 has 60 sts and the circle measures 5 in (12.7 cm).
- The head ends with 6 sts; the tail ends with 6 sts.
- The edge round has 74 sts.
- The taupe round has 14 sc, 10 scallops and 6 sc.
- The finished size is 6.5 in (16.5 cm) x 6.75 in (17.1 cm), or 7.25 in (18.4 cm) tall with the comb.
- The coaster lies flat with no cupping or ruffling.
- The small pieces are sewn on securely and no ends show on the RS.
Troubleshooting
- Circle cups: Your tension is tight. Go up half a hook size, or work your increases more loosely.
- Circle ruffles: Your tension is loose, or you made an extra increase. Count each round again.
- Head leans to one side: Check that Row 1 starts exactly in st 19 and ends in st 30.
- Scallops don’t fit: Count the edge round again. The scalloped section must be exactly 40 sts.
- Edge pulls in: Work the row-end sc loosely, putting the hook under 2 strands of each row end.
- Comb flops: Sew each circle to the circle next to it as well as to the head.
Care
Hand wash in cool water, press out the water in a towel, and dry flat. Reshape the scallops while the coaster is still damp.

Final Notes
Each stage builds on the one before. You start with a 60-st circle that measures 5 in (12.7 cm). A 12-st head and a 10-st tail bring the piece to about 5.5 in (14.0 cm) x 6 in (15.2 cm). A 74-st cream edge round and a taupe round with 10 scallops finish the hen at 6.5 in (16.5 cm) x 6.75 in (17.1 cm). Check each number as you go and your hen will lie flat and even.
Happy crocheting!