

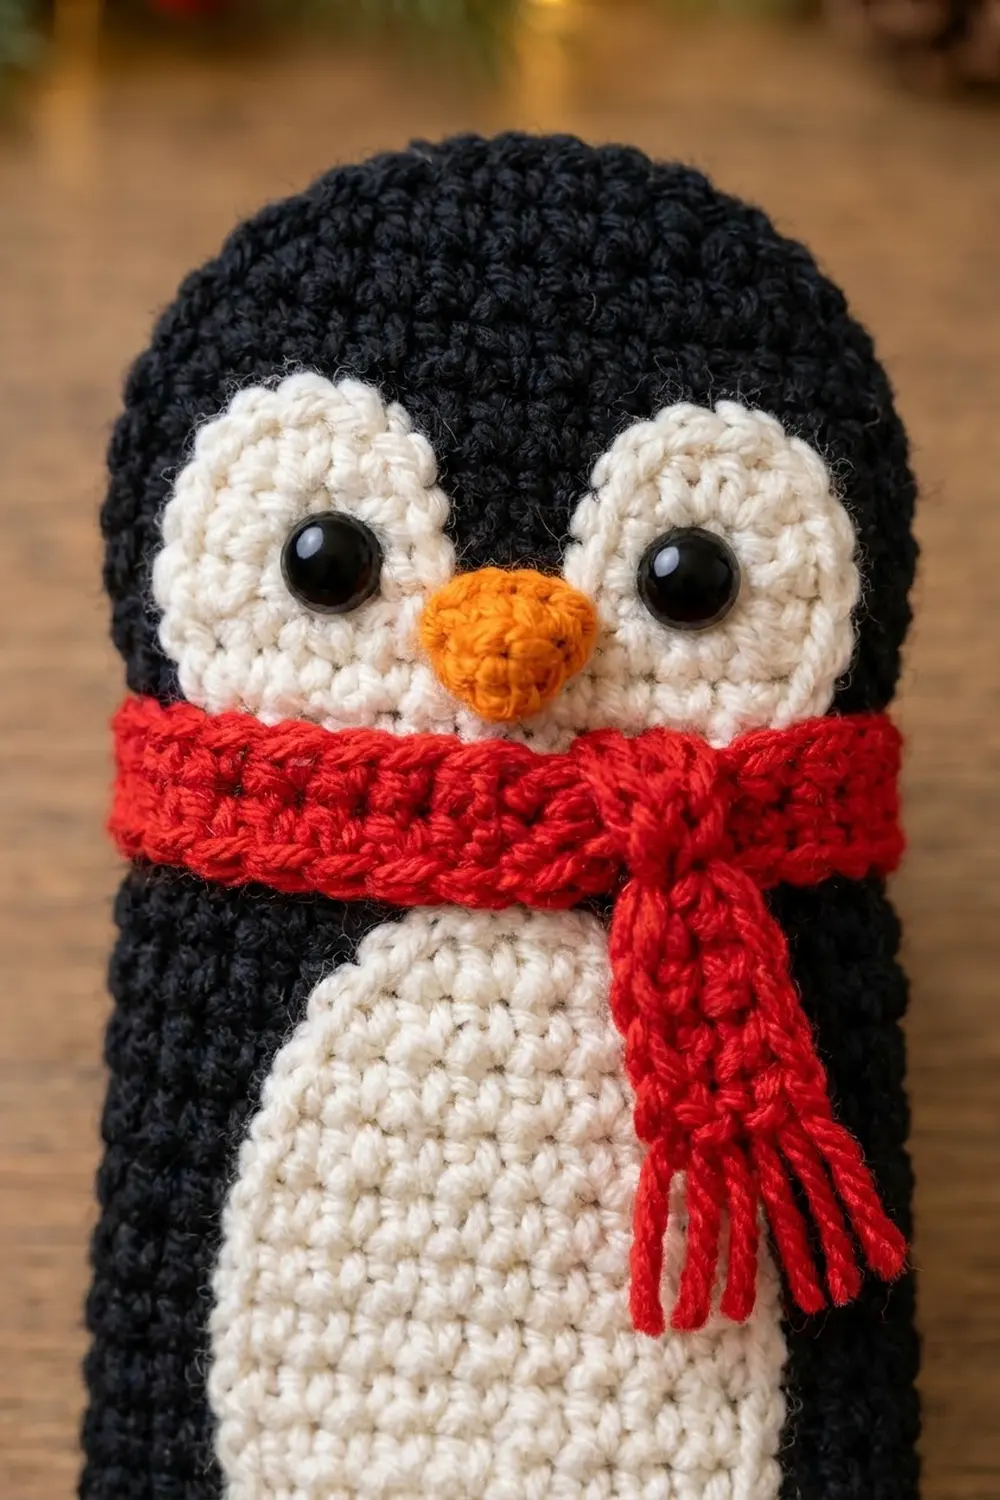
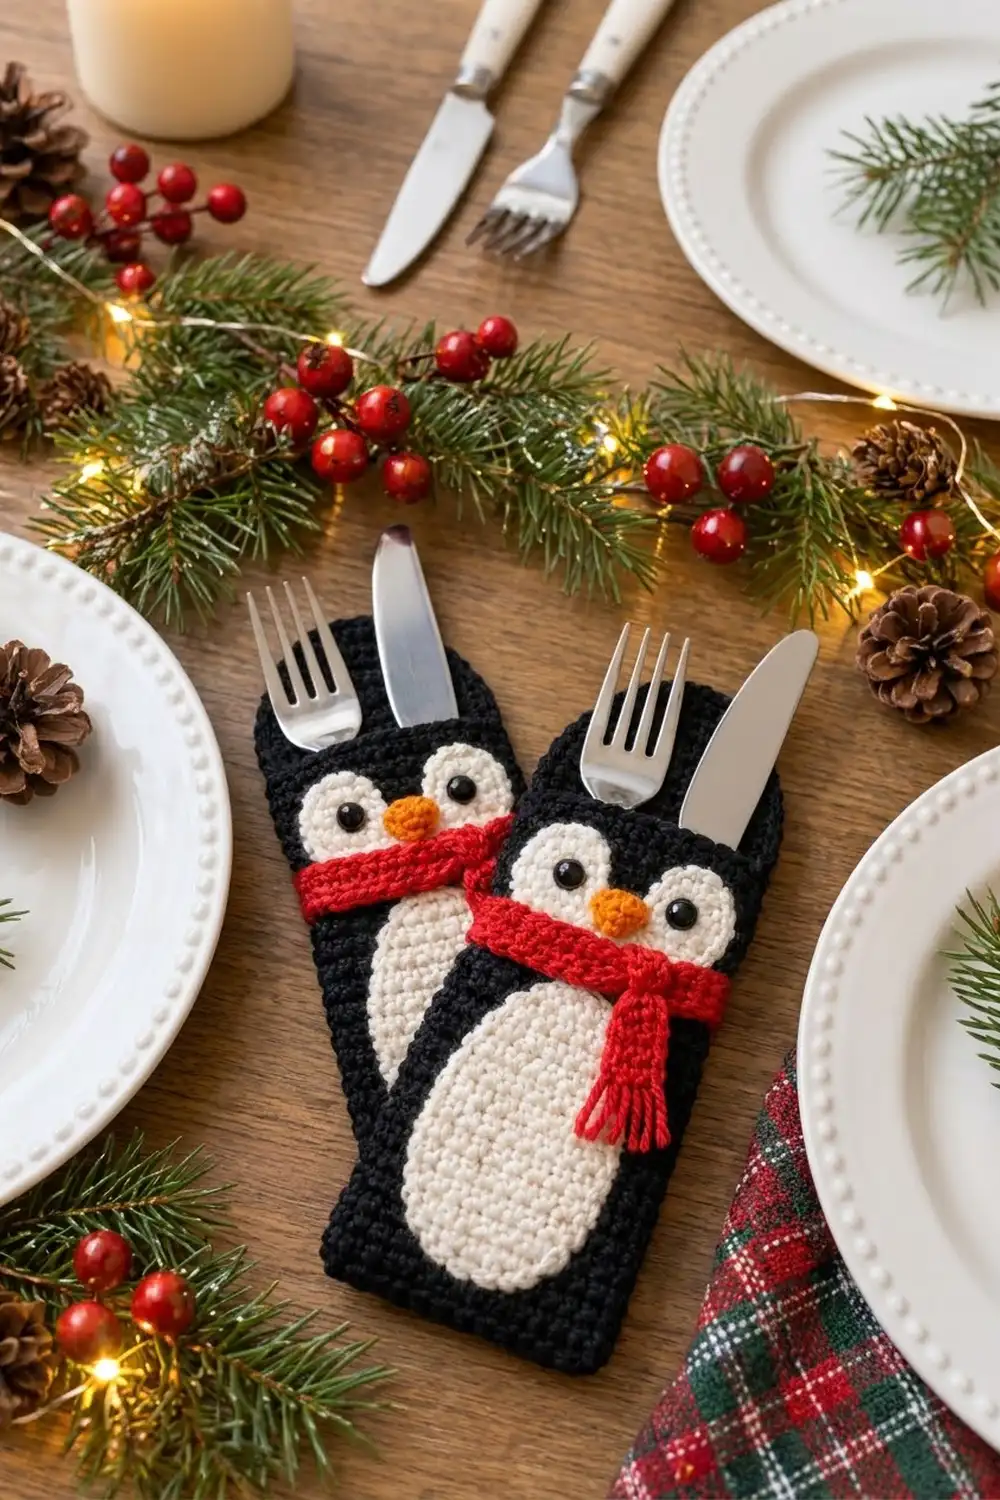
This little penguin holds a fork and knife upright at each place setting. He has a solid black body, an ivory face with shiny black eyes, a small orange beak, a tall ivory belly and a bright red scarf with fringed tails. Two holders make a matching pair for a holiday table, and a larger batch can dress up a whole dinner party.
The style is clean and graphic. The body is plain single crochet, and every detail is a separate flat appliqué sewn onto the front. The palette is classic: black, ivory, orange and red.
This pattern uses US crochet terms. The finished holder measures 3.5 in (8.9 cm) wide and 8 in (20.3 cm) tall.
How it’s made: you crochet two identical black panels in rows and shape the arched top with decreases. Then you sew the appliqués onto the front panel and join the panels with single crochet through both layers along the sides and bottom. Last, you edge the open arch on each layer so the cutlery slides in from the top.
Finished Size and Construction
- Finished size: 3.5 in × 8 in (8.9 × 20.3 cm)
- Skill level: Easy / advanced beginner
- Terminology: US
- Yarn weight: Worsted (#4) cotton
- Hook: 4.0 mm (G-6)
- Number of pieces per holder: 11 (2 panels, 2 eye circles, 1 belly, 1 beak, scarf band, 2 scarf tails, 1 knot)
- Layout: Front and back panels stacked, with all appliqués on the front panel
- Panel size: 3 in × 7.5 in (7.6 × 19.1 cm)
- Size before border: 3 in × 7.5 in (7.6 × 19.1 cm)
- Border depth: 1 round of sc, 0.25 in (0.6 cm)
Materials
Use a smooth mercerized or matte cotton in worsted weight. Cotton holds its shape, washes well and shows clean stitches. Avoid fuzzy acrylic, because the black shows lint easily.
Per holder:
– Black: 18 g / 32 m (35 yd)
– Ivory: 5 g / 9 m (10 yd)
– Red: 3 g / 5 m (5.5 yd)
– Orange: 1 g / 2 m (2.2 yd)
For the set of 2 shown, double every amount. These quantities include a margin of about 15% for your gauge swatch and for tails.
Tools:
– 4.0 mm (G-6) crochet hook
– Two 6 mm black safety eyes or black beads (embroider the eyes instead if the holder will be near small children)
– Tapestry needle
– Stitch markers
– Scissors
– Pins
– Ruler or tape measure
Abbreviations (US Terms)
- ch – chain
- sc – single crochet
- hdc – half double crochet
- dc – double crochet
- sl st – slip stitch
- st(s) – stitch(es)
- inc – 2 sc in the same stitch
- sc2tog – single crochet 2 together: (insert hook in next st, yarn over, pull up a loop) twice, yarn over, pull through all 3 loops
- RS / WS – right side / wrong side
Special stitch – sc seam: Hold both panels together and insert the hook through matching stitches or row ends on both layers. Work a normal sc through all four loops.
Gauge and Checkpoints
Gauge: 16 sc × 18 rows = 4 in (10.2 cm). That works out to 4 sts and 4.5 rows per 1 in (2.5 cm).
Make one complete panel before you start anything else. The panel is your real gauge test.
Checkpoints:
– After Row 10: 3 in (7.6 cm) wide and about 2.2 in (5.6 cm) tall
– After Row 29: 3 in (7.6 cm) wide and about 6.4 in (16.3 cm) tall
– After Row 34: 7.5 in (19.1 cm) tall in the center
– Finished holder: 3.5 in × 8 in (8.9 × 20.3 cm)
Too big? Go down half a hook size. Too small? Go up half a hook size. Hold your gauge firm: loose stitches let light through the pocket and make it floppy.
Body Panels (make 2, black)
Ch 13.
Row 1 (RS): Sc in the 2nd ch from the hook and in each ch across, turn. (12 sc)
Rows 2–29: Ch 1 (does not count as a st), sc in each st across, turn. (12 sc)
The panel should now measure 3 in × 6.4 in (7.6 × 16.3 cm).
Shaping the arched top:
- Row 30: Ch 1, sc2tog, sc 8, sc2tog, turn. (10 sc)
- Row 31: Ch 1, sc in each st across, turn. (10 sc)
- Row 32: Ch 1, sc2tog, sc 6, sc2tog, turn. (8 sc)
- Row 33: Ch 1, sc2tog, sc 4, sc2tog, turn. (6 sc)
- Row 34: Ch 1, sc2tog, sc 2, sc2tog. (4 sc)
Fasten off and weave in the ends. The shaped section adds 5 rows, about 1.1 in (2.8 cm). The panel is now 3 in × 7.5 in (7.6 × 19.1 cm). It has a straight 4-st top, and the border will round it into a smooth arch.
Choose the neater face of one panel as the front RS.
Appliqués
Eye Circles (make 2, ivory)
Make a magic ring.
- Rnd 1: Ch 1, 6 sc in the ring, sl st to the first sc. (6 sc)
- Rnd 2: Ch 1, inc in each st around, sl st to the first sc. (12 sc)
- Rnd 3: Ch 1, (sc 1, inc) 6 times, sl st to the first sc. (18 sc)
Fasten off and leave a 12 in (30.5 cm) tail. Each circle measures about 1.3 in (3.3 cm) across.
Fix a 6 mm safety eye just inside the center of each circle, offset slightly toward what will be the inner edge. Snap the washer on behind the circle now, before the circle is sewn down.
Lay the two circles side by side so they overlap by 0.25 in (0.6 cm), and whipstitch them where they overlap. The face patch is now about 2.35 in (6 cm) wide.
Belly (make 1, ivory)
Ch 8.
- Rnd 1: Sc in the 2nd ch from the hook, sc 5, 3 sc in the last ch. Rotate and work along the underside of the chain: sc 5, 2 sc in the same ch as the first sc. Sl st to the first sc. (16 sc)
- Rnd 2: Ch 1, inc, sc 5, inc 3 times, sc 5, inc 2 times, sl st to the first sc. (22 sc)
- Rnd 3: Ch 1, sc 1, inc, sc 5, (sc 1, inc) 3 times, sc 5, (sc 1, inc) 2 times, sl st to the first sc. (28 sc)
- Rnd 4: Ch 1, sc 2, inc, sc 5, (sc 2, inc) 3 times, sc 5, (sc 2, inc) 2 times, sl st to the first sc. (34 sc)
Fasten off and leave a 16 in (40.6 cm) tail. The oval measures about 2 in × 3.5 in (5.1 × 8.9 cm).
Beak (make 1, orange)
Make a magic ring. Ch 1, then work into the ring: sc, hdc, dc, ch 1, dc, hdc, sc.
Pull the ring tight so the stitches close into a small teardrop with the ch-1 as its point. Sl st to the first sc and fasten off, leaving an 8 in (20.3 cm) tail. The beak is about 0.5 in (1.3 cm) wide.
Scarf (red)
Band (make 1): Ch 16.
– Row 1: Sc in the 2nd ch from the hook and in each ch across, turn. (15 sc)
– Rows 2–3: Ch 1, sc 15, turn.
Fasten off. The band measures 3.75 in × 0.7 in (9.5 × 1.8 cm).
Tails (make 2): Ch 9.
– Rows 1–2: Sc in each st across (8 sc), turning after each row.
Fasten off. Each tail measures 2 in × 0.45 in (5.1 × 1.1 cm).
Knot (make 1): Ch 5.
– Rows 1–3: Sc in each st across (4 sc), turning after each row.
Fasten off and leave a 10 in (25.4 cm) tail. The knot measures 1 in × 0.7 in (2.5 × 1.8 cm).
Fringe: Cut 6 strands of red, each 1.5 in (3.8 cm) long. Knot 3 strands through the bottom row of each tail and trim the fringe to 0.5 in (1.3 cm).
Make All Pieces
Per holder:
– Black: 2 panels
– Ivory: 2 eye circles, 1 belly
– Orange: 1 beak
– Red: 1 band, 2 tails, 1 knot, 6 fringe strands
For the set of 2: 4 panels, 4 eye circles, 2 bellies, 2 beaks, 2 bands, 4 tails, 2 knots and 12 fringe strands.
Front panel layout (measured up from the bottom edge of the bordered holder):
 8.0 in  ┌───arch top───┐   black head, open pocket mouth
         │   (  o  o  )  │   face patch 4.85–6.15 in, beak centered
         │      ▼        │   on the overlap seam
 4.95 in │═══════════════│   scarf band 4.25–4.95 in
         │      ║║       │   knot + 2 tails at center
         │   (  belly )  │   belly 0.5–4.0 in, centered
         │   (        )  │
 0.0 in  └───────────────┘
Assembly order:
- Pin the belly to the unbordered front panel, centered, with its bottom 0.25 in (0.6 cm) above the bottom edge (0.5 in / 1.3 cm on the finished holder). Whipstitch it down through its outer loops.
- Pin the face patch with its lower edge 4.6 in (11.7 cm) above the panel’s bottom edge, and sew it down.
- Sew the beak point-down over the overlap seam, between the eyes.
- Sew the band across the panel so it just covers the lower edge of the face patch. Let 0.125 in (0.3 cm) of each end hang past the side edges for now.
- Tack both tails just right of center. Wrap the knot around their tops and the band, then sew the knot closed at the back.
Sew only through the front panel, never into the back panel.
Joining
Place the panels WS together with the decorated front facing you. Tuck the band ends so they sit flush with the side edges. They will be caught in the seam.
Joining pass (sc seam through both layers):
Join black with a sc through both layers at the top of Row 29 on the left side.
- Left side: Work 1 sc in each row end down to Row 1. (29 sc, including the join)
- Bottom: Work 3 sc in the first foundation st, sc in each of the next 10 sts, then 3 sc in the last foundation st. (16 sc)
- Right side: Work 1 sc in each row end up to Row 29. (29 sc)
Joining pass total: 74 sc.
Stitch-to-stitch logic: Each row end on the front matches the same row end on the back, and each foundation stitch matches its twin. Both panels came from identical rows, so the layers line up exactly with no easing needed.
Tension: Keep the seam stitches the same height as your fabric. If they’re too tight, the sides pucker and the pocket curls. If they’re too loose, the bottom edge flares.
Size checkpoint: The joined width at the bottom should be 3.5 in (8.9 cm).
Border
Border gauge: One round of sc adds 0.25 in (0.6 cm) on every edge it covers.
The joining pass you just worked is already the border along the sides and bottom. Now finish the open arch.
Front arch: Don’t turn. Continue working through the front panel only.
- Work 1 sc in each of the 5 row ends (Rows 30–34) up the right shaping.
- Across the 4 top sts, work 2 sc in the first, sc 2, then 2 sc in the last. (6 sc)
- Work 1 sc in each of the 5 row ends down the left shaping. (16 sc for the arch)
- Sl st to the first sc of the joining pass.
Round total: 74 + 16 = 90 sc.
Back arch: Turn the holder so the back faces you. Working through the back panel only:
- Work 5 sc up the shaping.
- Work 6 sc across the top, increasing as for the front arch.
- Work 5 sc down the shaping. (16 sc)
- Sl st into the last sc of the joining pass, at the top of the right side.
Fasten off and weave in the end. Grand total: 74 + 16 + 16 = 106 sc.
Why the math works:
– Sides: The 29 straight rows get 29 sc, one per row end. That matches the row gauge of 4.5 per in, so the sides lie flat.
– Bottom: The 12 foundation sts plus 4 extra corner sc (10 + 3 + 3 = 16) turn the corners without cupping.
– Arch: On each layer the 4-st top gets 2 increases (4 worked + 2 added = 6), plus 5 row ends on each side, for 16 sc. Those increases round the top into a smooth curve.
– Width: 3 in panel + 0.25 in border on each side = 3.5 in (8.9 cm).
– Height: 7.5 in panel + 0.25 in at the bottom + 0.25 in at the top = 8 in (20.3 cm).
Final Blocking
- Lightly mist the holder with water. Don’t soak it, because the safety eye washers can rust.
- Lay it flat with the front facing up.
- Pin it to 3.5 in × 8 in (8.9 × 20.3 cm), keeping the sides straight and parallel.
- Shape the arch into an even curve with your fingers.
- Straighten the scarf tails and comb out the fringe.
- Let it dry completely, at least 4 hours.
- Slide a fork and knife in to check the fit.
Final Quality-Control Checklist
- Each panel has 29 straight rows and 5 shaping rows, ending with 4 sts.
- The joining pass has 74 sc and each arch has 16 sc.
- The finished holder measures 3.5 in × 8 in (8.9 × 20.3 cm).
- The eyes are level and the beak is centered on the overlap seam.
- The belly is centered and its bottom sits 0.5 in (1.3 cm) above the bottom edge.
- The scarf band covers the lower edge of the face patch and both ends are caught in the side seams.
- No appliqué stitches go through the back panel, so the pocket opens freely.
- All ends are woven in on the inside of the pocket.
Troubleshooting
- Sides pucker: The seam is too tight. Redo it with a looser hand, or go up one hook size for the joining pass only.
- Arch looks pointed: You probably skipped the top increases. Check for 6 sc across the 4 top sts.
- Belly ripples: The increases are drifting off the ends. Line them up with the curved ends of the oval each round.
- Face patch sits crooked: Unpin it, measure 4.6 in (11.7 cm) from the panel’s bottom edge on both sides, and pin it again.
- Cutlery won’t go in: Appliqué stitches have caught the back panel. Snip and re-sew them through the front layer only.
- Light shows through the fabric: Your gauge is loose. Remake the panels with a smaller hook.
Care
Hand wash in cool water with mild soap, press out the water in a towel, and dry flat. Don’t tumble dry, so the appliqués stay flat and the eyes stay secure.
Final Notes
Here is the full measurement chain. With a gauge of 16 sc × 18 rows = 4 in (10.2 cm), 12 sts and 34 rows make a 3 in × 7.5 in (7.6 × 19.1 cm) panel. Two panels joined with a 74-sc seam and edged with two 16-sc arches finish at 3.5 in × 8 in (8.9 × 20.3 cm). If you check each stage against these numbers, every penguin in your set will match. Happy crocheting!