

The Lucky Lattice Shamrock Panel is a light, lacy rectangle made of eight joined square motifs. Each square has a plump three-leaf shamrock in the center, surrounded by an open web of chain loops. That web is closed off by a crisp single crochet frame.
The palette is soft and fresh. Mint green is used for all of the mesh, the joins, and the border. Shamrocks alternate between peach and mint in a checkerboard, so each peach leaf cluster sits next to a mint one. The result looks springlike and a little vintage.
This pattern uses US crochet terms. The finished panel measures 8 x 15 in (20.3 x 38.1 cm) after blocking. Each motif is 3.5 in (8.9 cm) square.
You’ll make each motif from the center outward. First you crochet the shamrock in its own color, then you work four mint rounds to build the mesh and square it off. After that, you whipstitch the eight motifs into a 2 x 4 layout and finish with a three-round picot border.
Finished Size and Construction
- Finished size: 8 x 15 in (20.3 x 38.1 cm)
- Skill level: Intermediate
- Terminology: US crochet terms
- Yarn weight: DK (#3 light), cotton or cotton blend
- Hook: 3.5 mm (E-4)
- Number of pieces: 8 square motifs
- Layout: 2 motifs wide x 4 motifs tall
- Motif size: 3.5 in (8.9 cm) square
- Size before border: 7 x 14 in (17.8 x 35.6 cm)
- Border depth: 0.5 in (1.3 cm) on each side
Materials
Mercerized or matte DK cotton is the best choice. It shows the heart-shaped leaves clearly and blocks flat. These quantities assume yarn that runs about 230 m per 100 g.
- Color MC, Mint Green: 90 g (about 207 m). This covers 4 shamrocks, all of the mesh, the joins, and the border.
- Color CC, Peach: 20 g (about 46 m). This covers 4 shamrocks.
Both quantities already include a safety margin of about 15%.
Tools:
– 3.5 mm (E-4) crochet hook
– Tapestry needle
– Stitch markers (4)
– Scissors
– Blocking mat, rust-proof pins, and a spray bottle
– Ruler or tape measure
Abbreviations (US Terms)
- ch – chain
- sl st – slip stitch
- sc – single crochet
- hdc – half double crochet
- dc – double crochet
- sp(s) – space(s)
- st(s) – stitch(es)
- rnd(s) – round(s)
- MC / CC – main color / contrast color
Special stitch – Picot: Ch 3, then sl st into the top of the last sc worked.
Special stitch – Leaf: Ch 2, then work (3 dc, ch 2, sl st, ch 2, 3 dc) all in the next sc. Ch 2 and sl st in the following sc. The sl st in the middle of the leaf pulls the two 3-dc lobes into a heart with a notch on top.
Gauge and Checkpoints
Make one complete motif before you start the others. Check it at each stage:
- After Rnd 2 (shamrock): 2 in (5.1 cm) from the tip of one leaf to the tip of the opposite leaf.
- After Rnd 3: 2.75 in (7.0 cm) across.
- After Rnd 5: 3.25 in (8.3 cm) square, measured side to side.
- After Rnd 6: 3.5 in (8.9 cm) square from corner space to corner space. Each side has 19 sc, which works out to about 5.4 sc per inch (2.5 cm) along the frame.
If your motif is bigger than 3.5 in (8.9 cm), go down to a 3.25 mm (D-3) hook. If it’s smaller than 3.25 in (8.3 cm), go up to a 3.75 mm (F-5) hook. Getting the size right on the first motif keeps every later measurement accurate.
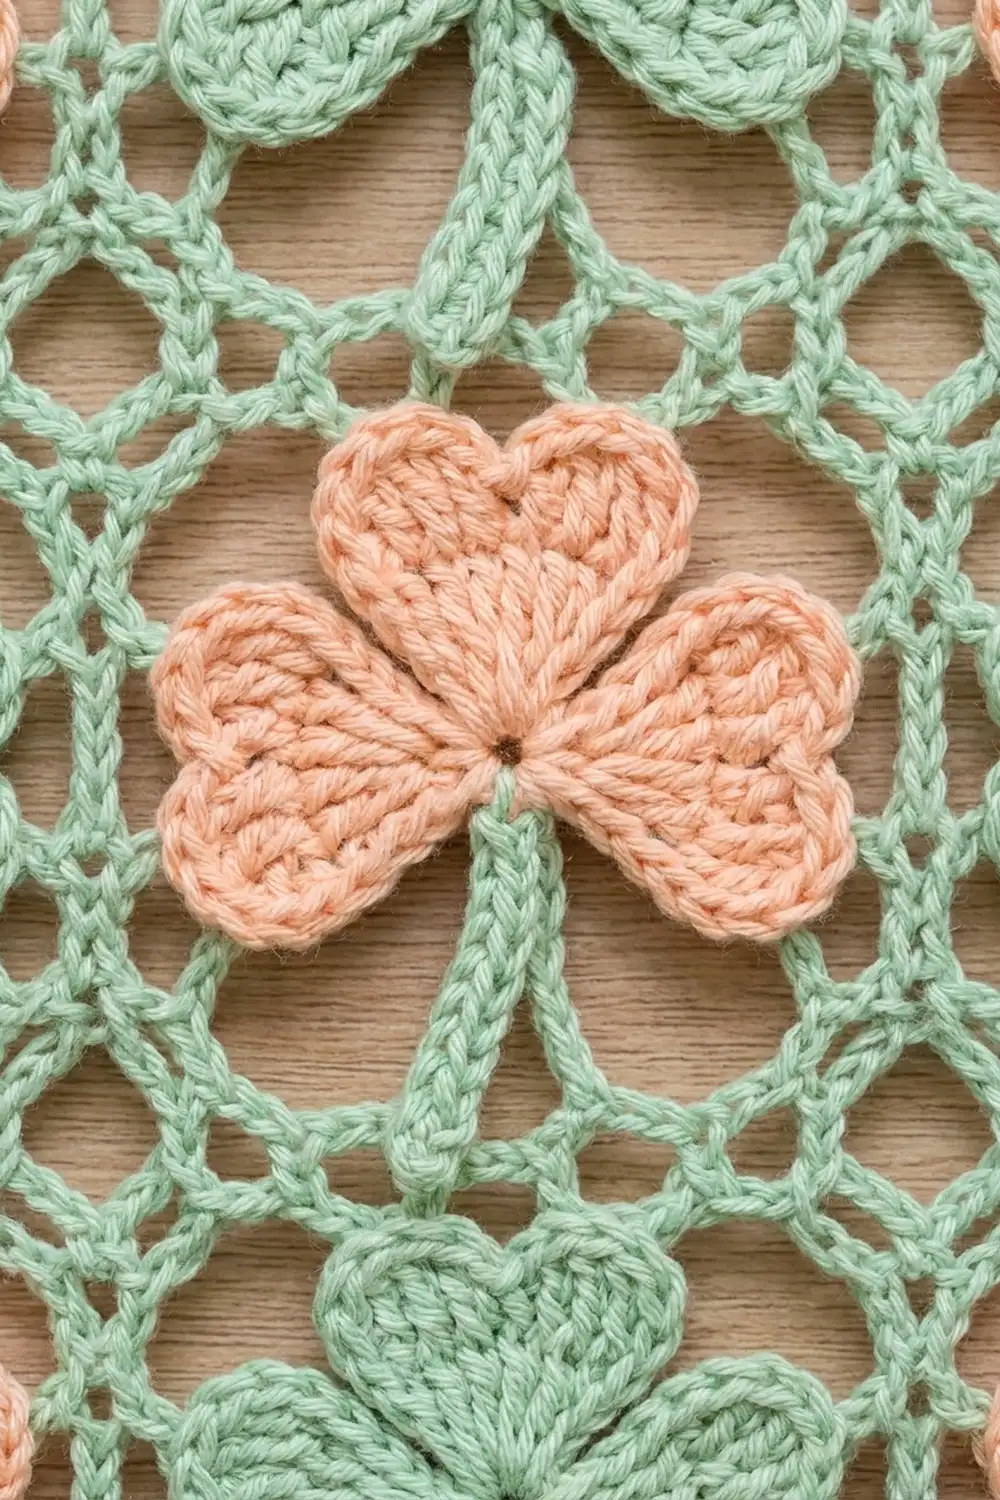
Motif (Make 8)
Make 4 motifs with a CC (peach) shamrock and 4 with an MC (mint) shamrock. Rnds 3 to 6 are always worked in MC.
Shamrock
Rnd 1 (shamrock color): Make a magic ring, ch 1, and work 8 sc in the ring. Join with sl st to the first sc. (8 sc)
Rnd 2: Work a Leaf into sc 1 and sc 2. Work a Leaf into sc 3 and sc 4. Work a Leaf into sc 5 and sc 6. (3 leaves, 18 dc total, 6 lobes)
Stem: Sl st in sc 7 and ch 11. Sl st in the 2nd ch from the hook and in each of the next 9 ch (10 sl st). Sl st in sc 8, then sl st in the first sc of Rnd 1. Fasten off and leave a 6 in (15.2 cm) tail. Pull the ring tight.
The stem sits between leaf 3 and leaf 1. The middle (2nd) dc of each lobe will be an anchor point for the mesh.
Mesh and Frame (MC)
Rnd 3: With MC, join with sc in the middle dc of the second lobe of leaf 3. That’s the lobe right before the stem. Ch 8 and carry the chain behind the stem. Sc in the middle dc of the first lobe of leaf 1. Ch 6, sc in the middle dc of the next lobe. Repeat 4 more times. Ch 6 and join with sl st to the first sc. (6 sc, 1 ch-8 sp, 5 ch-6 sps)
The ch-8 sp is the first space of this rnd, and the stem lies across it.
Rnd 4: Sl st into the first ch-8 sp. Ch 1, then work (sc, ch 5, sc) in the same sp and ch 5. Work (sc, ch 5, sc) in the next ch-6 sp and ch 5. Repeat 4 more times. Join to the first sc. (12 ch-5 sps: 6 inside the Rnd 3 spaces and 6 connecting loops)
Rnd 5 (squaring rnd): Sl st in the first 2 ch to reach the first ch-5 sp, which is the loop over the stem. Ch 1 and work (sc, ch 7, sc) in the same sp for the corner. [Ch 5, sc in the next ch-5 sp] twice, then ch 5. Work (sc, ch 7, sc) in the next ch-5 sp, [ch 5, sc in the next ch-5 sp] twice, then ch 5. Repeat 2 more times. Join to the first sc. (4 corner ch-7 sps and 12 ch-5 sps, with 3 per side)
This rnd puts the stem in a corner, so the shamrock sits on a slight diagonal with its stem pointing to a lower corner.
Rnd 6 (frame): Sl st in the next 3 ch to center yourself in the corner ch-7 sp, and ch 1. Work (2 sc, ch 2, 2 sc) in the corner sp, then 5 sc in each of the next 3 ch-5 sps. Repeat 3 more times. Join and fasten off. (76 sc total: 19 sc per side between the corner ch-2 sps, worked as 2 + 15 + 2)
In this pattern, the corner ch-2 spaces don’t count as stitches. “19 sc per side” means only the sc between two corner spaces.
Finishing each motif: Use the shamrock tail to tack the stem tip to the Rnd 4 loop just under it. Weave in all ends on the wrong side.
Make All Pieces
- Peach shamrock motifs: 4
- Mint shamrock motifs: 4
Layout grid (P = peach shamrock, M = mint shamrock), with all stems pointing toward the lower right:
Row 1:  P  M
Row 2:  M  P
Row 3:  P  M
Row 4:  M  P
Before you join, lightly steam or wet-block each motif to 3.5 in (8.9 cm) square.
Joining
Method: Flat whipstitch through the outer loops, using MC and a tapestry needle.
Stitch-to-stitch logic: Place two motifs side by side with the right sides facing up. Line up the corner ch-2 sp with the corner ch-2 sp. Begin with 1 stitch through the matching corner chains. Then work 1 stitch through the outer loop of each matching sc pair, 19 in total, and finish with 1 stitch through the far corner chains. Because every motif has exactly 19 sc per side, the edges match one to one.
Order: Join the motifs into two columns of 4, then join the two columns with one long seam. Pass the needle firmly through each four-way intersection so the corners don’t gap.
Tension: Make each stitch snug but not tight. A seam pulled too tight will pucker the frames. A loose seam makes a visible ridge.
Checkpoint: The joined panel should measure 7 x 14 in (17.8 x 35.6 cm). Lay it flat and measure before you start the border.
Border
Border gauge: The border keeps the frame gauge, about 5.4 sc per inch (2.5 cm). Each side starts with exactly 19 sc per motif.
Rnd 1: Join MC with sl st in any outer corner ch-2 sp, then ch 1. Work (sc, ch 2, sc) in each of the 4 outer corner sps. Along the sides, sc in each sc. Don’t work into the corner spaces at seams, because the join has already closed them.
- Long sides: 4 x 19 = 76 sc, plus 1 corner sc at each end = 78 sc between corner ch-2 sps.
- Short sides: 2 x 19 = 38 sc, plus 1 corner sc at each end = 40 sc between corner ch-2 sps.
- Total: 236 sc and 4 corner ch-2 sps.
Rnd 2 (loop rnd): Sl st into the corner sp. Work (sc, ch 3, sc) in the corner sp and ch 3. Skip the first sc of the side and sc in the next sc. [Ch 3, skip 1 sc, sc in the next sc] to the last sc of the side, ending with sc in that last sc. Ch 3. Repeat around and join.
- Long sides: sc lands in sc 2, 4, 6 … 78, which is 39 points. That gives 38 loops between them, plus 1 loop at each end = 40 ch-3 loops.
- Short sides: sc lands in sc 2, 4 … 40, which is 20 points. That gives 19 loops, plus 2 end loops = 21 ch-3 loops.
- Also 4 corner ch-3 sps.
Rnd 3 (picot rnd): Sl st into the first corner ch-3 sp and ch 1. In each corner sp, work (2 sc, picot, 2 sc). In each side loop, work (sc, picot, sc). On the top short side only, work (sc, ch 7, sc) in the 11th loop instead. That’s the center loop, with 10 loops on each side of it, and it forms the pointed hanging loop. Join and fasten off.
- Long sides: 40 picots each.
- Bottom short side: 21 picots.
- Top short side: 20 picots and 1 ch-7 point.
Why the math works: Every count on a side starts from 19 sc per motif. Rnd 2 always uses 2 sc per loop, and both side totals (78 and 40) are even, so the loops fall evenly and end exactly at the corners. The short sides have an odd number of loops (21), so there’s a true center loop for the point.
Final Blocking
- Soak the panel in cool water for 10 minutes and press out the water gently in a towel. Don’t wring it.
- Lay it right side up on a blocking mat.
- Pin the four corners to an 8 x 15 in (20.3 x 38.1 cm) rectangle.
- Pin along each long side every 1.5 in (3.8 cm), keeping the edges straight.
- Pin out each picot and stretch the top ch-7 point into a neat triangle.
- Shape each shamrock leaf with your fingers so the heart notches stand out.
- Leave it to dry completely, which usually takes 24 hours.
Final Quality-Control Checklist
- The panel measures 8 x 15 in (20.3 x 38.1 cm).
- Each motif measures 3.5 in (8.9 cm) square.
- There are 4 peach and 4 mint shamrocks, arranged in a checkerboard.
- All stems point the same way and are tacked down.
- Every seam lines up 19 sc pairs, with one extra stitch through the corner chains at each end.
- Border Rnd 1 has 78 sc on each long side and 40 sc on each short side.
- There are 40 picots on each long side and 21 loops on each short side.
- The ch-7 point is centered on the top edge.
- All ends are woven in and invisible from the front.
Troubleshooting
- The leaves look like fans instead of hearts. Make sure the center sl st of each Leaf goes into the same sc as the dc, and pull it snug.
- The mesh ruffles. Your chains are too loose. Go down one hook size for Rnds 3 to 5 only.
- The motif cups. Your chains are too tight. Go up one hook size for Rnds 3 to 5.
- The stem flips up. Tack it again at its tip and halfway along.
- The seams gap at intersections. Make a second pass through the four meeting corners.
- The border loops don’t land on the last sc. Recount Rnd 1. Each side needs exactly 78 or 40 sc.
- The edges wave after blocking. Re-wet the panel and pin it more closely, every 1 in (2.5 cm).
Care
Hand wash in cool water with mild soap and dry flat. Lightly steam it to refresh the shape, and never iron directly on the shamrocks.

Final Notes
The measurement chain is simple. Each shamrock is 2 in (5.1 cm) and grows to a 3.5 in (8.9 cm) motif with 19 sc per side. Eight motifs joined 2 x 4 make a 7 x 14 in (17.8 x 35.6 cm) panel. A 0.5 in (1.3 cm) border brings it to 8 x 15 in (20.3 x 38.1 cm). If you check each stage as you go, the panel will come out square and flat.
Happy crocheting!