

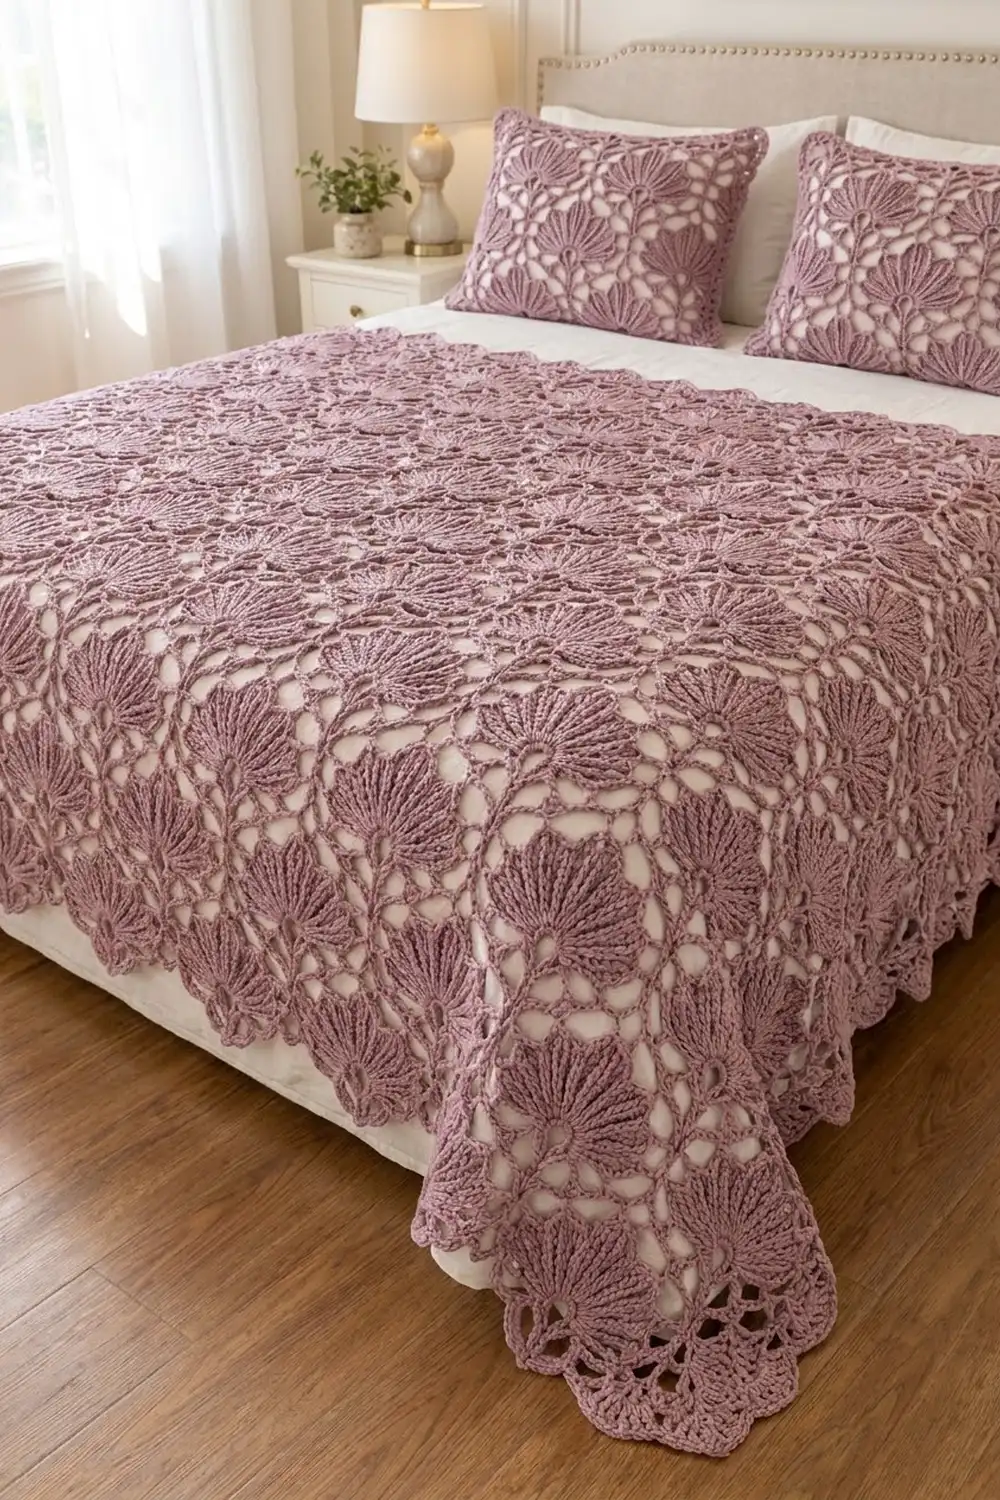
This bedspread is built from rows of ribbed fans. Each fan opens from a tiny eyelet and floats in an open chain lattice. Over pale bedding, the lace reads as a soft, vintage pattern of shells with plenty of light showing through.
The sample is worked in one color, a dusty mauve. With a single shade, the texture does all the work: raised post-stitch ribs on every petal, rounded scallop tips, and a crisp dc frame that turns each fan into a square.
All terms are US crochet terms. After blocking, the bedspread measures 84 x 102 in (213.4 x 259.1 cm).
You’ll make 99 identical motifs, each 9 in (22.9 cm) square. Each motif starts as a fan worked in rows and is squared off with three rounds. The motifs are joined in a 9 x 11 grid with a flat slip-stitch seam, and a three-round shell border finishes the edge.
Finished Size and Construction
- Finished size: 84 x 102 in (213.4 x 259.1 cm)
- Skill level: Intermediate
- Terminology: US
- Yarn weight: Worsted (#4)
- Hook: 5.0 mm (H-8)
- Number of pieces: 99 square motifs
- Layout: 9 motifs wide x 11 motifs long
- Motif size: 9 x 9 in (22.9 x 22.9 cm)
- Size before border: 81 x 99 in (205.7 x 251.5 cm)
- Border depth: 1.5 in (3.8 cm) on each side
Materials
Choose a smooth worsted-weight cotton or cotton blend with good stitch definition, so the ribs and lattice chains stay crisp. Avoid fuzzy yarns, because they blur the eyelets.
- Dusty Mauve: 1,750 g (about 3,500 m), based on a yarn with about 200 m per 100 g
Each motif uses about 13 g (26 m). Joining and the border together use about 220 g (440 m). The total includes a margin of about 15% for gauge differences and your test motif. Buy all of the yarn from one dye lot.
Tools
- 5.0 mm (H-8) crochet hook
- Tapestry needle
- Locking stitch markers
- Blocking mats, rust-proof pins, and a spray bottle
- Measuring tape
Abbreviations (US Terms)
- ch: chain
- sl st: slip stitch
- sc: single crochet
- dc: double crochet
- tr: treble crochet
- dtr: double treble (yarn over 3 times, then [yarn over, pull through 2] 4 times)
- FPdc / BPdc: front post / back post double crochet
- sp(s): space(s)
- st(s): stitch(es)
- RS / WS: right side / wrong side
- rep: repeat
Corner ring: ch 5, then sl st in the 5th ch from the hook. This makes a small closed loop at the end of a chain.
Gauge and Checkpoints
Gauge: 14 dc and 8 dc rows = 4 in (10.2 cm). The motif is the real gauge test, so make one complete motif and block it before you make the rest.
Checkpoints
- After Row 6: the fan measures 6.75 in (17.1 cm) across the base and 3.5 in (8.9 cm) from the eyelet to the tallest tip.
- After Rnd 8: the motif is about 8 in (20.3 cm) square, unblocked.
- After Rnd 9, blocked: 9 in (22.9 cm) square, with 31 dc per side.
If your blocked motif is larger than 9.25 in (23.5 cm), go down a hook size. If it is smaller than 8.75 in (22.2 cm), go up a hook size. An error of only 0.25 in (0.6 cm) per motif adds up to 2.25 in (5.7 cm) across 9 motifs.
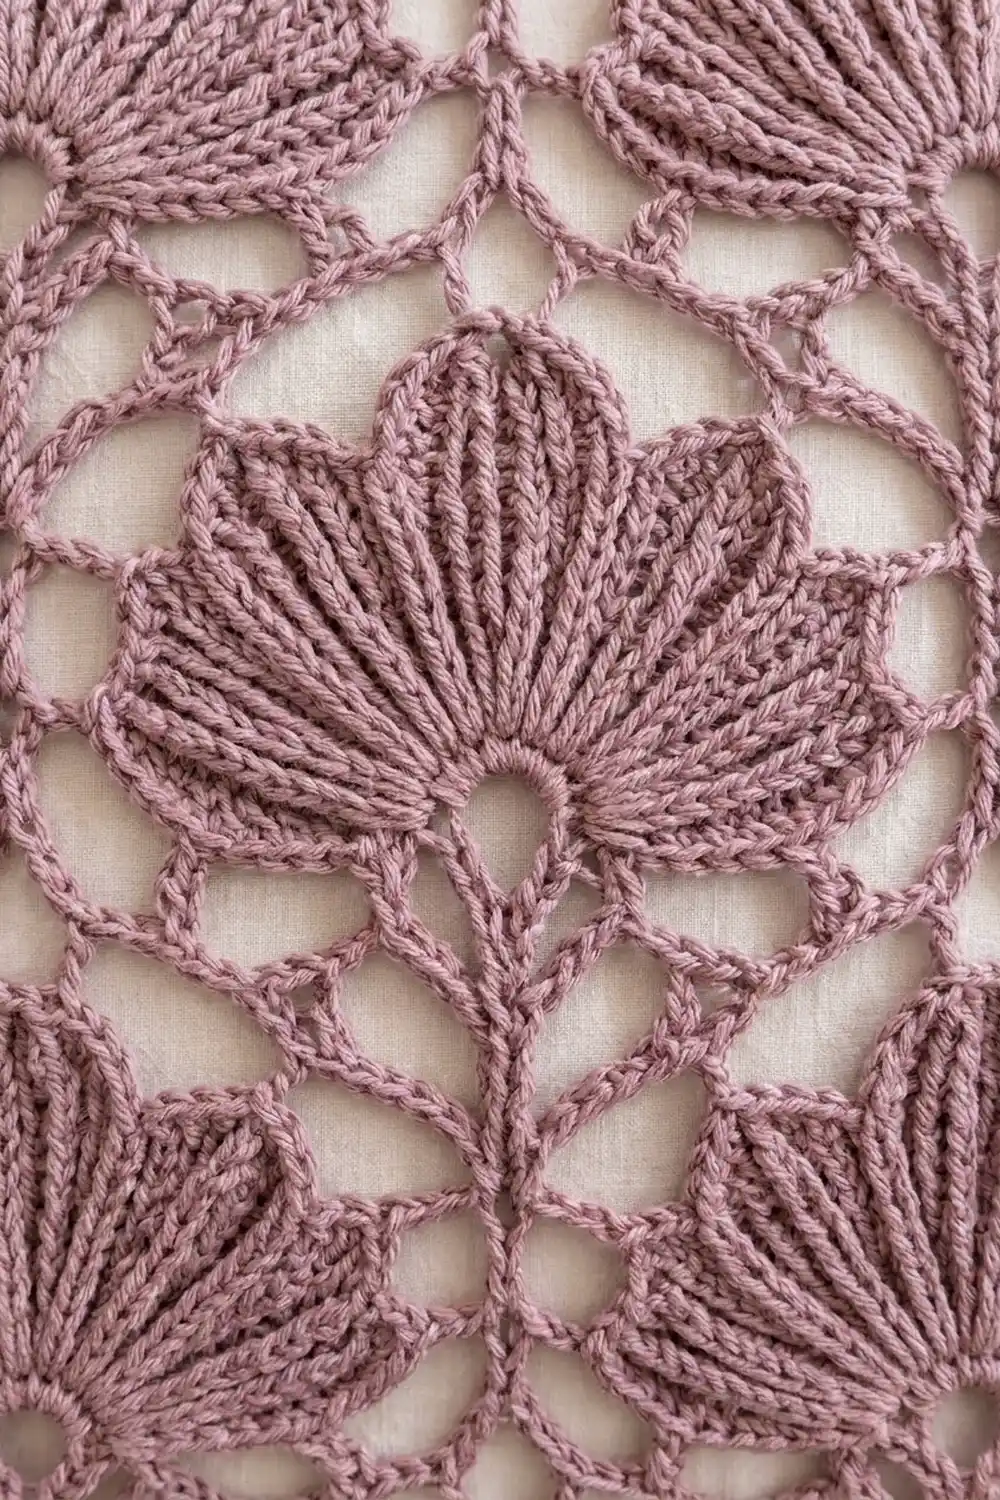
Motif
Fan (Worked in Rows)
Ch 5, then sl st in the first ch to form a ring. You’ll work only into the top half of the ring. The lower half stays open and forms the eyelet.
Row 1 (RS): Ch 2 (doesn’t count as a st here or in any later row). Work 6 dc in the ring. Turn. (6 dc)
Row 2 (WS): Ch 2, then work 2 dc in each st across. Turn. (12 dc)
Row 3 (RS): Ch 2, dc in each of the next 2 sts, ch 1, dc in each of the next 2 sts; rep from * 4 more times. Turn. (12 dc in 6 petals of 2, with 5 ch-1 sps)*
Row 4 (WS): Ch 2, [BPdc around the next st, dc in the top of the same st, BPdc around the next st], ch 1, skip the ch-1 sp; rep from * 4 more times, then work the bracketed part once more. Turn. (18 sts in 6 petals of 3, with 5 ch-1 sps)*
Row 5 (RS): Ch 2, [FPdc around each of the next 2 sts, FPdc around the next st, dc in the top of the same st], ch 1, skip the ch-1 sp; rep from * 4 more times, then work the bracketed part once more. Turn. (24 sts in 6 petals of 4, with 5 ch-1 sps)*
The post stitches stack up into raised ribs on the RS. The plain dc in each petal starts one new rib column per row.
Row 6 (WS, scallop crown): Ch 1, [sc in the next st, (dc, tr) in the next st, (tr, dc) in the next st, sc in the next st], sl st in the ch-1 sp; rep from * 4 more times, then work the bracketed part once more. Fasten off. (36 petal sts and 5 sl sts)*
Some reference points for the next rounds:
- Tip: the gap between a petal’s two tr.
- Valley: the sl st between two petals.
- Base end: the last sc at either end of Row 6.
Lattice and Squaring Rounds
Turn the fan so the RS faces you and the crown points up. Number the petals 1 to 6 from right to left. The valleys between them are V1 to V5.
Rnd 7 (RS): Join with a sl st in the open lower half of the ring.
- Stem: Ch 11, then make a corner ring. This is the bottom-middle (BM) ring.
- Bottom right and right side: Ch 12, then make a corner ring for the bottom-right (BR) corner. Ch 12, then sc in the right base end.
- Crown:
- Ch 5, sc in the petal 1 tip. Ch 5, sc in V1. Ch 5, (sc, ch 3, sc) in the petal 2 tip.
- Ch 5, sc in V2. Ch 5, sc in the petal 3 tip. Ch 5, sc in V3. Ch 5, sc in the petal 4 tip. Ch 5, sc in V4.
- Ch 5, (sc, ch 3, sc) in the petal 5 tip. Ch 5, sc in V5. Ch 5, sc in the petal 6 tip. Ch 5, sc in the left base end.
- Left side and bottom left: Ch 12, then make a corner ring for the bottom-left (BL) corner. Ch 12, then sl st in the BM ring.
Fasten off. (12 ch-5 crown sps, 2 ch-3 corner loops, 4 ch-12 sps, and 3 corner rings)
Rnd 8: Join with a sc in the BR ring, then ch 5 and sc in the same ring.
- Right side: Ch 5, sc in the next ch-12 sp. Ch 5, dc in the next ch-5 sp. [Ch 5, tr in the next ch-5 sp] 2 times.
- Top-right corner: Ch 5, then (dtr, ch 5, dtr) in the ch-3 loop.
- Top side: Ch 5, tr in the next sp. Ch 5, skip the next sp, sc in the following sp. Ch 5, sc in the next sp. Ch 5, skip the next sp, tr in the following sp.
- Top-left corner: Ch 5, then (dtr, ch 5, dtr) in the ch-3 loop.
- Left side: [Ch 5, tr in the next ch-5 sp] 2 times. Ch 5, dc in the next ch-5 sp. Ch 5, sc in the next ch-12 sp.
- Bottom-left corner: Ch 5, then (sc, ch 5, sc) in the BL ring.
- Bottom side: Ch 5, sc in the next ch-12 sp. Ch 5, (sc, ch 5, sc) in the BM ring. Ch 5, sc in the next ch-12 sp. Ch 5, sl st in the first sc.
(24 sts and 24 ch-5 sps: 5 sps on each side between the corners, plus 4 corner sps)
The petal tips sit inside the square’s diagonal. That’s why the top corners use dtr: the taller stitches reach past the tips to the corner.
Rnd 9: Sl st in the next corner ch-5 sp. Ch 3 (counts as dc), then work (2 dc, ch 2, 3 dc) in the same sp. Work 5 dc in each of the next 5 ch-5 sps, then (3 dc, ch 2, 3 dc) in the corner sp; rep from * 2 more times. Work 5 dc in each of the last 5 sps, then join to the top of the ch-3. Fasten off. (124 dc and 4 ch-2 corner sps)*
Each side has 3 + 25 + 3 = 31 dc. That count includes the corner dc on both ends but not the ch-2.
Make All Pieces
Make 99 motifs in Dusty Mauve, using about 1,290 g (2,580 m). Weave in the ends as you go, and steam-block each motif to 9 in (22.9 cm).
Layout (M = motif; the crown of every fan points toward the head of the bed):
Head of bed
M M M M M M M M M   row 1
M M M M M M M M M   row 2
...                 rows 3-10
M M M M M M M M M   row 11
Foot of bed
Keep every fan pointing the same way so the rows of fans stay straight.
Joining
Use a flat slip-stitch seam:
- Hold two motifs side by side with the RS up.
- Working through the back loops of both edges, sl st from one corner ch-2 sp to the next.
- Match all 31 dc on one side to the 31 dc on the other, stitch for stitch.
- Finish with a sl st through both corner ch-2 sps.
First join the motifs into 11 horizontal strips of 9. Then join the strips along their long edges, lining up the seams. Where four corners meet, work one sl st through all of them to secure the intersection.
Keep your sl sts as loose as the dc they sit on. If they pull tight, switch to a 5.5 mm hook for seaming. The seam doesn’t add any stitches.
Size checkpoint: the joined panel measures 81 x 99 in (205.7 x 251.5 cm).
Border
Border gauge: Use the same 5.0 mm hook. The border works 1 st into each motif dc, so it keeps the panel’s gauge of 14 sts = 4 in (10.2 cm).
Starting count: Each width side has 9 x 31 = 279 dc. Each length side has 11 x 31 = 341 dc. Skip the ch-2 sps at the seams. Work only into the ch-2 sps at the 4 outer corners of the panel.
Rnd 1 (RS): Join in any outer corner ch-2 sp. Work (sc, ch 2, sc) in each outer corner sp and sc in each dc. (Width sides: 279 + 2 = 281 sc. Length sides: 341 + 2 = 343 sc. Both counts include the corner sc.)
Rnd 2: Ch 3 (counts as dc). Work dc in each sc and (dc, ch 2, dc) in each corner sp. (Width sides: 281 + 2 = 283 dc. Length sides: 343 + 2 = 345 dc.)
Rnd 3 (shell scallops): Work 7 dc in each corner ch-2 sp to make a corner fan. Between the corners:
- Width sides (283 sts): Skip 1 st, sc in the next st. Skip 1 st, 5 dc in the next st, skip 1 st, sc in the next st; rep from * 69 more times. Skip the last st. (1 + 1 + 280 + 1 = 283, for 70 shells)*
- Length sides (345 sts): Sc in the first st. Skip 1 st, 5 dc in the next st, skip 1 st, sc in the next st; rep from * 85 more times. (1 + 344 = 345, for 86 shells)*
Join and fasten off.
Why the math works: Each shell repeat uses 4 sts. On the width sides, 283 = 4 x 70 + 3, so those edges start and end with a skipped st. On the length sides, 345 = 4 x 86 + 1, so those edges start and end with a sc. Both layouts are symmetrical, and no stitch is left over.
Final Blocking
- Soak the bedspread for 20 minutes in cool water with a little wool wash.
- Press out the water without wringing, then roll the bedspread in towels to remove more.
- Lay it flat on blocking mats or on a sheet over a clean carpet.
- Pin the outer corners to 84 x 102 in (213.4 x 259.1 cm).
- Pin each seam line straight, then pin the tip of every border shell.
- Use your fingers to open each fan’s petals and eyelet so the ribs lie flat.
- Let it dry completely before you remove the pins.
Final Quality-Control Checklist
- Every motif has 31 dc per side and four ch-2 corners.
- Every fan points toward the head of the bed.
- No stitches were added at the seams, and the four-way intersections are secure.
- Border Rnd 1 has 281 sts on each width side and 343 on each length side.
- The shells end evenly at every corner fan.
- All ends are woven in along the dc columns.
- The blocked size is 84 x 102 in (213.4 x 259.1 cm).
Troubleshooting
- The fan ruffles: Your dc rows are too short for the increases. Go up a hook size for the fan only.
- The fan cups: Pull each post stitch up to its full height.
- The top corners pull in: Check that you used dtr, not tr, in the corner groups.
- The stem sags: Chain more firmly, or work ch 10 instead of ch 11.
- The seams pucker: Loosen your sl sts or use a larger hook for joining.
- The border ruffles: Check that you skipped the ch-2 sps at the seams.
Care
Hand wash in cold water, or machine wash on a gentle cycle in a mesh bag, then dry flat. Don’t hang the bedspread while it’s wet, or the lace will stretch.
Final Notes
Here is the full measurement chain:
- A 6.75 in (17.1 cm) fan grows into a 9 in (22.9 cm) motif with 31 dc per side.
- Nine motifs give 279 border sts across 81 in (205.7 cm).
- Eleven motifs give 341 border sts down 99 in (251.5 cm).
- The 1.5 in (3.8 cm) border brings the total to 84 x 102 in (213.4 x 259.1 cm).
Check each of these numbers as you go and the bedspread will come out square. The matching shams in the photo use the same motif.
Happy crocheting!