

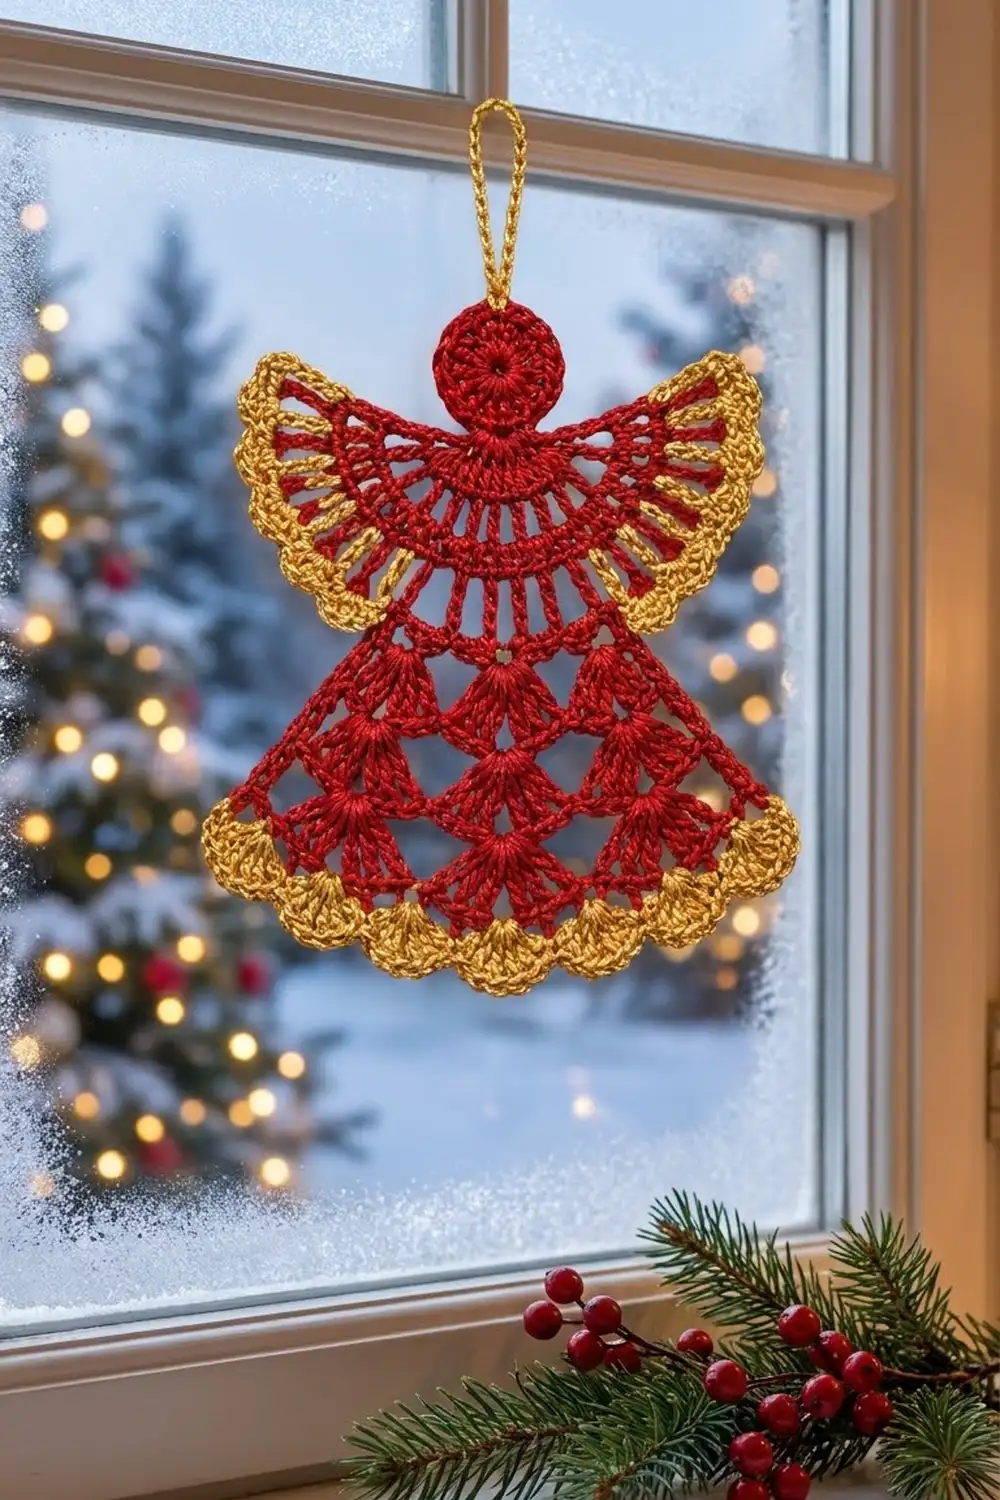
The Golden Herald Angel is a small, flat lace angel made in one piece. It has a round red head and wide fan-shaped wings that open out at shoulder height. The skirt flares out in staggered shells. Gold scallops trim the wing tips and the hem, and a gold chain loop at the top lets it hang.
The colors are classic Christmas: deep red cotton thread for the body and bright metallic gold for the edgings and loop. The style is traditional thread lace. The wings have radiating double crochet lines and the skirt has stacked fans, so the angel looks delicate but holds its shape well after blocking.
This pattern uses US crochet terms. The finished angel is about 4 in (10.2 cm) wide at the hem and 3.6 in (9.1 cm) across the wings. It is 3.5 in (8.9 cm) tall from the top of the head to the hem, or 4.5 in (11.4 cm) with the loop.
The construction is simple:
- Work the head in the round.
- Work the wing yoke in rows around the lower half of the head.
- Work the skirt in rows down from the two center spaces of the yoke, adding one shell per row.
- Add the gold wing edgings, the gold hem border, and the hanging loop.
There is no sewing and no joining.
Finished Size and Construction
- Finished size: 4 in (10.2 cm) wide at the hem x 3.5 in (8.9 cm) tall, plus a 1 in (2.5 cm) loop
- Skill level: Intermediate (thread work, counting into spaces)
- Terminology: US
- Yarn weight: Size 10 crochet thread (lace weight)
- Hook: 1.75 mm steel hook
- Number of pieces: 1, worked continuously
- Layout: Single motif, no joining
- Piece size: Head 1.1 in (2.8 cm) across; wingspan 3.1 in (7.9 cm); skirt hem 3.75 in (9.5 cm)
- Size before border: 3.75 in (9.5 cm) wide at the hem x 3.25 in (8.3 cm) tall
- Border depth: 0.25 in (0.6 cm) on the wings and hem
Materials
For the red, use mercerized cotton thread in size 10. It keeps a crisp shape and blocks flat. For the gold, use a size 10 metallic thread or a gold cotton of the same thickness. If your gold is noticeably thicker, the scallops will crowd. In that case, use a 1.5 mm hook for the gold rows only.
Metallic threads can twist and split. Cut the gold from the ball in lengths of about 40 in (101.6 cm) and let the strand hang free now and then to untwist.
- Red (Color A): 5 g, about 26 m (28 yd)
- Gold (Color B): 3 g, about 15 m (16 yd)
These amounts include a margin of roughly 30 percent for testing gauge and for weaving in tails.
Tools:
- 1.75 mm steel hook
- Tapestry needle with a small eye
- Locking stitch markers (3)
- Sharp scissors
- Ruler or tape measure
- Blocking board or foam mat, rustproof pins
- Spray bottle with water; light spray starch (optional)
Abbreviations (US Terms)
- ch – chain
- sl st – slip stitch
- sc – single crochet
- dc – double crochet
- st(s) – stitch(es)
- sp(s) – space(s)
- beg – beginning
- tch – turning chain
- RS / WS – right side / wrong side
Special stitches:
- Shell: (2 dc, ch 2, 2 dc) in the same stitch or space.
- Scallop: 5 dc in the same stitch.
Gauge and Checkpoints
Gauge is 9 dc and 4 dc rows = 1 in (2.5 cm) with size 10 thread and a 1.75 mm hook. Shell rows are slightly taller, about 0.3 in (0.8 cm) each.
Thread lace is hard to swatch as a square, so make the head first and use it as your gauge test. Measure each stage flat, without stretching:
- Head after Rnd 2: 1.1 in (2.8 cm) across
- Yoke after Row 2: 2.1 in (5.3 cm) from one wing end to the other
- Yoke after Row 4: 3.1 in (7.9 cm) wingspan
- Skirt after Row 2: 2.2 in (5.6 cm) wide
- Skirt after Row 4: 3.75 in (9.5 cm) wide
A difference of up to 0.1 in (0.3 cm) on the head is fine.
- If the head is larger than 1.2 in (3.0 cm), go down one hook size.
- If the head is smaller than 1 in (2.5 cm), go up one hook size.
Get the gauge right at this stage, because every later measurement depends on it.
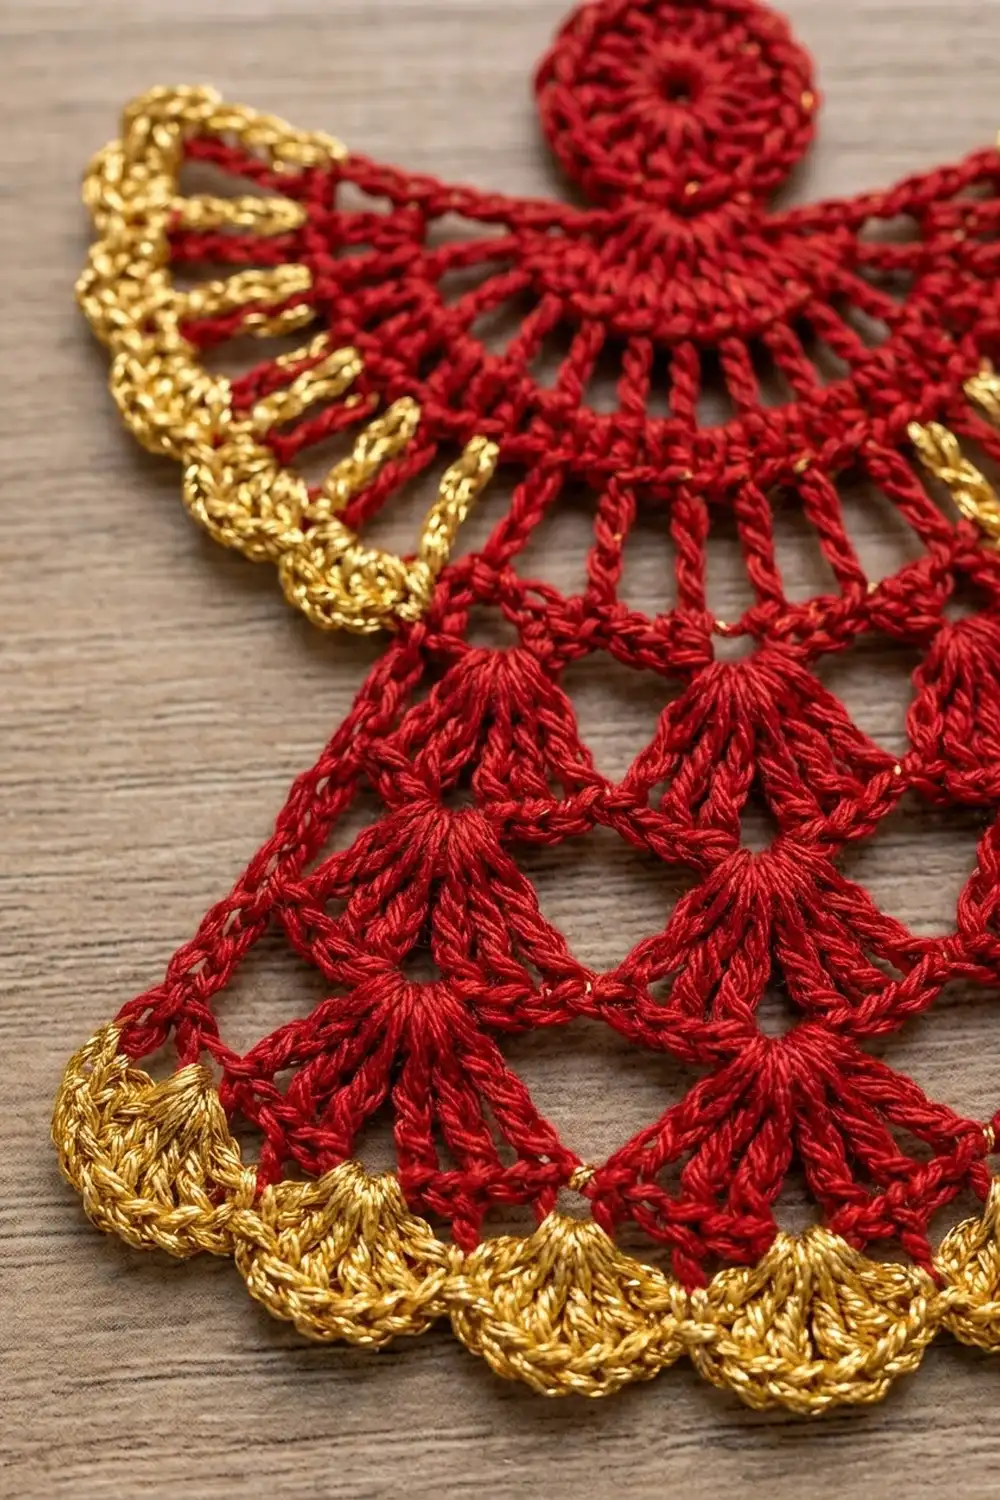
Head
With red, make a magic ring.
Rnd 1: Ch 3 (counts as dc), 15 dc in ring, join with sl st to top of beg ch-3. Pull the ring tight. (16 dc)
Rnd 2: Ch 3 (counts as dc), dc in same st, 2 dc in each st around, join with sl st to top of beg ch-3. (32 dc)
Fasten off.
Number the stitches so the joining st (top of the ch-3) is st 1. Turn the head so st 1 sits at the top center. St 17 is now at the bottom center, and sts 9 and 25 are at the left and right sides. Mark sts 9 and 25.
Checkpoint: 1.1 in (2.8 cm) across.
Wing Yoke
The yoke is a half circle worked in rows around the lower 17 sts of the head (sts 9 through 25). The two ends of each row become the wing tips.
Row 1 (RS): With RS facing, join red with sl st in st 9. Ch 3 (counts as dc), 2 dc in next st, dc in next st, 2 dc in next st 7 times, dc in st 25. Turn. (25 dc)
Row 2 (WS): Ch 3 (counts as dc), dc in next st, 2 dc in next st, dc in next 2 sts, 2 dc in next st 7 times, dc in top of tch. Turn. (33 dc)
Row 3 (RS): Ch 5 (counts as dc + ch 2), skip next st, dc in next st, ch 2, skip next st, dc in next st 15 times, working the last dc in top of tch. Turn. (17 dc, 16 ch-2 sps)
Row 4 (WS): Ch 6 (counts as dc + ch 3), dc in next dc, ch 3, dc in next dc 14 times, ch 3, dc in 3rd ch of tch. (17 dc, 16 ch-3 sps)
Fasten off.
Rows 1 and 2 make the solid inner band. Rows 3 and 4 make the open lines that radiate out across the wings. Rows 1 and 2 each add 8 sts. Rows 3 and 4 widen the arc by using longer chains, so the half circle lies flat.
Number the 16 ch-3 sps of Row 4 from either end. Sps 8 and 9 are the two center spaces at the bottom of the arc, and the skirt grows from them. Sps 1–7 belong to one wing and sps 10–16 belong to the other.
Checkpoint: 3.1 in (7.9 cm) from wing tip to wing tip.
Skirt
The skirt is worked in rows downward from the two center spaces. In each row, you work a shell in every ch-1 sp between the shells of the row before, plus one edge shell at each end. This adds exactly one shell per row and staggers the fans like brickwork.
Row 1 (RS): With RS facing, join red with sl st in sp 8 of yoke Row 4. Ch 3 (counts as dc), (dc, ch 2, 2 dc) in same sp, ch 1, shell in sp 9. (2 shells, 1 ch-1 sp)
Row 2 (WS): Ch 3 (counts as dc), turn, (dc, ch 2, 2 dc) in first st, ch 1, shell in next ch-1 sp, ch 1, shell in top of beg ch-3. (3 shells, 2 ch-1 sps)
Row 3 (RS): Ch 3 (counts as dc), turn, (dc, ch 2, 2 dc) in first st, ch 1, shell in next ch-1 sp 2 times, ch 1, shell in top of tch. (4 shells, 3 ch-1 sps)
Row 4 (WS): Ch 3 (counts as dc), turn, (dc, ch 2, 2 dc) in first st, ch 1, shell in next ch-1 sp 3 times, ch 1, shell in top of tch. (5 shells, 4 ch-1 sps)
Fasten off.
Row 4 has 20 dc (5 shells x 4 dc), 5 ch-2 sps, and 4 ch-1 sps.
Keep the ch-1 between shells firm. If those chains are loose, the shells drift apart and the skirt widens faster than the checkpoints.
Checkpoint: 3.75 in (9.5 cm) wide at the hem and 1.2 in (3.0 cm) tall from the yoke to the hem.
Border
Border gauge is 10 sc = 1 in (2.5 cm) in gold. Each border has two rows: a solid sc row, then a scallop row. Together they add 0.25 in (0.6 cm) of depth.
Wing Edgings (make 2)
Work each wing separately, from the wing tip toward the skirt.
Row 1 (RS): With RS facing, join gold with sl st in the dc at the tip of one wing (end of yoke Row 4). Ch 1, sc in same dc, 3 sc in next ch-3 sp, sc in next dc 7 times. Turn. (29 sc)
You will finish in the dc right beside the skirt: dc 8 on one wing, or dc 10 on the other.
Row 2 (WS): Ch 1, sc in first sc, skip next sc, scallop in next sc, skip next sc, sc in next sc 7 times. (7 scallops)
Fasten off. Repeat on the second wing, starting at its tip.
Why the math works: Each ch-3 sp gets 3 sc, plus 1 sc in the dc after it, for 4 sc per space. Seven spaces give 28 sc, and the first sc makes 29. The scallop repeat uses 4 sts, so 29 = (7 x 4) + 1. One scallop sits centered over each wing space.
Hem Border
Row 1 (RS): With RS facing, join gold with sl st in the first st of skirt Row 4. Ch 1, sc in same st, sc in next dc, 3 sc in ch-2 sp, sc in next 2 dc, 2 sc in next ch-1 sp, sc in next 2 dc, 3 sc in ch-2 sp, sc in next 2 dc 4 times. Turn. (43 sc)
Count check: This is a conversion row. Each of the 5 shells gives 4 sc worked one per dc, plus 3 sc in its ch-2 sp, for 7 sc each and 35 in total. Each of the 4 ch-1 sps gives 2 sc, for 8 more. 35 + 8 = 43.
Row 2 (WS): Ch 1, sc in first sc, skip next 2 sc, scallop in next sc, skip next 2 sc, sc in next sc 7 times. (7 scallops)
Fasten off.
Why the math works: The scallop repeat uses 6 sts, and 43 = (7 x 6) + 1, so the row starts and ends with an sc. Row 4 of the skirt is 34 stitch-widths wide, and the 43 sc give a few more stitches than that. The extra stitches let the hem flare slightly, so the scallops fan open instead of pulling the skirt into a curve.
Checkpoint: Hem width 4 in (10.2 cm) after the border.
Hanging Loop
Join gold with sl st in st 1 at the top center of the head. Ch 20, sl st in same st. Fasten off. The loop stands about 1 in (2.5 cm) tall.
Final Blocking
- Weave in all ends through stitches of the same color, then trim them close.
- Soak the angel in cool water for 5 minutes. Press out the water in a towel; do not wring it.
- Lay the angel face up on the blocking board.
- Pin the head into a circle 1.1 in (2.8 cm) across.
- Pin each wing tip so the wingspan is 3.6 in (9.1 cm). Pin the dc lines of yoke Rows 3 and 4 so they radiate evenly.
- Pin the hem straight at 4 in (10.2 cm) wide. Pin out the point of every scallop on the wings and the hem.
- Check that the height is 3.5 in (8.9 cm) from the top of the head to the hem.
- Mist with water, or with light starch for a stiffer ornament. Leave it pinned until it is completely dry, at least 6 hours.
Final Quality-Control Checklist
- The head is round, 1.1 in (2.8 cm) across, with the ring pulled tight.
- Yoke Row 4 has 17 dc and 16 ch-3 sps.
- The skirt starts in sps 8 and 9 and is centered under the head.
- Skirt Row 4 has 5 shells and 4 ch-1 sps.
- Each wing has 7 gold scallops, and the hem has 7 gold scallops.
- Wingspan is 3.6 in (9.1 cm), hem is 4 in (10.2 cm), and height is 3.5 in (8.9 cm).
- The loop is centered at the top of the head.
- There are no loose ends or visible knots on the front.
Troubleshooting
The head cups. Rnd 2 is too tight. Relax your tension or go up one hook size.
The head ruffles. Your dc are too short for the number of stitches. Go down one hook size, or pull up each loop a little higher.
The yoke ruffles. The chains in Rows 3 and 4 are too loose. Chain more firmly, or redo those rows one hook size smaller. Keep the chain counts the same so the edging math still works.
The skirt is off center. Row 1 started in the wrong space. Count the 16 sps again; sps 8 and 9 must sit directly below st 17 of the head.
The skirt edges curl. The edge shells are tight. Make the beginning ch-3 a little taller.
The hem ripples or pulls in. Your gold sc don’t match the border gauge. If the hem ripples, use a 1.5 mm hook for the gold. If it pulls in, go up one hook size.
The wing scallops crowd. The gold is thicker than the red. Use a 1.5 mm hook for the gold.
The metallic thread frays. Work with shorter lengths and avoid splitting the strand with the hook tip.
Care
Hand wash in cool water with mild soap, press dry in a towel, and block flat again. Store flat between sheets of tissue paper so the scallops stay crisp.
Final Notes
Every measurement in this pattern builds on the one before:
- The 16-st head at 9 dc per inch gives a 1.1 in (2.8 cm) circle.
- The 17-st yoke base and two 8-st increase rows give a half circle 3.1 in (7.9 cm) wide. The gold edging brings it to 3.6 in (9.1 cm).
- The skirt grows from 2 to 5 shells and reaches 3.75 in (9.5 cm).
- The 43-st hem border brings the hem to 4 in (10.2 cm).
If the head measures right, the rest will follow.
Hang one on a tree, tie one to a gift, or put one in a window. You can also make several and hang them side by side on gold strands for a festive display.
Happy crocheting!