

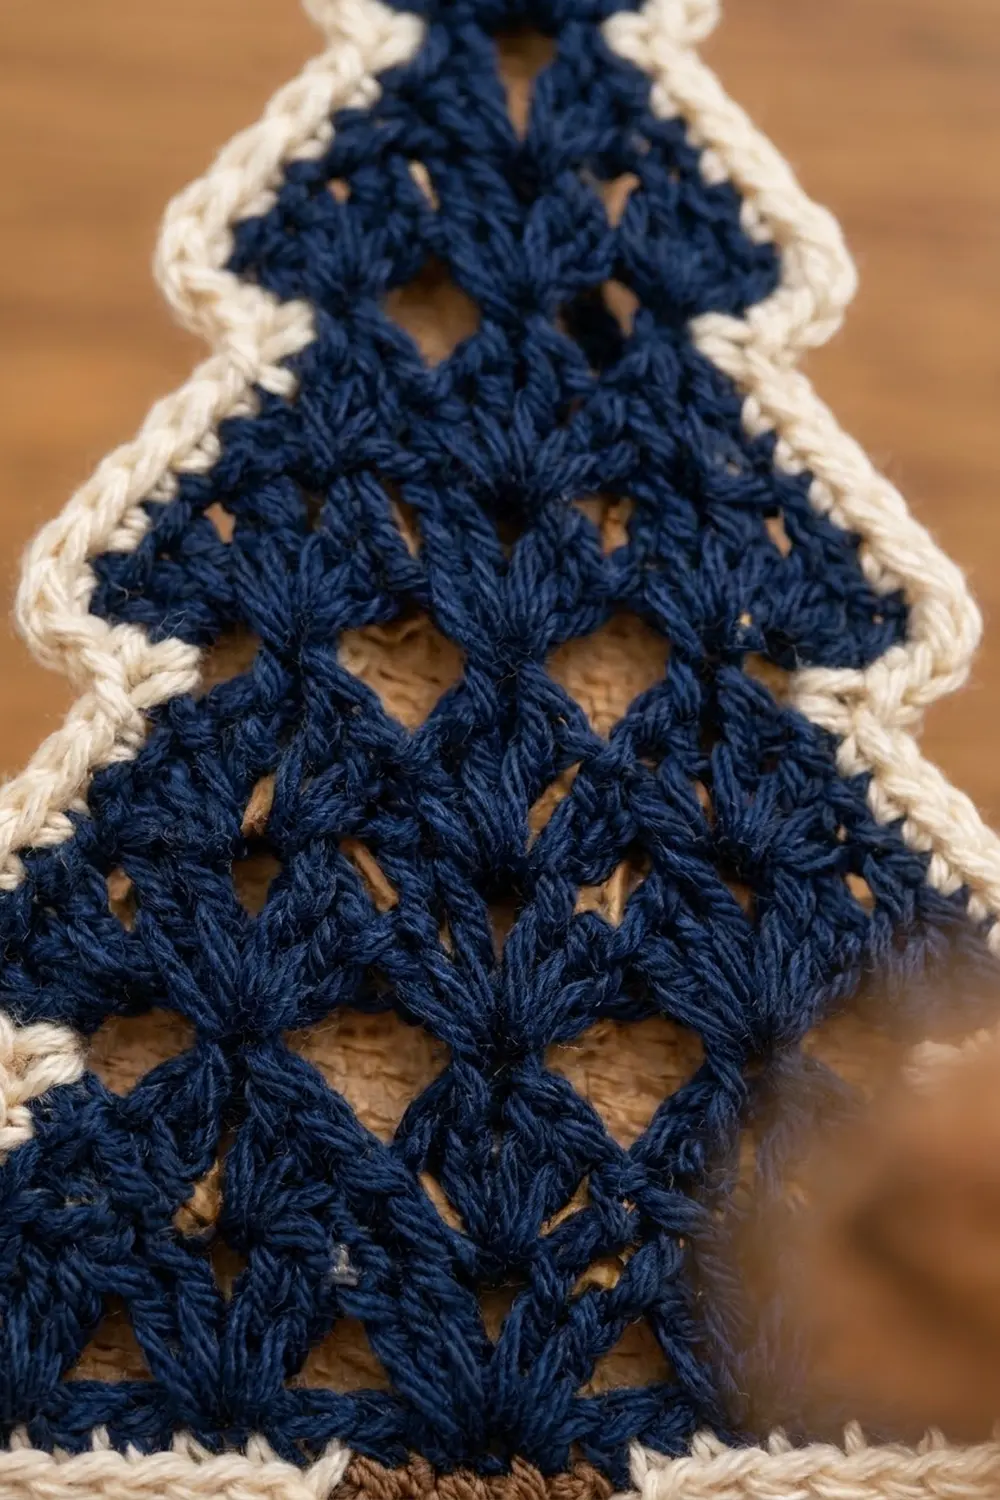
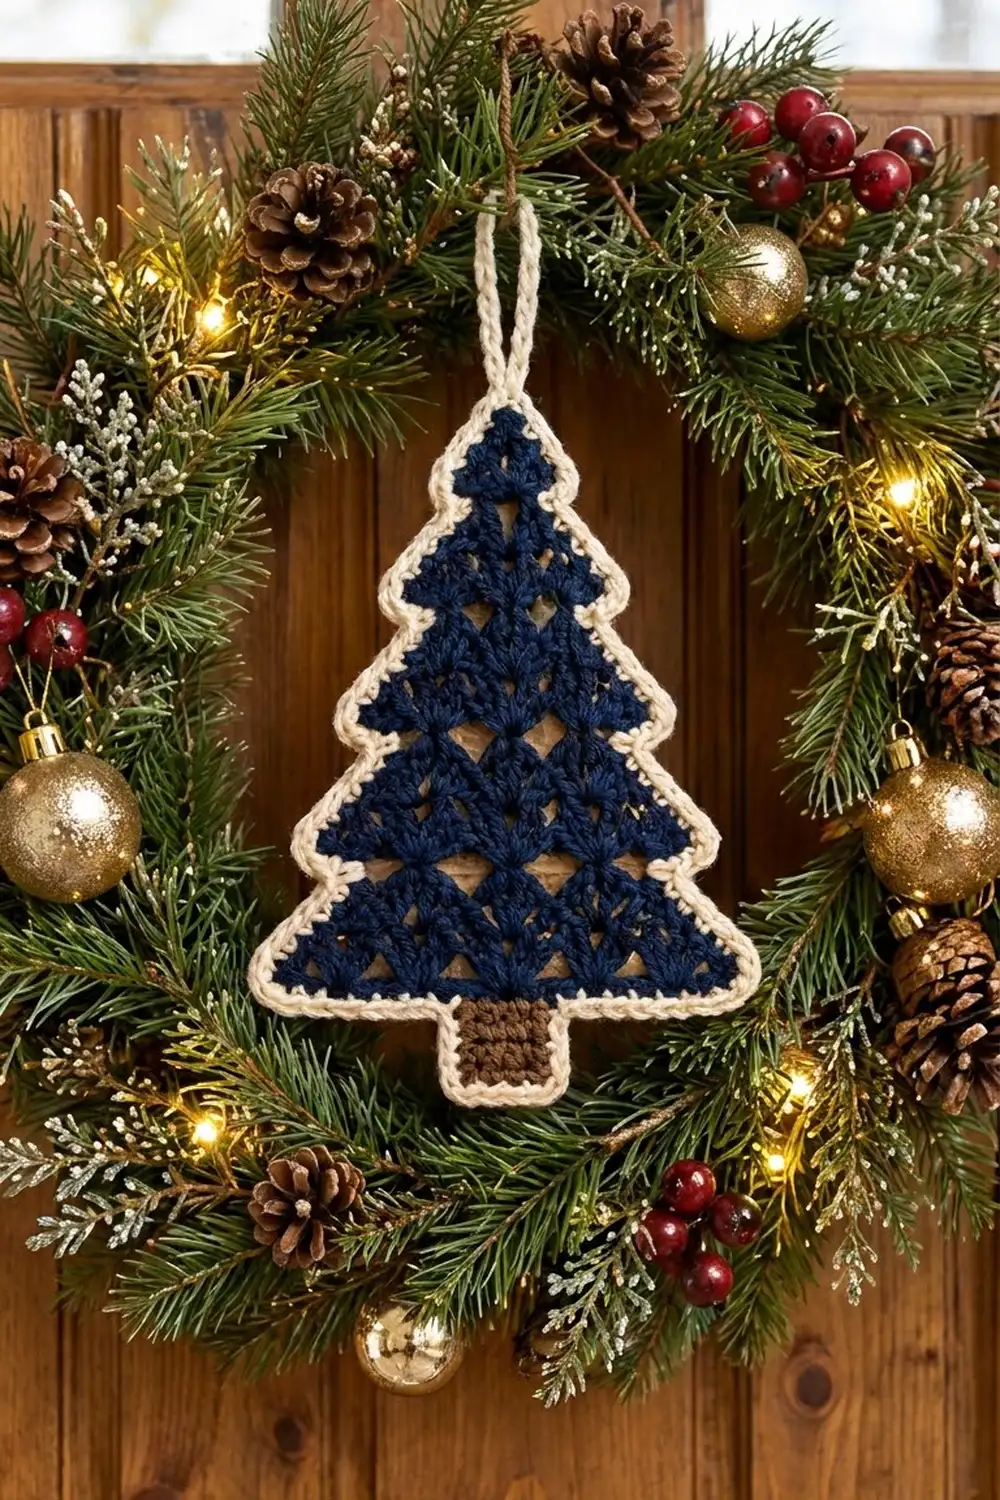
The Midnight Pine ornament is a flat, lacy Christmas tree with a four-tier stepped outline. The navy body is made of staggered three-double-crochet groups with small triangular openings between them. This makes the tree look light and airy when it hangs on a wreath or a branch.
The colors are simple. Deep navy forms the branches, warm brown makes a small solid trunk, and cream gives a crisp outline and a padded hanging loop. The style is classic and quiet. You can hang it on a tree, use it as a gift tag, or tie it to a wrapped present.
This pattern uses US crochet terms. Without the loop, the finished ornament measures about 5.1 in (13.0 cm) wide and 7.2 in (18.3 cm) tall. With the loop, it is about 8.4 in (21.3 cm) tall.
The tree is a single piece, worked flat from the tip downward in turned rows of double crochet groups. Each tier grows for two rows and then steps inward on the next row, which creates the notched branch outline. You work the trunk straight onto the bottom row in single crochet. Two rounds of cream border finish the edge and form the loop.
Finished Size and Construction
- Finished size: 5.1 in (13.0 cm) wide x 7.2 in (18.3 cm) tall, plus a loop of about 1.2 in (3.0 cm)
- Skill level: Easy
- Terminology: US
- Yarn weight: DK (weight 3)
- Hook: 4.0 mm (G-6)
- Number of pieces: 1
- Layout: one flat ornament, no joining
- Tree body (Rows 1–12): 4.7 in (11.9 cm) wide x 6 in (15.2 cm) tall
- Size before border (body plus trunk): 4.7 in (11.9 cm) x 6.8 in (17.3 cm)
- Border depth: about 0.2 in (0.5 cm) on every edge
Materials
Choose a smooth DK yarn with good stitch definition. Cotton or a cotton blend shows the openings clearly and blocks flat. Soft acrylic also works, but it may need a little more steam to lie flat.
- Navy (tree): 12 g, about 30 m
- Brown (trunk): 2 g, about 5 m
- Cream (border and loop): 5 g, about 12 m
These amounts include a small margin for checking gauge and weaving in ends.
Tools:
- 4.0 mm (G-6) crochet hook
- Tapestry needle
- Scissors
- Stitch markers (2)
- Ruler or tape measure
- Blocking mat and rust-proof pins
- Spray bottle or steam iron
Abbreviations (US Terms)
- ch – chain
- sl st – slip stitch
- sc – single crochet
- dc – double crochet
- sp – space
- st(s) – stitch(es)
- tch – turning chain
- RS / WS – right side / wrong side
- rep – repeat
Special stitches:
- Group: 3 dc worked into the same ch-1 sp.
- Half group: 2 dc at the edge of a row. At the start of a row, it is ch 3 (counts as dc) plus 1 dc. At the end of a row, it is 2 dc.
Each ch 1 between groups counts as 1 stitch when measuring and when working the border.
Gauge and Checkpoints
Gauge: 4 repeats of (3 dc, ch 1) = 16 sts = 3 in (7.6 cm). 6 rows of the group pattern = 3 in (7.6 cm).
The ornament is small, so the tree itself serves as your gauge swatch. Work Rows 1–6 and measure before you continue.
Checkpoints:
- After Row 3: 13 sts, 2.4 in (6.1 cm) wide, 1.5 in (3.8 cm) tall
- After Row 6: 17 sts, 3.2 in (8.1 cm) wide, 3 in (7.6 cm) tall
- After Row 9: 21 sts, 3.9 in (9.9 cm) wide, 4.5 in (11.4 cm) tall
- After Row 12: 25 sts, 4.7 in (11.9 cm) wide, 6 in (15.2 cm) tall
- After the trunk: 6.8 in (17.3 cm) tall in total
- After the border: 5.1 in (13.0 cm) x 7.2 in (18.3 cm)
If your tree is too big, switch to a 3.75 mm hook. If it is too small, switch to a 4.5 mm hook. If only the height is off, check your dc. Tall, loose dc stretch the tree lengthwise, so pull up the first loop a little less.
Tree Body
Work with navy from the tip down. Turn at the end of every row. The ch 3 at the start of each row counts as 1 dc.
Tier 1
Row 1 (RS): Make a magic ring. Ch 3, 1 dc in ring, ch 1, 2 dc in ring. Pull the ring tight. (4 dc, 1 ch-1 sp; 5 sts)
Row 2: Ch 3, turn, 1 dc in the first dc (the st at the base of the ch-3), ch 1, 1 group in the ch-1 sp, ch 1, 2 dc in the top of the tch. (7 dc, 2 ch-1 sps; 9 sts)
Row 3: Ch 3, turn, 1 dc in the first dc, ch 1, [1 group in the next ch-1 sp, ch 1] 2 times, 2 dc in the top of the tch. (10 dc, 3 ch-1 sps; 13 sts)
Rows 2 and 3 are growth rows. Each one adds one full group and one ch-1 sp.
Tier 2
Row 4 (step row): Turn. Sl st in each of the first 2 dc and into the first ch-1 sp. Ch 3, 1 dc in the same sp, ch 1, 1 group in the next ch-1 sp, ch 1, 2 dc in the last ch-1 sp. Leave the last 2 dc unworked. (7 dc, 2 ch-1 sps; 9 sts)
The step row skips the edge half group on each side. This leaves a short ledge on both sides, which forms the underside of the tier above.
Row 5: Ch 3, turn, 1 dc in the first dc, ch 1, [1 group in the next ch-1 sp, ch 1] 2 times, 2 dc in the top of the tch. (10 dc, 3 ch-1 sps; 13 sts)
Row 6: Ch 3, turn, 1 dc in the first dc, ch 1, [1 group in the next ch-1 sp, ch 1] 3 times, 2 dc in the top of the tch. (13 dc, 4 ch-1 sps; 17 sts)
Tier 3
Row 7 (step row): Turn. Sl st in each of the first 2 dc and into the first ch-1 sp. Ch 3, 1 dc in the same sp, ch 1, [1 group in the next ch-1 sp, ch 1] 2 times, 2 dc in the last ch-1 sp. Leave the last 2 dc unworked. (10 dc, 3 ch-1 sps; 13 sts)
Row 8: Ch 3, turn, 1 dc in the first dc, ch 1, [1 group in the next ch-1 sp, ch 1] 3 times, 2 dc in the top of the tch. (13 dc, 4 ch-1 sps; 17 sts)
Row 9: Ch 3, turn, 1 dc in the first dc, ch 1, [1 group in the next ch-1 sp, ch 1] 4 times, 2 dc in the top of the tch. (16 dc, 5 ch-1 sps; 21 sts)
Tier 4
Row 10 (step row): Turn. Sl st in each of the first 2 dc and into the first ch-1 sp. Ch 3, 1 dc in the same sp, ch 1, [1 group in the next ch-1 sp, ch 1] 3 times, 2 dc in the last ch-1 sp. Leave the last 2 dc unworked. (13 dc, 4 ch-1 sps; 17 sts)
Row 11: Ch 3, turn, 1 dc in the first dc, ch 1, [1 group in the next ch-1 sp, ch 1] 4 times, 2 dc in the top of the tch. (16 dc, 5 ch-1 sps; 21 sts)
Row 12: Ch 3, turn, 1 dc in the first dc, ch 1, [1 group in the next ch-1 sp, ch 1] 5 times, 2 dc in the top of the tch. (19 dc, 6 ch-1 sps; 25 sts)
Fasten off navy.
Count check: every row has (4 x ch-1 sps) + 1 sts. Row 12 has 6 sps, so 6 x 4 + 1 = 25 sts. Each row shifts by half a group, so the groups sit staggered over the row below. This lets the ch-1 sps open into small triangles between the groups.
Trunk
Row 12 has 5 full groups. Place one marker in the ch-1 sp just before the 3rd (center) group and another in the ch-1 sp just after it. Counted from either edge, these are sts 11 and 15 of 25.
Row 1: With brown, join with sc in the first marked ch-1 sp, 1 sc in each of the next 3 dc, 1 sc in the second marked ch-1 sp. (5 sc)
Rows 2–4: Ch 1, turn, 1 sc in each st across. (5 sc)
Fasten off. The trunk measures about 0.9 in (2.3 cm) wide x 0.8 in (2.0 cm) tall. There are 10 unworked navy sts on each side of it.
Checkpoint: the tree with trunk measures 4.7 in (11.9 cm) x 6.8 in (17.3 cm). Weave in the navy and brown ends now along the backs of the dc, so the border doesn’t have to cover bulky tails.
Border
Border gauge: 2 sc per dc row end, 1 sc per sc row end, and 1 sc per st along row tops. One dc row is about as tall as two sc, so this keeps every edge flat.
Hold the tree with RS facing and the tip at the top.
Round 1: With cream, join at the tip with a sc around the magic ring. Ch 14, then work 1 sc in the same place to make the hanging loop. Then work down the right side as follows.
Right side (top to bottom), 34 sc:
- Tier 1: 2 sc in the end of Row 1, 2 sc in the end of Row 2, 3 sc in the end of Row 3 (tier point), then 2 sc along the ledge (1 sc in each of the 2 unworked or slipped sts of Row 3). (9 sc)
- Tier 2: 2 sc in Row 4, 2 sc in Row 5, 3 sc in Row 6, 2 sc along the Row 6 ledge. (9 sc)
- Tier 3: 2 sc in Row 7, 2 sc in Row 8, 3 sc in Row 9, 2 sc along the Row 9 ledge. (9 sc)
- Tier 4: 2 sc in Row 10, 2 sc in Row 11, 3 sc in the end of Row 12 (bottom corner). (7 sc)
Bottom right: 1 sc in each of the 10 unworked sts of Row 12. (10 sc)
Trunk, 17 sc: 1 sc in each of the 4 row ends down the trunk side, 3 sc in the first st of the trunk bottom, 1 sc in each of the next 3 sts, 3 sc in the last st, 1 sc in each of the 4 row ends up the other side.
Bottom left: 1 sc in each of the 10 unworked sts of Row 12. (10 sc)
Left side (bottom to top), 34 sc: Work the right-side sequence in reverse: 3 sc in the end of Row 12, 2 sc in Row 11, 2 sc in Row 10, 2 sc along the Row 9 ledge, 3 sc in Row 9, 2 sc in Row 8, 2 sc in Row 7, 2 sc along the Row 6 ledge, 3 sc in Row 6, 2 sc in Row 5, 2 sc in Row 4, 2 sc along the Row 3 ledge, 3 sc in Row 3, 2 sc in Row 2, 2 sc in Row 1.
Join with a sl st to the first sc. (107 sc plus the ch-14 loop)
Round 1 total: 2 (tip) + 34 (right) + 10 + 17 (trunk) + 10 + 34 (left) = 107 sc.
Round 2: Ch 1, sl st in the same sc, work 20 sc into the ch-14 loop, then sl st loosely in each of the remaining 106 sc around. Join with a sl st to the first sl st. (107 sl sts plus 20 sc in the loop)
Fasten off and weave in the cream ends.
Why the math works: the two sides mirror each other at 34 sc each. Each 3-sc tier point turns the outer corner. The 2 ledge sc match the 2 sts that each step row leaves unworked, so the notches stay sharp. The bottom edges use exactly the 10 + 10 sts left free by the 5-st trunk (10 + 5 + 10 = 25). The inner corners get no extra stitches, so they stay crisp. These are the spots where a ledge meets the next row and where the tree meets the trunk. The 20 sc in the loop pack the 14 chains firmly and make a thick, rope-like hanger. Round 2 adds about 0.1 in (0.3 cm) of firm edge, so the two rounds together give about 0.2 in (0.5 cm) per side.
Final Blocking
- Lay the ornament RS up on a blocking mat.
- Pin the tip, the 8 tier points and the 4 trunk corners first.
- Check the size: 5.1 in (13.0 cm) wide at the bottom tier and 7.2 in (18.3 cm) from the tip to the bottom of the trunk.
- Use a pin to ease each ledge straight, and gently open the triangular gaps with your fingertip.
- Spray lightly with water, or hold a steam iron just above the piece without touching it.
- Leave it pinned until it is completely dry.
- Unpin it and shape the loop with your fingers so it stands upright.
Final Quality-Control Checklist
- Row 12 has 25 sts, with 5 full groups and 6 ch-1 sps.
- Each tier has a visible step on both sides.
- The trunk is centered under the middle group, with 10 sts free on each side.
- Round 1 has 107 sc, with 34 on each side.
- The left and right outlines are mirror images.
- The loop is fully covered with 20 sc and sits straight above the tip.
- The ornament lies flat with no rippling or cupping.
- All ends are woven in and can’t be seen from the front.
Troubleshooting
The tree leans to one side. Check that every growth row ends with 2 dc in the top of the tch. If you miss that last stitch, one edge comes out shorter.
The steps don’t show. Make sure each step row slips across 2 dc and leaves the last 2 dc unworked. If you work groups into the edge sps, the tier won’t narrow.
The gaps close up. Your ch 1 is too tight. Work it a little looser, or go up half a hook size.
The border ruffles. You are adding extra sc. Count each side against the 34 sc total, and don’t add stitches at the inner corners.
The border pulls and cups. Your sc are too tight, or you skipped the 3-sc tier points. Loosen your tension, and work the Round 2 sl sts with a relaxed hand.
The trunk is off-center. Count to the 3rd group of Row 12 again and place the markers before you join the brown yarn.
Care
Hand wash in cool water with mild soap, press out the water in a towel, and dry flat with light pinning. Store it flat or hanging so the tree keeps its shape.
Final Notes
The measurement chain is short and easy to check. Check gauge after Row 6: 3.2 in (8.1 cm) wide and 3 in (7.6 cm) tall. Row 12 should have 25 sts and measure 4.7 in (11.9 cm) wide. The trunk brings the height to 6.8 in (17.3 cm). After the border of 107 sc and a sl st round, the ornament measures 5.1 in (13.0 cm) x 7.2 in (18.3 cm). Make one for every branch, or tie one to a gift.
Happy crocheting!