

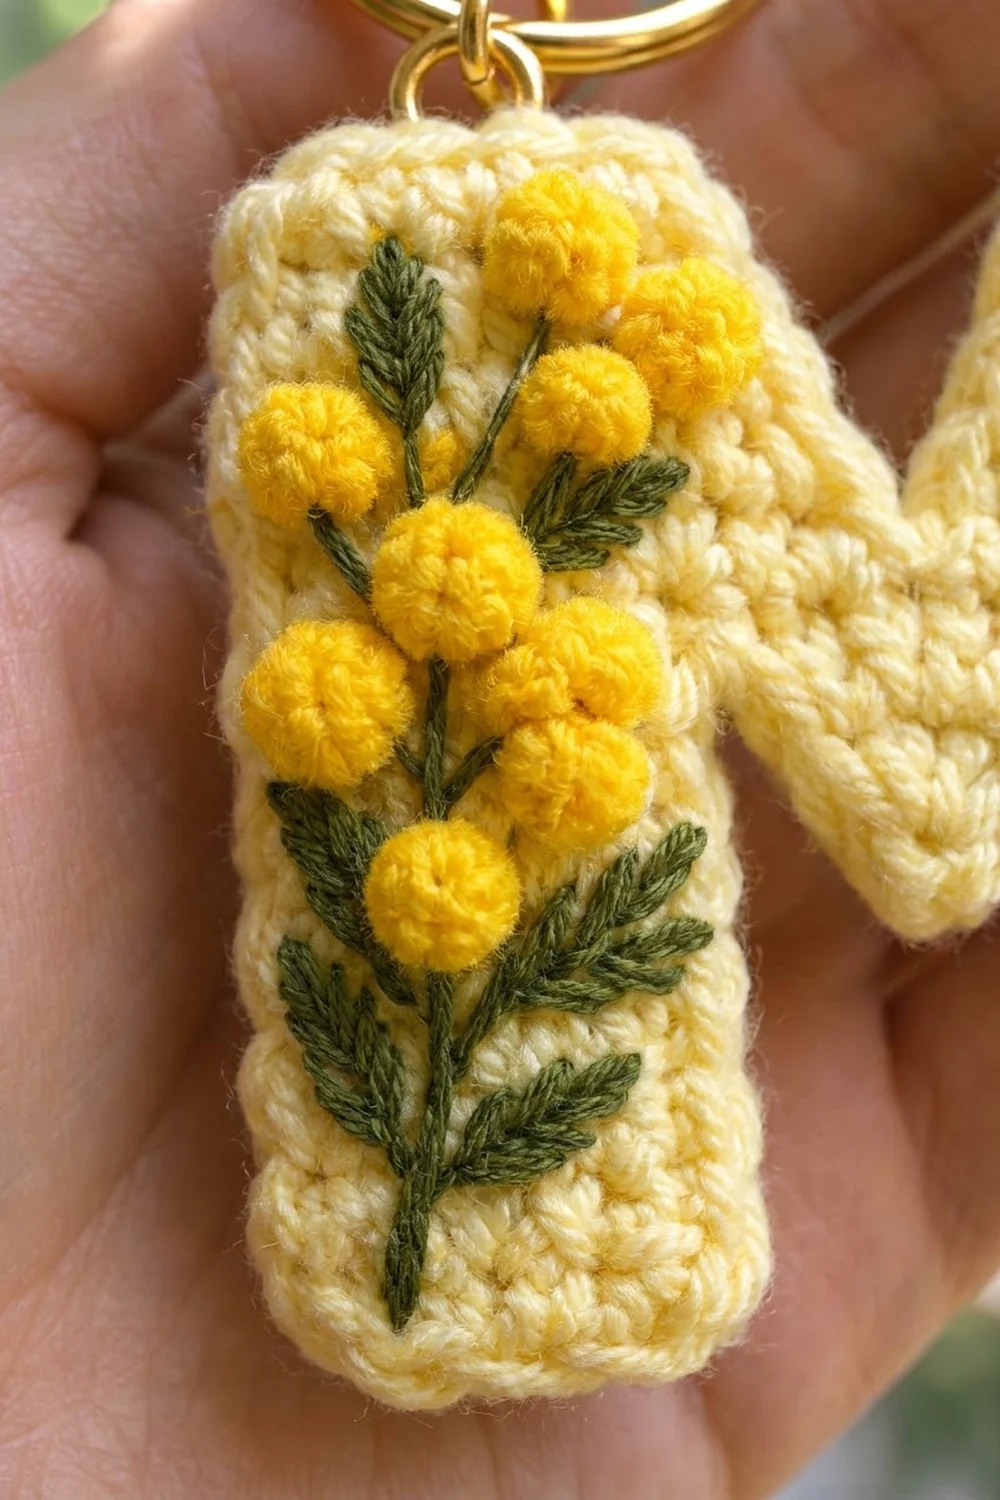
This letter M keychain is small, cheerful, and quick to make. The letter is worked in pale butter yellow, and a mimosa sprig is embroidered up the left leg: an olive-green stem, fern-like leaves, and plump golden flower balls. A gold split ring finishes it, so it works as a bag charm, a key fob, or a personalized gift.
The style is clean and graphic. The single crochet fabric is dense and tidy, and a single crochet border gives the letter a soft, slightly raised outline. The embroidery adds texture and color without changing the shape.
This pattern uses US crochet terms. The finished keychain measures about 3.6 in (9.1 cm) wide and 3.4 in (8.6 cm) tall, not counting the ring.
Construction overview: you crochet two legs separately from the bottom up, adding stitches on their inner edges. Then you join them with a chain bridge and work across both legs. The top splits into two halves, and decreases form the V-notch. Next comes one border round around the whole outline. Last, you embroider the sprig and attach the hardware.
Finished Size and Construction
- Finished size: 3.6 in (9.1 cm) wide x 3.4 in (8.6 cm) tall
- Skill level: Easy (basic crochet plus simple embroidery)
- Terminology: US crochet terms
- Yarn weight: DK (#3), cotton or cotton blend
- Hook: 3.0 mm (US C/2 or D/3)
- Number of pieces: 1 (single flat piece)
- Layout: one capital letter M, worked flat in rows
- Piece size before border: 3.2 in (8.1 cm) wide x 3 in (7.6 cm) tall
- Border depth: about 0.2 in (0.5 cm) on every edge
Materials
Use a smooth, mercerized or soft cotton DK yarn. Cotton gives crisp stitch definition and holds the letter’s corners well. A fuzzy acrylic will blur the outline and make the embroidery harder to place.
- Pale butter yellow (main color, MC): about 10 g / 23 m
- Bright golden yellow (flowers, CC1): about 2 g / 5 m
- Olive or leaf green (stem and leaves, CC2): about 2 g / 5 m
These quantities include a margin for your gauge swatch, tails, and any re-work.
Tools:
– 3.0 mm crochet hook
– Tapestry needle (blunt) for weaving in ends
– Sharp embroidery needle with an eye large enough for DK yarn
– 2 stitch markers
– Gold split keyring, about 1 in (2.5 cm) in diameter
– Gold jump ring, about 0.3 in (0.8 cm), and 2 pairs of flat-nose pliers
– Scissors
– Blocking board or foam mat, rust-proof pins, and a spray bottle
Abbreviations (US Terms)
- ch – chain
- sc – single crochet
- sc2tog – single crochet 2 together: (insert hook in next st, yarn over, pull up a loop) twice, yarn over, pull through all 3 loops on hook
- st(s) – stitch(es)
- inc – 2 sc in the same stitch
- sl st – slip stitch
- RS – right side
- MC / CC – main color / contrast color
Special note on “inner edge”: the inner edge of a leg is the edge that will face the other leg. Place a marker on that edge at the end of Row 1 of each leg and move it up as you go, so every increase lands on the correct side.
Gauge and Checkpoints
Gauge: 5 sc and 6 rows = 1 in (2.5 cm) in sc worked flat.
Rather than a separate swatch, use the first leg as your test piece. Measure it at these checkpoints:
- After leg Row 7: 5 sts = 1 in (2.5 cm) wide; 7 rows = about 1.2 in (3.0 cm) tall.
- After leg Row 10: 7 sts = 1.4 in (3.6 cm) wide at the top.
- After Row 13 (joined): 16 sts = 3.2 in (8.1 cm) wide; height about 2.2 in (5.6 cm).
- After Row 18: 3.2 in (8.1 cm) wide x 3 in (7.6 cm) tall.
- After the border: 3.6 in (9.1 cm) wide x 3.4 in (8.6 cm) tall.
If your piece is too big: go down to a 2.75 mm hook, or crochet more tightly.
If your piece is too small: go up to a 3.25 mm hook.
A difference of 0.1 in (0.3 cm) per leg is fine for a keychain. A difference of 0.3 in (0.8 cm) or more will show in the letter’s proportions, so adjust before you continue.
Leg 1 (Left Leg)
With MC, ch 6, leaving a 6 in (15.2 cm) tail.
Row 1: Sc in 2nd ch from hook and in each ch across, turn. (5 sts)
Place a marker at the inner edge.
Rows 2–7: Ch 1 (does not count as a st), sc in each st across, turn. (5 sts)
Row 8: Ch 1, sc across, working an inc in the inner-edge st, turn. (6 sts)
Row 9: Ch 1, sc in each st across, turn. (6 sts)
Row 10: Ch 1, sc across, working an inc in the inner-edge st. (7 sts)
Fasten off, leaving a 6 in (15.2 cm) tail. Leg 1 measures about 1.4 in (3.6 cm) wide at the top and 1.7 in (4.3 cm) tall.
Leg 2 (Right Leg)
Work as for Leg 1 through Row 10. (7 sts)
Do not fasten off. Turn.
Join and Body
Lay both legs side by side with RS facing up and the inner edges (marked) facing each other. The bottom edges should be level.
Row 11 (joining row): Ch 1, sc in each of the 7 sts of Leg 2. Ch 2. Working across Leg 1, starting at its inner edge, sc in each of the 7 sts. Turn.
Count: 7 sc + 2 ch + 7 sc = 16 sts.
The 2 chains form the peak of the bottom gap. Below the bridge, the gap is 2 sts wide at Row 10 and 6 sts (1.2 in / 3.0 cm) wide at Row 1. The inner-edge increases create the angled sides of the gap.
Row 12: Ch 1, sc in each sc and in each ch across, turn. (16 sts)
Row 13: Ch 1, sc in each st across, turn. (16 sts)
Checkpoint: 3.2 in (8.1 cm) wide, about 2.2 in (5.6 cm) tall.
Top Halves and V-Notch
The top is split into two halves of 8 sts each. Decreases on the inner edge of each half form the V-notch.
First Half
Work over the first 8 sts only, leaving the other 8 unworked.
Row 14: Ch 1, sc in next 6 sts, sc2tog over sts 7–8 (the center), turn. (7 sts)
Row 15: Ch 1, sc2tog (inner edge), sc in next 5 sts, turn. (6 sts)
Rows 16–18: Ch 1, sc in each st across, turn. (6 sts)
Fasten off.
Second Half
Join MC with a sl st at the outer edge of the remaining 8 sts of Row 13, so that you finish at the center.
Row 14: Ch 1, sc in the same st as the join and in the next 5 sts, sc2tog over the last 2 sts (the center), turn. (7 sts)
Row 15: Ch 1, sc2tog (inner edge), sc in next 5 sts, turn. (6 sts)
Rows 16–18: Ch 1, sc in each st across. (6 sts)
Do not fasten off. Turn so that the RS faces you.
Checkpoint: 3.2 in (8.1 cm) wide x 3 in (7.6 cm) tall. At Row 18, the gap at the top is 4 sts (0.8 in / 2.0 cm) wide, and it narrows to a point at Row 13.
Border
Border gauge: 1 sc per stitch along top and bottom edges, 1 sc per row end along side edges, and 3 sc in every outer corner stitch.
Work 1 round of sc in MC around the whole outline. Begin at the top outer corner of the second half (right leg) and work counterclockwise. Keep the same tension as the body.
Round 1:
- Right leg top (Row 18, 6 sts): 3 sc in first st, sc in next 4 sts, 3 sc in last st. (10 sc)
- Right half inner notch edge (row ends of Rows 18–15): 1 sc in each row end. (4 sc)
- Notch point: sc2tog, joining the Row 14 row end of the right half to the Row 14 row end of the left half. (1 st)
- Left half inner notch edge (row ends of Rows 15–18): 1 sc in each row end. (4 sc)
- Left leg top (Row 18, 6 sts): 3 sc in first st, sc in next 4 sts, 3 sc in last st. (10 sc)
- Left leg outer edge (row ends of Rows 18–1): 1 sc in each row end. (18 sc)
- Left leg bottom (5 foundation chains): 3 sc in first ch, sc in next 3 ch, 3 sc in last ch. (9 sc)
- Left leg inner edge (row ends of Rows 1–10): 1 sc in each row end. (10 sc)
- Bridge underside (2 ch from Row 11): 1 sc in each ch. (2 sc)
- Right leg inner edge (row ends of Rows 10–1): 1 sc in each row end. (10 sc)
- Right leg bottom (5 foundation chains): 3 sc in first ch, sc in next 3 ch, 3 sc in last ch. (9 sc)
- Right leg outer edge (row ends of Rows 1–18): 1 sc in each row end. (18 sc)
Join with a sl st to the first sc. Fasten off.
Total: 10 + 4 + 1 + 4 + 10 + 18 + 9 + 10 + 2 + 10 + 9 + 18 = 105 sts.
Why the math works:
– Each top and bottom edge already has its own stitches, so they get 1 sc each. The 3-sc groups go only into the existing corner stitches, so no corner is counted twice.
– The side edges take 1 sc per row end, which matches the 18 rows of the outer edges, the 10 rows of the leg inner edges, and the 5 rows (14–18) of each notch edge.
– On the notch, the two Row 14 row ends merge into one sc2tog, which keeps the V point sharp.
– At the bridge, the 2 chains get exactly 2 sc, so the concave peak stays crisp and doesn’t bunch.
The border adds about 0.2 in (0.5 cm) on each edge. That gives 3.2 + 0.4 = 3.6 in (9.1 cm) of width and 3 + 0.4 = 3.4 in (8.6 cm) of height.
Embroidery: Mimosa Sprig
Work on the RS of the left leg, inside the border.
Stem (CC2): Using a single strand, backstitch a slightly curved line up the center of the left leg. Start just above the bottom border and stop about 0.5 in (1.3 cm) below the top border. The stem is about 2.4 in (6.1 cm) long. Add 2 or 3 short side branches near the top, each about 0.4 in (1.0 cm) long.
Leaves (CC2): Along the lower two-thirds of the stem, work 4 pairs of fern-like leaves. Each leaf is a central straight stitch about 0.3 in (0.8 cm) long, flanked by 2–3 tiny angled straight stitches, like a feather. Angle the leaves upward.
Flowers (CC1): Cluster 9 round flower balls at the tips of the branches and along the top of the stem.
– Make each one as a French knot, using doubled yarn wrapped 3 times. That gives a ball about 0.25 in (0.6 cm) across.
– Bring the needle up through the same hole twice for extra plumpness.
– Gently brush each knot with the needle tip to fluff it.
Secure all tails on the WS by weaving them through the backs of stitches, not through the embroidery.
Hardware
Open the jump ring by twisting it sideways with pliers. Never pull it apart. Thread it through the border at the top outer corner of the left leg, going through the center sc of the 3-sc corner group. Add the split keyring, then close the jump ring flush.
Final Blocking
- Weave in all crochet tails before blocking. Leave the embroidery for after blocking if you prefer flat, even stitches under the design.
- Lightly mist the piece with water until damp, not soaked.
- Lay it RS up on a gridded blocking board.
- Pin the 4 outer bottom corners and the 2 top outer corners to a 3.6 in (9.1 cm) x 3.4 in (8.6 cm) rectangle.
- Pin the bottom of the notch point to square up the V.
- Nudge the legs so they are parallel and the bottom gap is symmetrical.
- Let it dry completely, about 2–4 hours.
- Unpin. If you haven’t already, embroider now, then attach the hardware.
Final Quality-Control Checklist
- Both legs are 5 sts wide at the bottom and 7 sts wide at Row 10.
- The joining row counts 16 sts, and the bridge is centered.
- Each top half ends with 6 sts, and the notch is symmetrical.
- The border round counts 105 sts, with 3 sc in all 8 outer corners.
- Finished size is 3.6 in (9.1 cm) x 3.4 in (8.6 cm), within 0.1 in (0.3 cm).
- The embroidery sits inside the border on the left leg and doesn’t pucker.
- The jump ring is fully closed and can’t snag yarn.
- All ends are woven in and invisible from the RS.
Troubleshooting
- The legs lean outward. An increase was worked on the outer edge. Check the markers and redo Rows 8–10.
- The bottom gap is lopsided. The legs were joined with different edges facing each other. Re-check that both marked inner edges meet at the bridge.
- The notch is shallow or uneven. Make sure both halves start their decreases at the center, in Rows 14 and 15.
- The border ruffles along the sides. Your border tension is looser than the body. Use the next smaller hook for the border only.
- The border cups or pulls. Make sure you worked 3 sc in every outer corner and didn’t skip any row ends.
- The French knots unravel. Pull the wraps snug before inserting the needle, and anchor each knot on the back.
- The piece is floppy. Use a smaller hook for the body, or back the letter with felt cut 0.1 in (0.3 cm) inside the border.
Care
Hand wash in cool water with mild soap, press out the water in a towel, and dry flat. Remove the keyring first if it isn’t rust-proof.

Final Notes
The measurement chain is simple:
– Each leg starts 5 sts (1 in / 2.5 cm) wide and grows to 7 sts (1.4 in / 3.6 cm).
– The bridge makes 7 + 2 + 7 = 16 sts (3.2 in / 3.0 x 2 rows taller to 3 in / 7.6 cm by Row 18).
– The 105-st border adds 0.2 in (0.5 cm) per edge, for a finished 3.6 in (9.1 cm) x 3.4 in (8.6 cm) letter.
Once your gauge matches at the first leg checkpoint, every later number follows. Then the mimosa sprig turns a simple initial into a sunny little gift.
Happy crocheting!