

The Mocha Shell Lattice Bedspread pairs solid, ribbed fans with airy chain lattice. Each square motif holds one upright fan. When the squares are joined, the fans line up in calm columns and the lattice between them opens into soft diamond shapes.
The sample uses one warm taupe, close to mushroom or mocha. A single neutral color keeps the texture in focus: the raised ribs, the scalloped tops of the fans, and the shadows in the open lace. It looks good over white or cream bedding, which shows through the lattice.
This pattern uses US crochet terms. The finished bedspread measures 100 in x 100 in (254.0 cm x 254.0 cm) after blocking, which covers a queen-size bed with a generous drop.
Construction is simple to follow. You crochet a fan in turned rows. Three rounds of lattice then build it out into a 12 in (30.5 cm) square. You make 64 squares, join them with slip stitches into an 8 x 8 grid, and finish with a four-round scalloped picot border.
Finished Size and Construction
- Finished size: 100 in x 100 in (254.0 cm x 254.0 cm)
- Skill level: Intermediate
- Terminology: US
- Yarn weight: Worsted (#4)
- Hook: 5.0 mm (H-8)
- Number of pieces: 64 identical square motifs
- Layout: 8 motifs across x 8 motifs down
- Motif size: 12 in x 12 in (30.5 cm x 30.5 cm), blocked
- Size before border: 96 in x 96 in (243.8 cm x 243.8 cm)
- Border depth: 2 in (5.1 cm) per side
Materials
Yarn: Use a smooth worsted-weight yarn with good stitch definition, such as a cotton blend or soft acrylic, so the ribs stay crisp. Avoid fuzzy or very loosely plied yarns, which blur the lattice.
- Taupe (main and only color): 3,200 g / about 6,400 m (32 skeins of 100 g / 200 m)
These quantities include a margin of about 10% for gauge swatches, joining, and differences between dye lots. Buy all skeins from the same dye lot.
Tools:
– 5.0 mm (H-8) crochet hook
– Tapestry needle
– 4 locking stitch markers
– Scissors
– Tape measure
– Blocking mats, rustproof pins, and a spray bottle
Abbreviations (US Terms)
- ch: chain
- sl st: slip stitch
- sc: single crochet
- dc: double crochet
- tr: treble crochet
- sp(s): space(s)
- st(s): stitch(es)
- tch: turning chain
- RS / WS: right side / wrong side
- FPdc (front post double crochet): Yarn over, insert the hook from front to back to front around the post of the stitch, then complete a dc.
- BPdc (back post double crochet): Yarn over, insert the hook from back to front to back around the post of the stitch, then complete a dc.
- Shell: 5 dc in the same stitch.
- Picot: (sc, ch 3, sc) in the same stitch.
Rib stitches: In the fan, the ribs are post stitches: FPdc on RS rows and BPdc on WS rows. Both raise the rib on the RS.
Gauge and Checkpoints
Gauge: 13 dc and 7 rows = 4 in (10.2 cm) in plain dc rows.
Motif edge gauge: 38 sts along one side of the motif = 12 in (30.5 cm) after blocking.
Make one full motif and block it before you start the rest. Check it at each stage:
- After Fan Row 9: about 5.5 in (14.0 cm) from the point to the top of the center shell, and about 9 in (22.9 cm) across the outer shells.
- After Round 1: about 8 in (20.3 cm) across at the widest point.
- After Round 2: about 10 in (25.4 cm) across.
- After Round 3, unblocked: about 11.5 in (29.2 cm) per side.
- After blocking: 12 in (30.5 cm) per side.
If your motif is too big: Go down half a millimeter in hook size. A motif that is just 0.5 in (1.3 cm) too big makes the joined bedspread 4 in (10.2 cm) too wide.
If your motif is too small: Go up half a millimeter. Don’t add stitches, because the border math depends on exactly 38 sts per side.
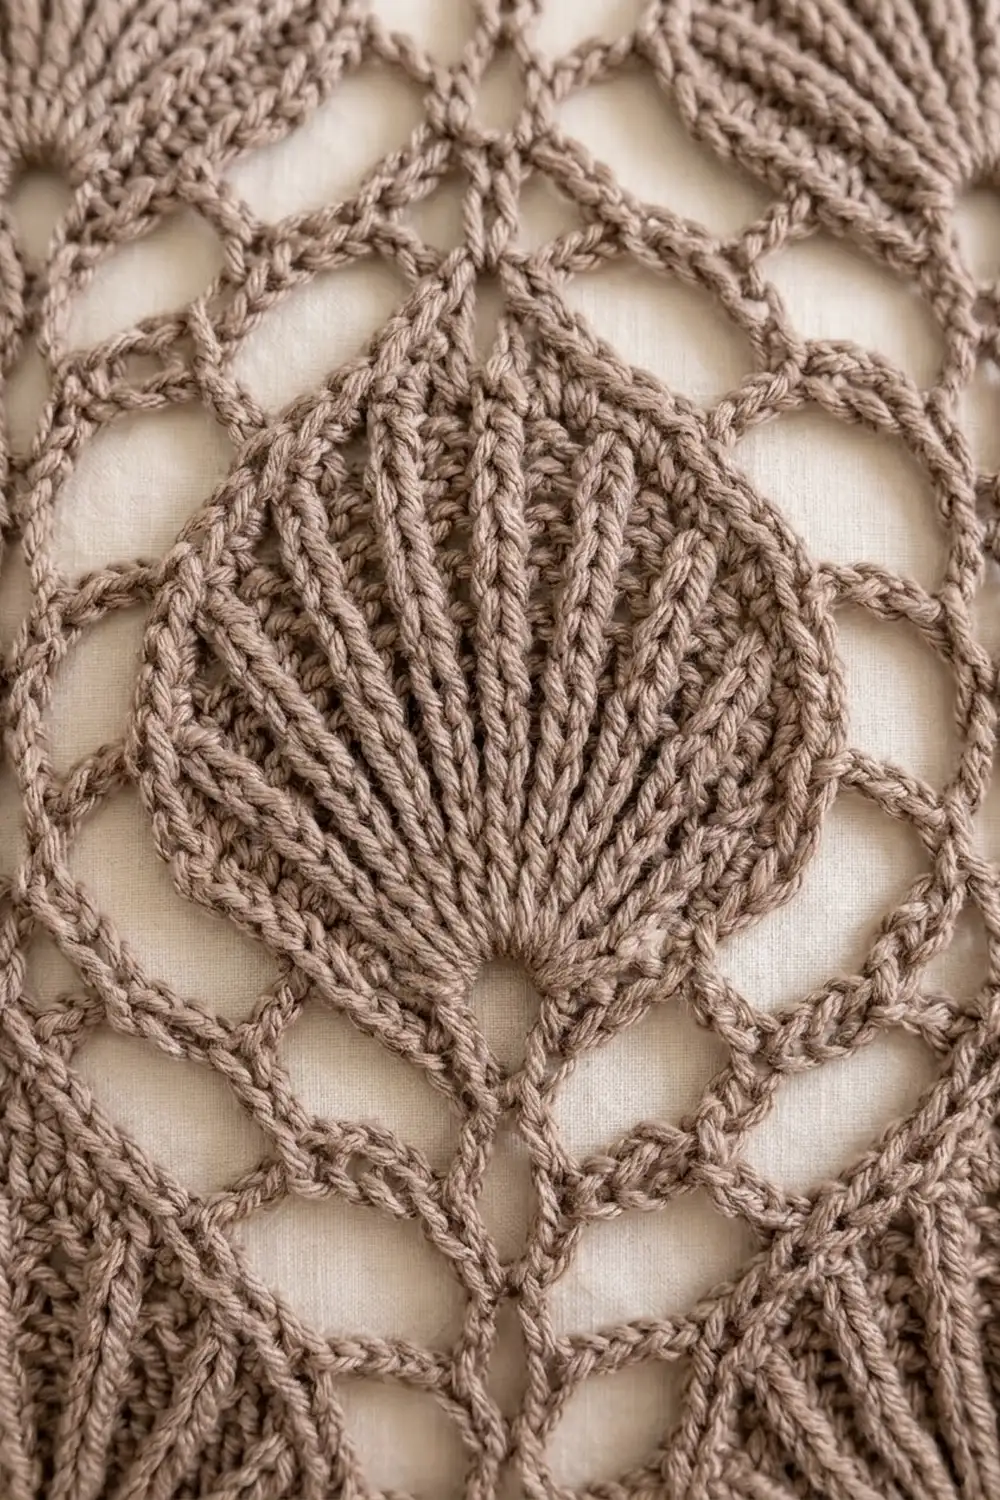
Motif (Make 64)
The Fan (worked in turned rows)
Ch 5 and sl st to the first ch to form a ring.
Row 1 (RS): Ch 3 (counts as dc), 8 dc in ring. Turn. (9 sts)
St 1 and st 9 are edge sts. Sts 2–8 are the 7 ribs.
Row 2 (WS): Ch 3 (counts as dc throughout), BPdc around the next st, dc in the sp before the next st 6 times, BPdc around the next st, dc in top of tch. Turn. (15 sts: 2 edge sts, 7 ribs, 6 wedge sts)
Row 3 (RS): Ch 3, FPdc around the next rib, 2 dc in the next wedge st, FPdc around the next rib 6 times, dc in top of tch. Turn. (21 sts, 2 sts per wedge)
Row 4 (WS): Ch 3, BPdc around the next rib, dc in each of the next 2 wedge sts, BPdc around the next rib 6 times, dc in top of tch. Turn. (21 sts)
Row 5 (RS): Ch 3, FPdc around the next rib, dc in the next wedge st, 2 dc in the next wedge st, FPdc around the next rib 6 times, dc in top of tch. Turn. (27 sts, 3 per wedge)
Row 6 (WS): Work as Row 4, with dc in each of the 3 wedge sts. Turn. (27 sts)
Row 7 (RS): Ch 3, FPdc around the next rib, dc in each of the next 2 wedge sts, 2 dc in the next wedge st, FPdc around the next rib 6 times, dc in top of tch. Turn. (33 sts, 4 per wedge)
Row 8 (WS): Ch 3, BPdc around the next rib, dc in each of the next 3 wedge sts, 2 dc in the next wedge st, BPdc around the next rib 6 times, dc in top of tch. Turn. (39 sts, 5 per wedge)
Row 9 (RS, scallops): Ch 1, sc in the first st, sc in the next rib, skip 2 wedge sts, shell in the next (center) wedge st, skip 2 wedge sts, sc in the next rib 6 times, sc in top of tch. Do not turn or fasten off. (39 sts: 9 sc and 6 shells)
The ribs run up between the shells, so each scallop sits on a wedge. The fan is pointed at the ring and rounded at the top.
The Lattice Frame (worked in rounds)
Call the last sc of Row 9 Point A and the first sc of Row 9 Point B.
Round 1 (RS): Ch 1, sc in Point A.
– Down the first straight side of the fan: ch 6, sc around the end st of Row 6, ch 6, sc around the end st of Row 3, ch 6, sc into the ring at the fan’s point.
– Up the second straight side: ch 6, sc around the end st of Row 3, ch 6, sc around the end st of Row 6, ch 6, sc in Point B.
– Across the scallops: ch 6, sc in the center dc of shell 1, ch 6, sc in the sc above the next rib, ch 6, sc in the center dc of the next shell 5 times, ch 6, sl st to the first sc.
(18 sc and 18 ch-6 loops: 6 along the straight sides and 12 across the scallops)
Number these loops 1–18, starting with the first loop you made after Point A.
Round 2: Sl st into loop 1, ch 1.
– Work (sc, ch 7, sc) in loops 1, 6, 9, 12, 13, and 16.
– Work 1 sc in every other loop.
– Work ch 7 between every pair of sc.
– Ch 7 and join with a sl st to the first sc.
(24 sc and 24 ch-7 loops: 18 sc worked 1 per loop + 6 extra sc from the doubled loops)
Number the new loops 1–24, starting with the loop made inside Round 1 loop 1. Place a marker in loops 1, 7, 13, and 19. These are the four corners. There should be 5 unmarked loops between each pair of markers.
Round 3: Sl st into loop 1. Ch 3 (counts as dc), 2 dc, tr, 3 dc in the same loop. 6 dc in each of the next 5 loops, (3 dc, tr, 3 dc) in the next marked loop 3 times. 6 dc in each of the last 5 loops. Join to the top of the ch-3 and fasten off.
(148 sts: 4 corner groups of 7 + 20 side loops of 6)
Per side: corner tr + 3 dc + 30 dc + 3 dc + corner tr = 38 sts, including both corner trs. Check: 4 sides x 38 = 152, minus the 4 shared corner trs = 148.
Make All Pieces
Make 64 motifs in Taupe. Block them all to 12 in (30.5 cm) square before joining.
Lay them out with every fan pointing toward the same edge, which becomes the head of the bed:
Head of bed
M M M M M M M M
M M M M M M M M
M M M M M M M M
M M M M M M M M
M M M M M M M M
M M M M M M M M
M M M M M M M M
M M M M M M M M
Foot of bed
That is 8 columns x 8 rows = 64 motifs.
Joining
Method: Slip-stitch join with the RS together, working through the back loops.
- Hold two motifs RS together with their Round 3 edges lined up.
- Starting in the corner trs, sl st through the back loop of each pair of matching sts. Work all 38 sts, ending in the opposite corner trs.
- Join the motifs into 8 horizontal strips first. Then join the strips along the long seams, passing straight through each four-way intersection by working the corner trs together.
Stitch-to-stitch logic: Each side has 38 sts, so every seam pairs st 1 with st 1 and st 38 with st 38. No stitches are added or skipped.
Tension: Keep your slip stitches as loose as your dc. A tight seam makes the lace pucker. If needed, go up one hook size for joining.
Size checkpoint: The joined bedspread measures 96 in x 96 in (243.8 cm x 243.8 cm). Each side of the bedspread has 8 x 38 = 304 sts.
Border
Border gauge: 38 sc = 12 in (30.5 cm), matching the motif edge. Join the yarn in any corner tr of the bedspread with the RS facing.
Round 1: Ch 1. (sc, ch 2, sc) in the corner tr, then sc in each st across to the next corner tr. Work each motif’s corner tr at a seam separately. Repeat around and join.
(1,212 sc worked 1 per existing st + 4 extra sc at the corners = 1,216 sc, plus 4 corner ch-2 sps. That is 304 sc per side.)
Round 2: Sl st into the corner ch-2 sp, ch 1. (sc, ch 3, sc) in the same sp. [Ch 3, skip 1 sc, sc in the next sc] 152 times, ch 3, (sc, ch 3, sc) in the next corner sp. Repeat around, omitting the last corner group, and join.
(153 ch-3 loops per side + 4 corner loops = 616 loops, and 616 sc)
Round 3: Sl st into the corner loop. Ch 3 (counts as dc), 6 dc in the same loop. [Sc in the next loop, shell in the next loop] 76 times, sc in the next loop, 7 dc in the corner loop. Repeat around, omitting the last corner, and join.
(Per side: 77 sc and 76 shells. Plus 4 corner groups of 7 dc.)
Round 4 (picots): Ch 1.
– Each 5-dc shell: sc in the next 2 dc, picot in the center dc, sc in the next 2 dc.
– Each sc: sl st in it.
– Each 7-dc corner: sc in the next 3 dc, picot in the 4th dc, sc in the next 3 dc.
Join and fasten off. (Per side: 77 sl st, 456 sc, and 76 picots. Each corner: 8 sc and 1 picot.)
Why the math works: Each side starts with 304 sc. Skipping every other sc uses them up exactly in 152 repeats, which leaves 153 loops. Because 153 is odd, the sc-and-shell pattern starts and ends with a sc on every side, so the scallops are symmetric at all four corners. The border adds 2 in (5.1 cm) per side: 96 + 2 + 2 = 100 in (254.0 cm).
Final Blocking
- Weave in all ends along the seams, not through the open lattice.
- Lay the bedspread flat on blocking mats, a clean carpet, or a bed covered with towels.
- Mist it evenly until damp, without soaking.
- Pin the four corners to a 100 in (254.0 cm) square.
- Pin along the edges at each seam line, checking that each motif spans 12 in (30.5 cm).
- Pin the tip of every border picot to open the scallops.
- Pat the fans flat and gently open the chain loops with your fingers.
- Let it dry completely before unpinning.
Final Quality-Control Checklist
- [ ] Every fan has 7 raised ribs and 6 scallops.
- [ ] Every motif has 38 sts per side, including the corner trs.
- [ ] All fans point toward the head of the bed.
- [ ] The seams lie flat with no puckering at the intersections.
- [ ] The bedspread measures 96 in (243.8 cm) before the border.
- [ ] Each border side has 304 sc in Round 1 and 153 loops in Round 2.
- [ ] The scallops are symmetric at all four corners.
- [ ] The finished size is 100 in x 100 in (254.0 cm x 254.0 cm).
- [ ] All ends are secure and hidden.
Troubleshooting
- The fan cups instead of lying flat: Your post stitches are too tight. Loosen them, or check your Row 2–8 counts.
- The fan ruffles: You added extra wedge increases. Recount against the row totals.
- The ribs look sunken: You used FP and BP on the wrong rows. Use FPdc on RS rows and BPdc on WS rows.
- The motif won’t square up: Check the marker spacing. You need 5 loops between corners. Block firmly.
- The corners look rounded: Pin the corner trs to a sharp point while blocking.
- The border ripples: Your Round 2 chains are too long. Try ch 2 instead of ch 3 without changing the stitch counts.
- The border cups: Use a hook one size larger for the border.
Care
Hand wash or machine wash on a gentle cold cycle in a mesh bag, following your yarn label. Reshape and dry flat. Never hang it wet, because the lace will stretch.

Final Notes
The measurement chain is simple:
– The fan reaches 5.5 in (14.0 cm).
– The finished motif reaches 12 in (30.5 cm), with 38 sts per side.
– Eight motifs across give 96 in (243.8 cm) and 304 sts per side.
– The 2 in (5.1 cm) border brings the bedspread to 100 in (254.0 cm).
Check each step and the finished bedspread will block out square and calm.
Happy crocheting!