

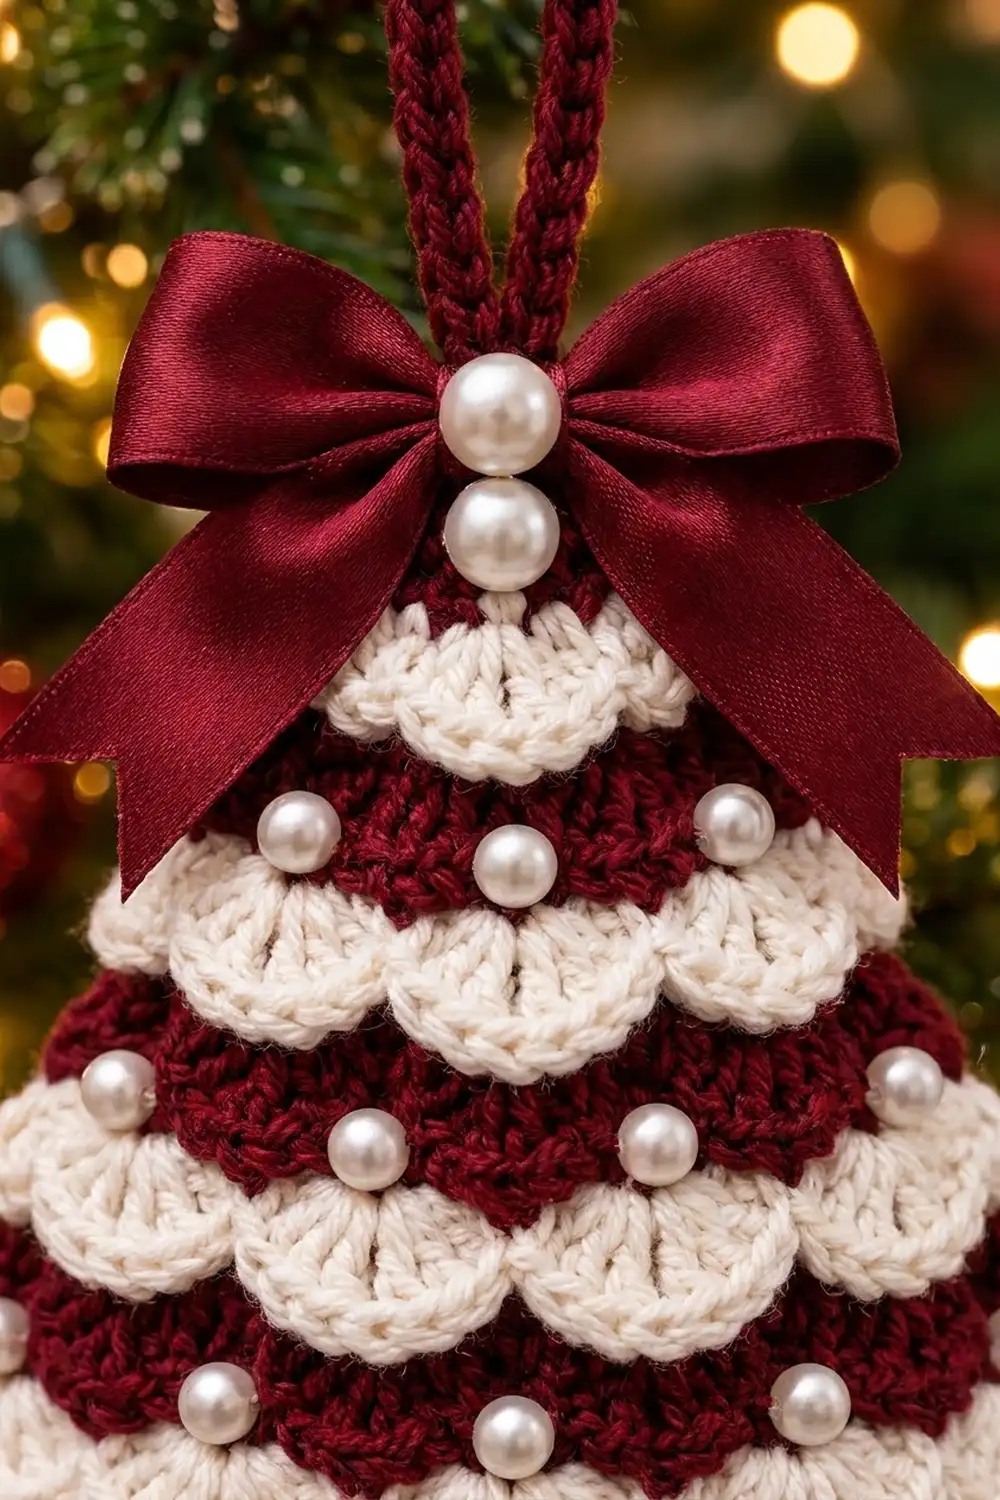
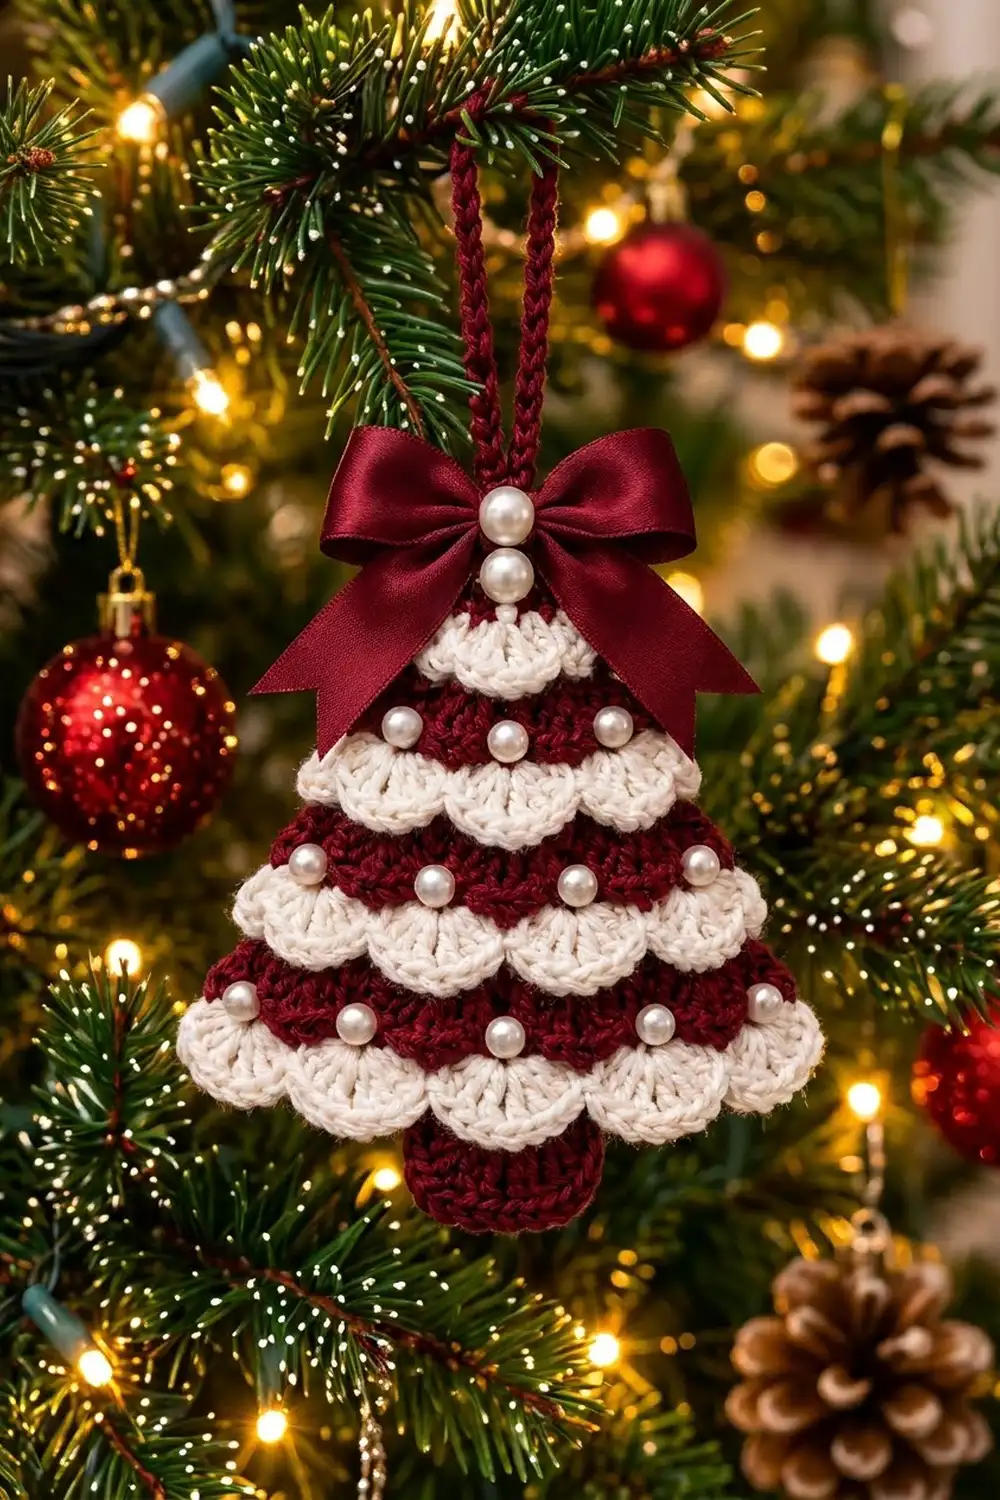
This little tree ornament has deep cranberry stitches covered in tiers of cream scallops. Tiny pearl beads and a satin bow at the top finish it off. It looks fancy on a branch, but it is one flat piece worked in simple rows.
It uses two yarn colors. Rich burgundy makes the tree body, trunk, edging and hanging loop, and soft cream makes the six scalloped tiers. A matching burgundy satin ribbon and white pearl beads add some sparkle. The style is classic, cozy and a bit vintage, and it suits red-and-gold decor.
The pattern uses US crochet terms. The finished ornament is about 6 in (15.2 cm) wide across the bottom tier. It is about 5 in (12.7 cm) tall from the tip to the base of the trunk, or about 6.5 in (16.5 cm) tall with the hanging loop.
Construction is straightforward. You work the burgundy triangle from the tip down in half double crochet rows. Every other row goes into back loops only, which leaves a line of front loops free. Next you add the trunk and work a single crochet edging up both sides, with the hanging loop at the tip. Last, you work cream shell frills into the free front loops and add the pearls and bow.
Finished Size and Construction
- Finished size: 6 in (15.2 cm) wide x 5 in (12.7 cm) tall; 6.5 in (16.5 cm) tall with the loop
- Skill level: Easy (advanced beginner)
- Terminology: US crochet terms
- Yarn weight: DK (light worsted, category 3)
- Hook: 3.5 mm (E-4)
- Number of pieces: 1 (single ornament)
- Layout: one flat triangular tree with six layered cream tiers and a short trunk
- Piece size: 6 in (15.2 cm) x 5 in (12.7 cm) after edging
- Size before border: 5.5 in (14.0 cm) wide x 4.75 in (12.1 cm) tall
- Border depth: 1 row of single crochet, about 0.25 in (0.6 cm)
Materials
Choose a smooth DK cotton or cotton blend. Cotton gives crisp scallops and clear stitches, and it blocks flat. A yarn with about 115 m per 50 g is ideal.
- Burgundy (Color A): 10 g, about 23 m, for the body, trunk, edging and hanging loop
- Cream (Color B): 6 g, about 14 m, for the six scalloped tiers
Tools and notions:
- 3.5 mm (E-4) crochet hook
- Tapestry needle
- Sewing needle and burgundy or cream thread
- 27 white pearl beads: 25 at 6 mm and 2 at 8 mm
- 14 in (35.6 cm) burgundy satin ribbon, 1 in (2.5 cm) wide
- Scissors, stitch markers, pins and a blocking mat
- Optional: fabric glue or clear nail polish to seal the ribbon ends
The yarn amounts include a margin of about 30% for checking gauge and weaving in ends.
Abbreviations (US Terms)
- ch – chain
- sl st – slip stitch
- sc – single crochet
- hdc – half double crochet
- dc – double crochet
- st(s) – stitch(es)
- sk – skip
- BLO – back loop only
- FLO – front loop only
- RS / WS – right side / wrong side
Special stitch – Shell: (hdc, 3 dc, hdc) all in the same stitch. A shell has 5 stitches. The middle dc forms the peak of the scallop.
Turning chain: The ch 2 at the start of each hdc row does not count as a stitch.
Gauge and Checkpoints
Gauge in hdc worked flat: 18 sts and 14 rows = 4 in (10.2 cm), which is 4.5 sts and 3.5 rows per inch.
Gauge in sc along the edging: 22 sc = 4 in (10.2 cm), or 5.5 sc per inch.
This is a small project, so the ornament itself is your test piece. Measure it at these checkpoints:
- After Row 6 (13 sts): about 2.9 in (7.4 cm) wide and 1.75 in (4.4 cm) tall
- After Row 12 (25 sts): about 5.5 in (14.0 cm) wide and 3.5 in (8.9 cm) tall
- After the trunk: about 4.75 in (12.1 cm) tall in total
If Row 6 is wider than 3 in (7.6 cm), go down half a hook size. If it is narrower than 2.75 in (7.0 cm), go up half a hook size. Rip back and start again. It only takes a few minutes and keeps the frills in proportion.
Tree Body
Work with Color A from the tip down. From Row 3 on, odd rows are RS rows worked in BLO. Even rows are WS rows worked through both loops. Each BLO row leaves the front loops of the row before it free on the RS, and the cream tiers go into those free loops.
Keep your tension even. Tight increases at the edges make the sides curl, and loose BLO rows make the free loops sag.
Ch 5.
Row 1 (RS): Hdc in 3rd ch from hook and in each of next 2 ch. Turn. (3 sts) The 2 skipped ch do not count as a stitch.
Row 2 (WS): Ch 2, 2 hdc in first st, hdc in next st, 2 hdc in last st. Turn. (5 sts)
Row 3 (RS): Ch 2, working in BLO: 2 hdc in first st, hdc in each st to last st, 2 hdc in last st. Turn. (7 sts)
Row 4 (WS): Ch 2, working through both loops: 2 hdc in first st, hdc in each st to last st, 2 hdc in last st. Turn. (9 sts)
Rows 5–12: Repeat Rows 3 and 4 four more times. Each row has 2 more sts than the row before it.
- Row 5: 11 sts (BLO)
- Row 6: 13 sts
- Row 7: 15 sts (BLO)
- Row 8: 17 sts
- Row 9: 19 sts (BLO)
- Row 10: 21 sts
- Row 11: 23 sts (BLO)
- Row 12: 25 sts
Fasten off after Row 12.
Free front loops now run along Rows 2, 4, 6, 8 and 10 on the RS. Row 12 still has both loops free. The trunk will use its back loops and the bottom tier will use its front loops.
Put a marker in the free loops of each even row so you can find them easily later.
Trunk
Hold the tree with the RS facing you and the tip pointing up. Count the stitches of Row 12 from the right edge and skip the first 10 sts.
Trunk Row 1 (RS): Join Color A with a sl st in the BLO of the 11th st. Ch 2, hdc in BLO of same st and in BLO of next 4 sts. Turn. (5 sts) This leaves 10 sts on each side of the trunk.
Trunk Rows 2–4: Ch 2, hdc in each st across. Turn. (5 sts)
Trunk Row 5: Ch 1, 2 sc in first st, sc in next 3 sts, 2 sc in last st. (7 sts) This row works 5 sts one into each stitch, plus 2 extra sts. That gives the trunk its slightly flared, rounded base.
Fasten off. The trunk is about 1.1 in (2.8 cm) wide and adds about 1.25 in (3.2 cm) of height.
Border (Side Edging and Hanging Loop)
The border is a single row of sc along the two slanted sides, with the hanging loop worked at the tip. It smooths the stepped hdc edges and gives the tree a crisp outline.
Border gauge: 5.5 sc per inch (22 sc = 4 in / 10.2 cm).
Hold the tree with the RS facing you. Join Color A with a sl st at the bottom left corner, in the side edge of Row 12.
Left side: Ch 1, then work 2 sc into the side of each row end, from Row 12 up to Row 1. (24 sc)
Tip: Work into the free loops of the foundation chain. Sc in the first ch and sc in the center ch. Ch 18, then work 26 sc over the ch-18 to cover the loop. Sc in the center ch again, then sc in the last ch. (4 sc on the tip + 26 sc on the loop)
Right side: Work 2 sc into the side of each row end, from Row 1 down to Row 12. (24 sc)
Fasten off. Total: 52 sc on the tree edge + 26 sc on the loop.
Why the math works: Each slanted side is about 4.2 in (10.7 cm) long. At 5.5 sc per inch, a side needs about 23 sc, so 12 rows x 2 sc = 24 sc lies flat. Fewer stitches would pull the edge in, and more would make it ripple. Packing 26 sc over 18 ch makes a firm, smooth loop about 1.5 in (3.8 cm) tall.
Cream Tiers
Each tier is one row of shells worked into a line of free front loops. Each tier row has 4k + 1 sts, where k is the number of shells. That way the shells always come out even, with an sc at each end.
| Tier | Worked into | Free loops | Shells | Sc |
|---|---|---|---|---|
| 1 | Row 2 | 5 | 1 | 2 |
| 2 | Row 4 | 9 | 2 | 3 |
| 3 | Row 6 | 13 | 3 | 4 |
| 4 | Row 8 | 17 | 4 | 5 |
| 5 | Row 10 | 21 | 5 | 6 |
| 6 | Row 12 | 25 | 6 | 7 |
Hold the tree with the RS facing you and the tip pointing up. The free loops sit at the lower edge of each even row, so the shells grow downward and overlap the burgundy rows below.
Each tier: Join Color B with a sl st in the first free front loop at the right end of the row. Ch 1, sc in the same loop, sk 1 loop, shell in next loop, sk 1 loop, sc in next loop; repeat from * to the end. Fasten off.
Start with Tier 6 at the bottom, in the free front loops of Row 12, and work up to Tier 1. That way each upper tier sits on top of the one below it.
- Tier 1: 1 shell, 2 sc (7 sts)
- Tier 2: 2 shells, 3 sc (13 sts)
- Tier 3: 3 shells, 4 sc (19 sts)
- Tier 4: 4 shells, 5 sc (25 sts)
- Tier 5: 5 shells, 6 sc (31 sts)
- Tier 6: 6 shells, 7 sc (37 sts)
Tier 6 hangs just below the bottom edge of the body, so its scallops form the hem, and the trunk peeks out in the center. About 0.25 in (0.6 cm) of burgundy shows between the tiers.
Leave cream tails of about 4 in (10.2 cm). They are easier to hide behind the scallops than short tails.
Pearls and Bow
With sewing thread, sew one 6 mm pearl on the burgundy band directly above each sc of Tiers 2–6. Each pearl sits in the dip between two scallops or at the outer end of a tier. That uses 3 + 4 + 5 + 6 + 7 = 25 pearls. The bow covers Tier 1, so it gets no pearls.
Tie the ribbon into a bow about 3 in (7.6 cm) wide, with two tails about 2 in (5.1 cm) long. Cut the tails at an angle or in a V and seal the ends. Sew the knot to the tip just below the hanging loop, over Tier 1. Sew the two 8 mm pearls on the knot, one above the other.
Final Blocking
- Weave in all ends before blocking. Hide the cream tails behind the frills.
- Mist the ornament lightly until it is damp but not wet. Keep the ribbon dry.
- Pin the tree to the mat RS up, with the tip directly above the center of the trunk.
- Pin the bottom tier to 6 in (15.2 cm) wide and the body to 5 in (12.7 cm) tall.
- Smooth each scallop downward with your fingers so the tiers lie flat and overlap evenly.
- Shape the hanging loop into a neat oval.
- Let it dry completely, then unpin. If you prefer, add the pearls and bow after blocking.
Final Quality-Control Checklist
- Row 12 has 25 sts, and the trunk is centered with 10 sts on each side.
- Each tier has the right number of shells: 1, 2, 3, 4, 5 and 6.
- Each tier starts and ends with an sc at the side edge.
- Both slanted sides have 24 sc and look straight, not wavy.
- The hanging loop is firm and fully covered with 26 sc.
- Burgundy shows evenly between all the tiers.
- All 25 pearls are secure and evenly placed.
- The bow is centered and tightly sewn.
- The finished size is about 6 in (15.2 cm) x 5 in (12.7 cm).
Troubleshooting
The tree leans to one side. You probably missed an increase on one edge. Count every row; each one must grow by exactly 2 sts.
The shells don’t fit evenly. The number of free loops is wrong. Recount the row: it must be 5, 9, 13, 17, 21 or 25.
I can’t find the free loops. You may have worked a RS row through both loops. Check that Rows 3, 5, 7, 9 and 11 were worked in BLO.
The tiers cover all the burgundy. Your dc are tall. Try pulling the yarn-over tighter, or change the shell to (hdc, 3 hdc, hdc).
The side edges ripple. Work 3 sc over every 2 row ends instead of 2 sc per row end.
The loop flops. Pack more sc over the chain, up to 28, or use a slightly smaller hook for the loop.
Care
Spot clean with a damp cloth and mild soap, then lay flat to dry. Store the ornament flat in tissue paper so the bow and scallops keep their shape.
Final Notes
The measurements build on each other. Row 6 at 2.9 in (7.4 cm) wide confirms your gauge, and Row 12 at 5.5 in (14.0 cm) confirms the body. The trunk brings the height to 4.75 in (12.1 cm), and the edging brings the tree to 6 in (15.2 cm) x 5 in (12.7 cm). If those numbers are right, the six cream tiers will fit.
Make one for your own tree, or a few to give as gifts. Happy crocheting!