

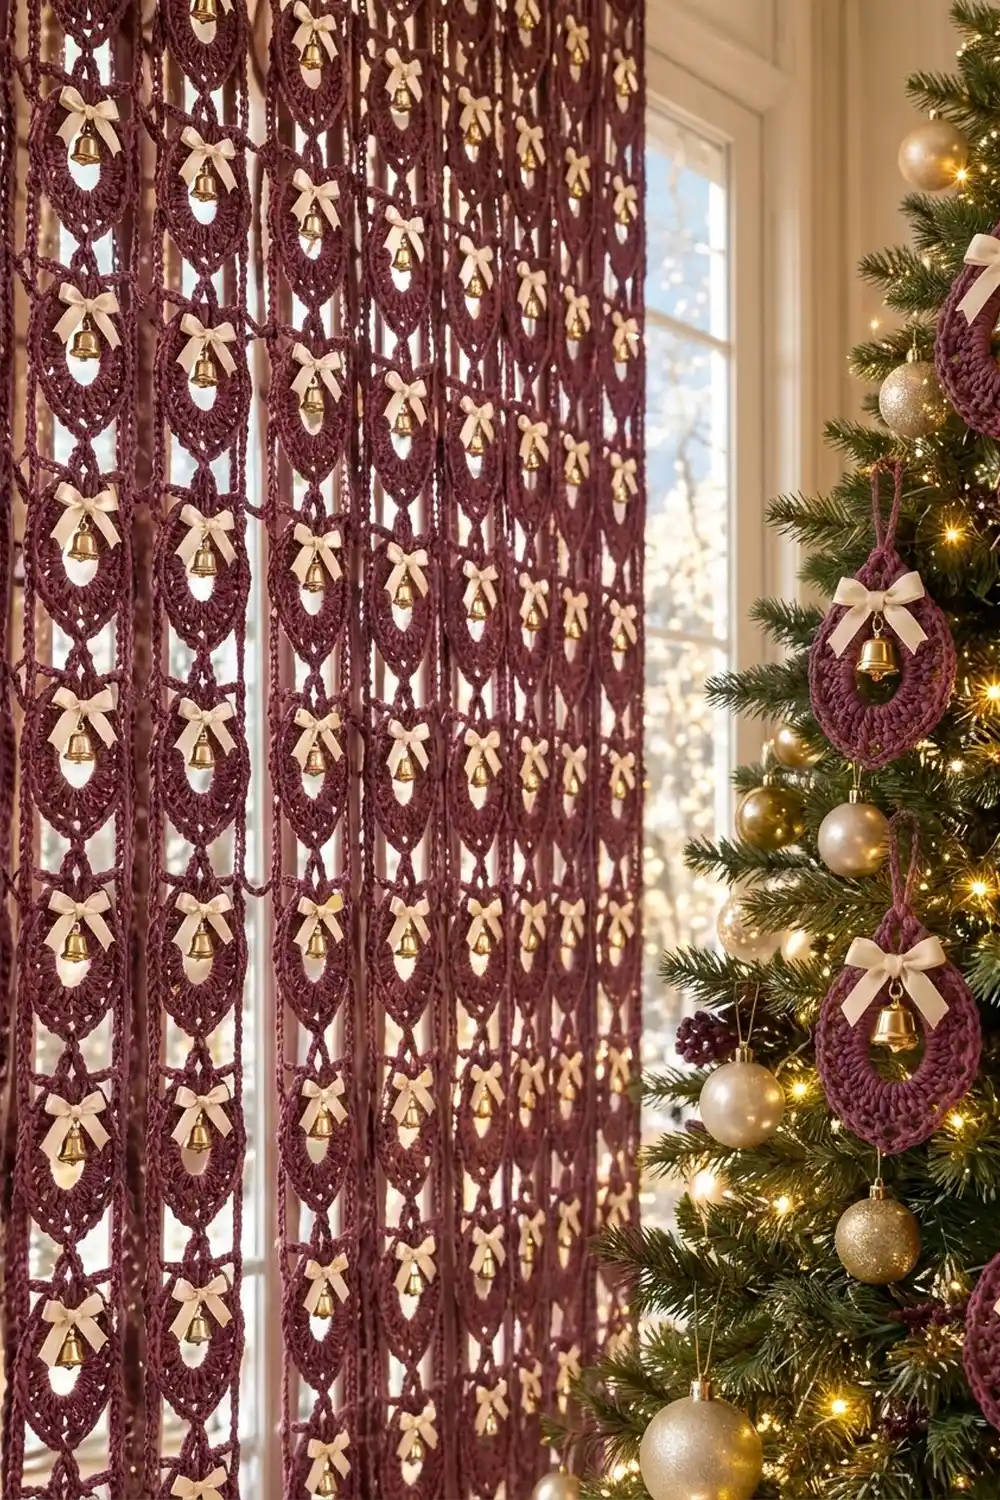
This curtain is made of open teardrop motifs in a deep mulberry burgundy. Each teardrop has a solid crescent of stitches that is thick at the bottom and thin at the top. Around that is a lacy round of chain spaces and a scalloped outer edge. A cream satin bow with a small gold jingle bell sits at the top of every opening.
The motifs hang in vertical strands joined by doubled chain links. The strands are joined to each other at their widest points, which makes a light lattice that lets light through. It works well on a window or as a festive doorway panel.
The pattern uses US crochet terms. The finished curtain measures about 32 in (81.3 cm) wide and 47.3 in (120.1 cm) long, including the rod-pocket header.
Construction is simple. You make 64 motifs and join them as you go in the last round, in 8 columns of 8 motifs. Then you crochet a separate header band, fold it into a rod pocket, and hang the 8 columns from its lower edge with chain hangers. Bows and bells go on last.
Finished Size and Construction
- Finished size: about 32 in (81.3 cm) wide x 47.3 in (120.1 cm) long
- Skill level: Intermediate
- Terminology: US crochet terms
- Yarn weight: DK (#3)
- Hook: 4.0 mm (US G-6)
- Number of pieces: 64 teardrop motifs plus 1 header band
- Layout: 8 columns x 8 motifs
- Motif size: 3.5 in (8.9 cm) wide x 4.5 in (11.4 cm) tall, not counting the tip loop
- Motif panel before header: about 31.5 in (80.0 cm) wide x 44.75 in (113.7 cm) long
- Header depth: about 1.3 in (3.3 cm) after folding. The hangers add about 1.25 in (3.2 cm).
Materials
Pick a smooth DK cotton or cotton blend with a soft sheen. Cotton holds the teardrop shape well and doesn’t stretch much while hanging. Avoid fuzzy yarns, because they hide the lace.
- Mulberry burgundy DK yarn: about 230 g (520 m / 569 yd)
- Cream satin ribbon, 3/8 in (1.0 cm) wide: 15 m (16.4 yd), cut into 64 pieces of 8 in (20.3 cm)
- Gold jingle bells, 15 mm: 64
- 4.0 mm (US G-6) crochet hook
- Tapestry needle
- Cream sewing thread and a sharp needle
- Locking stitch markers
- Scissors, pins, blocking mat, spray bottle
- Measuring tape
- Curtain rod or tension rod up to 1 in (2.5 cm) thick
Yarn and ribbon quantities include a margin of about 15% for gauge differences and test pieces.
Abbreviations (US Terms)
- ch – chain
- sl st – slip stitch
- sc – single crochet
- hdc – half double crochet
- dc – double crochet
- st(s) – stitch(es)
- sp – space
- RS – right side
- WS – wrong side
Scallop: (sc, hdc, sc) worked in the same ch-2 sp.
Tip loop: (sc, ch 4, sc) worked in the same st.
Side join: (sc, ch 2, sl st in center hdc of the neighbor’s matching scallop, ch 2, sc) worked in one ch-2 sp. This replaces one scallop.
Vertical link: (sc, ch 6, sl st in bottom anchor sc of the motif above, ch 6, sc) worked in one st. This replaces the tip loop.
Gauge and Checkpoints
Header gauge: 16 sc x 18 rows = 4 in (10.2 cm) in sc rows.
Motif gauge: one finished motif = 3.5 in (8.9 cm) wide x 4.5 in (11.4 cm) tall.
Make one full motif first, without joins, and block it lightly. This motif sets the size of everything else.
Checkpoints for a single motif, measured flat:
- After Round 2: about 2.75 in (7.0 cm) wide x 3.5 in (8.9 cm) tall
- After Round 3: about 3.25 in (8.3 cm) wide x 4.25 in (10.8 cm) tall
- After Round 4: 3.5 in (8.9 cm) wide x 4.5 in (11.4 cm) tall
- Center opening: about 1.5 in (3.8 cm) wide x 2.25 in (5.7 cm) tall
If your motif is more than 0.25 in (0.6 cm) too big, go down a hook size. If it’s more than 0.25 in (0.6 cm) too small, go up a hook size. Check the header gauge too. Its 16 sc per 4 in must match the 4 in column pitch, as explained in the Border section.
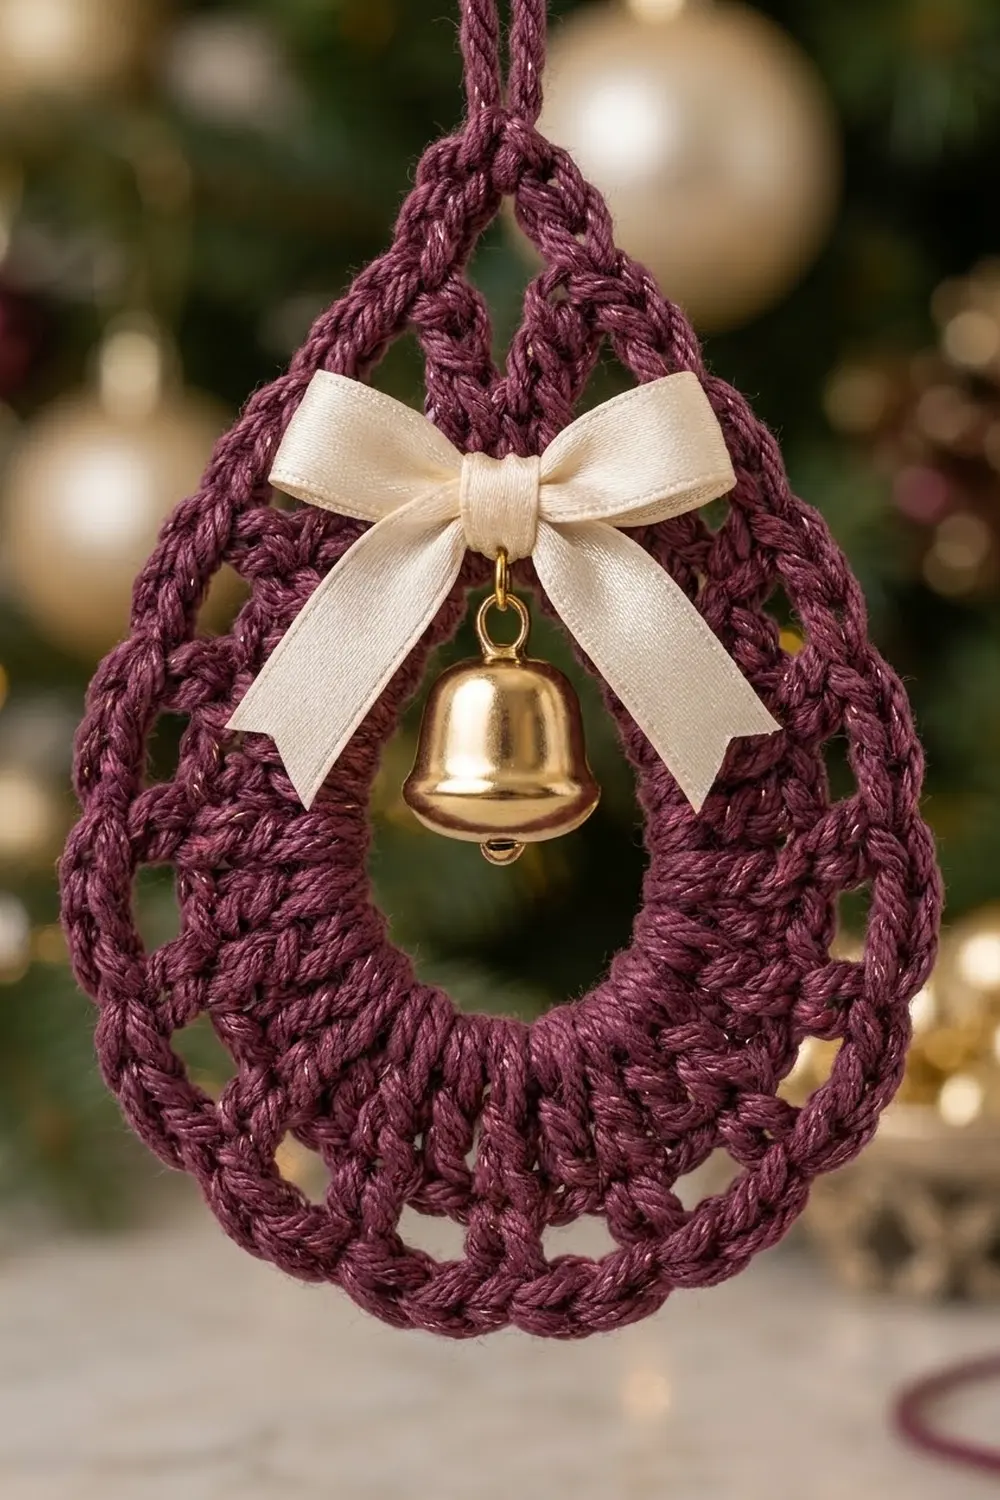
Teardrop Motif
The top point of the teardrop sits over the join of each round. Rounds 1 and 2 use short stitches at the top and tall stitches at the bottom. This makes the crescent shape: a thick band at the bottom and a thin band near the point.
Foundation: Ch 32. Sl st in the first ch to form a ring, taking care not to twist.
Round 1 (RS): Ch 1. Work in each ch around: sc in first 4 ch, hdc in next 4 ch, dc in next 16 ch, hdc in next 4 ch, sc in next 4 ch. Sl st in first sc to join. (32 sts)
Round 2: Ch 1. Sc in first 4 sts, hdc in next 4 sts, dc in next 4 sts, 2 dc in each of next 8 sts, dc in next 4 sts, hdc in next 4 sts, sc in next 4 sts. Sl st in first sc to join. (40 sts)
All 8 increases sit at the bottom curve. The band gets wider there while the top stays narrow.
Round 3 (lace round): Ch 5 (counts as dc + ch 2), skip next st. Dc in next st, ch 2, skip next st. Repeat from * around. Sl st in 3rd ch of beginning ch-5 to join. (20 dc, 20 ch-2 sps)
The beginning ch-5 is dc 1, at the top point. Dc 11 lands in st 21 of Round 2, at the bottom center. Number the ch-2 sps 1 to 20, going around from the top. Sp 7 and sp 14 sit at the widest part of the motif, one on each side.
Round 4 (scallop edge): Ch 1. Work a tip loop in the same st as the join (dc 1). Work a scallop in each of ch-2 sps 1–10. Sc in dc 11 (this is the bottom anchor sc). Work a scallop in each of ch-2 sps 11–20. Sl st in first sc to join. Fasten off.
Round 4 count: 20 scallops x 3 sts = 60 sts, plus 2 sc in the tip loop, plus 1 bottom anchor sc = 63 sts and 1 ch-4 tip loop.
Weave in ends on the WS, through the solid crescent where they won’t show.
Bow and Bell (add after blocking)
Tie each 8 in (20.3 cm) ribbon into a small bow about 1.5 in (3.8 cm) wide. Sew a bell to the back of the knot with cream thread so it hangs down about 0.5 in (1.3 cm). Stitch the bow to the RS of Round 1, right under the top point, so the bell hangs inside the opening.
Make All Pieces
You need 64 motifs, all in mulberry burgundy.
- First motif (top of column 1), no joins: 1
- Rest of column 1, vertical link only: 7
- Top motif of columns 2–8, side join only: 7
- All other motifs, vertical link and side join: 49
Work column by column, top to bottom, from left to right.
     C1  C2  C3  C4  C5  C6  C7  C8
R1   M - M - M - M - M - M - M - M
     |   |   |   |   |   |   |   |
R2   M - M - M - M - M - M - M - M
     |   |   |   |   |   |   |   |
R3   M - M - M - M - M - M - M - M
     |   |   |   |   |   |   |   |
R4   M - M - M - M - M - M - M - M
     |   |   |   |   |   |   |   |
R5   M - M - M - M - M - M - M - M
     |   |   |   |   |   |   |   |
R6   M - M - M - M - M - M - M - M
     |   |   |   |   |   |   |   |
R7   M - M - M - M - M - M - M - M
     |   |   |   |   |   |   |   |
R8   M - M - M - M - M - M - M - M
M = motif, | = vertical link, – = side join
Joining (Join-As-You-Go)
All joins happen in Round 4. Work Rounds 1–3 of every motif as written.
Vertical link (within a column): For any motif below another, work a vertical link in dc 1 in place of the tip loop: sc, ch 6, sl st in the bottom anchor sc of the motif above, ch 6, sc. The two ch-6 strands make a doubled chain about 1.25 in (3.2 cm) long.
Side join (between columns): For any motif in columns 2–8, the neighbor on the left is already finished. When you reach ch-2 sp 14 (the widest point on the left side), work a side join in place of that scallop: sc, ch 2, sl st in the center hdc of scallop 7 of the motif on the left, ch 2, sc. This leaves a gap of about 0.5 in (1.3 cm).
Stitch logic: Each join replaces exactly one tip loop or one scallop and never adds a stitch. Every motif stays at 63 sts, so all motifs are the same size and line up in straight rows.
Tension: Keep the link chains at the same tension as your motif chains. If the links are tight, the columns pucker. If they’re loose, the motifs sag unevenly. Lay the panel flat after every column and check that the motif centers line up across each row.
Size checkpoints:
- 2 motifs in a column: 4.5 + 1.25 + 4.5 = 10.25 in (26.0 cm)
- Full column: 8 x 4.5 in + 7 x 1.25 in = 44.75 in (113.7 cm)
- Full panel width: 8 x 3.5 in + 7 x 0.5 in = 31.5 in (80.0 cm)
- Column pitch, center to center: 3.5 + 0.5 = 4 in (10.2 cm)
Border (Rod-Pocket Header and Hangers)
On this piece, the border is the header band at the top that holds the rod. The scalloped motif edges are the finished sides and bottom.
Border gauge: 16 sc = 4 in (10.2 cm), which is 4 sc per inch.
Why the math works: The column pitch is 4 in (10.2 cm). At 4 sc per inch, each column gets 16 sc of header. The starting count for the long side is 8 columns x 16 sc = 128 sc, which gives 32 in (81.3 cm). The motif panel is 31.5 in (80.0 cm) wide, so the header extends 0.25 in (0.6 cm) past it on each side. This keeps the outer columns from pulling inward.
Row 1: Ch 129. Sc in 2nd ch from hook and in each ch across. Turn. (128 sc)
Rows 2–12: Ch 1, sc in each st across. Turn. (128 sc per row)
The header is now about 2.7 in (6.9 cm) deep. Each short side is 12 rows, and each long side is 128 sts. Fasten off, leaving a 50 in (127.0 cm) tail.
Fold: Fold the header in half lengthwise with the WS together, so Row 12 meets the foundation chain. Use the tail to whipstitch each Row 12 st to its matching foundation ch, 128 sts to 128 sts. The folded header is about 1.3 in (3.3 cm) deep. Leave both short ends open for the rod.
Hangers: Divide the bottom fold edge into 8 sections of 16 sts. For each column, join yarn at st 8 of its section. Ch 6, sl st through the tip loop of that column’s top motif, ch 6, sl st in st 9 of the same section. Fasten off. (8 hangers, one per 16 sts)
Each hanger sits at the center of its 16-st section, so the hangers are exactly 4 in (10.2 cm) apart. That matches the column pitch.
Total length: 1.3 in header + 1.25 in hanger + 44.75 in panel = about 47.3 in (120.1 cm).
Final Blocking
- Weave in all remaining ends.
- Lay the curtain RS up on a large flat surface or on blocking mats.
- Mist it until it’s damp but not soaked.
- Pin the header straight at 32 in (81.3 cm).
- Pin each column straight down, 4 in (10.2 cm) center to center.
- Shape each teardrop with your fingers to 3.5 in (8.9 cm) x 4.5 in (11.4 cm), and pin a sharp point at the top.
- Open each center to about 1.5 in (3.8 cm) x 2.25 in (5.7 cm).
- Let it dry completely, then unpin.
- Sew on the 64 bows and bells.
Final Quality-Control Checklist
- Every motif has 63 sts in Round 4 and a crescent that is thickest at the bottom.
- Every motif measures 3.5 in (8.9 cm) x 4.5 in (11.4 cm).
- There are 8 columns of 8 motifs.
- All vertical links are doubled ch-6 strands of the same length.
- All side joins are at sps 7 and 14, so the rows line up.
- The header has 128 sts and is 32 in (81.3 cm) wide.
- All 8 hangers are centered on their 16-st sections.
- All bows are centered, and every bell hangs freely inside its opening.
- Total length is about 47.3 in (120.1 cm).
Troubleshooting
Motif curls into a cup: Round 4 is too tight. Go up half a hook size for Round 4 only.
Motif ruffles: The Round 3 chains are too loose. Make the ch-2s snugger.
No clear point at the top: Make sure Rounds 1 and 2 both start with exactly 4 sc. Pin the tip firmly when you block.
Rows don’t line up across the curtain: A side join was worked in the wrong sp. Count from the top (sp 1) and redo the join in sp 14.
Columns are different lengths: Your link chains vary. Redo any link that is more than 0.25 in (0.6 cm) off.
Header is more than 1 in (2.5 cm) wider than the panel: Your sc gauge is loose. Go down a hook size and remake the header with 128 sts.
Bells weigh down the bows: Sew through the bow and into Round 1 twice for extra support.
Care
Hand wash in cool water with mild soap, press the water out in a towel, and dry flat, reshaping each teardrop. Remove the bells before washing if they aren’t rustproof.
Final Notes
The whole curtain follows one measurement chain. A 63-st motif is 3.5 in (8.9 cm) x 4.5 in (11.4 cm). Adding a 0.5 in (1.3 cm) side join gives a 4 in (10.2 cm) column pitch. At 4 sc per inch, that’s 16 header sts per column and 128 sts in total. Vertically, 8 motifs and 7 links of 1.25 in (3.2 cm) make a 44.75 in (113.7 cm) panel. The header and hangers bring the total to about 47.3 in (120.1 cm). Check your first motif carefully and the rest will follow.
Happy crocheting!