

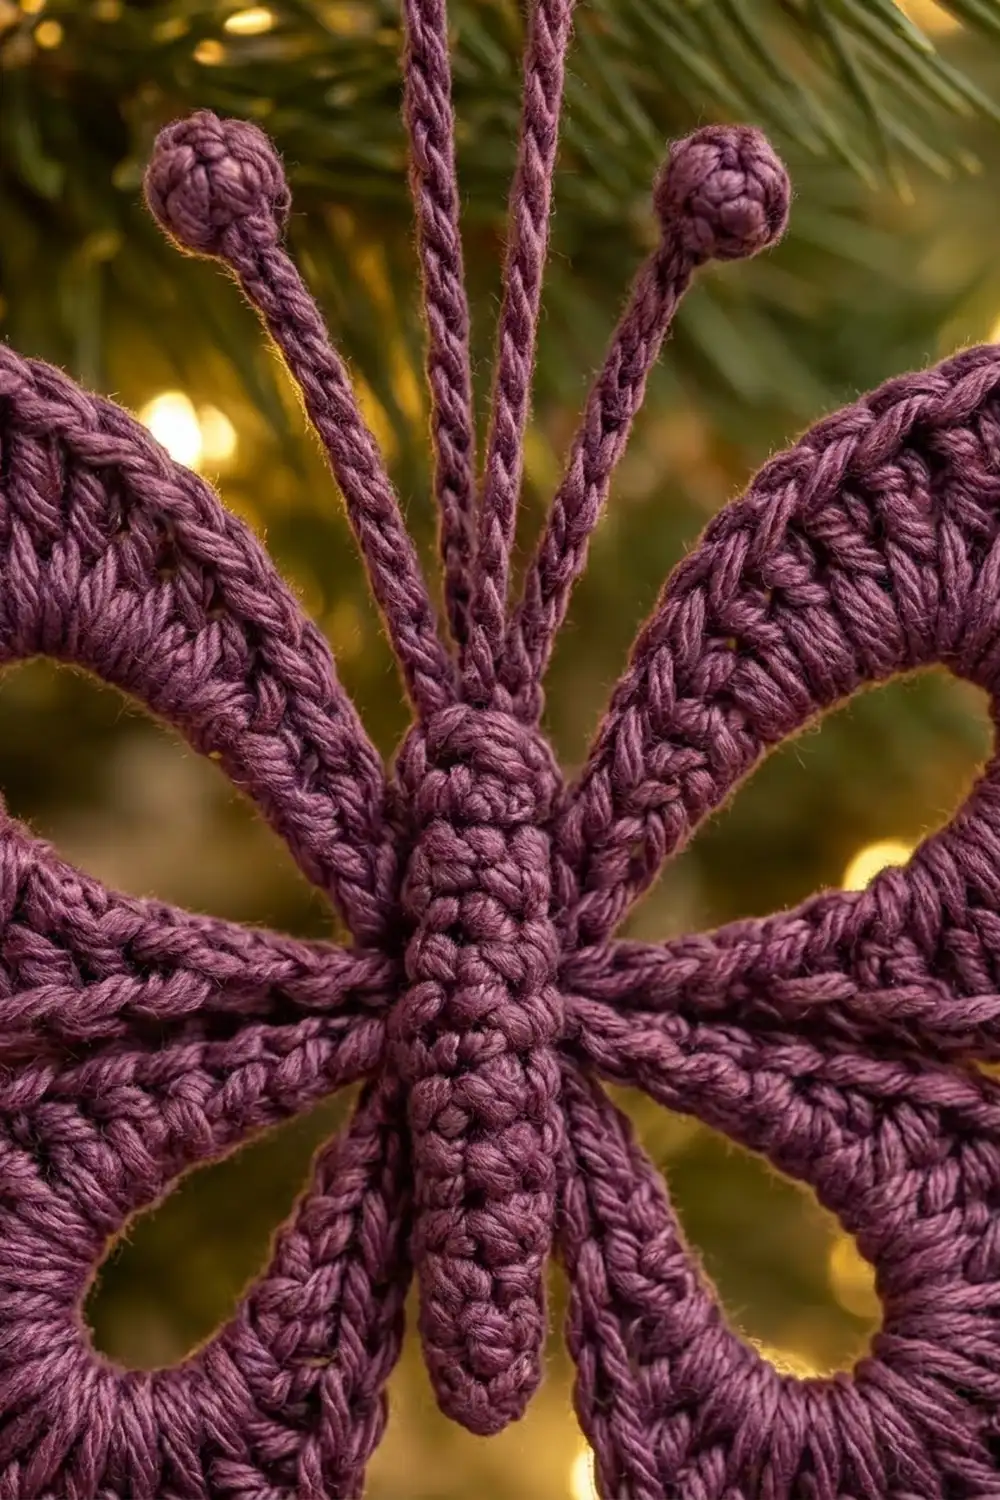
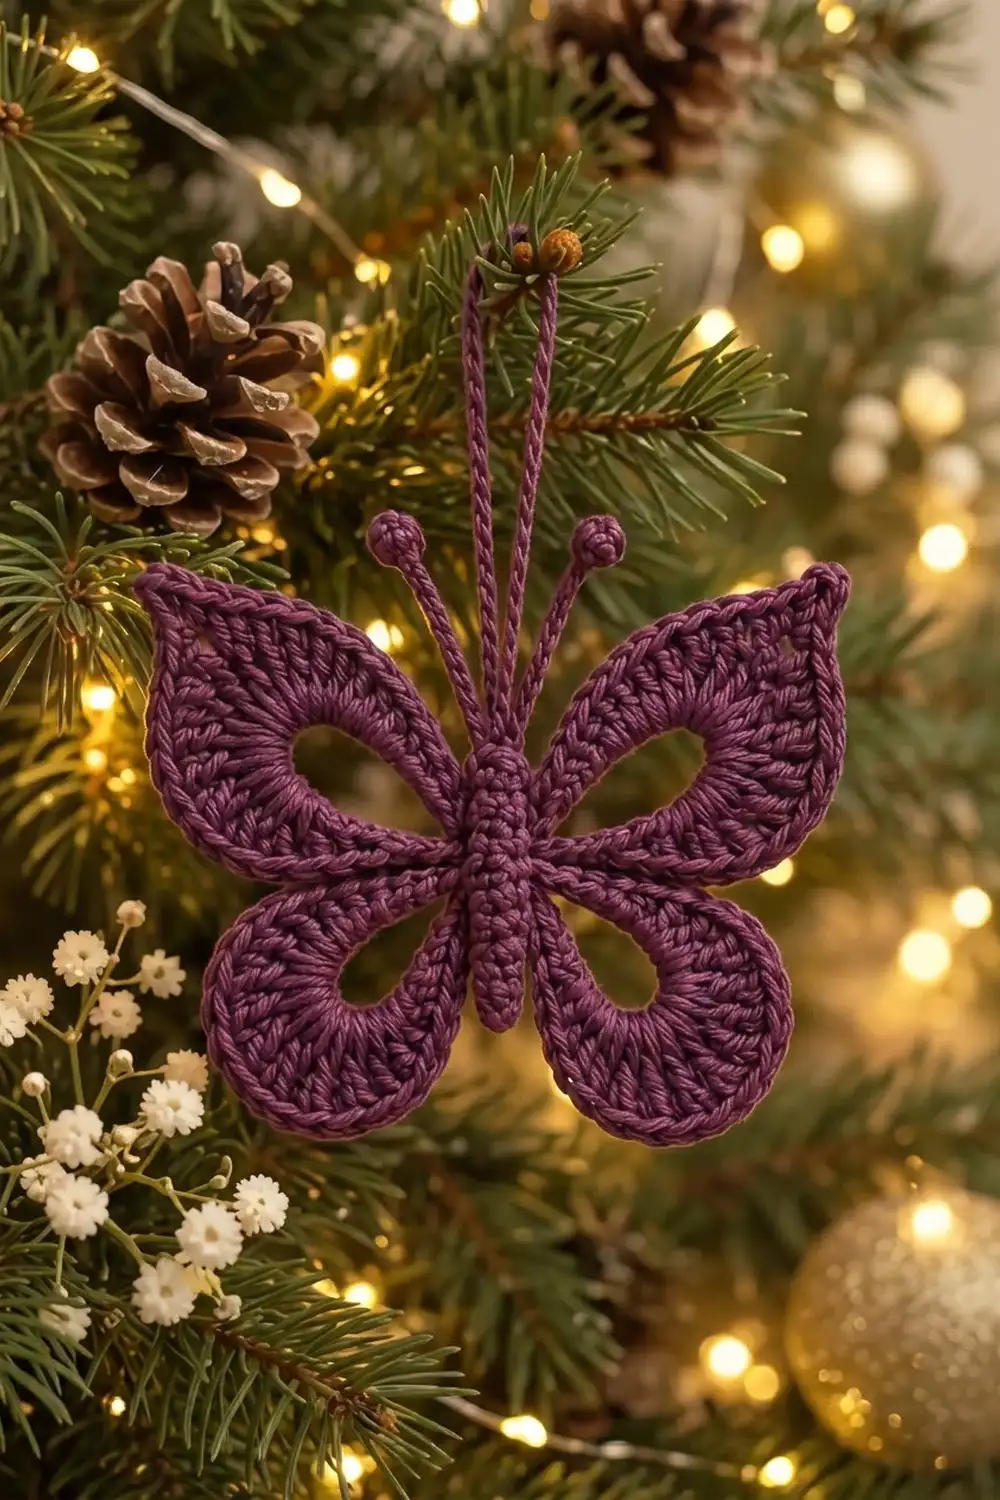
This little butterfly is a quick, elegant Christmas tree ornament worked entirely in one deep purple, mulberry-mauve yarn. It has four symmetrical teardrop-shaped wings set in a cross formation. Each wing has an open oval cutout in the center and a dense, smooth outline around the edge.
The body is a solid crocheted column. Five thin, twisted-look cord antennae rise from the top of the body, and each one ends in a small crocheted bead. The ornament hangs from its longest center antenna, so it swings freely among branches and lights.
The pattern uses US crochet terms. The finished wingspan is 3.5 in (8.9 cm), and the body-and-wing area is about 3.25 in (8.3 cm) tall. The antennae add 1.75–2.75 in (4.4–7.0 cm) above the body.
The ornament is made in one continuous piece with no sewing. You crochet the body from the bottom up, close the top, and work the five antennae straight off the top row. Then you build each wing from a chain loop anchored to the side of the body. A slip-stitch outline and light blocking finish it.
Finished Size and Construction
- Finished size: 3.5 in (8.9 cm) wingspan; body and wings about 3.25 in (8.3 cm) tall
- Skill level: Advanced beginner to intermediate
- Terminology: US crochet terms
- Yarn weight: DK (#3), cotton or cotton blend
- Hook: 3.0 mm (between US C-2 and D-3)
- Number of pieces: 1 (worked continuously, no sewing)
- Layout: Central body with 4 wings in a cross formation (2 per side) and 5 antennae on top
- Piece size: Body 2 in (5.1 cm) long and 0.5 in (1.3 cm) wide when flattened. Each wing is 1.75 in (4.4 cm) long and about 1.25 in (3.2 cm) wide.
- Size before border: 3.3 in (8.4 cm) wingspan
- Border depth: About 0.1 in (0.3 cm) slip-stitch outline on each outer edge
Materials
Yarn: Choose a smooth, tightly plied DK cotton or cotton blend. Mercerized cotton gives the crisp, slightly glossy stitch definition seen on this ornament. Avoid fuzzy or brushed yarns, because they hide the oval cutouts.
- Deep purple / mulberry: 10 g, about 23 m (25 yd)
This amount includes a margin. The ornament itself uses about 7 g (about 16 m), and the rest covers your gauge test, yarn tails, and the hanging strand.
Tools:
- 3.0 mm crochet hook
- Tapestry needle
- Scissors
- 1 stitch marker
- A small pinch of fiberfill or matching yarn scraps
- Rustproof pins and a foam blocking mat
- Spray starch or fabric stiffener (optional)
- A 6 in (15.2 cm) strand of matching yarn or thread for hanging
Abbreviations (US Terms)
- ch: chain
- sl st: slip stitch
- sc: single crochet
- hdc: half double crochet
- dc: double crochet
- st(s): stitch(es)
- rnd: round
- rem: remaining
- RS: right side
- [ ]: stitch count at end of round or row
Special stitch – Bead (4-dc popcorn):
- Work 4 dc in the indicated ch.
- Remove the hook from the loop.
- Insert the hook from front to back through the top of the first dc.
- Place the dropped loop back on the hook and pull it through.
- Ch 1 to lock.
This makes a firm, round bead that needs no stuffing.
Edge stitch: When the body is flattened, there is a front stitch closest to each side fold. These are the right-edge and left-edge stitches. Every wing anchors into an edge stitch.
Gauge and Checkpoints
Gauge: 6 sc and 6 rows = 1 in (2.5 cm), worked firmly.
At this tiny scale, a traditional swatch tells you less than the body itself. Use the body as your test piece:
- Checkpoint 1 (after body Rnd 6): The tube measures 1 in (2.5 cm) long.
- Checkpoint 2 (body complete): The body measures 2 in (5.1 cm) long and 0.5 in (1.3 cm) wide when flattened.
- Checkpoint 3 (first wing, Row 1): The wing reaches about 1.4 in (3.6 cm) from the body edge.
- Checkpoint 4 (first wing, Row 2): The wing is 1.65 in (4.2 cm) long, with an oval opening of about 0.75 in (1.9 cm) by 0.4 in (1.0 cm).
- Checkpoint 5 (all wings, before border): The wingspan is 3.3 in (8.4 cm).
- Checkpoint 6 (after border and blocking): The wingspan is 3.5 in (8.9 cm).
If your pieces are too big: Go down to a 2.75 mm hook, or tighten your tension on the sc.
If your pieces are too small: Go up to a 3.25 mm hook.
Change hooks after Checkpoint 1 if needed. Do not keep going and hope it evens out. Small errors grow quickly over four wings.
Body
The body is worked in continuous rounds from the bottom up. Do not join the rounds. Mark the first stitch of each round.
Rnd 1: Make a magic ring, then work 6 sc into the ring. Pull the ring closed. [6 sc]
Rnds 2–12: Sc in each st around. [6 sc in each rnd]
These rounds form a straight column with no increases.
Check Checkpoint 1 after Rnd 6, then check Checkpoint 2 after Rnd 12.
Push a small pinch of fiberfill or yarn scraps into the tube using the back of your hook. Fill it lightly. The body should feel solid but should still flatten to 0.5 in (1.3 cm) wide.
Flatten: Flatten the tube so that 3 sts lie on the front and 3 sts lie on the back. Turn it so the round seam sits at the back. The front stitch nearest each fold is that side’s edge stitch.
Rnd 13 (closing row): Work through both layers, matching each front st with the back st behind it. This makes 3 pairs.
- Sc in the first pair.
- Work 3 sc in the center pair.
- Sc in the last pair.
[5 sc]
The top is now closed and gives you exactly one base stitch for each of the five antennae. Do not fasten off.
Antennae
Each antenna is built the same way:
- Chain upward.
- Make a bead at the tip.
- Slip stitch back down the chain, working into the back bump of each ch.
Working into the back bump gives each cord a firm, twisted, braided look.
The formula for each antenna is: ch (L + 4), Bead in 4th ch from hook, sl st in each of the rem L ch.
Here is how that formula works:
- 3 chains are skipped, and 1 chain holds the Bead. That uses 4 chains.
- The remaining L chains form the cord.
Work the antennae from right to left across the 5 sc of Rnd 13. You are already in sc 5.
Antenna 1 (outer right, L = 9):
- Ch 13. Work a Bead in the 4th ch from hook.
- Sl st in each of the rem 9 ch.
- Sl st in the same sc at the base, then sl st in the next sc.
Antenna 2 (inner right, L = 12):
- Ch 16. Work a Bead in the 4th ch from hook.
- Sl st in each of the rem 12 ch.
- Sl st in the same sc, then sl st in the next sc.
Antenna 3 (center, hanging antenna, L = 15):
- Ch 19. Work a Bead in the 4th ch from hook.
- Sl st in each of the rem 15 ch.
- Sl st in the same sc, then sl st in the next sc.
Antenna 4 (inner left, L = 12): Work the same as Antenna 2.
Antenna 5 (outer left, L = 9):
- Work the same as Antenna 1.
- Sl st in the same sc at the base.
- Fasten off and weave in the tail.
[5 antennae; 77 ch total: 13 + 16 + 19 + 16 + 13]
Antenna lengths, including the bead:
- Short antennae (1 and 5): about 1.75 in (4.4 cm)
- Middle antennae (2 and 4): about 2.25 in (5.7 cm)
- Center antenna (3): about 2.75 in (7.0 cm)
Wings
All four wings are identical. Each wing is a ch-20 loop anchored to the body edge, with two rows worked over the loop.
The loop itself becomes the oval cutout. The narrow end of the teardrop sits against the body, and the round end faces outward.
Wing anchor points:
- Upper wings span Rnds 10 to 8.
- Lower wings span Rnds 6 to 4.
- Rnd 7 stays open between each pair of wings.
Upper Right Wing
Setup:
- With RS facing, join yarn with a sl st in the right-edge st of Rnd 10.
- Ch 20.
- Sl st in the right-edge st of Rnd 8. This forms the loop.
Row 1: Ch 1. Working over the ch-20 loop into the loop space, work:
- 4 sc
- 4 hdc
- 10 dc
- 4 hdc
- 4 sc
Then sl st in the right-edge st of Rnd 10. [26 sts]
The stitches pack tightly onto the chain. This is intentional, because it is what makes the dense outline. The taller dc stitches in the middle create the wide, rounded end of the teardrop.
Row 2: Ch 1, turn. Work:
- Sc in each of the first 8 sts (the 4 sc and 4 hdc).
- 2 sc in each of the next 10 dc.
- Sc in each of the last 8 sts.
Then sl st in the right-edge st of Rnd 8. [36 sc]
This is a conversion row. You work 26 sc (1 in each existing st) plus 10 extra sc on the outer curve, for 36 sc. The extra stitches keep the curve flat instead of cupping.
Check Checkpoints 3 and 4 on this first wing before continuing.
Lower Right Wing
Travel: Sl st in the right-edge st of Rnd 7, then sl st in the right-edge st of Rnd 6.
Setup: Ch 20. Sl st in the right-edge st of Rnd 4.
Row 1: Work the same as the upper wing Row 1. End with a sl st in the right-edge st of Rnd 6. [26 sts]
Row 2: Work the same as the upper wing Row 2. End with a sl st in the right-edge st of Rnd 4. [36 sc]
Fasten off.
Upper Left and Lower Left Wings
- With RS facing, join yarn with a sl st in the left-edge st of Rnd 10.
- Work the upper wing setup, Row 1, and Row 2 exactly as for the right side, using the left-edge sts.
- Travel to Rnd 6, then work the lower wing.
- Fasten off.
Check Checkpoint 5: the wingspan should be 3.3 in (8.4 cm) when you lay the wings at roughly 30° above and below horizontal.
Border
The border is a slip-stitch outline worked into the tops of Row 2. It gives each wing a crisp, smooth, rope-like rim. Because the edge should be smooth, use plain slip stitches, not a textured stitch.
Border gauge: 6 sl st per 1 in (2.5 cm). This matches the sc gauge, so the border neither pulls in nor ruffles. If your slip stitches tighten the edge, switch to a 3.25 mm hook for this round only.
For each wing:
- Join yarn with a sl st in the body edge st where Row 2 began. This is Rnd 10 for upper wings and Rnd 6 for lower wings.
- Sl st in each of the 36 sc of Row 2.
- Sl st in the closing anchor st, which is Rnd 8 or Rnd 4.
- Fasten off.
Counts per section of each wing:
| Section | Sl st |
|---|---|
| Body side edge | 8 |
| Outer curve | 20 |
| Return edge | 8 |
| Total per wing | 36 |
Across all 4 wings, that is 36 × 4 = 144 sl st.
Why the math works: Row 2 already added all the stitches the outer curve needs: 10 doubled dc become 20 sc on the curve. The border works exactly 1 sl st per existing sc, so it adds no new stitches and keeps the shape flat. It adds only about 0.1 in (0.3 cm) to each outer edge. That brings the wingspan from 3.3 in (8.4 cm) to 3.5 in (8.9 cm).
Final Blocking
- Weave in all tails along the wing outlines. Never weave across the oval openings.
- Lightly mist the ornament with water, or with diluted fabric stiffener if you want a firmer finish.
- Lay the ornament RS up on a foam mat. Center the body on a straight line.
- Pin the upper wings at about 30° above horizontal and the lower wings at about 30° below. Measure the wingspan: 3.5 in (8.9 cm).
- Insert a pin, or a rolled paper tube, into each oval opening so it dries open at about 0.75 in (1.9 cm) by 0.4 in (1.0 cm).
- Pin the outer curve of each wing into a smooth, round teardrop.
- Straighten each antenna, and fan the outer four slightly away from the center.
- Let it dry fully for about 24 hours before unpinning.
- Tie the 6 in (15.2 cm) hanging strand around the center antenna, just below its bead, and knot it into a loop.
Final Quality-Control Checklist
- Body is 2 in (5.1 cm) long and 0.5 in (1.3 cm) wide when flattened.
- Rnd 13 has 5 sc, with one antenna in each.
- Antenna chain counts are 13, 16, 19, 16, 13, and the cords are symmetrical.
- All 5 beads are round and locked.
- Each wing has 26 sts in Row 1 and 36 sc in Row 2.
- Each wing has 36 border sl st.
- Upper wings anchor at Rnds 10–8, and lower wings at Rnds 6–4, on both sides.
- All four oval openings are clear and similar in size.
- Wingspan is 3.5 in (8.9 cm).
- The ornament hangs straight from the center antenna.
Troubleshooting
Wing cups or curls inward: Your Row 2 tension is too tight, or you skipped increases. Recount the 10 doubled dc. Block flat using stiffener.
Wing ruffles: The border is too loose, or you added extra stitches. Recount to 36 sl st per wing, or work the border with a smaller hook.
Oval opening closes up: The ch-20 loop is too tight. Chain more loosely, or block with a paper tube inside the opening.
Wings uneven left vs. right: Check that you anchored into matching rounds on both sides. Count the rounds from the magic ring, not from the top.
Beads look flat: Make sure you pull the dropped loop through the first dc from front to back, and that you lock it with ch 1.
Ornament tilts when hanging: Check that the hanging loop sits on the center antenna (Antenna 3). Re-block the wings symmetrically.
Body too floppy: Add a little more stuffing before Rnd 13. On a finished piece, apply stiffener to the body.
Care
Spot clean only with cool water and mild soap. Re-block flat if needed, and store it flat or loosely wrapped in tissue between holidays.
Final Notes
The whole ornament follows one measurement chain:
- Body: 6 sc around, 12 rnds = 2 in (5.1 cm)
- Each wing: ch 20, then Row 1 = 26 sts, then Row 2 = 36 sc, giving 1.65 in (4.2 cm)
- Wingspan before border: 3.3 in (8.4 cm)
- Border: 36 sl st per wing, adding 0.1 in (0.3 cm) per edge
- Final wingspan: 3.5 in (8.9 cm)
Check each stage against its checkpoint, and your mulberry butterfly will come out balanced and ready for the tree.
Optional: for a second ornament in another shade, repeat the exact same pattern with a new color.
Happy crocheting!