

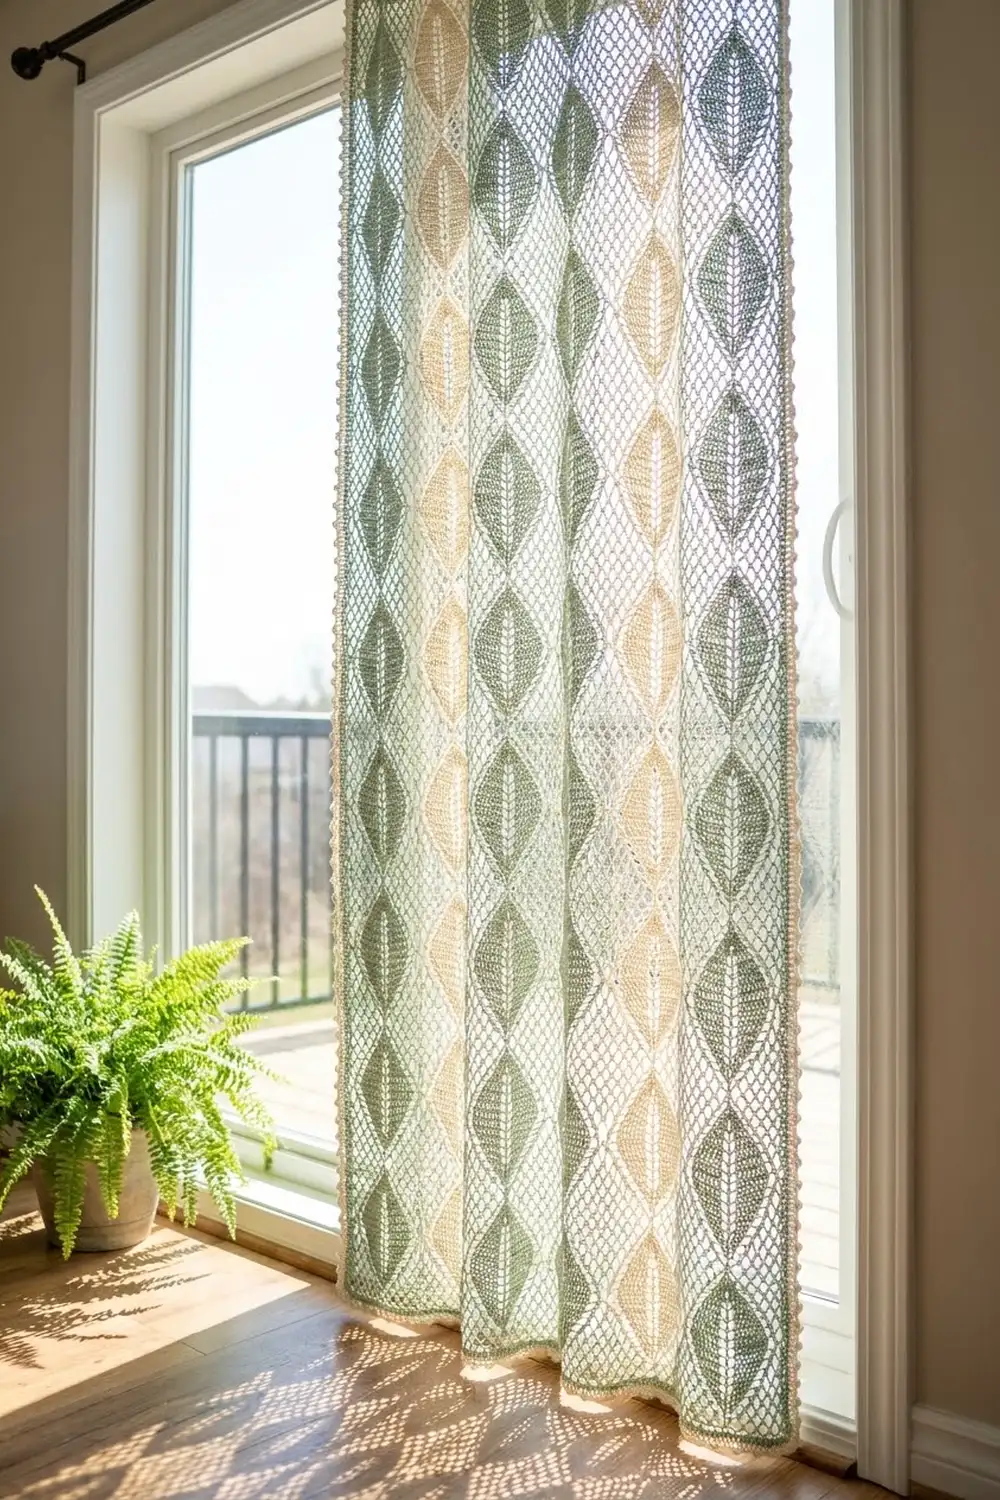
The Sage Willow curtain panel is a tall, airy lace made entirely from small almond-shaped leaves. Each leaf has an open ladder of eyelets around a slim center rib, a solid shaped band of graded stitches, and a crisp single crochet outline with a pointed loop at each tip.
The leaves alternate soft sage green and warm cream in a checkerboard. They join tip to tip into vertical columns and side to side at their widest points, which leaves open diamonds between them. Light comes through the diamonds, so the panel looks like a soft botanical lattice.
This pattern uses US crochet terms. One finished panel measures 28 in wide x 82 in long (71.1 cm x 208.3 cm) after blocking. Make two panels for a pair.
You crochet one leaf in four rounds. Each new leaf is joined to its neighbors on its last round (join-as-you-go). A three-round cream border then straightens the edges into a clean rectangle.
Finished Size and Construction
- Finished size: 28 in x 82 in (71.1 cm x 208.3 cm), one panel
- Skill level: Intermediate
- Terminology: US crochet terms
- Yarn weight: DK (light, #3) cotton or cotton blend
- Hook: 4.0 mm (US G-6)
- Number of pieces: 216 leaf motifs per panel
- Layout: 12 columns x 18 rows, checkerboard of sage and cream
- Piece size: 2.25 in wide x 4.5 in long (5.7 cm x 11.4 cm), from tip loop to tip loop
- Size before border: 27 in x 81 in (68.6 cm x 205.7 cm)
- Border depth: 0.5 in (1.3 cm) on every side
Materials
Use a smooth DK cotton or cotton blend. Cotton keeps the leaf points sharp and hangs straight. Avoid fuzzy yarns, because they blur the eyelets.
These amounts are for one panel and assume about 110 m (120 yd) per 50 g:
- Color A, sage green: 200 g, 440 m (481 yd), for 108 leaves
- Color B, cream: 250 g, 550 m (601 yd), for 108 leaves plus the border
Each leaf uses about 3.5 m (3.8 yd). Both amounts include a margin of roughly 15% for tails, swatching and dye-lot safety. Double them for a pair.
Tools:
- 4.0 mm (US G-6) hook, plus 3.75 mm and 4.5 mm hooks in case you need to adjust gauge
- Tapestry needle
- Stitch markers (at least 4)
- Rust-proof pins and blocking mats
- Spray bottle
- Measuring tape
- Curtain clip rings for hanging (optional, 12 per panel)
Abbreviations (US Terms)
- ch – chain
- sl st – slip stitch
- sc – single crochet
- hdc – half double crochet
- dc – double crochet
- tr – treble crochet
- sk – skip
- sp – space
- st(s) – stitch(es)
- rep – repeat
- Rnd – round
Special stitch – joining sc: Insert hook in the next st of the current leaf, yarn over and pull up a loop (2 loops on hook). Insert hook from front to back in the matching st of the neighboring leaf, yarn over and pull through that st and the first loop on the hook. Yarn over and pull through both loops. Counts as one sc.
Gauge and Checkpoints
Before anything else, make one complete leaf. Wet it, pin it lightly and let it dry. This test leaf is your gauge.
Motif gauge: One leaf = 2.25 in wide x 4.5 in long (5.7 cm x 11.4 cm), measured from tip loop to tip loop.
Stitch gauge (for the border): About 20 sc = 4 in (10.2 cm).
Check the size after each round:
- After Rnd 1: 2.25 in long x 0.5 in wide (5.7 cm x 1.3 cm)
- After Rnd 2: 3.25 in long x 1.25 in wide (8.3 cm x 3.2 cm)
- After Rnd 3: 4 in long x 2 in wide (10.2 cm x 5.1 cm)
- After Rnd 4: 4.5 in long x 2.25 in wide (11.4 cm x 5.7 cm)
If the leaf is too big, switch to a 3.75 mm hook. If it is too small, switch to a 4.5 mm hook. Keep all stitch counts the same. Small errors add up quickly: a leaf that is only 0.25 in (0.6 cm) too wide makes the panel 3 in (7.6 cm) too wide across 12 columns.
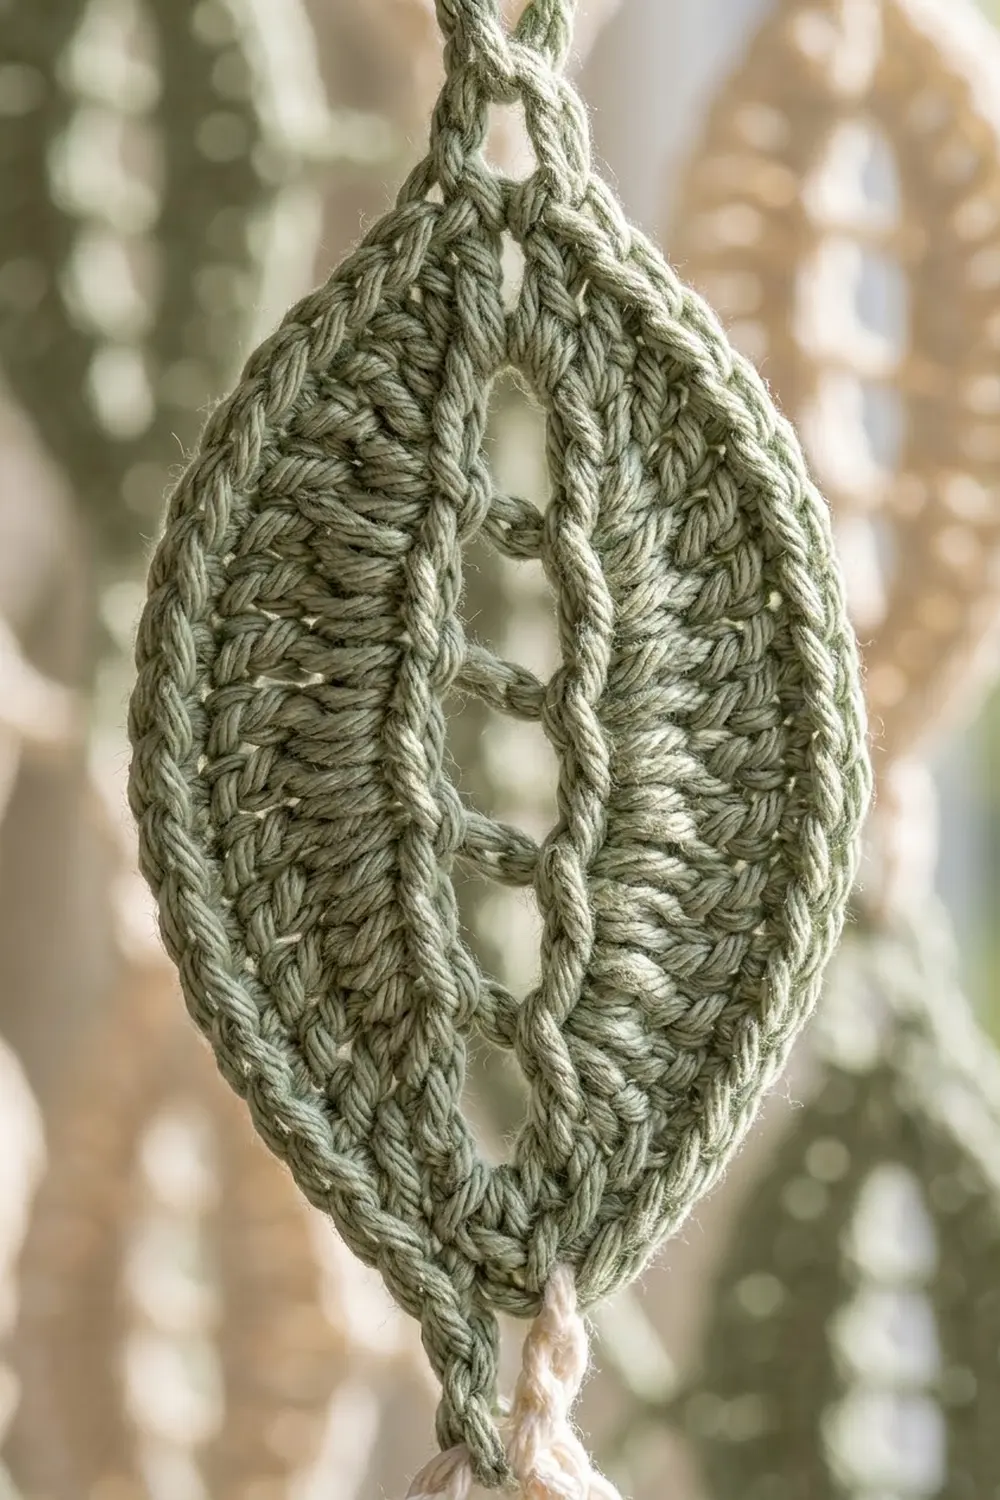
Leaf Motif
Make each leaf in a single color. Work every round with the right side facing, without turning.
Foundation: Ch 10.
Rnd 1 (center rib): 3 sc in 2nd ch from hook, sc in next 7 ch, 3 sc in last ch. Rotate and work along the opposite side of the foundation: sc in next 7 ch, join with sl st to first sc. (20 sc)
The middle sc of each 3-sc group is a tip st. Mark both. The first group is the top tip.
Rnd 2 (eyelet ladder): Sl st in next sc (the marked top tip st). Ch 5 (counts as dc + ch 2), dc in same st. [Ch 1, sk 1 st, dc in next st] 4 times, ch 1, sk 1 st, (dc, ch 2, dc) in next st (bottom tip st). Rep from * to ** once, then join with sl st to 3rd ch of beginning ch-5. (12 dc, 10 ch-1 sps, 2 ch-2 tip sps)*
Each side now has: tip dc, then 5 ch-1 sps alternating with 4 dc, then tip dc. The dc posts form the short bars of the ladder, and the skipped sts open into eyelets.
Rnd 3 (shaping band): Sl st in first ch-2 sp. Ch 1, sc in same sp. Sc in next dc, hdc in next ch-1 sp, dc in next dc, dc in next sp, tr in next dc, tr in next sp, tr in next dc, dc in next sp, dc in next dc, hdc in next sp, sc in next dc, (sc, ch 2, sc) in next ch-2 sp. Rep from * to ** once, then sc in first ch-2 sp, ch 2, join with sl st to first sc. (26 sts, 2 ch-2 tip sps)*
This is a conversion round: 22 sts worked one into each existing dc and ch-1 sp, plus 4 sc added in the 2 tip sps, gives 26. The tr group swells the middle of each side into an almond shape, and the sc at each end keep the tips pointed.
Rnd 4 (outline): Ch 1, sc in same st as join and in next 12 sts, (sc, ch 3, sc) in next ch-2 sp, sc in next 13 sts, (sc, ch 3, sc) in next ch-2 sp, join with sl st to first sc. Fasten off. (30 sc, 2 ch-3 tip loops)
Conversion count: 26 sts worked one each, plus 4 sc added at the tips, gives 30.
Each side has 15 sc: tip sc + 13 sc + tip sc. The 7th sc of each 13-sc run sits directly above the middle tr. This is the widest-point stitch. Hold the leaf with the top tip up. For a right-handed crocheter, the first 13-sc run is the left side and the second run is the right side. If you crochet left-handed, swap “left” and “right” in the joining section.
Make All Pieces
Make 216 leaves per panel:
- Color A (sage): 108 leaves
- Color B (cream): 108 leaves
Complete the first leaf on its own. Every other leaf is completed and joined at the same time, during Rnd 4.
Layout grid (12 columns x 18 rows; A = sage, B = cream):
Row 1:  A B A B A B A B A B A B
Row 2:  B A B A B A B A B A B A
Row 3:  A B A B A B A B A B A B
Row 4:  B A B A B A B A B A B A
...
Odd rows (1, 3, 5 ... 17):   start with A
Even rows (2, 4, 6 ... 18):  start with B
All leaves point up and down. Each row has 6 A and 6 B leaves, so 18 rows x 6 = 108 leaves of each color.
Joining
Join as you go on Rnd 4. Work Row 1 from left to right, then each following row from left to right.
Side join (widest points): If the leaf has a neighbor on its left, work the 7th sc of the first 13-sc run as a joining sc into the neighbor’s right widest-point st (the 7th sc of the neighbor’s second 13-sc run).
Tip join (vertical): If the leaf has a neighbor above, change the final top-tip group to: sc in ch-2 sp, ch 1, sl st in the bottom ch-3 loop of the leaf above, ch 1, sc in same ch-2 sp, join with sl st to first sc.
Stitch logic: The joining sc takes the place of one sc, and ch 1 + sl st + ch 1 takes the place of ch 3. Every leaf still has exactly 30 sc and 2 tip loops, so the seams add no stitches.
A leaf joins at most at two points while you make it: its left widest point and its top tip. Later leaves join to its right widest point and bottom tip.
Tension: Keep the sl sts and joining sc at the same tension as the other sc. If a join is too tight, the diamonds pucker. If it is too loose, the leaves twist.
Size checkpoints:
- Row 1 complete: 27 in (68.6 cm) wide
- 2 rows: 9 in (22.9 cm) tall
- 9 rows: 40.5 in (102.9 cm) tall
- 18 rows: 27 in x 81 in (68.6 cm x 205.7 cm)
Border
Work the whole border in Color B. In this section only, the per-side counts for Rnd 1 do not include the corner chains. Those are counted separately.
Border gauge: 22 border sts = 4.5 in (11.4 cm), the same as 20 sc per 4 in (10.2 cm).
The border counts come from the leaf sizes. On the top and bottom, each leaf contributes 11 sts (its 2.25 in width). On each side, each leaf contributes 22 sts (its 4.5 in length).
Rnd 1 (straightening round): With right side facing, join B in the top ch-3 loop of the top-left leaf.
- Top: Sc in this loop, *ch 10, sc in top loop of next leaf; rep from * 10 more times. Ch 17 (5 ch to finish the top, 2 corner ch, 10 ch down the side).
- Right side: 2 sc in right widest-point st of first right-column leaf, *ch 20, 2 sc in right widest-point st of next leaf down; rep from * 16 more times. Ch 17 (10 ch, 2 corner ch, 5 ch).
- Bottom: Sc in bottom loop of bottom-right leaf, *ch 10, sc in bottom loop of next leaf; rep from * 10 more times. Ch 17.
- Left side: 2 sc in left widest-point st of bottom-left leaf, *ch 20, 2 sc in left widest-point st of next leaf up; rep from * 16 more times. Ch 17, join with sl st to first sc.
Counts: Top and bottom have 132 sts each (5 + 12 sc + 110 ch + 5). Each side has 396 sts (10 + 36 sc + 340 ch + 10). Add 8 corner ch for a total of 1,064 sts.
Why it works: 12 leaves x 11 = 132, and 18 leaves x 22 = 396. Each 5-ch or 10-ch end chain is exactly half a full bridge, so every anchor stays centered on its leaf.
Rnd 2: Ch 1, sc in each sc and each ch along every side. At each corner: sc in 1st corner ch, ch 2, sc in 2nd corner ch. Join. (1,064 sc: 1,064 worked one per existing st + 0 added; 4 corner ch-2 sps)
Counting its 2 corner sc, each side has: top and bottom 134 sc, left and right sides 398 sc.
Rnd 3: Ch 1, sc in each sc around, (sc, ch 2, sc) in each corner ch-2 sp. Join and fasten off. (1,072 sc: 1,064 worked one per existing st + 8 corner sc added)
Counting its corner sc, each side has: top and bottom 136 sc, left and right sides 400 sc.
The border adds 0.5 in (1.3 cm) on every side. Width: 27 + 1 = 28 in (71.1 cm). Length: 81 + 1 = 82 in (208.3 cm).
Final Blocking
- Weave in all tails along the outline sc, never across an eyelet.
- Soak the panel in cool water for 15 minutes. Gently press out the water without wringing.
- Roll the panel in towels to remove extra moisture.
- Lay it flat on blocking mats.
- Pin the corners to 28 in x 82 in (71.1 cm x 208.3 cm).
- Pin along each border every 4.5 in (11.4 cm), keeping the edges straight.
- Pin a few inner leaf tips so each leaf measures 4.5 in (11.4 cm) and the diamonds open evenly.
- Mist any dry spots and leave the panel to dry completely, about 24 hours.
Final Quality-Control Checklist
- Every leaf has 30 sc and two pointed tip loops.
- The checkerboard is correct: no same-color leaves touch.
- All side joins sit at the widest points.
- All inner tip loops are joined.
- The Rnd 1 border anchors are centered on each leaf.
- Final counts are 136 sc on the top and bottom and 400 sc on each side.
- The panel measures 28 in x 82 in (71.1 cm x 208.3 cm).
- All tails are hidden and trimmed.
Troubleshooting
Leaf cups: Rnd 3 is too tight. Go up one hook size for Rnd 3 only.
Tips come out rounded: Make sure each side of Rnd 3 starts and ends with sc, and that each tip sp holds only (sc, ch 2, sc).
Columns lean: A side join landed off the widest point. Undo Rnd 4 of that leaf and rejoin at the 7th sc.
Border waves: The chains are looser than your sc. Use a hook one size smaller for Rnd 1.
Border pulls in: The chains are too tight. Use a hook one size larger for Rnd 1.
Care
Hand wash cool, or machine wash on a gentle cycle in a laundry bag. Reshape and dry flat, and don’t hang the panel while it is wet, because the weight can stretch it.
Final Notes
Every measurement in this panel follows from the leaf size. One leaf measures 2.25 in x 4.5 in (5.7 cm x 11.4 cm). Twelve leaves across give 27 in (68.6 cm), and 18 leaves down give 81 in (205.7 cm). The border gives each leaf 11 sts on the top and bottom and 22 sts on the sides. It then adds 0.5 in (1.3 cm) all around, for a finished panel of 28 in x 82 in (71.1 cm x 208.3 cm). If your first leaf and each row measure correctly, the whole panel will come out to size.
Happy crocheting!