

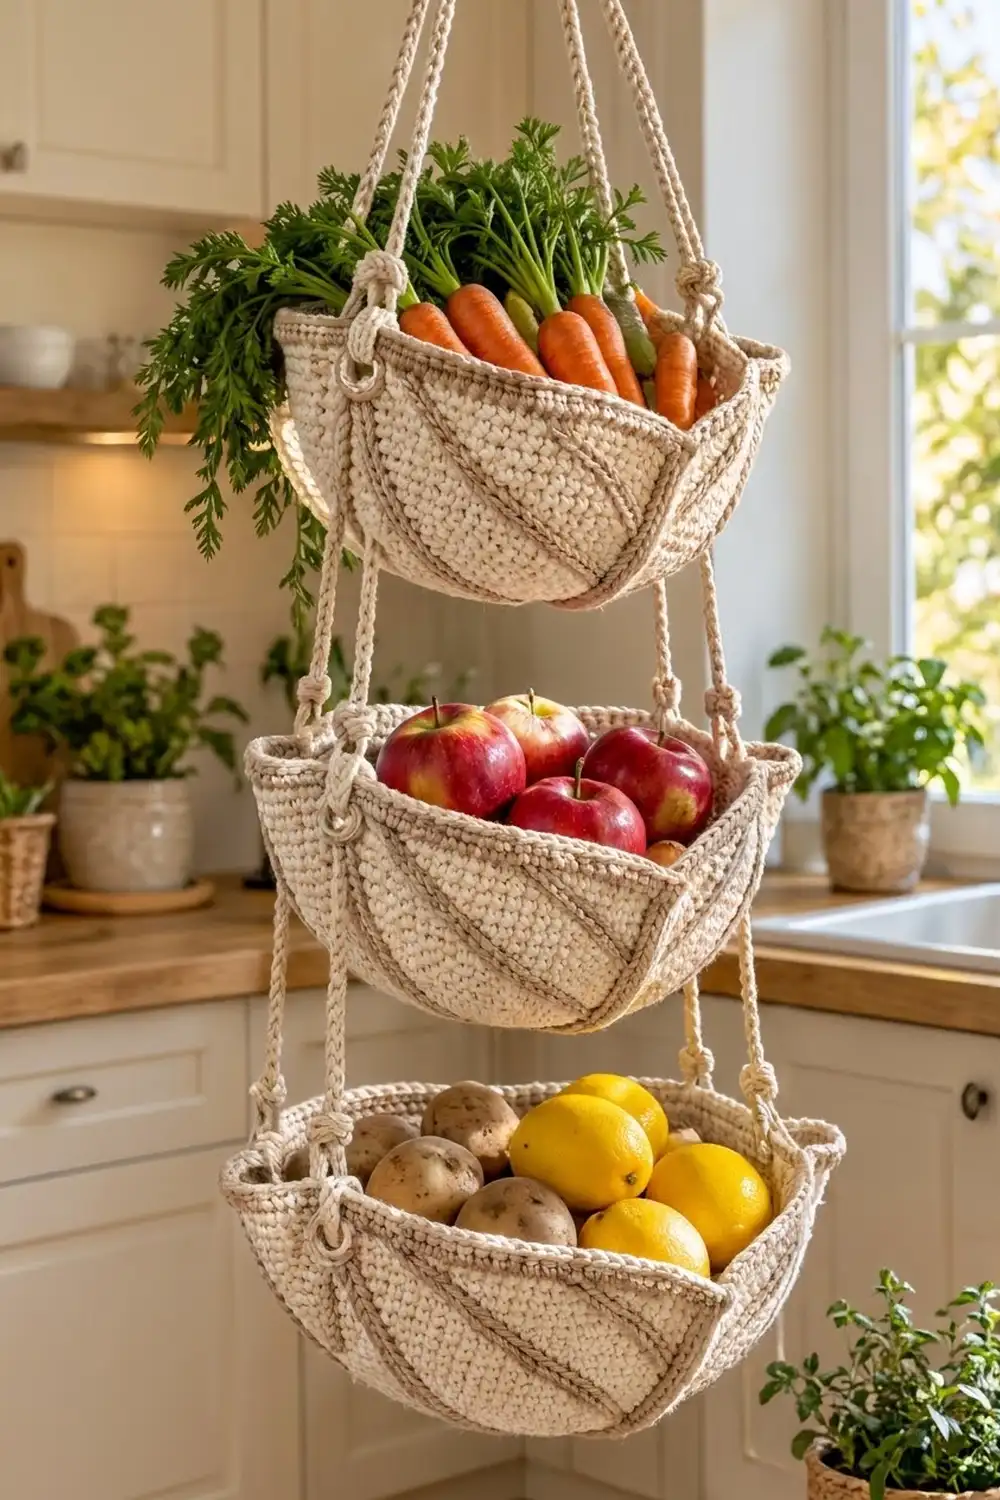
This three-tier hanging basket keeps fruit and vegetables off the counter and in plain sight. Three oval, boat-shaped baskets hang one above another on four rope-like crocheted cords. Overhand knots hold each basket in place.
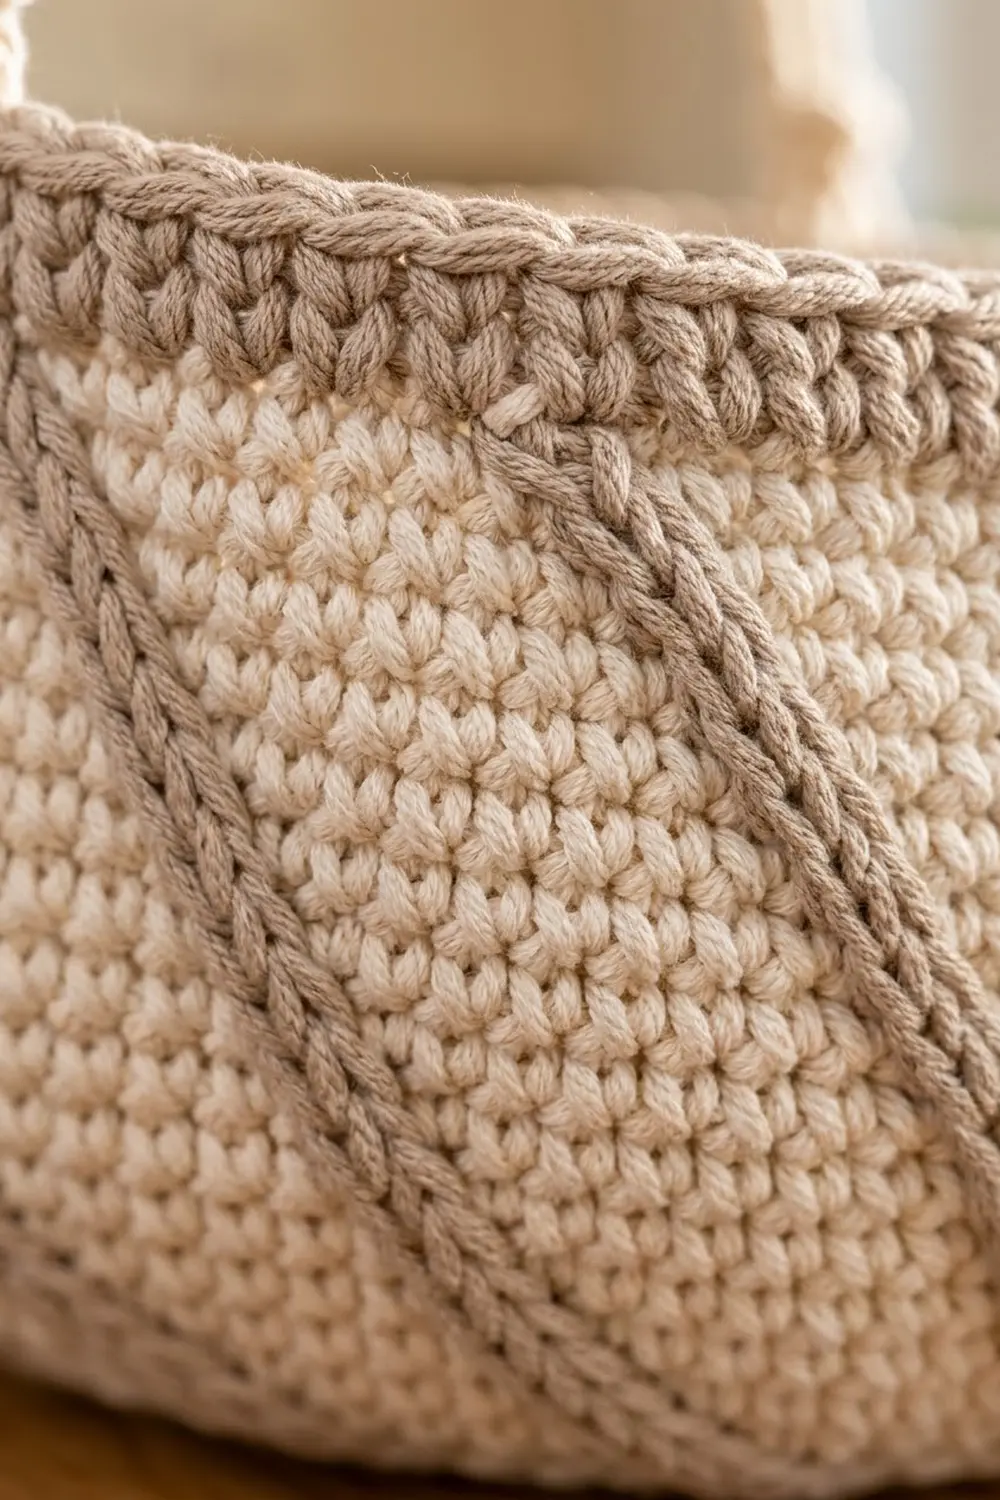
The baskets are worked in dense cream single crochet. Curved taupe lines sweep up each wall, and a taupe rope edge finishes the rim. Together they give a calm farmhouse look that suits a sunny kitchen.
The pattern uses US crochet terms. Each finished basket is about 12 in (30.5 cm) long, 7.25 in (18.4 cm) wide and 4.25 in (10.8 cm) deep. The finished hanger is about 44 in (111.8 cm) long from the top of the loop to the bottom of the lowest basket.
Each basket starts with an oval base worked in joined rounds. The walls rise from a back-loop ridge and flare gently. You add the taupe swirl lines in surface slip stitch, then work a two-round rope rim. Last, you make four slip-stitch cords and knot them through the rims.
Finished Size and Construction
- Finished basket size: 12 in x 7.25 in (30.5 cm x 18.4 cm) at the rim, 4.25 in (10.8 cm) deep
- Base size: 10.5 in x 6.25 in (26.7 cm x 15.9 cm)
- Skill level: Easy-Intermediate
- Terminology: US crochet terms
- Yarn weight: Bulky (#5) cotton or cotton blend
- Hook: 6 mm (US J-10)
- Number of pieces: 3 baskets + 4 cords
- Layout: 3 tiers stacked vertically on 4 cords
- Size before border (rim): wall height 3.75 in (9.5 cm), rim circumference 31.3 in (79.5 cm)
- Border depth: 2 rounds, about 0.5 in (1.3 cm)
- Total hanging length: about 44 in (111.8 cm)
Materials
Choose a firm, smooth bulky cotton or cotton blend. Cotton holds its shape when full of fruit and can be washed. Don’t use stretchy acrylic: the baskets will sag.
- Cream (main color): about 500 g / 700 m (765 yd), based on a yarn of about 140 m per 100 g
- Taupe (contrast color): about 50 g / 70 m (77 yd)
These amounts include a margin of about 10%. Each basket uses about 135 g / 187 m of cream, and the four cords use about 52 g / 73 m together.
Tools:
– 6 mm (US J-10) crochet hook
– 8 stitch markers
– Tapestry needle
– Scissors
– Measuring tape
– Old towels or a bowl for blocking
– A sturdy ceiling hook rated for the full weight of the produce
Abbreviations (US Terms)
- ch – chain
- sc – single crochet
- sl st – slip stitch
- BLO – back loop only
- st(s) – stitch(es)
- inc – 2 sc in the same stitch
- rev sc – reverse single crochet (crab stitch)
- Rnd – round
Special stitches
Reverse single crochet (rev sc): Work from left to right (right-handed). Insert the hook in the next stitch to the right, yarn over, pull up a loop, yarn over, and pull through both loops. This makes the twisted rope edge.
Surface slip stitch: Hold the yarn inside the basket. Insert the hook from the outside through a gap between stitches, yarn over on the inside, and pull the loop through the fabric and through the loop on your hook.
Gauge and Checkpoints
Gauge: 12 sc x 13 rnds = 4 in (10.2 cm) in sc with a 6 mm hook.
Make one complete basket before you start the others. It is your real gauge test. Bulky cotton varies a lot, and a tight fabric matters more than a perfect match.
Checkpoints:
– After Rnd 1: about 5 in (12.7 cm) long.
– After Rnd 5: about 7.5 in x 3 in (19.1 cm x 7.6 cm).
– After Rnd 10: 10.5 in x 6.25 in (26.7 cm x 15.9 cm). The edge measures about 28.7 in (72.9 cm).
– After Rnd 22: walls 3.75 in (9.5 cm) high, rim about 31.3 in (79.5 cm) around.
If too big: go down to a 5.5 mm hook. If too small: go up to a 6.5 mm hook. If the base cups before Rnd 10, your increases are too tight, so try a larger hook. If it ruffles, try a smaller hook. Keep the stitch counts the same.
Basket Base
Use cream throughout. Each round starts with ch 1, which does not count as a stitch, and ends by joining with a sl st to the first sc.
Ch 16.
Rnd 1: Sc in 2nd ch from hook and in each of the next 13 ch (14 sc), 3 sc in the last ch. Working along the opposite side of the foundation, sc in each of the next 13 ch, then 2 sc in the last ch (the same ch as the first sc). Join. (32 sts)
Each round now has two straight sides of 13 sts and two curved ends. End A is in the middle of the round. End B is split: it starts at the beginning of the round and finishes at the end.
Rnds 2–10: Ch 1, sc in the first k sts, inc in the next st, sc in the next 13 sts, [sc in the next k sts, inc in the next st] 3 times, sc in the next 13 sts, [sc in the next k sts, inc in the next st] 2 times. Join.
Use these values of k:
| Rnd | k | Total sts |
|---|---|---|
| 2 | 0 | 38 |
| 3 | 1 | 44 |
| 4 | 2 | 50 |
| 5 | 3 | 56 |
| 6 | 4 | 62 |
| 7 | 5 | 68 |
| 8 | 6 | 74 |
| 9 | 7 | 80 |
| 10 | 8 | 86 |
Each round adds 3 sts at each end, which is 6 in total. Each end is a half circle, so it lies flat. The 13 side stitches never change, which keeps the oval long. The Rnd 10 total is 13 + 30 + 13 + 30 = 86 sts.
Basket Walls
Rnd 11: Ch 1, sc in BLO of each st around. Join. (86 sts) This makes a crisp ridge where the base meets the wall.
Rnds 12–14: Ch 1, sc in each st around. Join. (86 sts)
Rnd 15: Ch 1, [sc in the next 20 sts, inc] 2 times, [sc in the next 21 sts, inc] 2 times. Join. (90 sts)
Rnds 16–18: Ch 1, sc in each st around. Join. (90 sts)
Rnd 19: Ch 1, [sc in the next 21 sts, inc] 2 times, [sc in the next 22 sts, inc] 2 times. Join. (94 sts)
Rnds 20–22: Ch 1, sc in each st around. Join. (94 sts) Fasten off cream.
The walls are now 12 rounds, or 3.75 in (9.5 cm), high. The two increase rounds give the gentle flare.
Taupe Swirl Lines
Add the lines before the rim so the rim hides the ends.
On Rnd 11, count from the joining seam and place markers in sts 1, 12, 23, 34, 44, 55, 66 and 77. The gaps between them are 11, 11, 11, 10, 11, 11, 11 and 10 sts, which add up to 86.
For each line, hold taupe inside the basket. Starting at a marker, work 1 surface slip stitch into each round from Rnd 11 to Rnd 22 (12 sl sts per line):
- Rnds 11–14: go straight up, staying above the same stitch.
- Rnds 15–18: move 1 st to the left in each round.
- Rnds 19–22: move 2 sts to the left in each round.
Each line moves 12 sts (about 4 in / 10.2 cm) to the side in total, which makes the curve. All eight lines curve the same way and stay parallel. Keep the slip stitches loose enough that the wall stays flat. Fasten off, and weave the tails in on the inside.
Rim Border
The rim is a two-round rope edge in taupe.
Border gauge: 3 sts per 1 in (2.5 cm), the same as the walls.
Before you start, mark 4 cord points on Rnd 22, counting from the seam: sts 12, 36, 59 and 83. They split the rim into sections of 24, 23, 24 and 23 sts. The 24-st sections run along the long sides, and the 23-st sections curve around the ends.
Rnd 23: Join taupe at the seam. Ch 1, sc in each st around. Join. (94 sts: 24 + 23 + 24 + 23)
Rnd 24: Ch 1, rev sc in each st around. Join. (94 sts: 24 + 23 + 24 + 23) Fasten off, and weave in the ends.
Why the math works: Rnd 22 has 94 sts, which is 31.3 in (79.5 cm) at 3 sts per in. Working exactly 1 rim stitch into each stitch keeps that length, so the rim doesn’t flare or pull in. The section counts add up to 24 + 23 + 24 + 23 = 94, so each cord sits at the same point on every basket.
Move the 4 markers up onto Rnd 22 below the matching rim stitches. Leave them in for joining.
Make All Pieces
- Baskets: 3 identical baskets. Each one takes about 135 g of cream and 9 g of taupe.
- Cords: 4 identical cords in cream, about 13 g each.
Cord: With cream held double, chain until the chain measures 60 in (152.4 cm). That is about 180 ch. Sl st in the back bump of each ch along the chain. Fasten off. If you need to, gently stretch the cord to 60 in (152.4 cm). All four cords must be the same length.
Layout (front view):
        [ hanging loop, 2 in ]
        [ wrap, 1.5 in       ]
               |  |  |  |     16 in cords
        [    BASKET 1       ]
               |  |  |  |     12 in cords
        [    BASKET 2       ]
               |  |  |  |     12 in cords
        [    BASKET 3       ]
               4 in tails
Joining
Top loop: Line up the tops of all 4 cords. Fold the top 4 in (10.2 cm) back down to make a loop about 2 in (5.1 cm) long. Wrap tightly with cream for 1.5 in (3.8 cm) just below the loop, and secure the end with the tapestry needle.
Top basket: On each cord, measure 16 in (40.6 cm) down from the bottom of the wrap, and tie an overhand knot there. Match each cord to one marked stitch. Take the cord over the rim into the basket, then push it back out through the wall between Rnds 21 and 22 at the marked stitch. Tie a second overhand knot snugly against the outside of the wall. The upper knot sits above the rim and the lower knot locks the cord below it.
Middle and bottom baskets: On each cord, measure 12 in (30.5 cm) down from the lower knot, and repeat the two knots at the matching marker on the next basket.
Stitch logic: Each cord goes through the same stitch on every basket: st 12, 36, 59 or 83. This way the cords hang straight and never cross.
Tension: Tie each knot firmly but don’t tighten it fully yet. Hang the piece and check that each basket is level. Slide the knots to adjust, then tighten them for good.
Size checkpoint: The total length should be about 44 in (111.8 cm). Because the cords angle outward, the vertical gap between the rims is a little less than the cord length. Trim the tails to 4 in (10.2 cm) below the bottom basket, and knot each end.
Final Blocking
- It’s best to block the baskets before the final knots are tightened.
- Soak the baskets in cool water for 10 minutes.
- Gently squeeze out the water. Don’t wring.
- Fill each basket with rolled towels, or turn it over a bowl that is about 10.5 in (26.7 cm) long.
- Push the ends up slightly so they lift into the boat shape.
- Smooth the rope rim and make sure the swirl lines are straight.
- Let the baskets dry completely, which takes 24–48 hours.
- Hang the piece, level the baskets, and tighten the knots.
Final Quality-Control Checklist
- Rnd 10 has 86 sts, and the base lies flat.
- Rnd 22 and both rim rounds have 94 sts.
- All 3 baskets measure within 0.25 in (0.6 cm) of each other.
- Each basket has 8 swirl lines, all curving the same way.
- Every cord passes through st 12, 36, 59 or 83 on every basket.
- All 4 cords are 60 in (152.4 cm) long before knotting.
- Every basket hangs level when it is empty.
- All ends are woven in on the inside.
Troubleshooting
Base cups like a bowl: The increases are too tight. Go up a hook size, or recount the increases at the ends.
Base ruffles: Your tension is too loose, or you added extra stitches. Recount using the table.
Walls are floppy: Go down to a 5.5 mm hook. Tight sc is what makes the basket stand up.
Swirl lines pucker: The slip stitches are too tight. Redo the line with a looser loop.
Rim waves: You probably missed or added a stitch. Recount to 94.
Basket tilts: Move the knots on the low side up until the rim is level.
Cords stretch under weight: Use the yarn held double as written, and don’t overload the baskets.
Care
Hand wash in cool water with mild soap. Reshape the baskets while damp and let them dry flat. Keep wet produce out of the baskets to prevent mildew.
Final Notes
Each stage depends on the one before. Gauge of 12 sc x 13 rnds = 4 in (10.2 cm) gives a 10.5 in x 6.25 in (26.7 cm x 15.9 cm) base at 86 sts. The flared walls end at 94 sts, which is 31.3 in (79.5 cm), and they are 3.75 in (9.5 cm) high. The rim keeps all 94 sts and adds 0.5 in (1.3 cm), so each finished basket is 4.25 in (10.8 cm) deep. Four 60 in (152.4 cm) cords hold the tiers at 16 in (40.6 cm) and 12 in (30.5 cm) intervals, for a total length of about 44 in (111.8 cm). If you check the numbers at each stage, all three baskets will match and hang level.
Happy crocheting!