

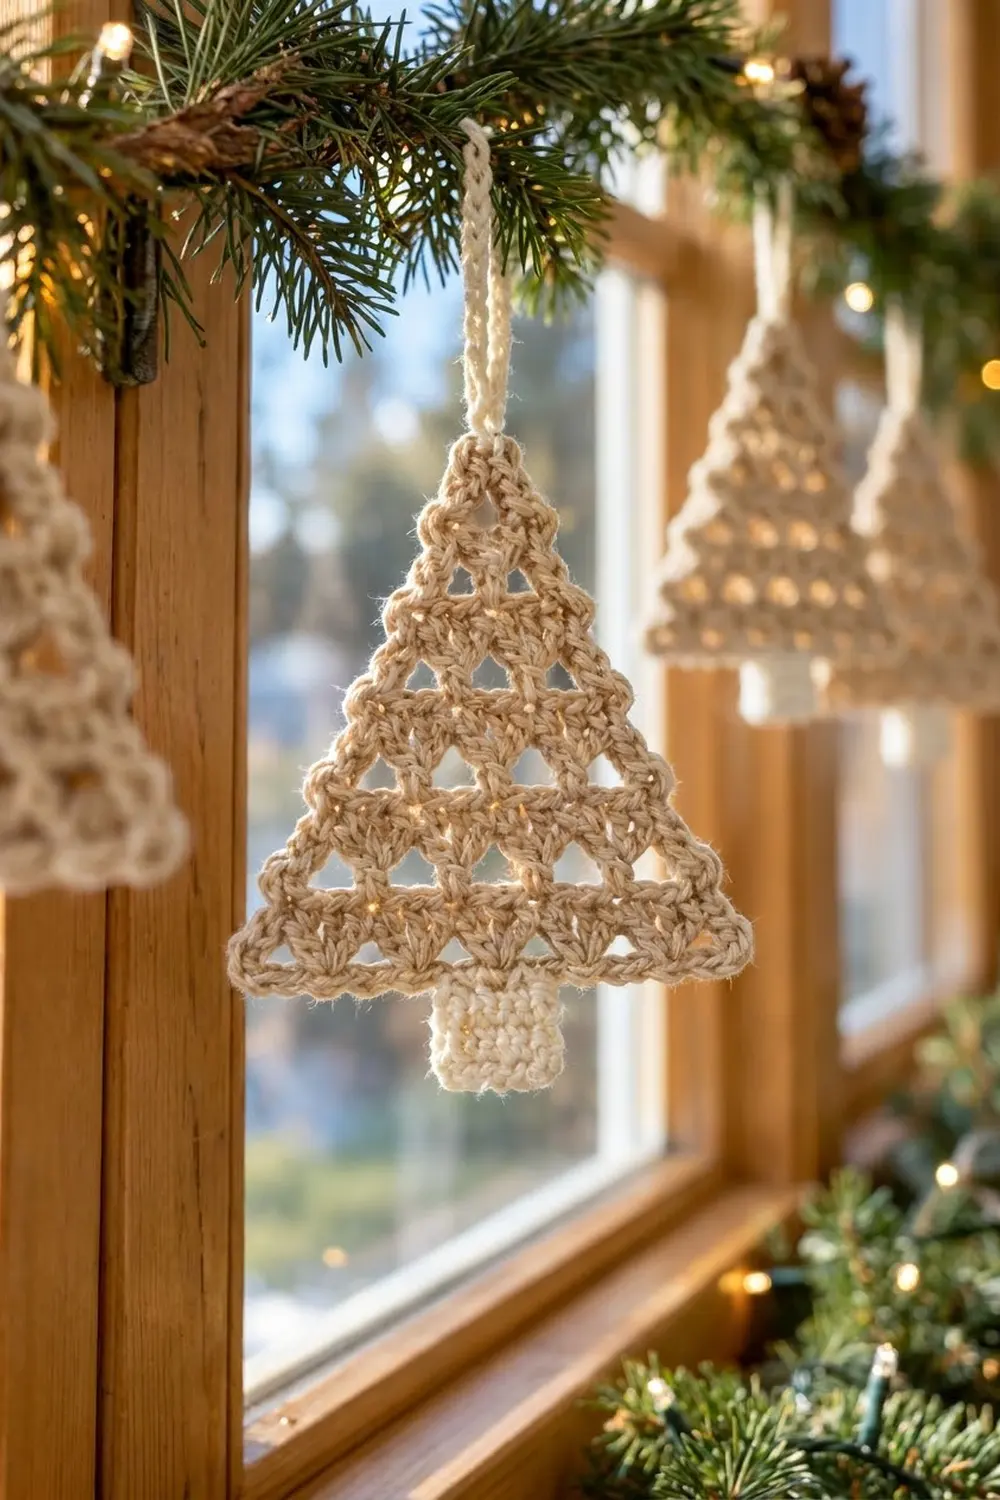
This little tree is all about texture. Rows of V-stitches leave neat triangular windows, so light shines through when it hangs in a window or on a branch. A firm braided edge keeps the triangle crisp, and a solid cream trunk and loop finish it off.
The palette is soft and natural: warm oatmeal beige for the tree and creamy off-white for the trunk and loop. It suits Scandinavian, farmhouse, and minimalist holiday decor, and it looks good on its own or repeated along a garland.
The pattern uses US crochet terms. The finished tree body measures 3.75 in (9.5 cm) wide by 3.5 in (8.9 cm) tall. With the trunk it is 4.25 in (10.8 cm) tall, and with the loop it hangs about 6 in (15.2 cm) long.
Construction is simple. You work the lattice in rows from the tip down to the base, adding one V-stitch per row. Next comes a two-round border: one round of single crochet, then one round of slip stitch. Last, you make a small single-crochet trunk and sew it on, then work the hanging loop directly onto the tip.
Finished Size and Construction
- Finished size (body with border): 3.75 in (9.5 cm) wide x 3.5 in (8.9 cm) tall
- Height with trunk: 4.25 in (10.8 cm)
- Hanging length with loop: about 6 in (15.2 cm)
- Skill level: Easy
- Terminology: US
- Yarn weight: DK (light worsted / #3)
- Hook: 3.5 mm (E-4)
- Number of pieces: 1 ornament (tree body, plus a small trunk sewn on; the loop is worked onto the tip)
- Layout: Single piece, no joining
- Body before border: 3.25 in (8.3 cm) wide x 3 in (7.6 cm) tall
- Border depth: 0.25 in (0.6 cm) on every edge
- Trunk: 0.75 in (1.9 cm) x 0.75 in (1.9 cm)
Materials
Choose a smooth DK cotton or cotton blend. Cotton shows the lattice clearly, blocks flat, and keeps its triangle shape. Fuzzy or very soft acrylic will blur the holes and can make the ornament floppy.
- Color A, oatmeal beige (tree body and border): 8 g, about 20 m (22 yd)
- Color B, cream (trunk and hanging loop): 3 g, about 7 m (8 yd)
These quantities include a margin for your gauge swatch and weaving in ends.
Tools:
– 3.5 mm (E-4) crochet hook
– Tapestry needle
– Scissors
– 1 stitch marker
– Blocking mat and rustproof pins
– Spray bottle with water
– Optional: fabric stiffener or a light starch spray
Abbreviations (US Terms)
- ch – chain
- sl st – slip stitch
- sc – single crochet
- dc – double crochet
- sp – space
- st(s) – stitch(es)
- V-st – V-stitch
Special stitch – V-stitch (V-st): Work (dc, ch 1, dc) in the stitch or space named. One V-st contains 2 dc and 1 center ch-1 space.
Separator: A single ch 1 worked between two V-sts. The next row’s inner V-sts go into these separators.
Gauge and Checkpoints
Gauge isn’t critical for an ornament, but it decides the final size and how open the lattice looks. Make one tree first and measure it at each checkpoint before you make a batch.
Single crochet gauge (trunk): 27 sc and 32 rows = 4 in (10.2 cm). In practice, the 5-stitch, 6-row trunk should measure 0.75 in (1.9 cm) square.
Lattice gauge: Each dc row adds about 0.43 in (1.1 cm) of height.
Checkpoints:
– After Row 4: about 1.75 in (4.4 cm) tall and 1.75 in (4.4 cm) across the last row.
– After Row 7: 3 in (7.6 cm) tall and 3.25 in (8.3 cm) across the base.
– After the border: 3.75 in (9.5 cm) wide and 3.5 in (8.9 cm) tall.
If your tree is too big, go down to a 3.25 mm (D-3) hook, or snug up your chains so they match the height of your dc. If it is too small, go up to a 3.75 mm (F-5) hook. Loose separators are the most common reason a tree spreads too wide, so keep every ch 1 the same size.
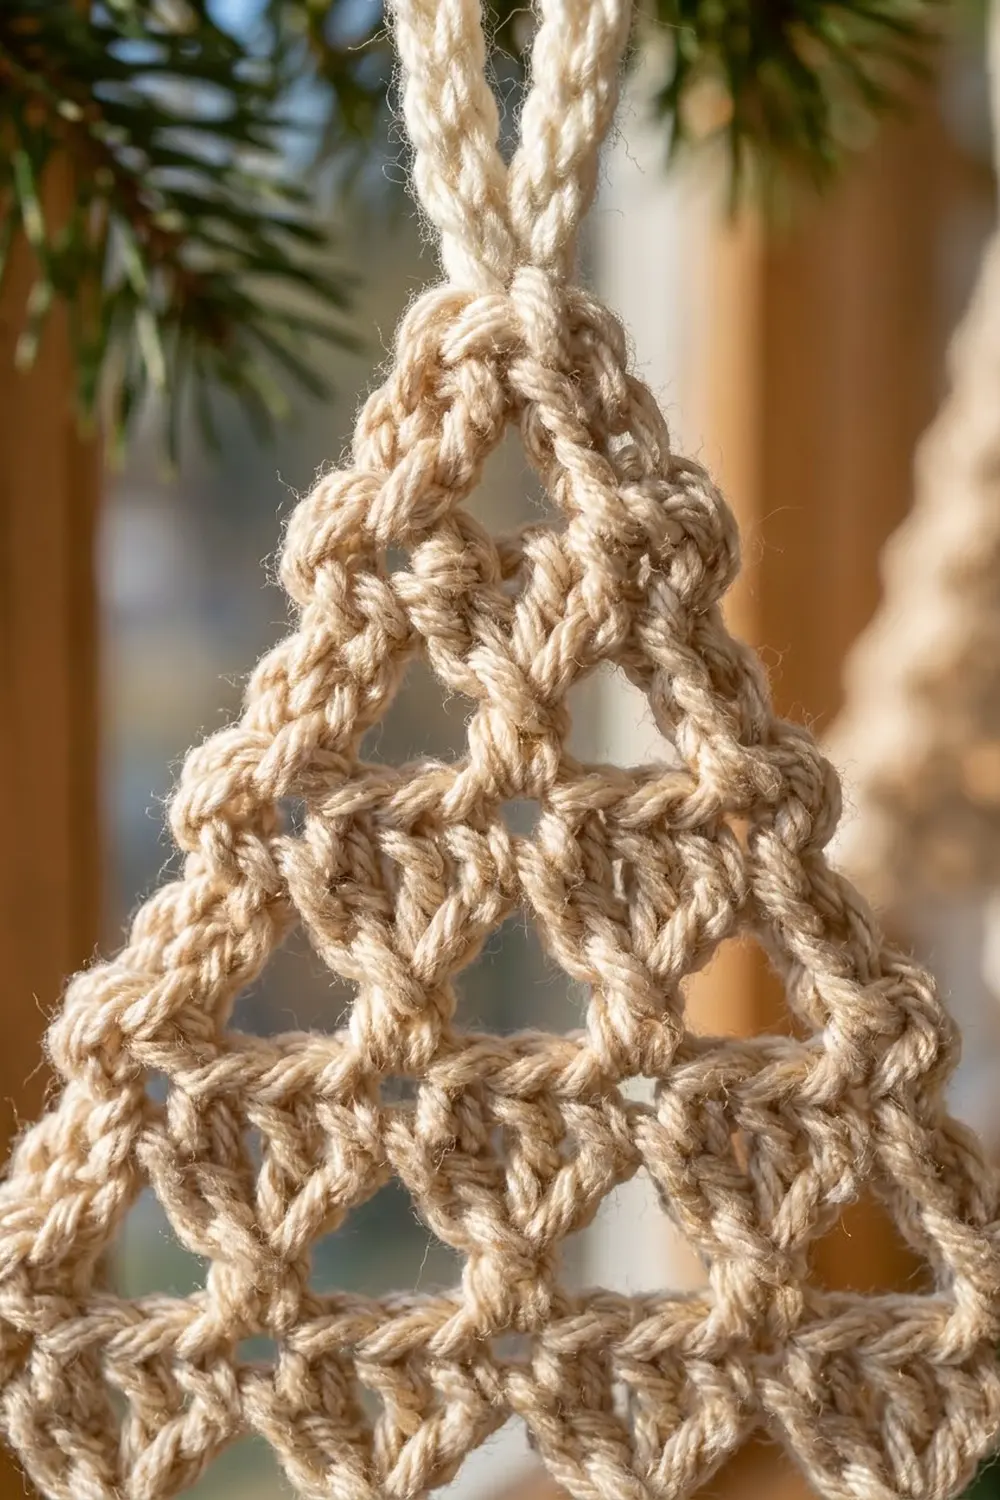
Tree Body (Color A)
You work the body back and forth in rows, starting at the tip. Every row starts with a ch 4, which counts as the first dc plus that V-st’s ch-1. Skipping the center of each V-st from the row before is what creates the triangular holes.
Row 1: With Color A, ch 5. Work 1 dc in the 5th ch from the hook; the 4 skipped chains count as 1 dc and a ch-1 sp. Place a marker in the ch holding the dc. This marked chain is the tip of the tree.
Count: 1 V-st (2 dc, 1 ch-1 sp).
Row 2: Ch 4 (counts as dc and ch 1), turn. Work 1 dc in the first dc, at the base of the ch-4; this is the first edge V-st. Ch 1 to make a separator, skip the center ch-1 sp of the V-st below, and work 1 V-st in the top ch of the beginning ch-5.
Count: 2 V-sts, 1 separator.
Row 3: Ch 4, turn. Work 1 dc in the first dc (edge V-st). Ch 1, work 1 V-st in the next separator, ch 1, then work 1 V-st in the 3rd ch of the turning ch-4.
Count: 3 V-sts, 2 separators.
Rows 4–7: Ch 4, turn. Work 1 dc in the first dc (edge V-st). Ch 1, V-st in the next separator. Repeat from * to * across. Then ch 1 and work 1 V-st in the 3rd ch of the turning ch-4. Each row has one more V-st than the row before.
- Row 4: 4 V-sts, 3 separators
- Row 5: 5 V-sts, 4 separators
- Row 6: 6 V-sts, 5 separators
- Row 7: 7 V-sts, 6 separators
Row 7 stitch total: 14 dc + 7 V-st ch-1 sps + 6 separators = 27 sts across the base.
Don’t fasten off; you’ll start the border from here. Check the Row 7 measurement now: 3 in (7.6 cm) tall and 3.25 in (8.3 cm) wide.
Border (Color A)
The border turns the stepped row ends into a clean straight edge and gives the tree its raised, braided frame. Each of the 3 corners gets a 3-sc group. Side counts below are given between the corner groups, so no corner stitch is counted twice.
Border gauge: Rnd 1 adds about 0.2 in (0.5 cm) and Rnd 2 about 0.05 in (0.1 cm), for a total depth of 0.25 in (0.6 cm) on each edge.
Rnd 1 (sc): Ch 1 and turn so the hook is ready to work along the base.
– Base: 3 sc in the first st (bottom corner). Work 1 sc in each st across the next 25 sts, working into the ch-1 sps and separators as well as the dc. Work 3 sc in the last st, the top of the turning ch (bottom corner).
– First slanted side: Rotate the work. Work 2 sc around each row-end post, from Row 7 up to Row 1: 14 sc.
– Tip: 3 sc in the marked chain. Move the marker to the center sc of this group.
– Second slanted side: Work 2 sc around each row-end post, from Row 1 down to Row 7: 14 sc.
– Join with a sl st to the first sc.
Rnd 1 total: 25 (base) + 14 + 14 (sides) + 9 (three 3-sc corners) = 62 sc.
Rnd 2 (slip stitch edge): Ch 1. Work 1 loose sl st in each sc around, including each corner sc. Join with a sl st to the first sl st.
Count: 62 sl sts. Fasten off and weave in the ends.
Why the math works:
– 2 sc per row end: One dc row is about as tall as two sc, so this keeps the slanted sides flat. With 1 sc per row end the sides would pucker; with 3 they would ruffle.
– Base, 1 sc per stitch: The base works 1:1 into the 27 Row 7 stitches. The 2 end stitches hold the corner groups and the 25 between them each get 1 sc.
– Corners: Each 3-sc corner adds enough stitches to turn the point without cupping.
– Center of the base: With 25 sts between the bottom corners, the 13th sc is the exact center. That gives the trunk a centered landing spot: sc 11 through 15, with 10 sc on each side.
Size checkpoint: 3.75 in (9.5 cm) wide x 3.5 in (8.9 cm) tall.
Trunk (Color B)
Row 1: With Color B, ch 6. Work 1 sc in the 2nd ch from the hook and in each ch across.
Count: 5 sc.
Rows 2–6: Ch 1, turn. Work 1 sc in each st across.
Count: 5 sc per row.
Fasten off, leaving a 12 in (30.5 cm) tail. The trunk should measure 0.75 in (1.9 cm) x 0.75 in (1.9 cm).
Attaching the trunk:
1. Count to the center 5 sc of the base in Rnd 1. These are sc 11 through 15 of the 25 between the corners.
2. Place the top edge of the trunk (Row 6) just behind the base. Overlap it by one sc row so the slip-stitch edge stays visible on the front.
3. With the tail, whipstitch each trunk stitch to one base sc, 5 to 5, working through the back of Rnd 1 only.
4. Check from the front: the trunk should hang straight down from the center with 10 sc of border showing on each side. Weave in the ends.
Hanging Loop (Color B)
- Join Color B with a sl st in the marked center sc at the tip.
- Ch 22, then sl st in the same tip sc to close the loop.
- Work 1 sl st in each of the 22 ch around the loop. This thickens the cord so it looks like the photo and doesn’t stretch.
- Sl st in the tip sc again. Fasten off and weave in the ends through the border.
The loop should stand about 1.75 in (4.4 cm) tall.
Final Blocking
- Spray the ornament until it’s evenly damp, not dripping.
- Lay it right side up on the blocking mat.
- Pin the 3 corners first: base width 3.75 in (9.5 cm), tip 3.5 in (8.9 cm) above the base.
- Pin along each slanted side so the edges are dead straight between the corners.
- Use a pin tip to open each triangular hole gently so the lattice reads clearly.
- Pin the trunk square to 0.75 in (1.9 cm) on each side, and lay the loop straight up.
- Optional: apply a light coat of fabric stiffener or starch for an extra-crisp ornament.
- Let it dry completely, usually 6 to 12 hours, before unpinning.
Final Quality-Control Checklist
- Row 7 has 7 V-sts and 6 separators (27 sts).
- Each row has a hole over every V-st center from the row before.
- Border Rnd 1 has 62 sc and Rnd 2 has 62 sl sts.
- Both slanted sides lie flat with 14 sc each.
- The body measures 3.75 in (9.5 cm) x 3.5 in (8.9 cm).
- The trunk is centered over sc 11–15 and measures 0.75 in (1.9 cm) square.
- The loop is attached at the exact tip and is firm, not stretchy.
- All ends are woven in invisibly.
Troubleshooting
- Tree leans to one side: You probably missed an edge V-st at the start or end of a row. Count V-sts per row; each row needs one more than the last.
- Holes are closed up: You worked into a V-st center instead of a separator. Rip back and work the inner V-sts only into the separators.
- Sides ruffle: Too many border sc. Use exactly 2 sc per row end.
- Sides pull in or curve: Too few border sc, or tight sc. Check for 14 sc per side and loosen your tension.
- Slip-stitch edge puckers: Your sl sts are too tight. Keep each one as loose as the sc beneath it, or go up a hook size for Rnd 2.
- Trunk sits off-center: Count the base again from a corner. The trunk belongs on sc 11–15 of the 25.
- Loop stretches: Add the slip-stitch round around the loop, or use a stiffer cotton.
Care
Spot clean or hand wash in cool water, press out the water in a towel, and re-pin to dry flat. Store flat or hanging so the tip and corners stay crisp.
Final Notes
The measurement chain is short and easy to check as you go:
1. Row 4 reaches 1.75 in (4.4 cm).
2. Row 7 reaches 3 in (7.6 cm) tall by 3.25 in (8.3 cm) wide.
3. The 0.25 in (0.6 cm) border brings the tree to 3.75 in (9.5 cm) by 3.5 in (8.9 cm).
4. The 0.75 in (1.9 cm) trunk makes it 4.25 in (10.8 cm) tall.
5. The 1.75 in (4.4 cm) loop gives a hanging length of about 6 in (15.2 cm).
If one tree hits those numbers, every tree after it will match.
Happy crocheting!