

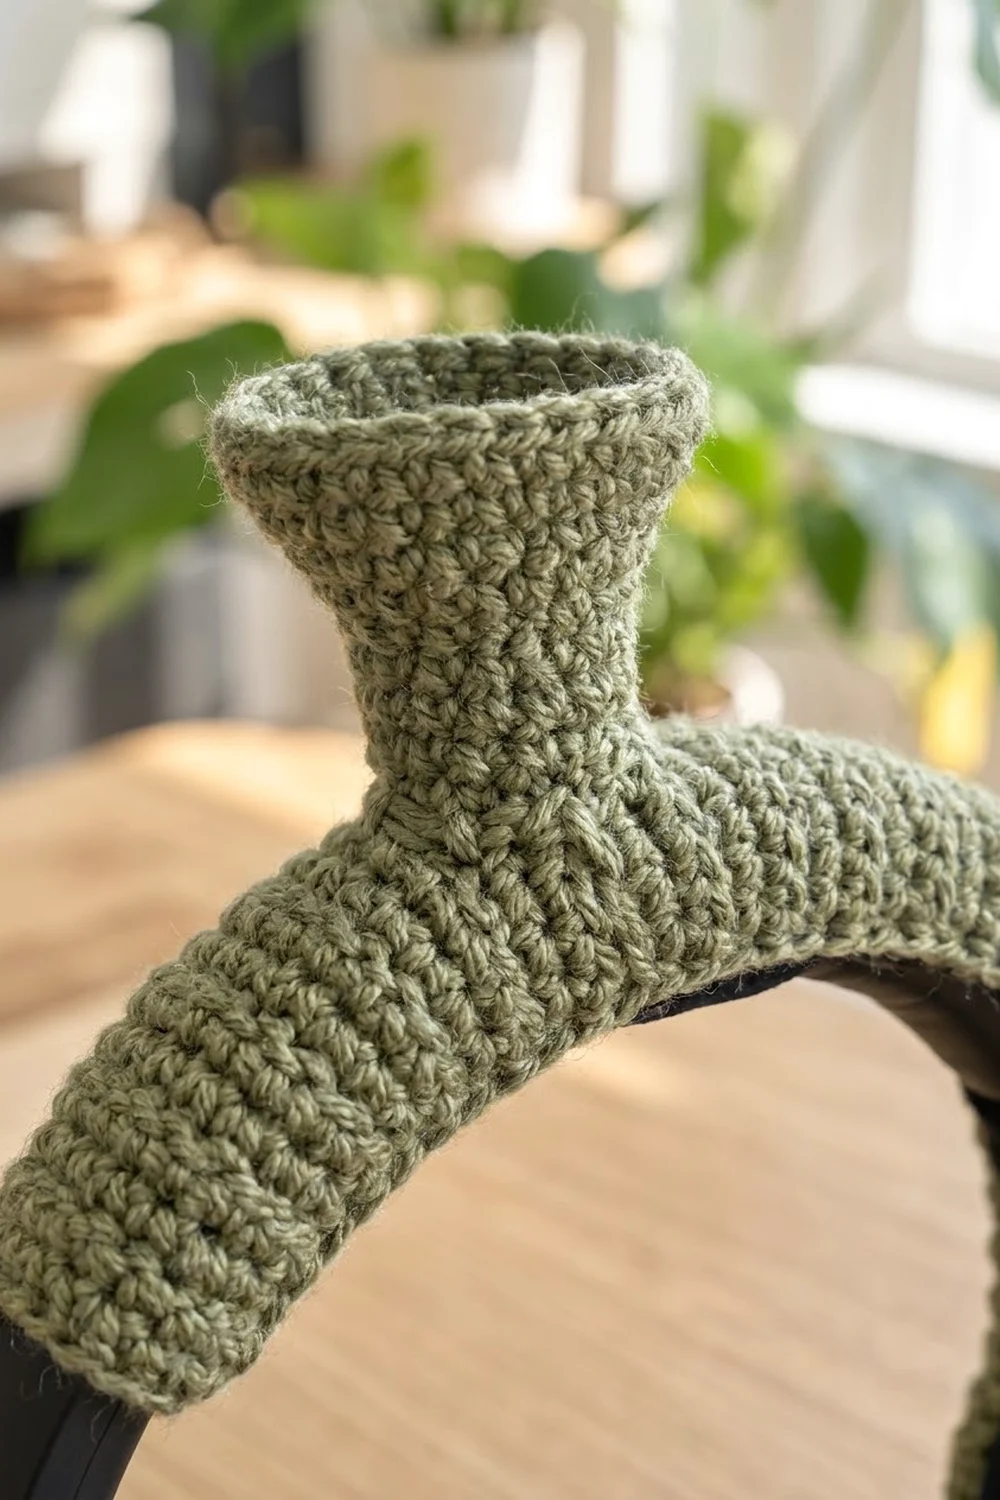
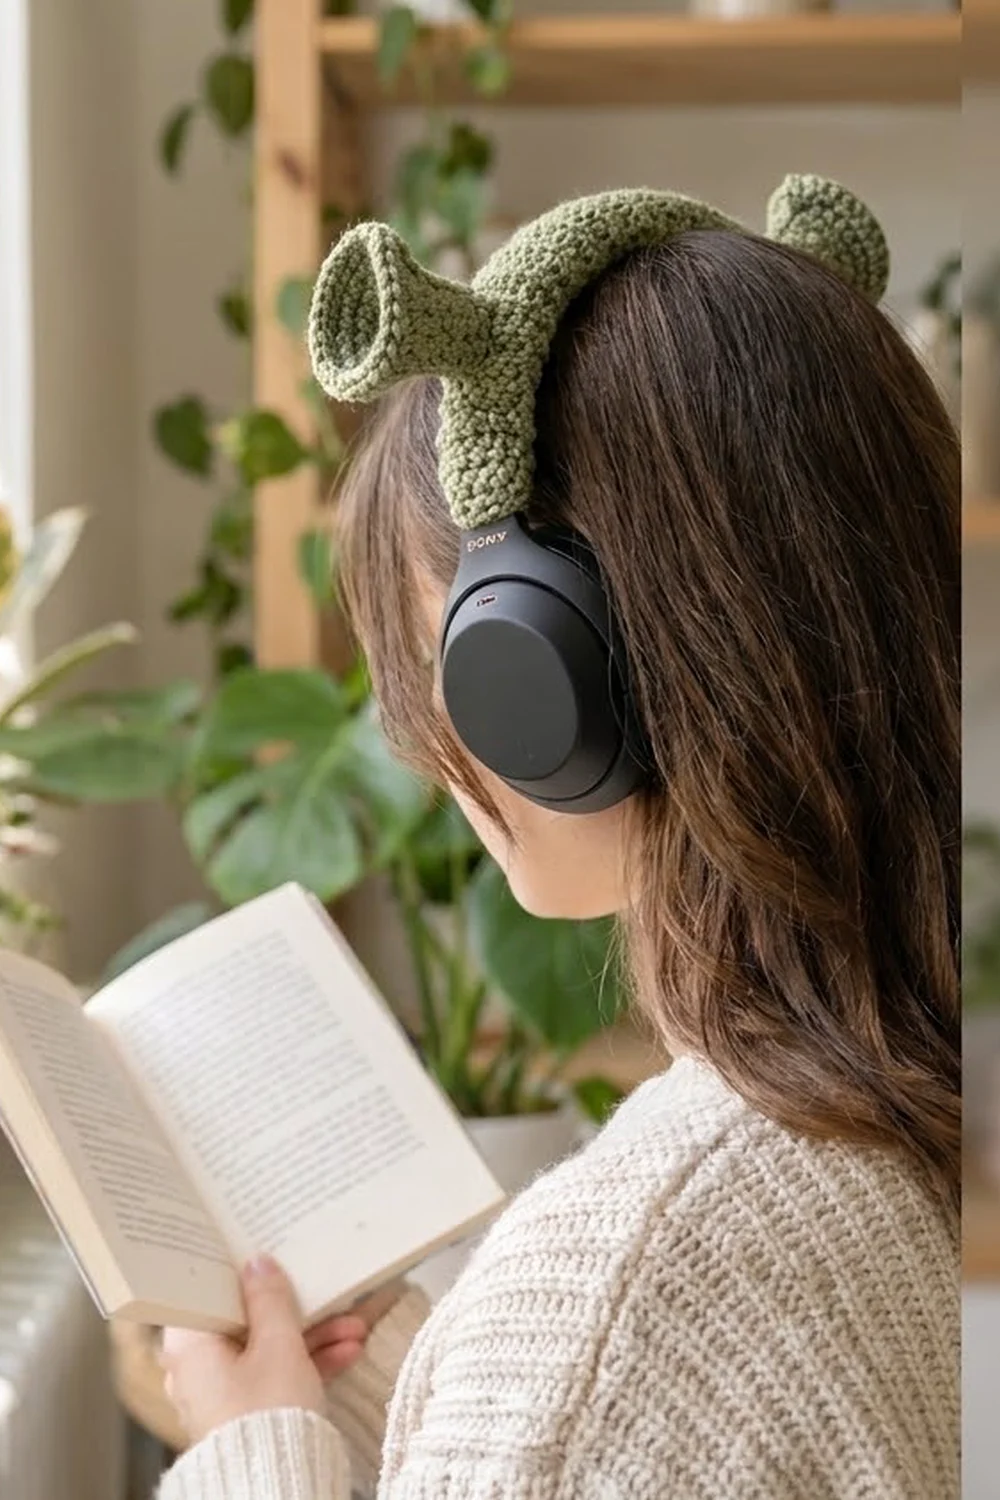
This cover turns ordinary over-ear headphones into something fun. A snug sage green sleeve wraps the headband, and two flared trumpet ears stand straight up from the top. It’s a quick, cheerful make, and it also pads the headband for long listening sessions.
The whole cover uses one color, a muted sage/olive green. The fabric is dense single crochet with a gently pebbly texture, firm enough to hold the ears upright and soft enough to wear comfortably. The look is cute and a little silly, with tidy finishing.
The pattern uses US crochet terms. The bordered cover strip measures 4 in x 11.5 in (10.2 cm x 29.2 cm) flat. Each ear stands about 2.4 in (6.1 cm) tall, with a rim about 2.9 in (7.4 cm) across.
Construction is simple. You crochet the headband strip flat in rows, add a one-round border, wrap it around the headband and whipstitch the long edges together on the underside. Then you crochet two ears in the round, from a closed base disc up through a narrow stem to a flared rim, and sew them on top.
Finished Size and Construction
- Finished size (strip, flat, bordered): 4 in x 11.5 in (10.2 cm x 29.2 cm)
- Finished size (ear): about 2.4 in (6.1 cm) tall, rim about 2.9 in (7.4 cm) across
- Skill level: Easy / advanced beginner
- Terminology: US crochet terms
- Yarn weight: Worsted (#4, medium)
- Hook: 4.0 mm (US G-6)
- Number of pieces: 3 (1 headband strip, 2 ears)
- Layout: One strip wrapped around the headband, with ears sewn on top at rows 12 and 44
- Strip size before border: 3.5 in x 11 in (8.9 cm x 27.9 cm)
- Border depth: 0.25 in (0.6 cm) on each edge
- Fits: headband perimeter of about 3.5–4 in (8.9–10.2 cm) and arc length of about 11.5 in (29.2 cm)
Materials
Yarn: Use a smooth worsted weight yarn in acrylic, cotton-acrylic blend or wool blend. Blends with a bit of loft give the slightly fuzzy, pebbly look in the photos. Pure cotton also works, but it makes stiffer ears and a heavier cover.
- Sage green: 45 g, about 90 m (98 yd)
The amount includes roughly a 20% margin for swatching, seaming tails and length adjustments.
Tools:
- 4.0 mm (US G-6) crochet hook
- Tapestry needle
- Scissors
- Stitch marker (for the ear rounds)
- A small pinch of polyester fiberfill (optional, for the ear stems)
- Sewing pins or locking stitch markers (for placing the ears)
- Soft measuring tape
Abbreviations (US Terms)
- ch – chain
- sc – single crochet
- inc – increase (2 sc in the same stitch)
- sl st – slip stitch
- MR – magic ring
- st(s) – stitch(es)
- sp – space
- [ ] x N – repeat the bracketed steps N times
Special technique: whipstitch seam. Hold the two edges side by side. Insert the needle through one loop of a stitch on the first edge and the matching stitch on the second edge, then pull through. Bring the needle back over the top each time.
Gauge and Checkpoints
Gauge: 16 sc x 20 rows = 4 in (10.2 cm) in sc worked flat. That works out to 4 sts and 5 rows per inch (2.54 cm).
Test one piece first. Make one ear before the strip. It’s small and uses the same gauge, so it tells you quickly whether your tension is right.
Checkpoints:
- Strip after 10 rows: 3.5 in wide x 2 in long (8.9 cm x 5.1 cm)
- Strip after 30 rows: 6 in (15.2 cm) long
- Strip after 55 rows: 3.5 in x 11 in (8.9 cm x 27.9 cm)
- Bordered strip: 4 in x 11.5 in (10.2 cm x 29.2 cm)
- Ear after Rnd 2: base disc about 1 in (2.5 cm) across
- Ear after Rnd 13: rim circumference 9 in (22.9 cm)
Too big? Go down half a hook size (3.75 mm). If the strip is wider than 3.5 in (8.9 cm), the cover will twist on the headband.
Too small? Go up to a 4.5 mm (US 7) hook. If the fabric already feels stiff, a bigger hook is better than adding stitches, because extra stitches change the border math.
Fitting your headphones: Measure the headband arc from yoke to yoke along the top. Each 5 rows add or remove 1 in (2.5 cm). Change the row count only in multiples of 5 so the border math still works (see Border).
Headband Strip
The strip is worked flat in rows. Turn at the end of every row. The ch 1 at the start of each row doesn’t count as a stitch.
Foundation: Ch 15.
Row 1: Sc in 2nd ch from hook and in each ch across. Turn. (14 sc)
Rows 2–55: Ch 1, sc in each st across. Turn. (14 sc)
At the end of Row 55 you have 55 rows of 14 sts. The strip should measure 3.5 in x 11 in (8.9 cm x 27.9 cm). Don’t fasten off. Go straight into the border.
Tip: Count stitches every 10 rows. Single crochet strips tend to lose a stitch at the turning edge, and even one missing stitch shows once the cover is seamed.
Ears (Make 2)
The ears are worked in continuous spiral rounds. Don’t join the rounds. Move the stitch marker up to the first stitch of each new round.
Base disc
Rnd 1: 6 sc in MR. Pull the ring closed. (6 sc)
Rnd 2: Inc in each st around. (12 sc)
The flat disc should be about 1 in (2.5 cm) across. This becomes the closed base that you sew to the headband.
Stem
Rnds 3–6: Sc in each st around. (12 sc each round)
The disc cups upward into a narrow tube about 0.8 in (2.0 cm) tall. If you want the ears extra upright, push a small pinch of fiberfill into the stem now, before it gets harder to reach.
Flare
Rnd 7: [Sc 3, inc] x 3. (15 sc)
Rnd 8: Sc in each st around. (15 sc)
Rnd 9: [Sc 4, inc] x 3. (18 sc)
Rnd 10: [Sc 2, inc] x 6. (24 sc)
Rnd 11: [Sc 3, inc] x 6. (30 sc)
Rnd 12: [Sc 4, inc] x 6. (36 sc)
Rnd 13: Sc in each st around. (36 sc)
The slow increases in Rounds 7–9 give a soft taper out of the stem. The faster increases in Rounds 10–12 open the trumpet bell. Round 13 has no increases, so the rim stands up instead of lying flat.
Rim circumference after Rnd 13 is 9 in (22.9 cm). Don’t fasten off. Finish the rim in the Border section.
Make All Pieces
All pieces are in sage green:
- Headband strip: 1 (about 30 g)
- Ears: 2 (about 5 g each)
Layout grid (top view of the strip, rows counted from Row 1):
Row:   1 ........ 12 ................ 44 ........ 55
       |          [EAR]               [EAR]          |
       |<-2.5 in->|<----- 6.4 in ---->|<-2.5 in->|
          (6.4 cm)       (16.3 cm)       (6.4 cm)
Put each ear centered across the 14 strip stitches, on stitches 7–8, so it sits on the top of the headband after seaming. Row 44 mirrors Row 12, because 55 − 44 + 1 = 12. The ears are 32 rows apart, which is 6.4 in (16.3 cm).
Border
Border gauge: 4 sc per inch (2.54 cm) along every edge. This matches the stitch gauge, so the edges stay flat.
Strip Border
Work 1 round around the whole strip, starting at the end of Row 55.
Rnd 1:
- Short end 1 (top of Row 55): Ch 1. Work 1 sc in each of the 14 sts. (14 sc)
- Corner: Ch 1. This is a corner space, not a stitch.
- Long side 1 (row ends): [Sc in each of the next 4 row ends, skip 1 row end] x 11. (44 sc)
- Corner: Ch 1.
- Short end 2 (underside of the foundation chain): Sc in each of the 14 chs. (14 sc)
- Corner: Ch 1.
- Long side 2 (row ends): [Sc in each of the next 4 row ends, skip 1 row end] x 11. (44 sc)
- Corner: Ch 1. Sl st to the first sc. Fasten off and leave a 36 in (91.4 cm) tail for seaming.
Total: 14 + 44 + 14 + 44 = 116 sc, plus 4 ch-1 corner spaces.
Why the math works: The strip has 5 rows per inch but only 4 stitches per inch. Working 4 sc for every 5 row ends turns 55 row ends into 44 sc, and 44 ÷ 4 = 11 in (27.9 cm), so the long sides match the strip length exactly. The short ends take 1 sc per stitch: 14 ÷ 4 = 3.5 in (8.9 cm). Both long sides have exactly 44 sc, which lets them pair up stitch for stitch when you seam. The corner ch-1 spaces don’t count in either side’s total.
Ear Rim
Rnd 14: Sl st loosely in each st around. (36 sl st)
Fasten off and leave a 12 in (30.5 cm) tail. Weave the rim end of the tail back down through the stem to the base, so it comes out next to the base disc and is ready for sewing.
The slip stitch round firms up the rim so it holds the open trumpet shape without adding height.
Joining
You’ll make two joins: the strip seam, then the ears.
Seam the Strip
- Unplug the headphones. Lay the strip wrong side up, then center it along the headband arc.
- Wrap both long edges down around the headband so they meet on the underside, against the cushion.
- Starting at one end with the seaming tail, whipstitch the long edges together through the back loops of the border sc. Match stitch 1 of long side 1 to stitch 1 of long side 2, and keep going in pairs. Stitch-to-stitch logic: 44 sc on each side gives 44 matched pairs. If you have a spare stitch at the end, you skipped a pair along the way.
- Tension: Pull each stitch just snug enough to close the gap. If you pull too hard, the seam puckers and the cover twists. If you leave it too loose, the seam gapes when you bend the band.
- At each short end, run the tail through the 14 short-end border sc and pull gently so the cover grips the headband above the yoke. Knot and weave in.
Size checkpoint: The seamed cover should go around the headband with no stretched or gaping stitches, about 3.75 in (9.5 cm) around. From end to end it should cover the arc, about 11.5 in (29.2 cm).
Attach the Ears
- Pin each ear’s base disc on top of the cover, centered over stitches 7–8 of Row 12 and Row 44. That puts each one about 2.5 in (6.4 cm) in from its end.
- Look from the front to check that both ears lean the same way, either straight up or tilted slightly outward.
- Using the 12 in (30.5 cm) tail, sew around the outer edge of Rnd 2. Go through 1 loop of each of the 12 base stitches and catch 1 strip stitch for each. That’s 12 stitches around.
- Sew a second lap through the same stitches for strength. Knot inside the cover and weave in.
Final Blocking
- Take the cover off the headphones if you can. If it’s fully sewn on, block it while it’s on the headphones with a damp cloth, and keep water away from the electronics.
- Mist the strip and ears lightly with cool water. Don’t soak them.
- Pat the strip flat and square to 4 in x 11.5 in (10.2 cm x 29.2 cm) before seaming. If it’s already seamed, smooth the seam flat with your fingers.
- Stuff each ear bell with a rolled-up tissue or a small ball of scrap yarn so the rim opens to about 2.9 in (7.4 cm) across.
- Let everything dry completely, then take out the forms.
- For acrylic, you can steam lightly from 1 in (2.5 cm) above. Don’t let the iron touch the fabric.
Final Quality-Control Checklist
- Strip has 14 sts in every row and 55 rows in total.
- Border has 14 + 44 + 14 + 44 = 116 sc and 4 corner spaces.
- Long seam runs straight along the underside, with 44 matched pairs.
- Cover doesn’t twist when you flex the headband.
- Ears sit on Rows 12 and 44, centered across the band.
- Both ears match in height (2.4 in / 6.1 cm) and rim size (36 sts).
- All tails are woven in and hidden inside the cover.
- Headphone sliders still extend freely below the cover.
Troubleshooting
Cover twists around the band: The strip is too wide or the seam is uneven. Check that you have 14 sts per row and redo the seam pair by pair.
Cover is too short or long: Add or remove rows in multiples of 5 and change the border repeats by 1 for each 5 rows. For example, 60 rows gives [sc 4, skip 1] x 12 = 48 sc per long side.
Ears flop over: Your tension is too loose. Go down a hook size, add fiberfill to the stem or sew a second lap around the base.
Rim ruffles: You probably crocheted too tightly in Rnds 10–12, or added an extra increase. Recount to 36.
Rim curls inward: Work the slip stitch round looser, or work it with a hook one size larger.
Long edges ripple: You missed the “skip 1” in the border repeats. The long sides need exactly 44 sc.
Care
Hand wash in cool water with mild soap, after removing the cover from the headphones. Press out water in a towel and dry flat, reshaping the ear bells.
Final Notes
Everything in this pattern follows from one gauge: 4 sts and 5 rows per inch. Fourteen stitches give a 3.5 in (8.9 cm) wide strip, and 55 rows give 11 in (27.9 cm). The border’s 4-in-5 row-end ratio turns 55 rows into 44 sc per long side, which brings the strip to 4 in x 11.5 in (10.2 cm x 29.2 cm) and leaves two edges that seam in exactly 44 pairs. Each ear grows from 6 to 12 sts for the base, holds 12 sts through the stem and flares to a 36-stitch rim measuring 9 in (22.9 cm) around. Check each measurement as you reach it, and the cover will fit snugly with the ears standing straight up.
Happy crocheting!