

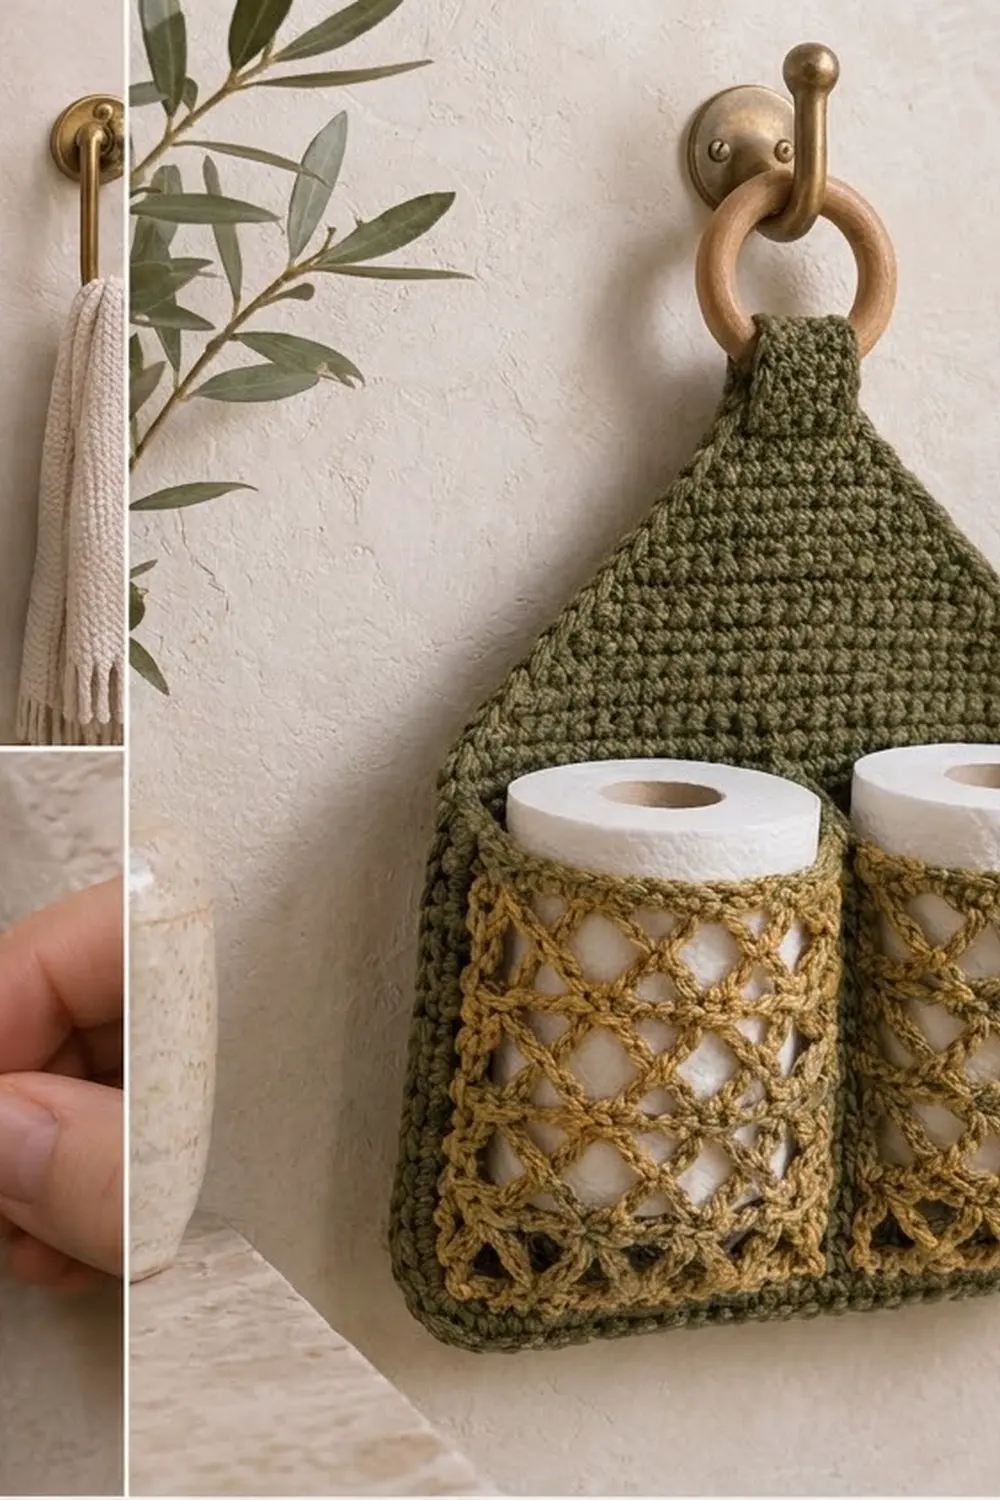
The Olive Lattice Toilet Paper Holder hangs on the wall and stores two spare rolls. A solid olive green back panel, shaped like a little house, rises to a narrow tab that loops through a wooden ring. An open mustard-gold lattice pocket covers the lower half and is divided down the center into two compartments.
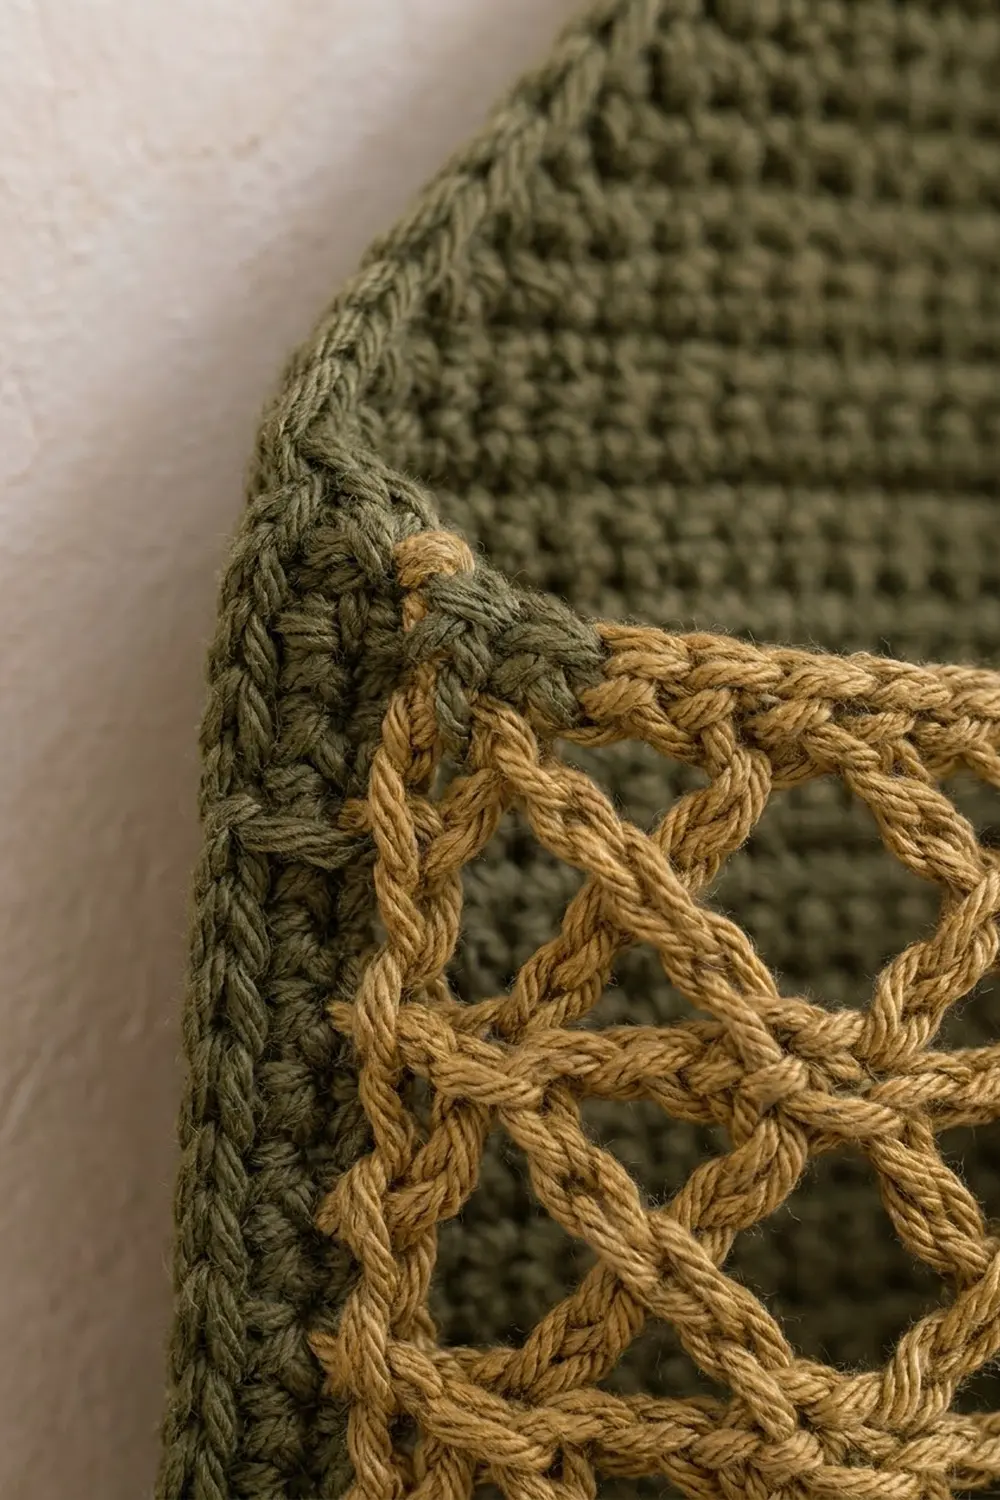
The colors are warm and earthy: deep olive for the structure and mustard gold for the diamond mesh. Olive also forms the band at the bottom of the pocket, the band across the pocket top, the center divider and the softly rounded outer border.
This pattern uses US crochet terms. The finished holder is 13 in (33.0 cm) wide and 13.4 in (34.0 cm) tall, not counting the tab. With the tab and ring, the total hanging height is about 16 in (40.6 cm).
You crochet three pieces: a back panel in single crochet rows, a flat lattice pocket panel and a short tab. Pin the pocket to the back panel and stitch a line down the center. A two-round border then joins the pocket sides and bottom to the back panel. Finally, fold the tab over the ring and sew it to the top.
Finished Size and Construction
- Finished size: 13 in (33.0 cm) wide x 13.4 in (34.0 cm) tall, not counting the tab
- Hanging height with tab and ring: about 16 in (40.6 cm)
- Skill level: Easy to intermediate
- Terminology: US crochet terms
- Yarn weight: Worsted (#4)
- Hook: 5 mm (H-8)
- Number of pieces: 3 (back panel, pocket panel, hanging tab), plus a wooden ring
- Layout: the pocket panel covers the lower part of the back panel; the tab sits at the top point
- Back panel size: 12 in (30.5 cm) wide x 12.4 in (31.5 cm) tall
- Pocket panel size: 12 in (30.5 cm) wide x 4.9 in (12.4 cm) tall, making two pockets 6 in (15.2 cm) wide
- Size before border: 12 in (30.5 cm) x 12.4 in (31.5 cm)
- Border depth: 2 rounds, about 0.5 in (1.3 cm)
Materials
Use a worsted-weight cotton or cotton blend. Cotton holds its shape on a wall, doesn’t stretch much under the weight of the rolls, and gives crisp lattice loops. Avoid fuzzy yarns, because they hide the open diamonds.
- Olive green: 120 g, about 190 m (back panel, pocket bands, divider, border, tab)
- Mustard gold: 35 g, about 55 m (lattice mesh)
These amounts include a margin of about 15 percent.
Tools:
- 5 mm (H-8) crochet hook
- Wooden ring, 2.5 in (6.4 cm) outer diameter
- Tapestry needle
- Locking stitch markers
- Sewing pins
- Scissors
- Measuring tape
Abbreviations (US Terms)
- ch – chain
- sc – single crochet
- dc – double crochet
- sl st – slip stitch
- sc2tog – single crochet 2 together
- sk – skip
- sp – space
- st(s) – stitch(es)
- tch – turning chain
- RS – right side
Special stitch – sc2tog: Insert the hook in the next st, yarn over and pull up a loop. Insert the hook in the following st, yarn over and pull up a loop (3 loops on hook). Yarn over and pull through all 3 loops. This turns 2 sts into 1.
Lattice loop: A ch-5 anchored with a sc. Each row of loops is worked into the loops of the row below, which forms the diamond mesh.
Gauge and Checkpoints
- Single crochet: 16 sc and 18 rows = 4 in (10.2 cm)
- Lattice mesh: 4 loops and 6 rows = 4 in (10.2 cm), lightly blocked
Make the hanging tab first and use it as your gauge swatch. It is 8 sts x 18 rows and should measure 2 in (5.1 cm) x 4 in (10.2 cm).
Checkpoints:
- Back panel after Row 36: 12 in (30.5 cm) x 8 in (20.3 cm)
- Back panel after Row 56: 12.4 in (31.5 cm) tall, top edge 2 in (5.1 cm)
- Pocket panel: 12 in (30.5 cm) x 4.9 in (12.4 cm)
- After border: 13 in (33.0 cm) x 13.4 in (34.0 cm)
If your tab comes out too big, go down a hook size. If it’s too small, go up a hook size. Measure again after the first 10 rows of the back panel, because a small difference spread across 48 sts adds up quickly.
Hanging Tab (Make 1)
With olive:
Row 1: Ch 9, sc in 2nd ch from hook and in each ch across, turn. (8 sc)
Rows 2–18: Ch 1, sc in each st across, turn. (8 sc)
Fasten off and leave a 16 in (40.6 cm) tail for sewing. The tab measures 2 in (5.1 cm) x 4 in (10.2 cm).
Back Panel (Make 1)
With olive, work from the bottom up.
Row 1 (RS): Ch 49, sc in 2nd ch from hook and in each ch across, turn. (48 sc)
Rows 2–36: Ch 1, sc in each st across, turn. (48 sc)
Checkpoint: 12 in (30.5 cm) wide x 8 in (20.3 cm) tall.
Shaping the point: Every row from here decreases 1 st at each end, which makes the diagonal roof lines.
Row 37: Ch 1, sc2tog, sc in each st to last 2 sts, sc2tog, turn. (46 sc)
Rows 38–56: Repeat Row 37. Each row has 2 fewer sts than the row before.
Stitch counts: Row 38 has 44 sc, Row 40 has 40 sc, Row 45 has 30 sc, Row 50 has 20 sc and Row 56 has 8 sc.
Fasten off. The shaped section is 20 rows, about 4.4 in (11.2 cm) tall. The whole panel measures 12 in (30.5 cm) x 12.4 in (31.5 cm), and its top edge is 8 sts, or 2 in (5.1 cm), wide.
Lattice Pocket Panel (Make 1)
The pocket panel is one flat piece. It becomes two pockets when you stitch the center divider.
Row 1 (RS): With olive, ch 49, sc in 2nd ch from hook and in each ch across, turn. (48 sc)
Row 2: Ch 1, sc in each st across, turn. (48 sc) Change to mustard on the last yarn over, then fasten off olive.
Row 3: With mustard, ch 1, sc in first sc, ch 5, sk 3 sc, sc in next sc 11 times, ch 5, sk 2 sc, sc in last sc, turn. (12 loops, 13 sc)
Row 4: Ch 5 (counts as dc + ch 2), sc in first ch-5 loop, ch 5, sc in next ch-5 loop 11 times, ch 2, dc in last sc, turn. (11 full loops and a half loop at each end)
Row 5: Ch 1, sc in first dc, ch 5, sc in next ch-5 loop 11 times, ch 5, sc in 3rd ch of tch, turn. (12 loops)
Rows 6–8: Repeat Rows 4, 5 and 4. Change to olive on the last dc of Row 8, then fasten off mustard.
Checkpoint: the mesh (Rows 3–8) is about 4 in (10.2 cm) tall and 12 in (30.5 cm) wide.
Row 9 (conversion row): With olive, ch 1, sc in first dc, sc in ch-2 sp, sc in next sc, 3 sc in next ch-5 loop, sc in next sc 11 times, sc2tog over the last ch-2 sp and the 3rd ch of tch, turn.
Count: 12 sc worked into the 12 sc of Row 8 + 33 sc worked into the 11 loops + 3 edge sts (in the dc, the first ch-2 sp and the final sc2tog) = 48 sc.
Row 10: Ch 1, sc in each st across. (48 sc)
Fasten off. The pocket panel is 12 in (30.5 cm) wide x 4.9 in (12.4 cm) tall.
Make All Pieces
You make one of each piece:
- Olive: back panel (1), hanging tab (1), plus the pocket bands, divider and border
- Mustard: lattice mesh of the pocket panel (1)
Layout, front view:
          [ ring ]
          [ tab  ]
         /        \
        / back     \
       /  panel     \
      |              |
      |------+-------|
      |pocket|pocket |
      | left | right |
      |______|_______|
Joining
Placing the pocket: Lay the back panel RS up. Place the pocket panel on top, also RS up. Line up the two foundation chains along the bottom and line up the side edges. The pocket top reaches about Row 22 of the back panel. Pin the sides and the bottom.
Center divider: Thread a 30 in (76.2 cm) length of olive on the tapestry needle. Start at the bottom, between the 24th and 25th sts of the pocket’s Row 1. Backstitch straight up through both layers to the top of Row 10. Catch both olive bands, and in each mesh row catch the knot closest to the center line. This makes two pockets, each 6 in (15.2 cm) wide.
Tension: Keep the backstitch firm but not tight. Pulling makes the mesh pucker and shortens the pockets. After sewing, the divider should run straight and the panel should lie flat.
Size checkpoint: The assembled piece still measures 12 in (30.5 cm) x 12.4 in (31.5 cm).
The border joins the pocket sides and bottom to the back panel.
Border
Border gauge: 4 sc per inch (2.5 cm) along every edge, the same as the back panel.
The bottom edge starts with 48 sts. The pocket’s 48 foundation loops sit right on top of the back panel’s 48 foundation loops, and you work each pair as one st, so no sts are added.
Round 1: With RS facing, join olive at the bottom right corner through both layers.
- Bottom: 3 sc in first ch, sc in next 46 chs, 3 sc in last ch. (46 straight sc + two 3-sc corner groups = 52 sc)
- Side: Work across 36 row ends: sc in next 8 row ends, sk next row end 4 times. (32 sc) Work the lower 22 row ends through both layers, where the pocket sits.
- Slanted edge: Work across 20 row ends: 2 sc in next row end, sc in next 2 row ends 6 times, 2 sc in next row end, sc in last row end. (27 sc)
- Top: Sc in each of the 8 sts. (8 sc)
- Second slanted edge: Work as for the first slanted edge. (27 sc)
- Second side: Work as for the first side, again through both layers at the pocket. (32 sc)
Join with a sl st to the first sc. Total: 46 + 6 + 32 + 27 + 8 + 27 + 32 = 178 sc.
Round 2: Ch 1, sc in each st around, but work 2 sc in each of the 3 sts in both bottom corner groups. Join with a sl st to the first sc. Total: 46 + 12 (two 6-sc corners) + 32 + 27 + 8 + 27 + 32 = 184 sc.
Fasten off.
Why the math works: Every edge carries about 4 sc per inch. The bottom has 48 sts over 12 in (30.5 cm), each side has 32 sts over 8 in (20.3 cm), each slanted edge has 27 sts over about 6.7 in (17.0 cm), and the top has 8 sts over 2 in (5.1 cm). Because every edge has the same stitch density, the border lies flat. The only extra sts are at the bottom corners, which gives them their soft curve. The angles at the shoulders and the top point are wide (obtuse), so they don’t need extra sts.
Attaching the tab: Slip the ring onto the tab and fold the tab in half. Center it over the top edge with one end in front of the panel and one behind, each overlapping the panel by 0.75 in (1.9 cm). Whipstitch both ends through all layers. The loop sits about 1.25 in (3.2 cm) above the panel.
Final Blocking
- Lay the holder RS up on a blocking mat or folded towel.
- Spray it evenly with water until damp but not soaked.
- Pin the bottom edge straight at 13 in (33.0 cm).
- Pin the sides straight, then pin the point so the body measures 13.4 in (34.0 cm).
- Gently open the lattice so the diamonds are even, and pin the pocket top straight.
- Ease the bottom corners into smooth curves.
- Let it dry completely before you remove the pins.
Final Quality-Control Checklist
- The body measures 13 in (33.0 cm) x 13.4 in (34.0 cm).
- The bottom edge and sides are straight and don’t ruffle.
- The slanted edges are even and meet the 2 in (5.1 cm) top cleanly.
- Round 1 of the border catches the pocket bottom and sides all the way along.
- The divider runs straight up the center and makes two 6 in (15.2 cm) pockets.
- The lattice diamonds are evenly open.
- The tab is firmly sewn and the ring hangs centered.
- All ends are woven in on the wrong side.
Troubleshooting
The border ruffles along the sides: You have too many sts. Skip 1 row end in every 9.
The border pulls in on the slanted edges: Work the 2-sc increases as written. One sc per row end isn’t enough.
The mesh looks too tight: Your chains are tight. Loosen your chain tension, or use a 5.5 mm (I-9) hook for the mustard rows only.
The pocket top flares: Work Rows 9 and 10 with a 4.5 mm (7) hook. Keep the count at 48 sc.
The holder tilts when hanging: The tab is off center. Re-sew it over the middle 2 in (5.1 cm) of the top edge.
The rolls fit tightly: The mesh stretches to hold rolls up to about 4.5 in (11.4 cm) across. Block the pockets over a roll to ease them.
Care
Hand wash in cool water with mild soap and lay flat to dry. Reshape the lattice while it’s damp.
Final Notes
Each measurement depends on the one before it. The tab confirms your gauge of 4 sc per inch, which gives a back panel 12 in (30.5 cm) wide and 12.4 in (31.5 cm) tall. The pocket panel matches that 12 in (30.5 cm) width and is 4.9 in (12.4 cm) tall. Two border rounds add about 0.5 in (1.3 cm) on every edge, so the finished body is 13 in (33.0 cm) x 13.4 in (34.0 cm). The tab and ring bring the total hanging height to about 16 in (40.6 cm). If each of these measurements checks out, the holder will hang straight and flat.
Happy crocheting!