
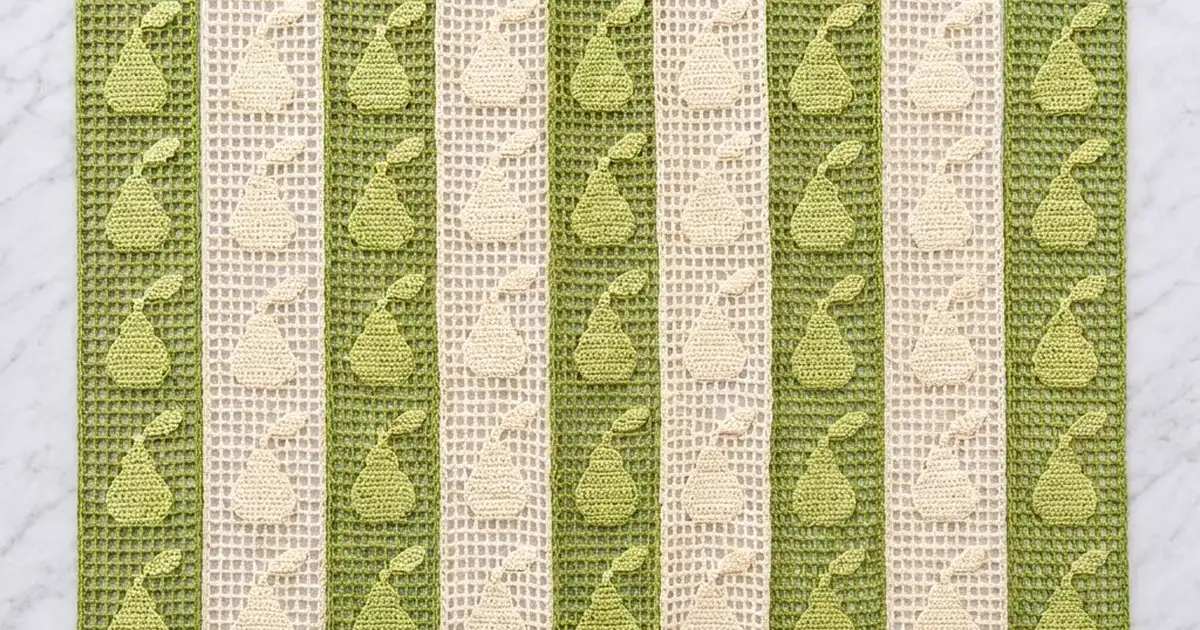
This curtain is made of seven long filet-mesh strips, each decorated with a column of plump little pears. The strips hang side by side from a rod and alternate moss green and ivory cream. Light comes through the open grid, and you can walk through the curtain by brushing the strips aside.
The pears are separate single-crochet appliqués. They are pale pistachio on the green strips and soft butter-cream on the cream strips. Each pear has a chained stem and a pointed leaf that tips to the right. The look is fresh, simple, and a little cottage-kitchen.
This pattern uses US crochet terms. Each finished strip measures 5 in (12.7 cm) wide by 76.5 in (194.3 cm) long, not counting the tabs. With 0.5 in (1.3 cm) gaps between strips, the curtain is about 38 in (96.5 cm) wide.
Construction overview: each strip is worked flat from top to bottom in filet mesh, framed by a solid row at each end. You then add a single-crochet border and two folded hanging tabs. Last, you crochet 7 pears with stems and leaves and sew them down the center of the strip.
Finished Size and Construction
- Finished size (curtain): about 38 in (96.5 cm) wide × 78.5 in (199.4 cm) long, measured from the top of the rod
- Skill level: Easy-intermediate
- Terminology: US
- Yarn weight: DK (3) cotton
- Hook: 4.0 mm (G-6)
- Number of pieces: 7 strips, 49 pears, 49 leaves
- Layout: 7 strips in one row: G, C, G, C, G, C, G
- Strip size before border: 4.5 in × 76 in (11.4 cm × 193.0 cm)
- Border depth: 0.25 in (0.6 cm) on every side
- Strip size after border: 5 in × 76.5 in (12.7 cm × 194.3 cm)
- Pear size (with stem and leaf): 2.75 in × 3.25 in (7.0 cm × 8.3 cm) for the body, plus about 1 in (2.5 cm) of stem and leaf
Materials
Use a smooth mercerized or matte DK cotton, about 115 m per 50 g. Cotton hangs straight, keeps the grid crisp, and won’t stretch out of shape the way acrylic can on long strips.
- Color G (moss green): 500 g / 1150 m, for 4 strips
- Color C (ivory cream): 400 g / 920 m, for 3 strips
- Color P (pale pistachio): 100 g / 230 m, for 28 pears and leaves
- Color B (butter-cream): 100 g / 230 m, for 21 pears and leaves
All quantities include a margin of about 10–15% for swatching and tension differences.
Tools:
– 4.0 mm (G-6) crochet hook
– Tapestry needle
– Locking stitch markers
– Rustproof pins and blocking mats
– Tape measure
– A curtain rod 40 in (101.6 cm) long and up to 1.25 in (3.2 cm) across
Abbreviations (US Terms)
- ch – chain
- sl st – slip stitch
- sc – single crochet
- hdc – half double crochet
- dc – double crochet
- sc2tog – single crochet 2 together
- sk – skip
- sp – space
- st(s) – stitch(es)
Special stitch – mesh square: In this pattern, one mesh square is 1 dc, then ch 2, then skip the next 2 sts (or the ch-2 sp), and 1 dc in the next dc. Squares sit side by side and share their dc posts, so 9 squares need 10 dc.
Gauge and Checkpoints
- Mesh gauge: 10 mesh squares × 10 rows = 5 in × 5 in (12.7 cm × 12.7 cm). Each square is 0.5 in (1.3 cm).
- Appliqué gauge: 9 sc × 10 rows = 2 in × 2 in (5.1 cm × 5.1 cm).
Test one piece first. Work Rows 1–21 of the first strip and make one pear, then check them.
- After Row 1: the strip is 4.5 in (11.4 cm) wide.
- After Row 21: the strip is 10.5 in (26.7 cm) long.
- Finished pear body, before the edging round: 2.5 in × 2.8 in (6.4 cm × 7.1 cm).
If your work is too big, go down one hook size (3.75 mm). If it is too small, go up one size (4.5 mm). Changing hooks is better than changing the stitch counts, because the border and the pear spacing depend on 28 stitches and 152 rows.
Small length differences can be fixed in blocking. A width difference larger than 0.25 in (0.6 cm) cannot.
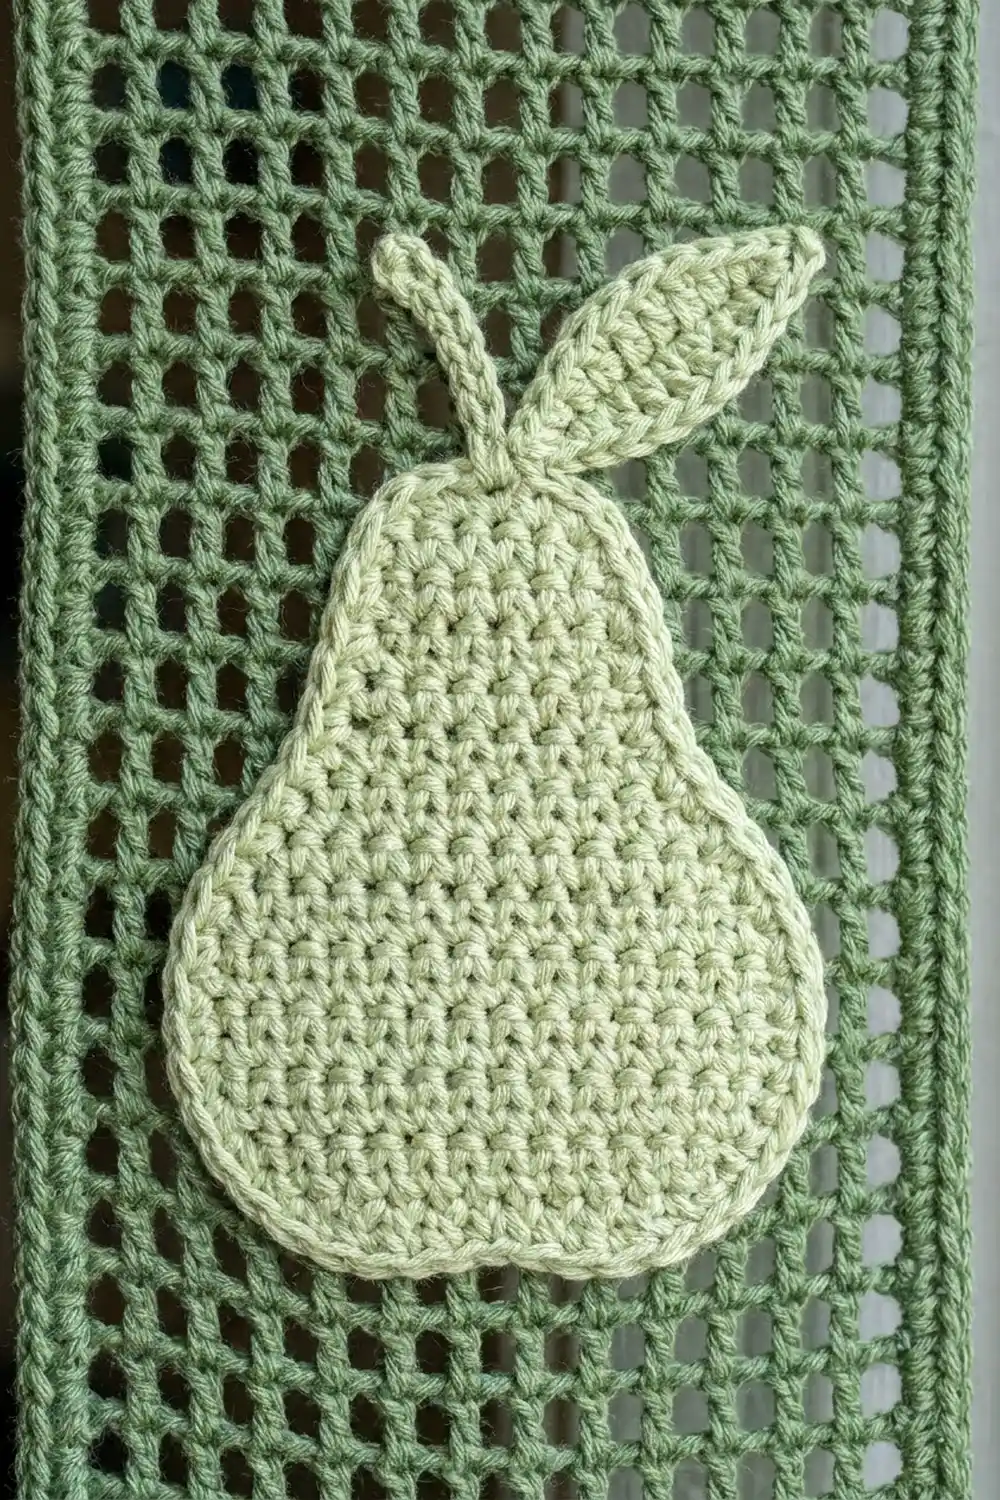
Strip (make 7: 4 in G, 3 in C)
The strip is worked from the top edge down.
Foundation: Ch 30.
Row 1 (solid row): Dc in the 4th ch from the hook and in each ch across. Turn. (28 sts: the skipped 3 ch count as 1 dc, plus 27 dc.)
Row 2 (first mesh row): Ch 5 (counts as 1 dc + ch 2), sk the next 2 dc, dc in the next dc. Ch 2, sk 2 dc, dc in the next dc. Repeat from * 7 more times. Your last dc goes in the top of the turning ch. Turn. (9 mesh squares: 10 dc and 9 ch-2 sps, which takes up all 28 stitch positions.)
Rows 3–151 (mesh rows): Ch 5 (counts as 1 dc + ch 2), dc in the next dc. Ch 2, dc in the next dc. Repeat from * 7 more times. Your last dc goes in the 3rd ch of the turning ch-5. Turn. (9 mesh squares in each row.)
Checkpoint: Put a marker every 21 rows (Rows 21, 42, 63, and so on). Each marked section should measure 10.5 in (26.7 cm).
Row 152 (solid conversion row): Ch 3 (counts as 1 dc). 2 dc in the next ch-2 sp, dc in the next dc. Repeat from * across. In the last repeat, work 2 dc in the space made by the turning ch-5, then dc in its 3rd ch. Do not fasten off.
(28 sts = 10 dc worked into the existing dc + 18 dc worked into the 9 spaces.)
Checkpoint: The strip should now measure 4.5 in × 76 in (11.4 cm × 193.0 cm): 152 rows × 0.5 in.
Pear Appliqué (make 49: 28 in P, 21 in B)
The pear is worked in rows from the bottom up, so the wide, rounded base comes first.
Foundation: Ch 6.
- Row 1: Sc in the 2nd ch from the hook and in each ch across. Turn. (5 sc)
- Row 2: Ch 1, 2 sc in the first st, sc in the next 3, 2 sc in the last st. Turn. (7 sc)
- Row 3: Ch 1, 2 sc in the first st, sc in the next 5, 2 sc in the last st. Turn. (9 sc)
- Row 4: Ch 1, 2 sc in the first st, sc in the next 7, 2 sc in the last st. Turn. (11 sc)
- Rows 5–7: Ch 1, sc in each st across. Turn. (11 sc in each row)
- Row 8: Ch 1, sc2tog, sc in the next 7, sc2tog. Turn. (9 sc)
- Row 9: Ch 1, sc in each st across. Turn. (9 sc)
- Row 10: Ch 1, sc2tog, sc in the next 5, sc2tog. Turn. (7 sc)
- Row 11: Ch 1, sc2tog, sc in the next 3, sc2tog. Turn. (5 sc — this is the neck)
- Rows 12–13: Ch 1, sc in each st across. Turn. (5 sc in each row)
- Row 14: Ch 1, sc2tog, sc in the next st, sc2tog. (3 sc) Do not turn.
Checkpoint: The pear body measures 2.5 in × 2.8 in (6.4 cm × 7.1 cm).
Edging round (trim round): Ch 1. Sc in each of the 3 top sts. Work 1 sc in each row end down the side (14). Work 1 extra sc at the bottom corner. Sc in each of the 5 foundation loops. Work 1 extra sc at the other bottom corner. Work 1 sc in each row end up the other side (14). Sl st to the first sc.
(38 sc = 36 sc worked one per existing st or row end + 2 extra corner sc.)
Stem: Continue without cutting the yarn. Sl st into the center top sc, ch 4, then sl st in the 2nd ch from the hook and in the next 2 ch. (3 sl sts, about 0.75 in / 1.9 cm long.) Fasten off and leave a 16 in (40.6 cm) tail for sewing.
Leaf (make 49 to match):
1. Ch 6. Working along one side of the chain: sc in the 2nd ch from the hook, hdc in the next ch, dc in the next ch, hdc in the next ch, sl st in the last ch.
2. Working back along the other side of the chain: hdc, dc, hdc, sc.
3. Sl st into the tip. (10 sts)
4. Fasten off and leave an 8 in (20.3 cm) tail.
The leaf is pointed at both ends and about 1.25 in (3.2 cm) long.
Stacking: Lay the leaf with its base touching the tip of the stem. Angle it up and to the right at about 45°, so it overlaps the stem slightly. Sew it down along its center line.
Make All Pieces
- Color G: 4 strips
- Color C: 3 strips
- Color P: 28 pears with stems and 28 leaves (7 for each green strip)
- Color B: 21 pears with stems and 21 leaves (7 for each cream strip)
Layout on the rod, left to right, with a gap of about 0.5 in (1.3 cm) between strips:
| G | C | G | C | G | C | G |
  P   B   P   B   P   B   P   <- pear color
  7   7   7   7   7   7   7   <- pears per strip
Joining: Tabs, Appliqués, and Hanging
The strips are never sewn to one another. The only joins are the tabs (added after the border) and the pear appliqués on each strip.
Pear placement: Center each pear on the middle mesh square (square 5 of 9), with the stem pointing toward the top edge. Measure from the top of Row 1:
- Put the pear centers at 6.5 in (16.5 cm), then every 10.5 in (26.7 cm) after that. These are Rows 13, 34, 55, 76, 97, 118, and 139.
- That leaves 6.5 in (16.5 cm) below the last pear, so the column is balanced top to bottom.
Pin each pear in place. Whipstitch through the back loops of the edging round into the mesh bars underneath.
Tension advice: Sew firmly but don’t pull. If the stitches are too tight, the mesh puckers around the pear. Slide a ruler under the strip while you sew to keep it flat.
Tab attachment is described after the border, below.
Size checkpoint: When the pears are sewn on, the strip should still lie flat at 4.5 in (11.4 cm) wide.
Border
Border gauge: 4 sc = 1 in (2.5 cm) along the long sides.
Round 1: With the strip’s working yarn still attached at the end of Row 152, ch 1.
- Bottom edge: 3 sc in the first st (corner), sc in the next 26 sts, 3 sc in the last st (corner).
- First long side: 2 sc in each row end, from Row 152 back to Row 1. (304 sc)
- Top edge: Turn the strip so you are working into the opposite side of the foundation chain. Work 3 sc in the first ch (corner), sc in the next 26, and 3 sc in the last ch (corner).
- Second long side: 2 sc in each row end. (304 sc)
- Sl st to the first sc.
Stitch counts: 26 sc on the bottom edge and 26 sc on the top edge between the corner groups, 304 sc on each long side, and 4 corner groups of 3. Total: 26 + 26 + 304 + 304 + 12 = 672 sc.
Why the math works:
– Each long side is 152 rows × 2 sc = 304 sc. At 4 sc per inch, that is exactly 76 in (193.0 cm), the length of the strip, so the edge neither ruffles nor pulls in.
– Each end edge uses all 28 sts of the solid row: 1 corner st + 26 + 1 corner st.
Hanging tabs (make 2 per strip):
1. On the top edge, count the 28 sts between the two corner center sc. That is 1 corner sc + 26 + 1 corner sc.
2. Tab A: Join the strip color in the 1st of those 28 sts. Ch 1, then sc in the same st and the next 4. (5 sc)
3. Work 23 more rows of 5 sc. (24 rows, 4.8 in / 12.2 cm)
4. Fasten off with a long tail.
5. Tab B: Work it the same way over the last 5 of the 28 sts. This leaves 18 sts between the tabs.
6. Fold each tab to the back and whipstitch its last row to the back of the same 5 border sts, one stitch to one stitch.
Checkpoint: Each loop stands about 2 in (5.1 cm) above the strip and slides easily onto the rod.
Final Blocking
- Weave in all ends inside the solid rows or along the back of the border.
- Soak each strip in cool water with a little wool wash for 15 minutes.
- Press the water out gently in a towel. Do not wring.
- Pin the strip flat to 5 in × 76.5 in (12.7 cm × 194.3 cm). Use a long straightedge so the sides run perfectly straight.
- Pin the mesh squares square, every 10 rows or so, with each square at 0.5 in (1.3 cm).
- Smooth each pear and leaf flat with your fingers.
- Let the strip dry completely, then unpin.
Final Quality-Control Checklist
- Every mesh row has 9 squares and 10 dc.
- Both solid rows have 28 sts.
- The border has 672 sc and lies flat.
- Each strip is 5 in × 76.5 in (12.7 cm × 194.3 cm).
- There are 7 pears per strip, centered at the correct rows, with every stem pointing up.
- Every leaf angles to the right.
- The tabs are 5 sc wide and 24 rows long, and sit 18 sts apart.
- The strips hang in the order G, C, G, C, G, C, G.
Troubleshooting
- The strip widens or narrows as you go: Check that you’re working the last dc into the turning ch-5.
- The squares are rectangles, not squares: Your dc are too tall. Wrap the yarn more snugly, or go down a hook size for the dc only.
- The border ruffles: Use 2 sc per row end, not 3. Check your border gauge.
- The border pulls in: Loosen your tension, or work the border with a hook one size larger.
- The pear is lopsided: Make sure the increases and sc2tog fall in the first and last sts of the row.
- The strips hang at different lengths: Re-block the shorter strips to 76.5 in (194.3 cm).
Care
Hand wash in cool water and dry flat. Re-block the strips if they stretch after long hanging.

Final Notes
The measurements build on each other. With 0.5 in (1.3 cm) mesh squares, 9 squares make a 4.5 in (11.4 cm) width and 152 rows make a 76 in (193.0 cm) length. The 0.25 in (0.6 cm) border brings each strip to 5 in × 76.5 in (12.7 cm × 194.3 cm). Seven strips with small gaps fill about 38 in (96.5 cm) of rod, and pears every 10.5 in (26.7 cm) give an even column down each strip. If you check your gauge once, the rest of the curtain should come out to these measurements.
Happy crocheting!