

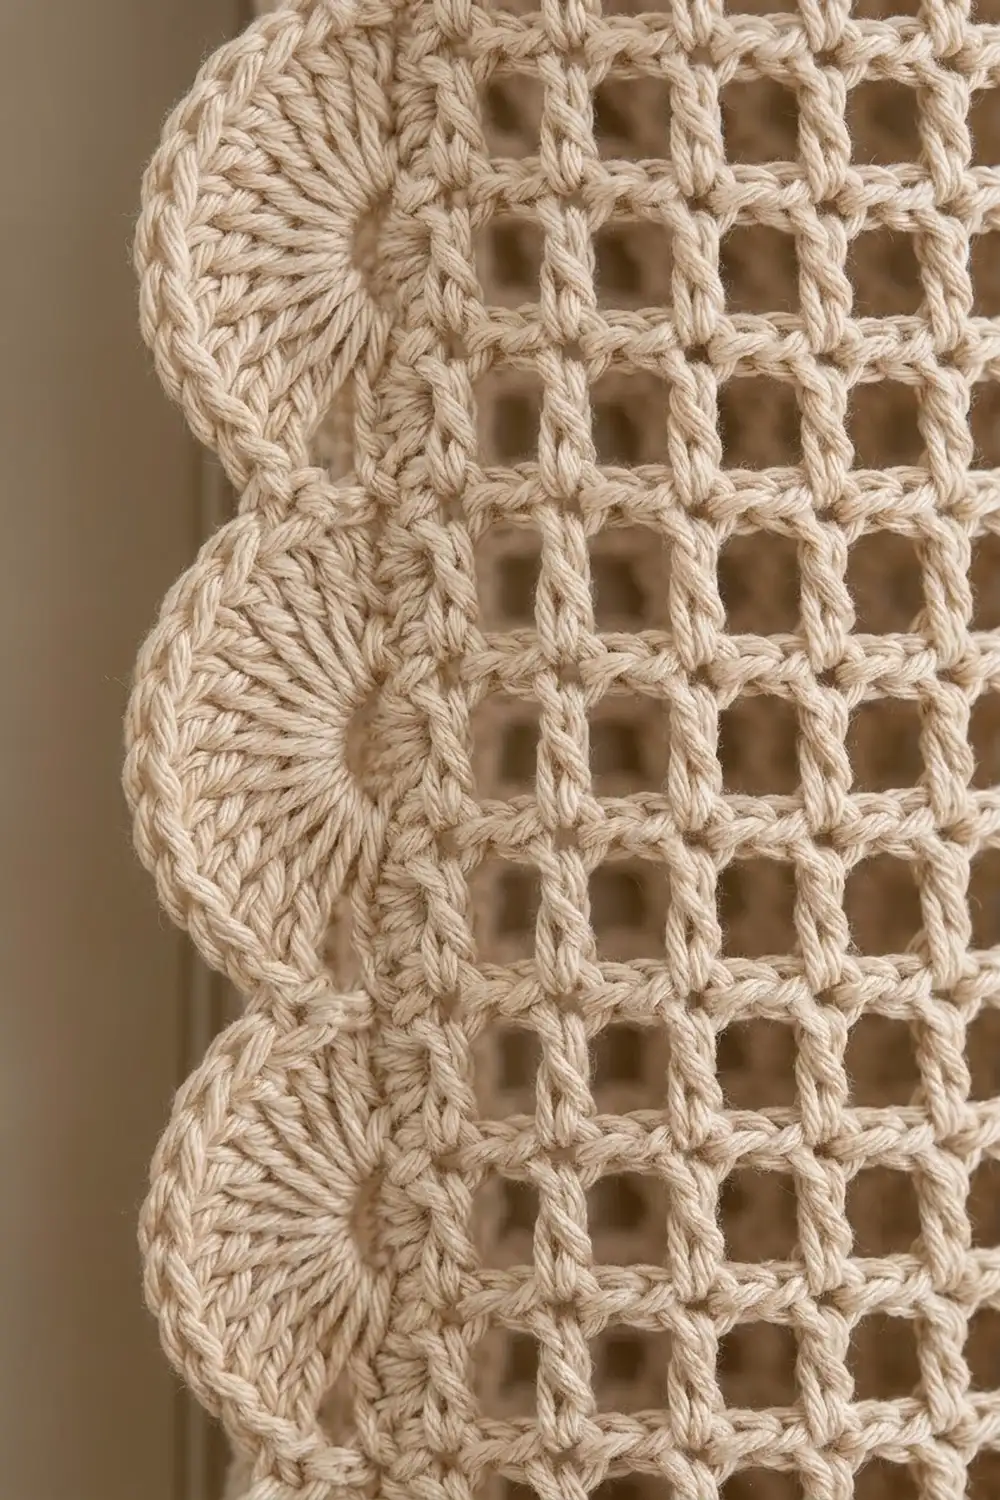
The Pantry Lattice Plastic Bag Holder is a tidy tube of open filet mesh that keeps loose grocery bags in one place. You push bags in at the top and pull them out one at a time from the bottom. The open squares let you see how many bags are left, and two rows of shell scallops run down the sides.
The holder is worked in one natural cream cotton, which suits farmhouse, Scandinavian, and neutral kitchens. Solid single crochet bands at the top and bottom give the openings a firm edge, and a slim strap hangs it from a hook or door knob.
This pattern uses US crochet terms. The finished holder measures 4.8 in (12.2 cm) wide laid flat across the body and 6.3 in (16.0 cm) wide including the scallops. It is 15.5 in (39.4 cm) long, and the strap adds about 4 in (10.2 cm) of hanging height.
Construction is simple and seamless. You work a chain ring, then make single crochet rounds for the bottom band, mesh rounds for the body, and single crochet rounds for the top band, all in the round. The scallops are then worked around the dc posts of the two side columns, and the strap goes on last.
Finished Size and Construction
- Finished size (body, flat): 4.8 in (12.2 cm) wide x 15.5 in (39.4 cm) long
- Width including scallops: 6.3 in (16.0 cm)
- Circumference: 9.6 in (24.4 cm)
- Strap: 9 in (22.9 cm) long, rising about 4 in (10.2 cm) above the top
- Skill level: Easy-intermediate
- Terminology: US
- Yarn weight: Worsted (#4), cotton or cotton blend
- Hook: 5.0 mm (US H-8)
- Number of pieces: 1 (worked in the round, no seams)
- Layout: Single tube; scallop edging down both side folds
- Piece size before edging: 4.8 in x 15.5 in (12.2 cm x 39.4 cm), flat
- Edging depth: Scallops stand out about 0.75 in (1.9 cm) on each side
Materials
Yarn advice: Choose a smooth, firm worsted-weight cotton or cotton blend. Cotton holds the square mesh shape and doesn’t stretch out under the weight of the bags. Avoid fuzzy or very loose-plied yarn, because it blurs the grid and makes the posts hard to find when you work the scallops.
- Natural cream / oatmeal: 100 g, about 180 m (197 yd)
One holder uses about 70 g. The amount above includes a margin for your gauge swatch and for differences in tension. If you plan to make a matching pair like the ones in the photo, buy 200 g.
Tools:
- 5.0 mm (US H-8) crochet hook
- 4 locking stitch markers
- Yarn needle
- Scissors
- Measuring tape
- Rust-proof pins and a rolled towel or a 1-liter bottle for blocking
Abbreviations (US Terms)
- ch – chain
- sl st – slip stitch
- sc – single crochet
- dc – double crochet
- sk – skip
- sp – space
- st(s) – stitch(es)
- rnd(s) – round(s)
- beg – beginning
Special stitch: Mesh. One mesh is (dc, ch 1). Each mesh counts as 2 sts: the dc plus the ch-1 sp.
Special stitch: Post shell. You work dc stitches around the vertical post of a dc from an earlier round, rather than into its top loops. Insert the hook from front to back on one side of the post, bring it out on the other side, and complete the dc as usual.
Gauge and Checkpoints
Gauge: 10 meshes = 4 in (10.2 cm) wide, and 8 mesh rows = 4 in (10.2 cm) tall. One mesh is 0.4 in (1.0 cm) wide, and one mesh row is 0.5 in (1.3 cm) tall.
Sc gauge: 20 sc = 4 in (10.2 cm), and 16 sc rows = 4 in (10.2 cm).
Test swatch: Make a flat swatch before you start the holder.
- Ch 22.
- Row 1: Sc in 2nd ch from hook and in each ch across. (21 sc)
- Row 2: Ch 4 (counts as dc + ch 1), turn, sk next sc, dc in next sc, ch 1, sk next sc, dc in next sc across. (11 dc, 10 meshes)
- Rows 3–9: Ch 4 (counts as dc + ch 1), turn, dc in next dc, ch 1 across to the last dc, then dc in 3rd ch of the turning ch-4. (10 meshes)
Measure the 10 meshes across and the 8 mesh rows (Rows 2–9) up. They should be 4 in (10.2 cm) in each direction.
- If the swatch is too big: Go down to a 4.5 mm hook.
- If the swatch is too small: Go up to a 5.5 mm hook.
- If the width is right but the rows are too tall: Pull up less yarn on each dc rather than changing hooks.
Checkpoints for the holder:
- After Rnd 4: the band measures 4.8 in (12.2 cm) wide flat and 1 in (2.5 cm) tall.
- After Rnd 15: the tube measures 6.5 in (16.5 cm) long.
- After Rnd 31: the tube measures 14.5 in (36.8 cm) long.
- After Rnd 35: the tube measures 15.5 in (39.4 cm) long.
Bottom Band
Ch 48 and join with a sl st to the first ch to form a ring. Make sure the chain isn’t twisted.
Rnd 1: Ch 1, sc in each ch around, then join with a sl st to the first sc. (48 sc)
Rnds 2–4: Ch 1, sc in each sc around, then join. (48 sc)
Checkpoint: Laid flat, the band is 4.8 in (12.2 cm) wide and 1 in (2.5 cm) tall.
Mesh Body
Rnd 5 (conversion round): Ch 4 (counts as dc + ch 1), sk next sc, dc in next sc, ch 1, sk next sc 23 times, then join with a sl st to the 3rd ch of the beg ch-4. (24 dc + 24 ch-1 sps = 48 sts, 24 meshes)
The beg ch-4 sits on sc 1, the dc stitches land on sc 3, 5, 7 and so on up to sc 47, and the last ch-1 skips sc 48. The total stays at 48, so the mesh matches the band exactly.
Mark the side columns: Place a marker in the 7th dc and another in the 19th dc of Rnd 5, counting the beg ch-4 as dc 1. These two columns are 12 meshes apart, which puts them on opposite sides of the tube when you flatten it. They form the side folds that will carry the scallops. The round joins then fall at the back of the holder.
Rnds 6–31: Ch 4 (counts as dc + ch 1), dc in next dc, ch 1 23 times, then join with a sl st to the 3rd ch of the beg ch-4. (24 dc + 24 ch-1 sps = 48 sts each round)
Every mesh round has the same count. Each dc sits directly on top of the dc below it, so the columns stay straight and the squares stay square.
Move the markers up every few rounds so they always sit in the 7th and 19th dc columns. You’ll need these columns for the scallops.
Checkpoint: After Rnd 15, the tube measures 6.5 in (16.5 cm) long. After Rnd 31, it measures 14.5 in (36.8 cm). The body has 27 mesh rounds (Rnds 5–31), and 27 x 0.5 in = 13.5 in (34.3 cm).
Top Band
Rnd 32 (conversion round): Ch 1, sc in the same st as the join, sc in next ch-1 sp, sc in next dc, sc in next ch-1 sp 23 times, then join to the first sc. (24 sc in dc + 24 sc in ch-1 sps = 48 sc)
The 7th dc becomes sc 13, and the 19th dc becomes sc 37. Move your markers to those two sc.
Rnds 33–35: Ch 1, sc in each sc around, then join. (48 sc)
Keep the markers in sc 13 and sc 37 of Rnd 35. Fasten off and weave in the ends.
Checkpoint: The tube is 15.5 in (39.4 cm) long and 4.8 in (12.2 cm) wide when flat. Both bands should match in width.
Scalloped Side Edging
Edging gauge: Each scallop covers 3 mesh rounds, or 1.5 in (3.8 cm) of height. It stands out about 0.75 in (1.9 cm) from the fold.
Flatten the tube so the two marked dc columns sit exactly on the left and right edges. Work the edging up one side, fasten off, and then repeat it on the other side.
Side edging (work once on each marked column):
- Turn the tube so the bottom band is toward you. Join the yarn with a sl st around the post of the marked dc in Rnd 5.
- Work 5 dc around the post of the marked dc in the next rnd up, then 5 dc around the post of the marked dc in the following rnd. Sl st around the post of the marked dc in the rnd after that.
- Repeat from * 7 more times, for 8 scallops so far. This uses anchor sl sts on Rnds 8, 11, 14, 17, 20, 23, 26, and 29.
- For the 9th scallop, work 5 dc around the post of the marked dc in Rnd 30, then 5 dc around the post in Rnd 31.
- Sl st into the marked sc of Rnd 32 (sc 13 for the first side, sc 37 for the second side). Fasten off.
Per side: 9 scallops x 10 dc = 90 dc, 9 anchor sl sts (Rnds 5, 8, 11, 14, 17, 20, 23, 26, 29), and 1 closing sl st.
Why the math works: The body has 27 mesh rounds, and each scallop uses exactly 3 of them (1 anchor round and 2 shell rounds). 27 ÷ 3 = 9 scallops, with no partial scallop. The last shell ends right under the top band, so the edging starts at the bottom band and finishes at the top band. Ten dc packed around two short posts make each shell flare outward into a rounded fan. That flare is what creates the fin-like scalloped edge.
Hanging Strap
- Join the yarn with a sl st in the marked sc 13 of Rnd 35.
- Ch 36.
- Sl st in the marked sc 37, then sl st in the next sc.
- Turn and sc in each of the 36 ch. (36 sc)
- Sl st in sc 13 and fasten off.
The 36 ch measure about 9 in (22.9 cm). Each end of the strap is anchored exactly over a scallop column, 24 sc apart (half of the 48-st round). Hung up, the strap forms a V that rises about 4 in (10.2 cm) to the hook. Weave in all the ends securely along the solid bands.
Final Blocking
- Soak the holder in cool water for 10 minutes, then gently press out the water. Don’t wring it.
- Roll it in a dry towel to remove the extra moisture.
- Slide a rolled towel or an empty 1-liter bottle inside the tube to hold it open.
- Flatten the tube so the scallop columns sit on the side edges. Ease the mesh until the columns are vertical and the squares are even.
- Pin each scallop into a rounded fan that stands out 0.75 in (1.9 cm). Check that the body is 4.8 in (12.2 cm) wide.
- Check that the length is 15.5 in (39.4 cm), and smooth both bands flat.
- Let it dry completely, then remove the pins and the form.
Final Quality-Control Checklist
- [ ] Every mesh round has 24 dc and 24 ch-1 sps (48 sts).
- [ ] Both bands have 48 sc and are 1 in (2.5 cm) tall.
- [ ] The dc columns run straight with no spiral.
- [ ] Each side has 9 scallops of 10 dc, all the same size.
- [ ] The scallop columns sit directly opposite each other.
- [ ] The strap is anchored over both scallop columns and measures 9 in (22.9 cm).
- [ ] The body measures 4.8 in x 15.5 in (12.2 cm x 39.4 cm) flat.
- [ ] All ends are woven into solid areas, not left in the mesh.
Troubleshooting
The tube twists into a spiral. The beg ch-4 is probably drifting. Join into the 3rd ch of the beg ch-4 every round, and start the next round directly above that join.
The meshes look like rectangles, not squares. Your dc stitches are too tall. Pull up less yarn, or try a shorter, tighter yo motion.
The scallops pucker the side. Your tension is too tight on the post shells. Loosen up, or go up half a hook size for the edging only.
The scallops ruffle too much. Work 4 dc per post (8 per scallop) instead of 5, and keep the anchor rounds the same.
The bottom band flares out. Your foundation chain is too loose. Use a smaller hook for the chain, or go down to a 4.5 mm hook for Rnds 1–4.
Bags fall out of the bottom too easily. Add one extra sc rnd to the bottom band and work it in the back loops for a firmer edge.
Care
Hand wash in cool water with mild soap, lay flat to dry, and reshape the scallops while damp. Cotton can go in the machine on a gentle cycle in a mesh bag, but always air-dry it.

Final Notes
The measurements build on each other. A 0.4 in (1.0 cm) mesh x 24 meshes gives a 9.6 in (24.4 cm) circumference, which lays flat at 4.8 in (12.2 cm). The bands are 1 in (2.5 cm) each, and 27 mesh rounds at 0.5 in (1.3 cm) give a 13.5 in (34.3 cm) body, for a total length of 15.5 in (39.4 cm). Nine 1.5 in (3.8 cm) scallops fill each side exactly, and the 9 in (22.9 cm) strap finishes it. Check your gauge first, count to 48 every round, and your holder will come out right.
Happy crocheting!