

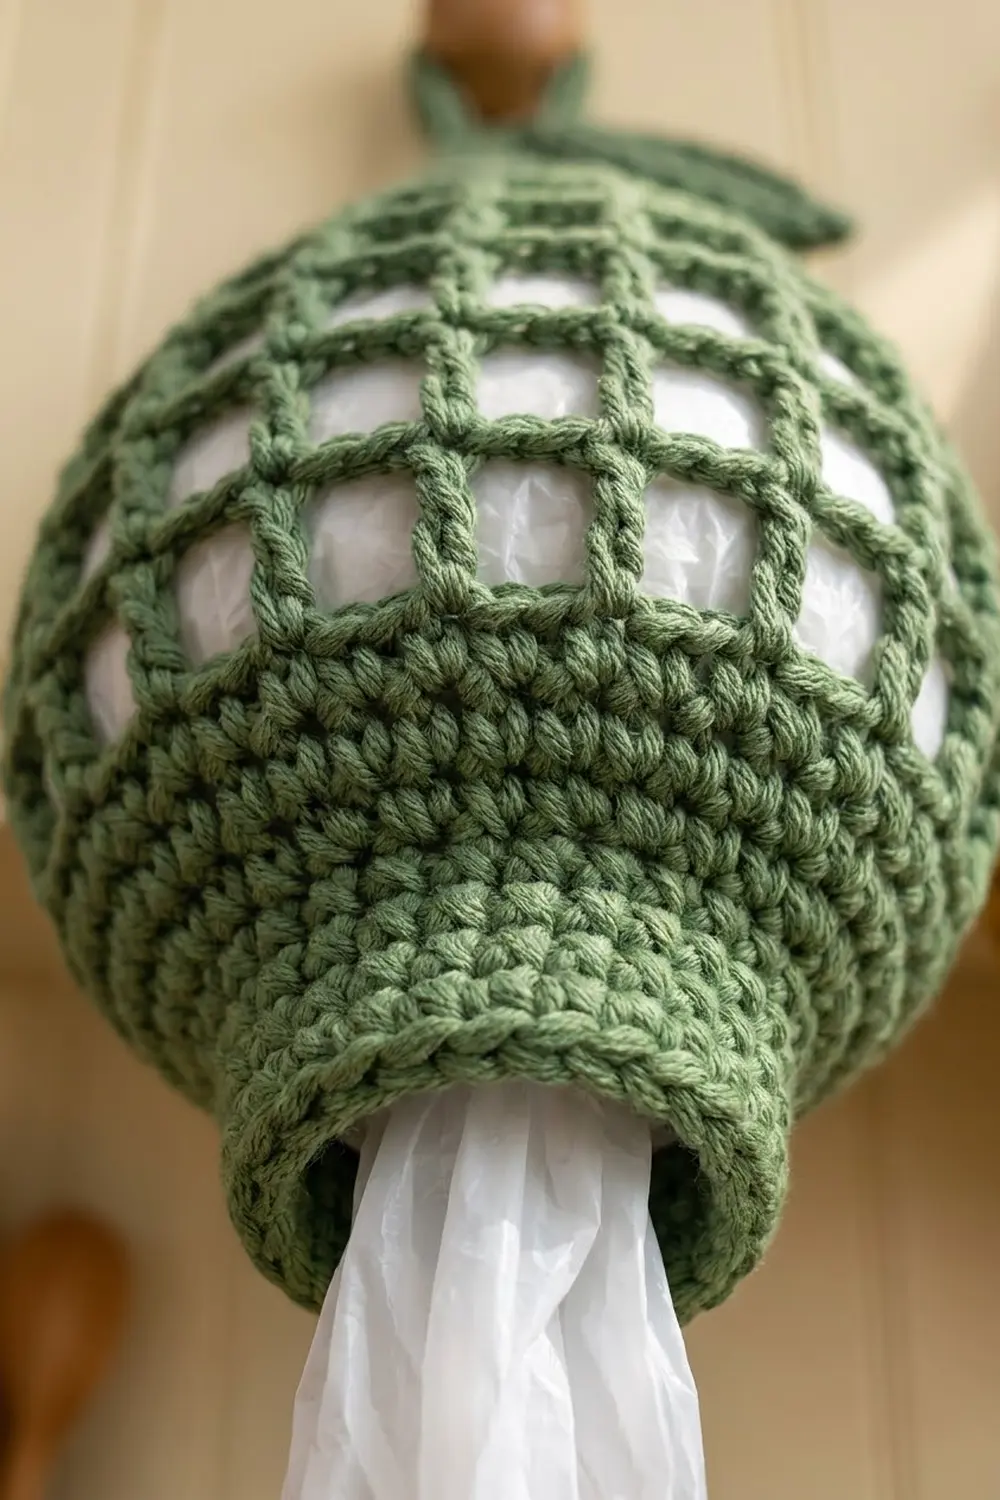
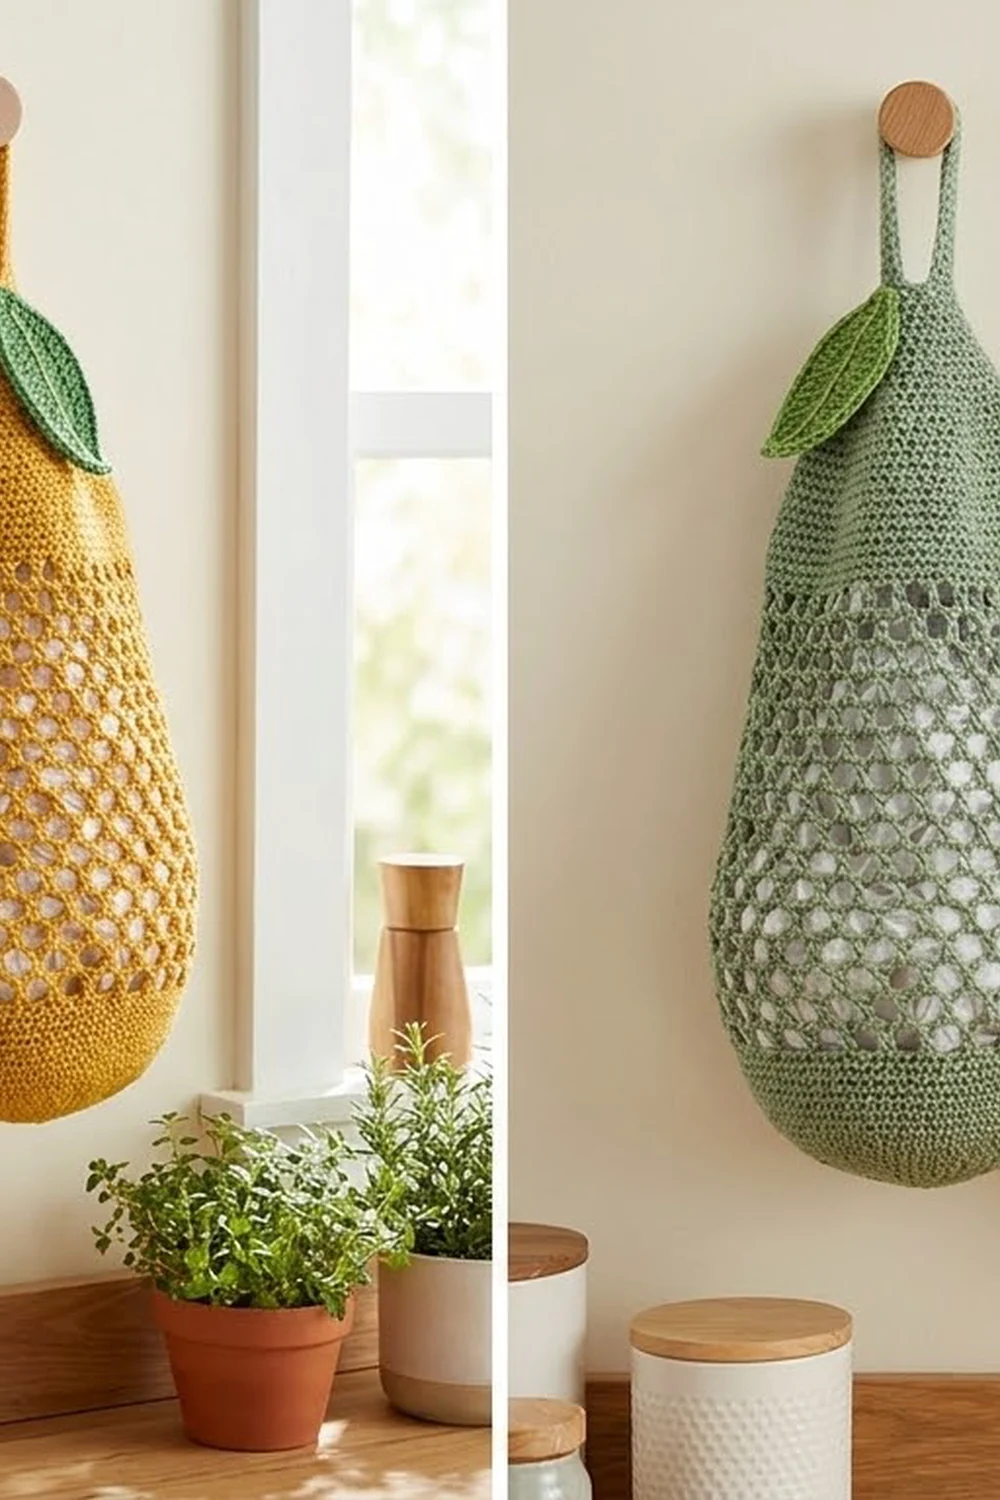
This hanging bag holder is shaped like a tall pear. It has a solid cone at the top, an open grid of mesh squares through the body, and a firm round cuff at the bottom that you pull bags out of. A small pointed leaf is sewn near the top beside the hanging loop. It finishes the fruit look, and the loop lets you hang the holder on any peg or hook.
The sample is worked in soft sage green with a matching green leaf. A second colorway uses mustard yellow for the body with the same green leaf. Both suit a farmhouse or plant-filled kitchen, and the white bags show through the open mesh like light behind a lattice.
All instructions use US crochet terms. Laid flat, the finished holder measures 8 in (20.3 cm) across at its widest point, and the body is 13.9 in (35.3 cm) tall. The loop adds 3 in (7.6 cm), for an overall height of 16.9 in (42.9 cm).
The holder is one piece, worked top-down in joined rounds:
1. Start with a chain ring at the top opening.
2. Increase through a solid single crochet cone.
3. Switch to treble-crochet mesh, then grow and shrink the mesh to form the pear.
4. Finish with a single crochet cuff.
The top rim, hanging loop and sewn-on leaf come last.
Finished Size and Construction
- Finished size: 8 in (20.3 cm) wide at the widest point, laid flat; body 13.9 in (35.3 cm) tall; 16.9 in (42.9 cm) tall including the loop
- Skill level: Easy-intermediate
- Terminology: US crochet terms
- Yarn weight: Worsted weight (#4), cotton or cotton blend
- Hook: 5.0 mm (US H-8)
- Number of pieces: 1 holder body plus 1 small leaf appliqué
- Layout: A single tube worked top-down in joined rounds, with no seams
- Piece size: Top opening 2.4 in (6.1 cm) flat; widest mesh 8 in (20.3 cm) flat; cuff 3.2 in (8.1 cm) flat
- Size before border: 12.4 in (31.5 cm) tall (cone plus mesh)
- Border depth: Bottom cuff 1.5 in (3.8 cm); the top rim is a single slip stitch round
Materials
Choose a smooth, firm cotton or cotton blend. Cotton holds the mesh squares open and won’t stretch under the weight of a full load of bags. Avoid very soft acrylic, which can sag over time.
- Color A (body): Sage green or mustard yellow, 80 g (about 152 m)
- Color B (leaf): Leaf green, 5 g (about 10 m). For an all-green holder, use Color A for the leaf.
These amounts include about 15 percent extra for a gauge check and weaving in ends.
Tools:
- 5.0 mm (US H-8) crochet hook
- Stitch marker
- Tapestry needle
- Scissors
- Rust-proof pins
- A 2-liter bottle or a rolled towel for blocking
Abbreviations (US Terms)
- ch – chain
- sl st – slip stitch
- sc – single crochet
- inc – 2 sc in the same stitch
- hdc – half double crochet
- dc – double crochet
- tr – treble crochet
- tr2tog – treble crochet 2 together
- yo – yarn over
- sp – space
- st(s) – stitch(es)
- rep – repeat
- beg – beginning
Special stitches:
- Square: Tr in the next tr, ch 2 (skipping the ch-2 sp below). One square is 3 sts (1 tr + 2 ch).
- Mesh increase (MI): Tr in the next tr, ch 2, tr in the next ch-2 sp, ch 2. This turns 1 old square into 2 new squares.
- Mesh decrease (MD): Tr2tog over the next 2 tr, skipping the ch-2 sp between them, then ch 2. This turns 2 old squares into 1 new square.
- How to tr2tog: *Yo twice, insert hook in the next tr, yo and pull up a loop, [yo, pull through 2 loops] twice; rep from * in the following tr, then yo and pull through all 3 loops.
Gauge and Checkpoints
- Single crochet: 15 sts and 16 rounds = 4 in (10.2 cm)
- Mesh: 5 squares and 5 rounds = 4 in (10.2 cm), so each square is 0.8 in (2.0 cm) wide and tall
One square is 3 sts, and 3 sts at 15 sts per 4 in is exactly 0.8 in. So the mesh gauge matches the single crochet gauge. That’s why the cone flows into the mesh, and the mesh into the cuff, without ruffling or pulling in.
Test the cone first. Work Rounds 1–8 and measure before you go on. This small section is your real gauge swatch.
- After Round 8: 36 sts, circumference 9.6 in (24.4 cm), flat width 4.8 in (12.2 cm), height 2 in (5.1 cm)
- After Round 12: 60 sts, circumference 16 in (40.6 cm), flat width 8 in (20.3 cm)
- After Round 18: total height 10 in (25.4 cm)
- After Round 21: 24 sts, flat width 3.2 in (8.1 cm), total height 12.4 in (31.5 cm)
- After the cuff: total height 13.9 in (35.3 cm)
If your piece is too big, switch to a 4.5 mm hook. If it is too small, switch to a 5.5 mm hook. If only the mesh rounds come out short, make sure you pull each tr loop up to its full height. Change hooks instead of changing stitch counts, because the counts are set so each section lines up with the next.
Top Cone
Using Color A, work in joined rounds. Place a marker in the first st of each round and move it up as you go. The ch 1 at the start of a round does not count as a st.
Round 1: Ch 18, sl st to the first ch to form a ring, taking care not to twist. Ch 1, sc in each ch around, join with a sl st to the first sc. (18 sts)
Round 2: Ch 1, sc in each st around, join. (18 sts)
Round 3: Ch 1, *sc in next 2 sts, inc; rep from * 6 times total, join. (24 sts)
Round 4: Ch 1, sc in each st around, join. (24 sts)
Round 5: Ch 1, *sc in next 3 sts, inc; rep from * 6 times total, join. (30 sts)
Round 6: Ch 1, sc in each st around, join. (30 sts)
Round 7: Ch 1, *sc in next 4 sts, inc; rep from * 6 times total, join. (36 sts)
Round 8: Ch 1, sc in each st around, join. (36 sts)
The cone should measure 2 in (5.1 cm) tall and 4.8 in (12.2 cm) across laid flat. Check this before you start the mesh.
Mesh Body
Every mesh round starts with ch 6, which counts as the first tr plus ch 2. Every mesh round ends with a sl st into the 4th ch of the beg ch-6. The count for each round is given in squares and sts.
Round 9 (set-up): Ch 6, skip next 2 sts, *tr in next st, ch 2, skip next 2 sts; rep from * 11 times, join. (12 squares, 36 sts)
Round 10 (growth): Ch 6, tr in next ch-2 sp, ch 2 (first MI made), work 2 squares, *MI, work 2 squares; rep from * 3 more times, join. (16 squares, 48 sts)
Each repeat uses 3 old squares and makes 4 new ones, so four repeats turn 12 squares into 16.
Round 11: Ch 6, work 15 squares, join. (16 squares, 48 sts)
Round 12 (growth): Ch 6, tr in next ch-2 sp, ch 2 (first MI made), work 3 squares, *MI, work 3 squares; rep from * 3 more times, join. (20 squares, 60 sts)
Each repeat uses 4 old squares and makes 5 new ones. The holder is now at its full width of 8 in (20.3 cm) laid flat.
Rounds 13–18: Ch 6, work 19 squares, join. (20 squares, 60 sts)
These 6 straight rounds form the wide, rounded belly of the pear. Total height should now be 10 in (25.4 cm).
Round 19 (decrease): Ch 6, work 2 squares, MD, *work 3 squares, MD; rep from * 3 more times, join. (16 squares, 48 sts)
The beg ch-6 counts as the first of the 3 squares in the first repeat. Each repeat uses 5 old squares and makes 4 new ones. The last MD is worked over the final 2 tr of the round.
Round 20 (decrease): Ch 6, work 1 square, MD, *work 2 squares, MD; rep from * 3 more times, join. (12 squares, 36 sts)
Each repeat uses 4 old squares and makes 3 new ones.
Round 21 (decrease): Ch 6, MD, *work 1 square, MD; rep from * 3 more times, join. (8 squares, 24 sts)
Each repeat uses 3 old squares and makes 2 new ones. These three quick decrease rounds curve the bottom of the pear in toward the cuff. Total height is now 12.4 in (31.5 cm). Do not fasten off.
Leaf Appliqué
Using Color B, make 1 leaf.
Foundation: Ch 11.
Round 1: Working in the back bump of the chain:
1. First side: Sc in 2nd ch from hook, hdc in next ch, dc in next 2 ch, tr in next 2 ch, dc in next 2 ch, hdc in next ch.
2. Tip: Work (sc, ch 2, sc) in the last ch.
3. Second side: Rotate and work along the other side of the foundation: hdc in next ch, dc in next 2 ch, tr in next 2 ch, dc in next 2 ch, hdc in next ch, sc in last ch.
4. Join with a sl st to the first sc. (20 sts plus 1 ch-2 tip sp)
Round 2: Sl st in each st around, working (sl st, ch 2, sl st) in the tip ch-2 sp. (22 sl sts plus 1 ch-2 tip sp)
Stem: Ch 3, then sl st back along the chain. Fasten off, leaving a 12 in (30.5 cm) tail for sewing.
Vein: With a 12 in (30.5 cm) strand of Color B, work surface sl sts along the center foundation chain from the stem to just below the tip. Fasten off and weave in the ends on the back.
The leaf measures about 2.75 in (7.0 cm) long and 1.5 in (3.8 cm) wide.
Border
The border is the bottom cuff plus a top rim. Both use the single crochet gauge: 15 sts per 4 in (10.2 cm) and 4 rounds per 1 in (2.5 cm). This is a round piece with no corners, so counts are given per round.
Bottom Cuff
Continue with Color A from Round 21.
Cuff Round 1 (conversion): Ch 1, sc in each tr and in each ch around (work into the chains themselves, not the space), join. (24 sts worked 1 per existing st + 0 added = 24 sts)
Round 21 has 8 tr and 16 ch, so 1 sc in each gives 24 sc with no increases.
Cuff Rounds 2–5: Ch 1, sc in each st around, join. (24 sts)
Cuff Round 6: Sl st loosely in each st around. (24 sl sts)
Fasten off and weave in the end. The cuff is 1.5 in (3.8 cm) deep.
Why the math works: 8 squares x 3 sts = 24 sts. At 15 sts per 4 in, 24 sts gives a circumference of 6.4 in (16.3 cm), or 3.2 in (8.1 cm) laid flat. That matches the width of Round 21, so the cuff hangs straight without flaring. It’s snug enough to hold the bags in but loose enough to pull one out with two fingers.
Top Rim
Rim Round: Join Color A with a sl st in any free loop on the opposite side of the Round 1 foundation chain. Sl st in each free loop around. (18 sl sts)
Fasten off. This round firms up the top opening. At 15 sts per 4 in, 18 sts is exactly 4.8 in (12.2 cm) around, or 2.4 in (6.1 cm) flat. That matches Round 1, so the rim won’t ruffle.
Hanging Loop
- Lay the holder flat with the round joins at one side, and find the center back st of the rim.
- Join Color A in that st, ch 24, and sl st into the same st to form a loop.
- Ch 1 and work 30 sc over the chain loop, then sl st into the rim st again.
- Fasten off and weave the end down into the cone.
The loop stands 3 in (7.6 cm) above the rim. The packed sc make it stiff enough to stay upright on a peg.
Attaching the Leaf
Pin the leaf to the front of the cone between Rounds 2 and 6. Put the stem near the base of the loop and angle the tip up and out to one side. Use the leaf tail to whipstitch around the edge, going through the Round 2 sl sts and into the cone. Keep the stitches small and even, and don’t pull them tight, or the cone will pucker. Weave in the end on the inside.
Final Blocking
- Mist the holder evenly with water until it is damp but not dripping.
- Slide it over a 2-liter bottle or a tightly rolled towel to hold the mesh open.
- Gently tug each column of squares lengthwise so the tr posts stand straight and the squares are even.
- Measure: 8 in (20.3 cm) wide at the belly laid flat, and 13.9 in (35.3 cm) tall from rim to cuff.
- Pin the leaf flat against the cone and open out the tip with your fingers.
- Let it dry completely, for at least 24 hours, before removing the form.
Final Quality-Control Checklist
- The top opening is 2.4 in (6.1 cm) across laid flat
- The cone is solid, with no holes at the increase points
- Every mesh square is open and about 0.8 in (2.0 cm) on each side
- The widest section is 8 in (20.3 cm) laid flat
- The decrease rounds curve smoothly into the cuff
- The cuff is 1.5 in (3.8 cm) deep and 3.2 in (8.1 cm) across
- Total body height is 13.9 in (35.3 cm)
- The loop is firm, 3 in (7.6 cm) tall and centered at the back
- The leaf is flat, the vein shows and the tip points up
- All ends are woven in on the inside
Troubleshooting
The mesh slants in a spiral. End each round with a sl st into the 4th ch of the beg ch-6, not the 6th. Joining in the wrong ch shifts every round over by one st.
Squares look short and wide. Your tr are too tight. Pull the first loop up to the height of the hook shaft, or go up one hook size for the mesh rounds only.
The cone ruffles where it meets the mesh. Your sc gauge is looser than your mesh gauge. Redo the cone with a hook 0.5 mm smaller.
The cuff flares. Check that Cuff Round 1 has exactly 24 sts. Working into the ch-2 spaces instead of the chains can add sts by accident.
Bags fall out on their own. Work Cuff Round 6 more tightly, or add one more sc round before the sl st round.
The leaf curls. Pin it flat while blocking. If it still curls, the Round 2 sl sts are too tight; redo them with a larger hook.
Care
Hand wash, or machine wash cold on a gentle cycle inside a mesh laundry bag. Reshape while damp, then lay flat or hang to dry.
Final Notes
Every measurement in this holder comes from one gauge: 15 sts per 4 in (10.2 cm).
- The 18-st top opening is 2.4 in (6.1 cm) flat, and the 36-st cone base is 4.8 in (12.2 cm) flat.
- One mesh square equals 3 sts, so 12 squares match the cone base.
- 20 squares reach 8 in (20.3 cm) at the belly.
- 8 squares bring you back down to 24 sts for a 3.2 in (8.1 cm) cuff.
Heights add up the same way. The cone is 2 in (5.1 cm), the mesh is 10.4 in (26.4 cm) and the cuff is 1.5 in (3.8 cm), for a 13.9 in (35.3 cm) body. The loop brings the total to 16.9 in (42.9 cm). Check your gauge after the cone and measure at each checkpoint, and the pear shape will come out right.
Happy crocheting!