

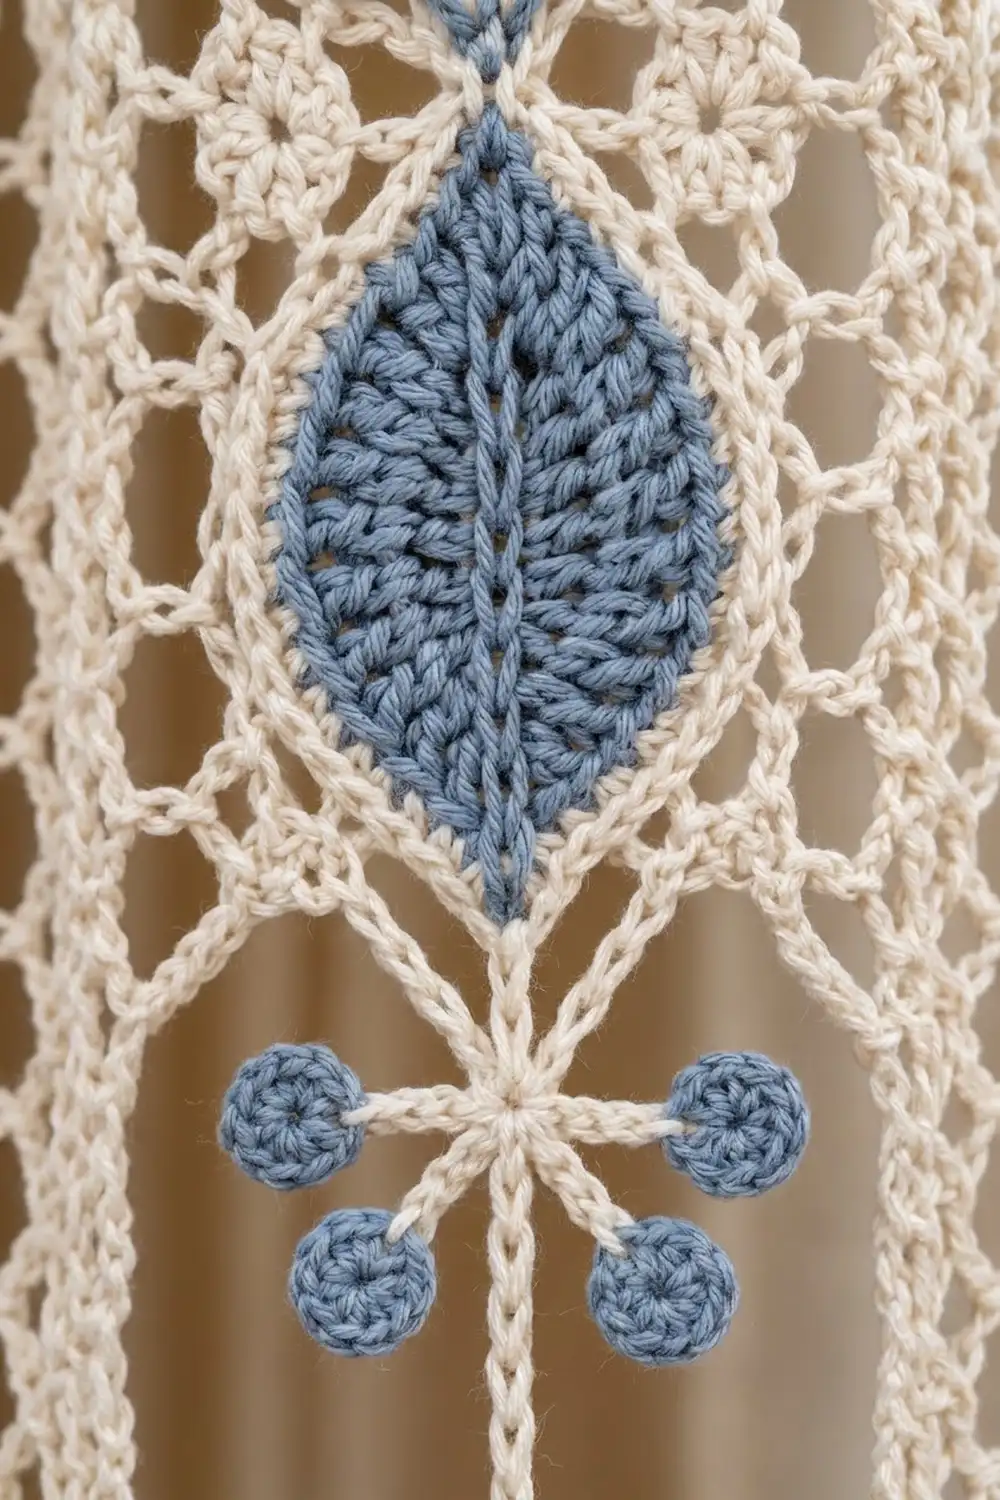
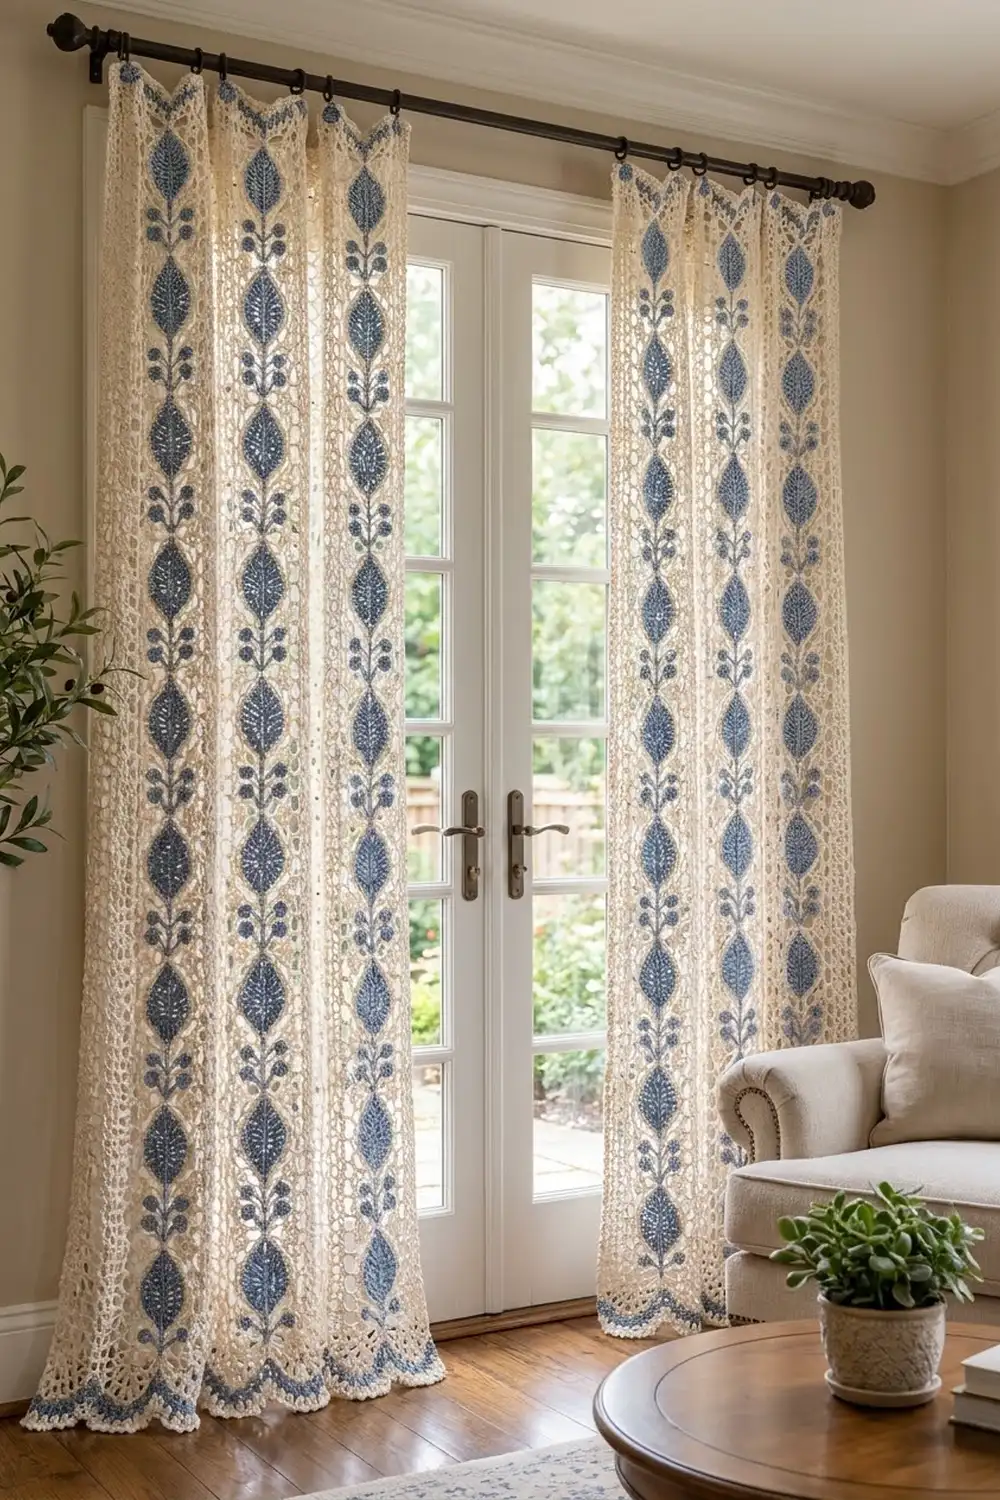
The Frosted Laurel curtain panel is a tall, airy lace curtain with a quiet winter feel. A cream diamond-net mesh lets the light through, and columns of blue leaves with little berry sprigs run from top to bottom. At the hem, a blue stripe sits above deep cream scallops with a picot edge.
The palette uses just two colors. Cream is for the mesh, outlines, stems, and border. A dusty denim blue is for the leaves, berries, and hem stripe. The look is classic and calm, and it suits a holiday room as well as every other season.
This pattern uses US crochet terms. One finished panel measures 45.5 in wide x 83.25 in long (115.6 x 211.5 cm). The photo shows a matching pair, so make two panels for the full look.
Each panel is built from four long mesh strips worked in rows from the hem upward. You sew the leaf-and-berry appliqués onto each strip, join the strips with raised single crochet seams, then add a header, a scalloped hem, and a side edging.
Finished Size and Construction
- Finished panel size: 45.5 x 83.25 in (115.6 x 211.5 cm)
- Skill level: Intermediate
- Terminology: US crochet terms
- Yarn weight: DK (#3) cotton
- Hook: 4 mm (G-6)
- Pieces per panel: 4 mesh strips, 36 leaf motifs, 144 berries
- Layout: 4 strips side by side; 9 motifs stacked down the center of each strip
- Strip size: 11.25 x 79.25 in (28.6 x 201.3 cm)
- Leaf motif: 3.5 x 2.25 in (8.9 x 5.7 cm), plus a 2.25 in (5.7 cm) sprig
- Size before border: 45 x 79.25 in (114.3 x 201.3 cm)
- Border depth: 1.25 in (3.2 cm) header at the top, 2.75 in (7.0 cm) scalloped hem at the bottom, 1 sc row on each side
Materials
Choose a smooth mercerized or combed DK cotton. Cotton drapes well, holds the lace shape after blocking, and washes easily. These amounts assume about 115 m per 50 g ball.
- Cream (main color): 650 g / 1,500 m per panel (1,300 g / 3,000 m for a pair)
- Dusty blue (contrast color): 200 g / 460 m per panel (400 g / 920 m for a pair)
Quantities include a margin of about 10% for swatching and small differences in tension.
Tools: 4 mm (G-6) hook, tapestry needle, locking stitch markers, rust-proof pins, blocking mats or a sheet over carpet, measuring tape, spray bottle, and 12 clip rings per panel.
Abbreviations (US Terms)
- ch – chain
- sl st – slip stitch
- sc – single crochet
- hdc – half double crochet
- dc – double crochet
- tr – treble crochet
- sk – skip
- sp – space
- st(s) – stitch(es)
- RS / WS – right side / wrong side
- rep – repeat
Picot: Ch 3, then sl st in the top of the sc just made.
Net loop: Ch 5, then sc in the next ch-5 loop. Each loop arches over the sc below it, which forms the diamond mesh.
Gauge and Checkpoints
- Sc gauge: 16 sc and 16 rows = 4 in (10.2 cm)
- Mesh gauge: 8 net rows = 5 in (12.7 cm)
- Strip width: 45 sc = 11.25 in (28.6 cm)
Finish one full strip before you start the others. Check it at each stage:
- After Row 1: 11.25 in (28.6 cm) wide.
- After 16 net rows: 10 in (25.4 cm) from the hem edge.
- After 64 net rows: 40 in (101.6 cm) long.
- After all 126 net rows: 78.75 in (200.0 cm) of mesh.
- After Row 128: 11.25 x 79.25 in (28.6 x 201.3 cm).
If the strip is too wide, go down one hook size. If it’s too narrow, go up one size. If the width is right but the length is off, keep the same hook and make your ch-5 loops slightly snugger or looser. Measure the strip lightly flattened, because lace relaxes when you block it.
Mesh Strip (make 4 per panel)
With cream, ch 46.
Row 1 (RS): Sc in the 2nd ch from hook and in each ch across, turn. (45 sc)
Row 2 (Net Row A): Ch 5 (counts as dc + ch 2; it stands over st 1, and the ch 2 skips sts 2–3), sc in st 4, ch 5, sk 3 sts, sc in next st; rep from * 9 more times, ch 2, dc in last st, turn. (11 sc, 10 full loops, 2 half loops)
Row 3 (Net Row B): Ch 1, sc in the dc, ch 5, sc in the next ch-5 loop; rep from * 9 more times, ch 5, sc in the 3rd ch of the turning ch, turn. (12 sc, 11 loops)
Row 4 (Net Row A): Ch 5 (counts as dc + ch 2), sc in the first loop, ch 5, sc in the next loop; rep from * 9 more times, ch 2, dc in last sc, turn. (11 sc, 10 full loops, 2 half loops)
Rows 5–127: Rep Rows 3–4, ending with a B row on Row 127. Even-numbered rows are A rows and odd-numbered rows are B rows. That makes 126 net rows: 63 A rows and 63 B rows.
Row 128: Ch 1, sc in the first sc, 3 sc in the next loop, sc in the next sc; rep from * 10 more times. Fasten off. (1 + 11 x 4 = 45 sc)
Rows 1 and 128 both have 45 sc. Each side edge has the same structure: 2 sc row ends, 63 dc posts from the A rows, and 63 sc ends from the B rows.
Leaf Motif (make 36 per panel)
Rnd 1 (blue): Ch 16. Work along one side of the chain: sc in 2nd ch from hook, hdc in next ch, dc in next 2 ch, tr in next 7 ch, dc in next 2 ch, hdc in next ch. Work (sc, ch 2, sc) in the last ch for the tip. Now work along the other side of the chain: hdc in next ch, dc in next 2 ch, tr in next 7 ch, dc in next 2 ch, hdc in next ch, sc in the same ch as the first sc. Join with a sl st to the first sc. (30 sts + 1 ch-2 sp)
The tall trebles fan out from the center chain. This creates the ribbed vein texture and the pointed oval shape.
Rnd 2 (blue): Ch 1, 2 sc in the first sc, sc in next 13 sts, sc in the tip sc, (sc, ch 2, sc) in the ch-2 sp, sc in the next tip sc, sc in next 13 sts, 2 sc in the last sc. Join and fasten off. (34 sc + 1 ch-2 sp: 16 sc per side and 2 at the tip)
Rnd 3 (cream outline): Join cream in the first sc of Rnd 2, at the base. Ch 1, sc in the same st and in the next 16 sts, (sc, ch 2, sc) in the tip ch-2 sp, sc in the next 17 sts. Join, but don’t fasten off. (36 sc + 1 ch-2 sp)
Berry sprig (cream, continuing from the base):
- Ch 13 for the stem. Sl st in the 2nd ch from hook and in the next 3 ch. (4 sl st; 8 stem ch remain)
- Lower branches: Ch 6, sl st in 2nd ch from hook and in next 4 ch; rep from * once more. (Two 5-st branches from the same point)
- Sl st in the next 4 stem ch. (4 stem ch remain)
- Upper branches: Ch 5, sl st in 2nd ch from hook and in next 3 ch; rep from * once more. (Two 4-st branches)
- Sl st in the last 4 stem ch, then sl st into the base st of Rnd 3. Fasten off, leaving a 20 in (50.8 cm) tail.
The leaf measures 3.5 x 2.25 in (8.9 x 5.7 cm). With the sprig, the whole motif is 5.75 in (14.6 cm) long.
Berry (make 144 per panel)
Rnd 1 (blue): Magic ring, ch 1, 8 sc in the ring. Pull the ring closed and join. (8 sc)
Rnd 2: Ch 1, 2 sc in each st around. Join and fasten off, leaving an 8 in (20.3 cm) tail. (16 sc)
Each berry is about 0.75 in (1.9 cm) across. Sew one berry to the tip of each branch, for 4 berries per motif.
Make All Pieces
Per panel:
- Cream: 4 strips, plus Rnd 3 and the sprig on all 36 leaves
- Blue: Rnds 1–2 of 36 leaves, plus 144 berries
For a pair, make 8 strips, 72 leaves, and 288 berries.
Placement: Divide each strip’s 126 net rows into 9 sections of 14 rows each. Each section is 8.75 in (22.2 cm) tall. Center one motif in each section with the leaf tip pointing toward Row 128. Leave about 1.5 in (3.8 cm) of open mesh above and below the motif, which gives a 3 in (7.6 cm) gap between motifs. Each motif sits 5.625 in (14.3 cm) from each long edge.
Pin all 9 motifs on a strip before you sew any of them. Whipstitch the back loops of Rnd 3 to the mesh. Tack the stem and branches down every 2–3 sts, then sew on the berries with their blue tails.
Strip 1 | Strip 2 | Strip 3 | Strip 4   (top = header)
  L1    |   L1    |   L1    |   L1
  L2    |   L2    |   L2    |   L2
  L3    |   L3    |   L3    |   L3
  L4    |   L4    |   L4    |   L4
  L5    |   L5    |   L5    |   L5
  L6    |   L6    |   L6    |   L6
  L7    |   L7    |   L7    |   L7
  L8    |   L8    |   L8    |   L8
  L9    |   L9    |   L9    |   L9
        (hem: Row 1 of every strip)
Joining
Hold two strips with WS together and the Row 1 ends matched. With cream, work through both layers on the RS as follows:
- 1 sc in the end of Row 1
- 2 sc around each A-row dc post
- 1 sc in the end of each B row
- 1 sc in the end of Row 128
That’s 1 + (63 x 2) + 63 + 1 = 191 sc per seam. The two edges are built the same way, so the rows match one-to-one. Work 3 seams to join all 4 strips. The seams form the raised vertical lines you see on the RS.
Keep your tension relaxed. A seam that’s tighter than the mesh will pucker the panel lengthwise. Every 20 in (50.8 cm), lay the work flat and check that the seam is still as long as the strip.
Checkpoint: The joined panel measures 45 x 79.25 in (114.3 x 201.3 cm). The seams add no stitches across the top or bottom edge.
Border
Border gauge: 16 sc = 4 in (10.2 cm), the same as the main gauge.
Header: With RS facing, join cream at the top right corner.
- Row 1: Ch 1, sc in each st of Row 128 across all four strips, turn. (4 x 45 = 180 sc)
- Rows 2–5: Ch 1, sc in each st across, turn. (180 sc)
Fasten off. The header measures 1.25 in (3.2 cm). Clip on 12 rings, spaced about every 4 in (10.2 cm).
Hem: With RS facing, join cream at the bottom right corner and work into the free loops of the foundation chain.
- Row 1 (cream): Ch 1, sc in each of the 180 sts, adding 1 extra sc in the last st, turn. (180 + 1 = 181 sc)
- Row 2 (blue): Ch 3 (counts as dc), dc in each st across, turn. (181 dc) Fasten off the blue.
- Row 3 (cream): Ch 1, sc in each st across, turn. (181 sc)
- Row 4: Ch 1, sc in the first st, ch 5, sk 3 sts, sc in next st; rep from * across, turn. (1 + 4 x 45 = 181 sts used: 46 sc, 45 loops)
- Row 5: Ch 1, sc in the first sc, sc in the next loop, 9 dc in the next loop, sc in the next loop; rep from * 14 more times, sc in the last sc, turn. (1 + 15 x 11 + 1 = 167 sts; 15 scallops)
- Row 6: Ch 1, sc in the first 2 sc, (sc in the next dc, picot) 9 times, sc in the next 2 sc; rep from * 14 more times. (2 + 15 x 11 = 167 sc, 135 picots) Fasten off.
The hem is 2.75 in (7.0 cm) deep.
Why the math works: The hem starts with 4 strips x 45 = 180 sts. Adding 1 st gives 181, which is the 4 x 45 + 1 that Row 4 needs. Row 4’s 45 loops split into 15 groups of 3, one group for each scallop. That puts one scallop every 3 in (7.6 cm).
Side edging: With RS facing, work 1 row of cream sc down each long side. Work 5 sc across the header row ends and 191 sc along the strip edge, using the same seam logic. Then work 9 sc across the hem row ends (1 + 2 + 1 + 2 + 2 + 1). That’s 205 sc per side. The edging brings the width to 45.5 in (115.6 cm).
Final Blocking
- Weave in all ends along the seams or behind the appliqué outlines.
- Soak the panel in cool water for 15 minutes.
- Press out the water without wringing, then roll the panel in towels.
- Lay it flat on mats or on a sheet over carpet.
- Pin it to 45.5 x 83.25 in (115.6 x 211.5 cm), keeping the seams straight.
- Pin out each scallop and open the mesh diamonds evenly.
- Shape each leaf tip to a point. Let the panel dry completely, for at least 24 hours.
Final Quality-Control Checklist
- [ ] Each strip has 45 sts in Rows 1 and 128, with 126 net rows between them.
- [ ] All 36 motifs point upward and are centered and evenly spaced.
- [ ] Each motif has 4 secure berries.
- [ ] The seams lie flat and are the full length of the strips.
- [ ] The header has 180 sc and the hem has 15 scallops.
- [ ] The panel measures 45.5 x 83.25 in (115.6 x 211.5 cm).
- [ ] Both panels in a pair match within 0.5 in (1.3 cm).
Troubleshooting
- Edges wave: Check that you’re alternating A and B rows. Every B row should have 11 loops.
- Leaf curls: Rnd 3 is too tight. Rework it more loosely, or steam the leaf before sewing it on.
- Seams pucker: Rework the seam more loosely, or use a hook one size larger for joining.
- Scallops ruffle: Check that Row 4 has exactly 45 loops.
- Berries pull the mesh: Tack each berry at its center only.
Care
Hand wash, or machine wash cold on a gentle cycle inside a mesh bag. Reshape the panel and dry it flat, because hanging it wet can stretch it.
Final Notes
The measurements build on each other. Each 45-st strip is 11.25 in (28.6 cm) wide, and 126 net rows reach 78.75 in (200.0 cm). Four joined strips measure 45 x 79.25 in (114.3 x 201.3 cm). The header, hem, and edging then bring each panel to 45.5 x 83.25 in (115.6 x 211.5 cm). Check your gauge early and at each checkpoint, and both panels will hang straight and match.
Happy crocheting!